Viewing and Editing an AP Invoice
On this page you may view the details of an AP Invoice.
-
Select
 AP Invoices on the Side Menu. See Side Menu.
The AP Invoices page opens.
-
Adjust the filter conditions.
See Details
-
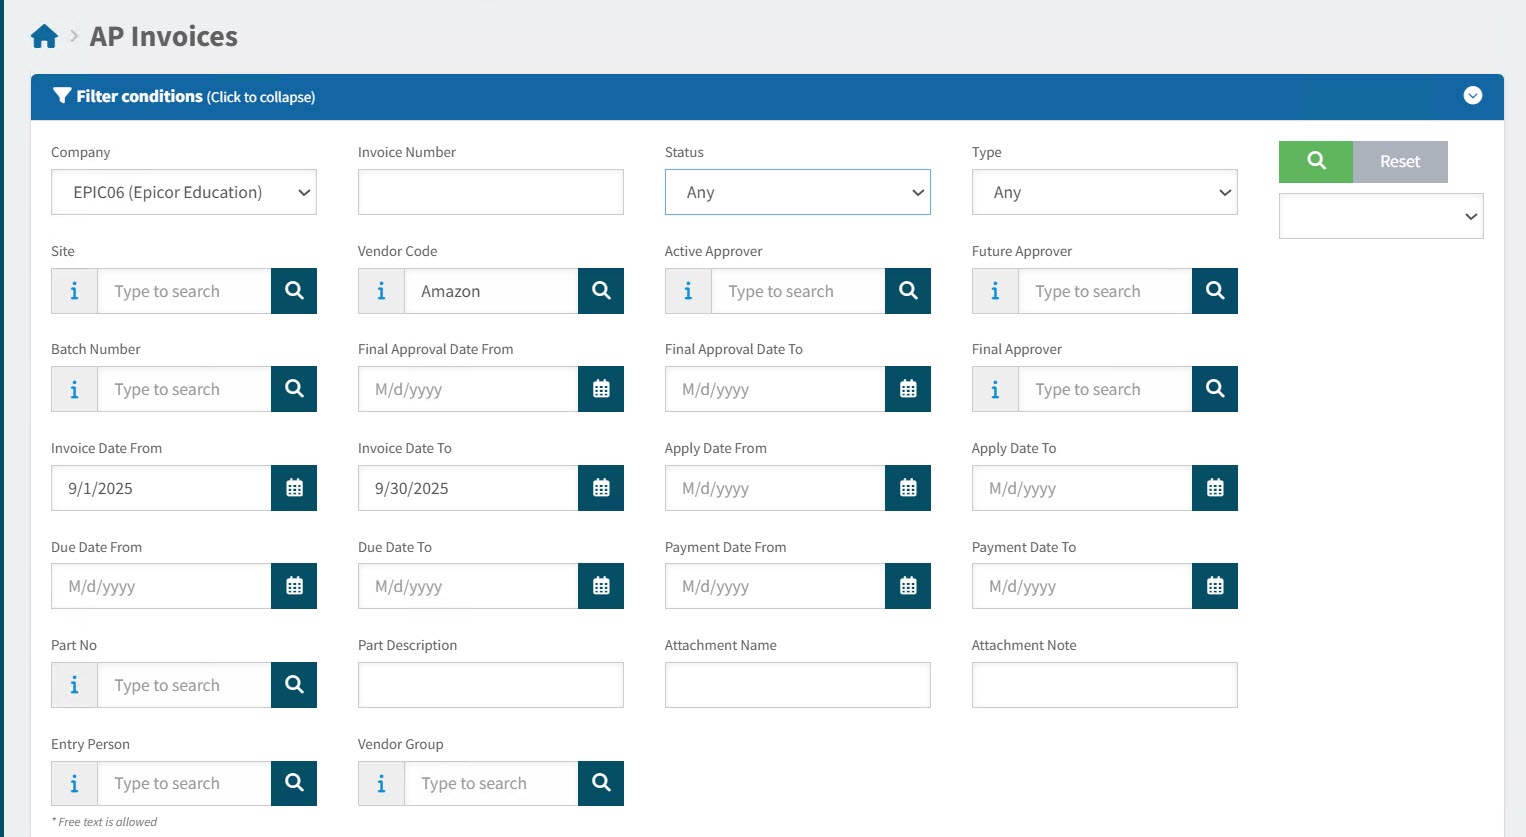
Expand the filter conditions in the top section of the page to search for a specific AP Invoice or to narrow your search.
View filter conditions
-
Enter values in the edit boxes, or select from the search boxes. See the filter conditions, below.
Filter conditions
Company Select a Company from the drop-down list. The current logged-in user only has access to Companies that include their accessible Sites (and Sites are accessible based on the user’s Assigned Locations).
Invoice Number Enter an Invoice Number (or part of the number) to match on.
Status Select one of the following status values from the drop-down list:
-
Any
-
Any (Workflow)
(This includes: Pending Revision, Review in Progress, Suspended, Rejected, Unsubmitted, Approval in Progress)
-
Pending Revision
-
Review in Progress
-
Paid
-
Posted
-
Suspended
-
Rejected
-
Unsubmitted
-
Submitted
-
Approval in Progress
-
Approved
Type Select one of the following types from the drop-down list:
-
Any
-
Invoice
-
Debit Memo
Site Only show AP Invoices belonging to the selected Site. The current logged-in user only has access to Sites that include the user’s Assigned Locations.
Vendor Code Only show AP Invoices for this Vendor. Vendors are limited to those belonging to the currently logged-in user’s Vendor Groups/the selected Vendor Group.
Active Approver Select a user from the drop-down list. Filters for this user as an active approver for the AP Invoice.
Future Approver Select a user from the drop-down list. Filters for this user as a future approver for the AP Invoice.
Batch Number Filter for AP Invoices with this batch number.
Final Approval Date From Final Approval Date between Final Approval Date and Final Approval Date To.
Final Approval Date To Final Approval Date between Final Approval Date and Final Approval Date To.
Final Approver The name of the final approver.
Invoice Date From Invoice Date between Invoice Date From and Invoice Date To.
Invoice Date To Invoice Date between Invoice Date From and Invoice Date To.
Apply Date From Apply Date between Apply Date From and Apply Date To.
Apply Date To Apply Date between Apply Date From and Apply Date To.
Due Date From Due Date between Due Date From and Due Date To.
Due Date To Due Date between Due Date From and Due Date To.
Payment Date From Payment Date between Payment Date From and Payment Date To.
Payment Date To Payment Date between Payment Date From and Payment Date To.
Part No Invoice lines contain this part number.
Part Description Invoice lines contain a part with this part description.
Attachment Name Name of an attachment file.
Attachment Note Name of an attached note.
Entry Person The person who captured the invoice.
Vendor Group Filter on AP Invoices for Vendors belonging to the selected Vendor Group. The currently logged-in user’s Vendor Groups are available.
-
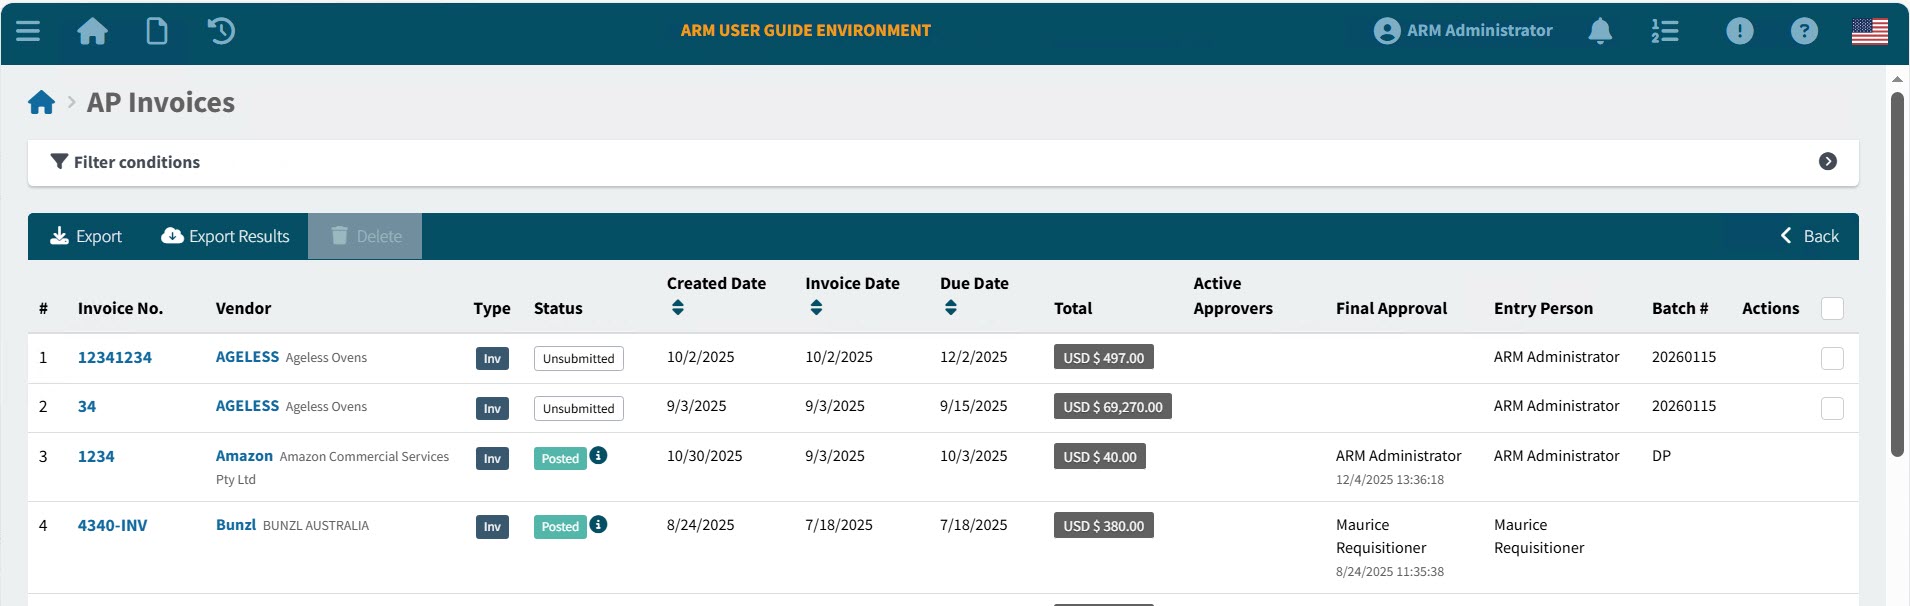
AP Invoices that match the filter conditions are listed in the grid.
-
-
To sort the results, click on one or the sort column headers: Created Date, Invoice Date or Due Date. Click once to sort from most recent to oldest, or click twice to sort from oldest to most recent.
-
Click on an Invoice Number to open the AP Invoices > [Invoice Number] page.
View the AP Invoices > [Invoice Number] page.
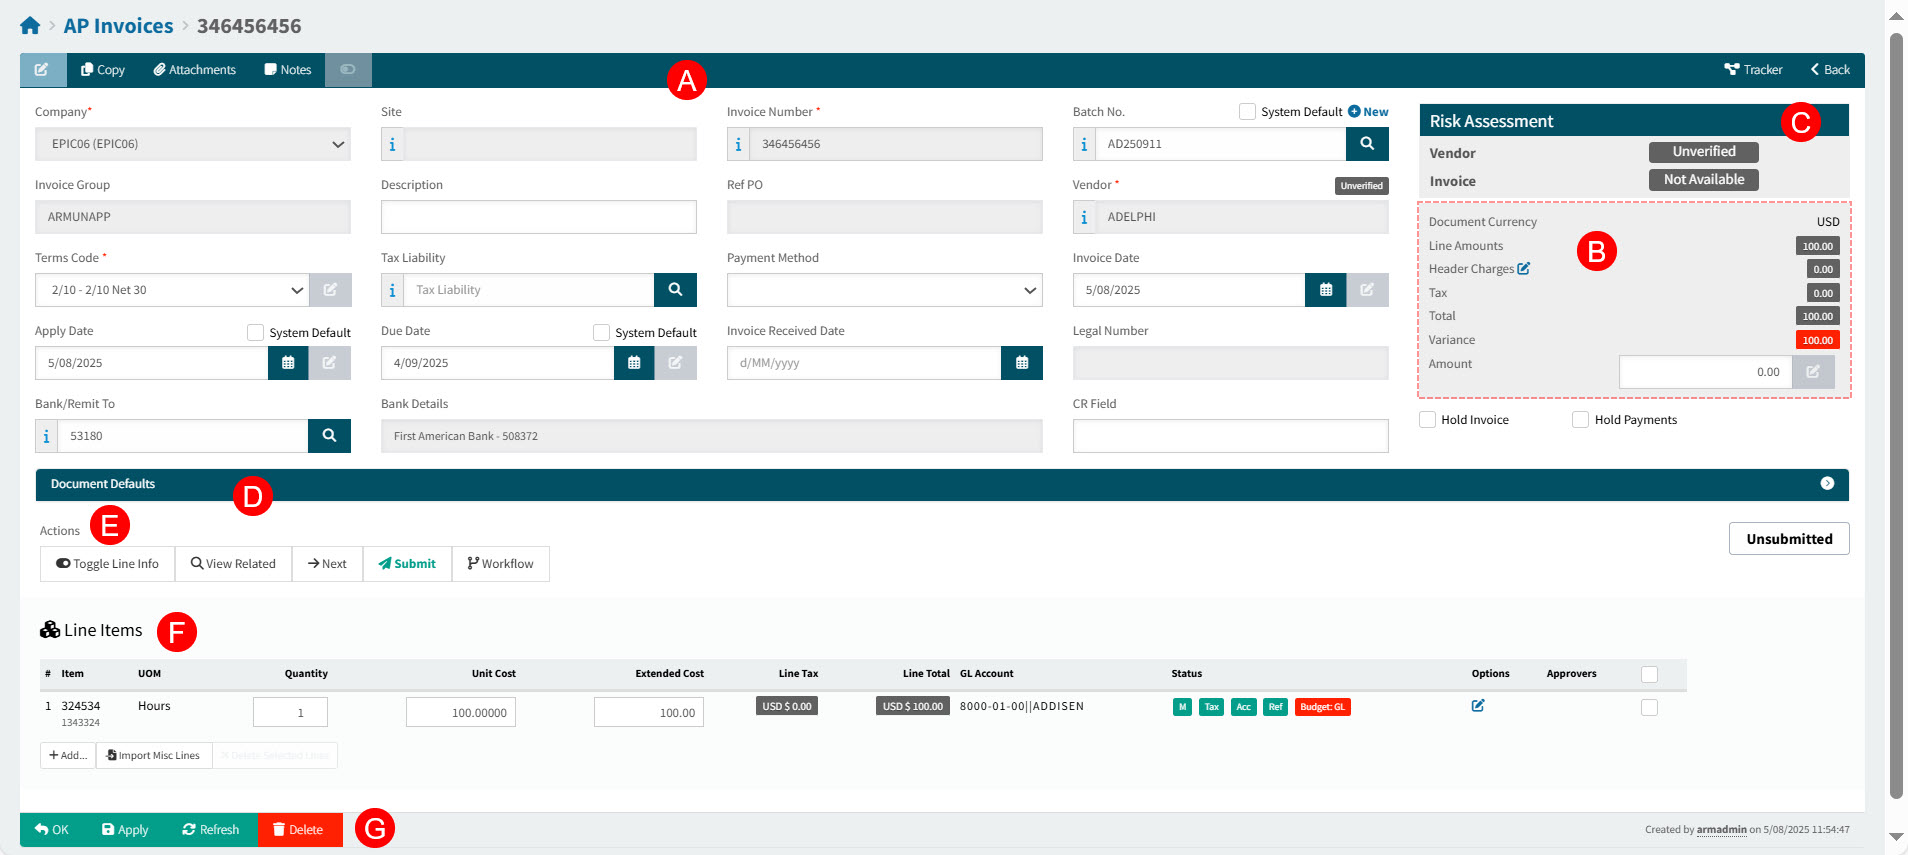
The AP Invoices > [Invoice Number] page is divided into separate sections:
-
Invoice Header and Header Menu Bar [A]
-
Document Header Values [B]
-
Risk Assessment Pane [C]
-
Document Defaults [D]
-
Actions Section [E]
-
Invoice Line Items [F]
-
Footer Menu [G]
AP Invoice Header Menu
On the Header Menu Bar you can perform additional functions:
Header Menu Bar

 Copy
Copy-
Click this button to copy this document.
 Attachments
-
Use this function to upload files. See Adding Attachments to Header.
The Global Setting Attachment Upload File Filter stores the file types that can be uploaded as Attachments.
- Notes
-
Use this function if you want to add multiple Internal notes, or a single External note. Notes can be deleted if you have the permission Can Delete Own Internal Notes or Can Delete Any Internal Note. See Adding Notes.
 Toggle document panel
-
Click the toggle button to hide the Document Panel, maximizing the AP Invoice panel. Click the toggle button again to show the Document Panel. This button is only enabled if there is a document associated with the AP Invoice.
 View review workflow
-
Click to view the Review Workflow Diagram for the AP Invoice.
 Tracker
-
Click to view the Tracker for this document. Read more about Trackers.
 Back
Back-
Click Back to return to the search page.
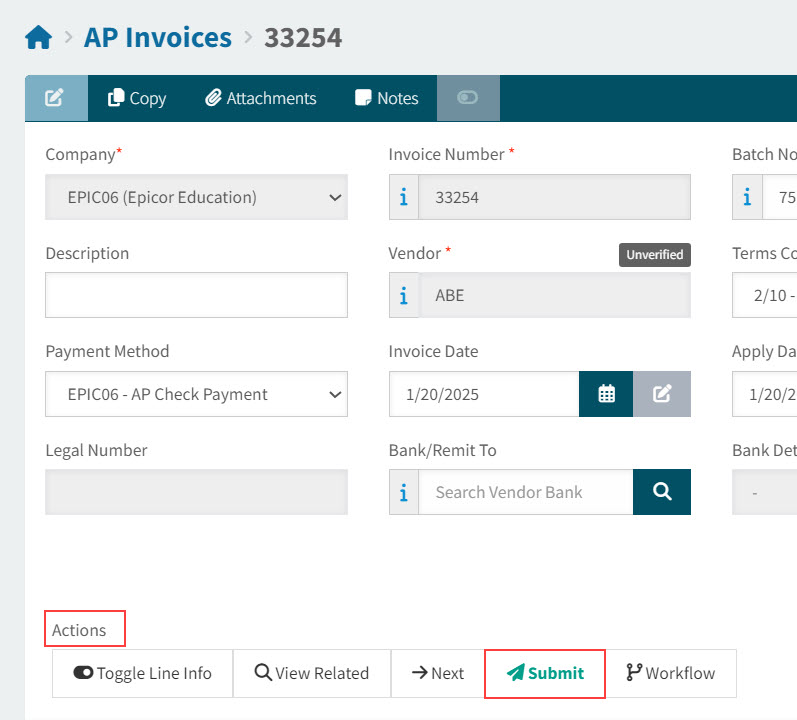
Invoice Header
The invoice header contains the vendor details, as well as due dates, bank details, payment method.
The header includes a panel showing the Document Header Values (showing Currency and Amounts).
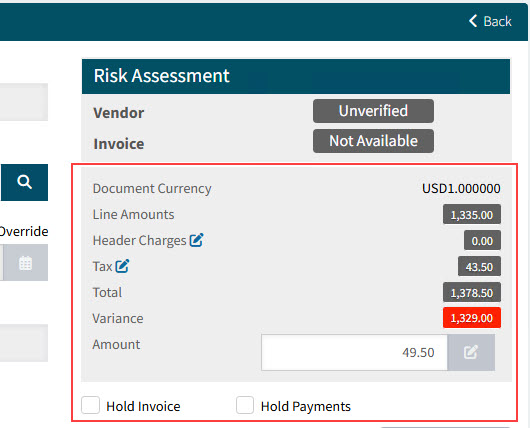
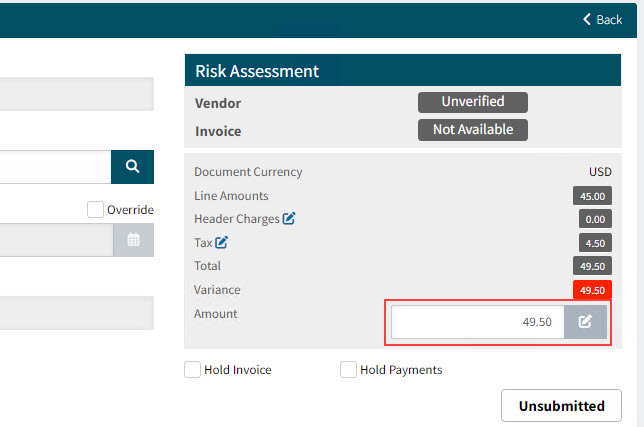
Risk Assessment Pane
This information pane shows a summarized Risk Assessment for the Vendor and the AP Invoice.
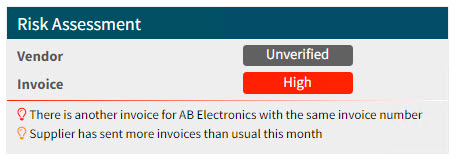
The Vendor’s verification status appears here. If the Vendor is unverified by the third party Invoice Automation provider, the label shows as Unverified. If a Vendor is verified within ARM, the label appears as Self-Verified. See Check Box Options for Vendors in ARM.
Actions Section
The following action menu items are available in the Actions section of an AP Invoice, depending on the AP Invoice’s state of readiness and its status.
- Toggle Line Info
-
Click to show/hide the receipt details for a Line Item.
- View Related
-
Click to open the Receipt Tracker, which shows records related to the AP Invoices.
- Next
-
Loads the next AP Invoice based on the current search criteria for AP Invoices.
- Submit
-
Submit the AP Invoice.
- Workflow
-
The Workflow steps depend on the current status of the AP Invoice:
- Finish Review
-
This action is available if the status is Review in Progress.
- Send for Review
-
Send the AP Invoice for review.
- Reject
-
Reject the AP Invoice.
- Revise
-
Revise an AP Invoice, for example one that has the status Review In Progress.
Invoice Line Items
ARM supports adding four line types to an AP Invoice:
| Receipt |
Select this invoice line type for lines that are linked to receipts. |
| Unreceived |
Create this invoice line type when you make a payment against a shipment that is sent out, but is not yet received by your company. |
| Miscellaneous |
This invoice line type is used for miscellaneous expenses, and is not linked to purchase orders. |
| Advanced Billing |
Use this invoice line type when you make an advance payment against a purchase order line before you receive a shipment from the supplier |
Working with the AP Invoice
You may only edit an AP Invoice that has one of the following statuses: Not Yet Submitted, Submitted, Approval in Progress, or Pending Revision.
You can complete the AP Invoice Details if you have just:
-
Created a new AP Invoice New AP Invoice
-
Created a new AP Invoice - from Receipts: New AP Invoice - From Receipts
-
Created a new AP Invoice - from Templates: New AP Invoice - From Templates
-
Optionally edit the header details.
Header Details
- Batch No
-
The Batch Number will be used as the Invoice Group ID when invoices belonging to the batch are approved in ARM, and ready to be posted in Kinetic. Choose from one of the Batch No. options:
Batch No. Options:
-
Select Auto Increment to apply the system default Batch No. which updates daily until the AP Invoice is approved.
Each day, the Batch No. updates to the current date in the format of YYYYMMDD or, if a two-character prefix AP Invoice Batch Number Prefix has been configured, then the Batch No updates to the current date preceded by the prefix [PP], in the format [PP]YYMMDD, for example MN250826, and the following day MN250827, and so on.
ARM uses the AP Invoice Batch Number Prefix in order of precedence, from:
-
the current-logged in User’s details (see User Detail section in the Information tab), if available, or
-
the selected Vendor (see Maintaining Vendors), if available, or
-
the selected Vendor Group (see Vendor Groups), if available, or
-
the Company Settings on the selected Company (see Company General Settings), if available.
OR
-
-
Clear Auto Increment to:
-
Enter an existing Batch No.
-
Manually create a new batch. The new Batch Number is entered into the AP Invoice Batch No. field.
-
Click
 New, then enter a Batch Number and Batch Description, and click OK.
The new batch is added.
Note: This requires the permission Edit AP Invoice Batch Number.
-
-
Search
 for a manually created Batch No.
-
-
- Description
-
Use the Description field to enter invoice information. This information helps other users identify the invoice while they process it in Kinetic.
- Terms Code
-
Specifies the conditions under which your company will pay for a purchase order.
- Terms
-
The Terms defaults to the first available from:
-
Supplier (Vendor), if available, otherwise
-
Company settings
If there is a Ref PO, the Terms Code from the PO is used here.
Note: To update the Terms Code, you require the permission Edit AP Invoice Terms Code.
-
- Tax Liability
-
This defaults to the Vendor’s Tax Liability, if available, otherwise the Company’s Default Tax Liability.
If there is a Ref PO, the Tax Liability from the PO is used here.
- Payment Method
-
Defines the method you use to pay the supplier on the current invoice. The default payment method selected on the supplier record displays by default.
- Invoice Date
-
The date on the original Invoice. This could be an Invoice Date, or a Billing Date.
This requires the permission Edit AP Invoice’s Invoice Date.
- Apply Date
-
The date used to book journals created from the transaction. The fiscal calendar used by the book determines the period to which the journals post.
To select the current date, select Use current date.
The Apply Date may not be before the Company’s Earliest Apply Date (see Company Settings). If the entered Apply Date is before the Earliest Apply Date, it overwritten by the Earliest Apply Date on submission.
- Due Date
-
Specifies the date on which payment on this invoice is due.
The Due Date for AP Invoices is calculated from the Invoice Date and the number of days from the terms.
To select a different date, select Override then select a different date.
This requires the permission Edit AP Invoice Due Date.
- Bank/ Remit To
-
Select a bank or remit to for the payment from the drop-down list. The list only contains records for the current vendor.
- Bank Details
-
The bank details for the selected bank, if applicable.
- Hold Invoice
-
When selected, this check box indicates that the entire invoice is on hold. You place an invoice on hold if it is disputed or if you need supervisor approval before they are posted.
- Hold Payment
-
When selected, this check box indicates that payments will not be made against this invoice.
Important: You can change the Hold status on this sheet before or after the invoice is posted.
-
Optionally set Document Defaults. See Setting Document Defaults.
-
Optionally add one or more Invoice Lines. See Adding Invoice Line Items.
-
To edit Invoice Lines, see Editing Invoice Line Items.
-
Update the invoice Amount to match the Total, and click Apply on the Footer Menu.
See Detail
-
Add attachments to the AP Invoice. See Adding Attachments to the AP Invoice.
-
Click the Submit button in the Actions section.
See Detail
Setting Document Defaults
-
To set default values in new line items, set and select default values in the Document Defaults section before adding the new line items.
OR
-
To update values in existing line items, set and select default values in the Document Defaults section, select the line items to update, then click Apply selected fields to selected Lines on the bottom left of the Document Defaults section.
To select default values in the Document Defaults section:
-
Click on Document Defaults section header bar, to expand the Document Defaults section.
Some of the defaults already have values.
Document Defaults

-
For each default setting, select a value, then select the check box alongside its label. If the check box is not selected, the default value will not be applied to the corresponding field on the new or selected lines.
Tip: Click the Toggle field selections button at the bottom of this section, to select/clear the selected fields in Document Defaults.

Default Settings
- Location Code
-
Select a Location Code.
- Category
-
Select a Category.
- UOM
-
Select a UOM.
- Tax Category
-
Select a Tax Category.
- GL Account Code
-
Click the search
 button on the GL Account Code edit box. This opens the GL Account Code Search screen. Search for and select a GL Account Code.
OR
- Use Location’s G/L Mask
-
Click Use Location’s G/L Mask if you want the list of GL Account Codes in the drop-down list limited to the document location’s GL Account Mask (for example, if the location’s GL Account Mask is _ _ _ _ -_ _-10, the drop-down list will only display GL Account Codes that end in 10).
OR
- Edit the GL Account Code
-
If you have edit permissions on the three GL Account segments you may edit the GL Account Code in the edit box.
Otherwise, click the edit
 button on the GL Account Code edit box. This opens the GL Account Segments screen. Search for and select the segments that make up a GL Account Code.
Details
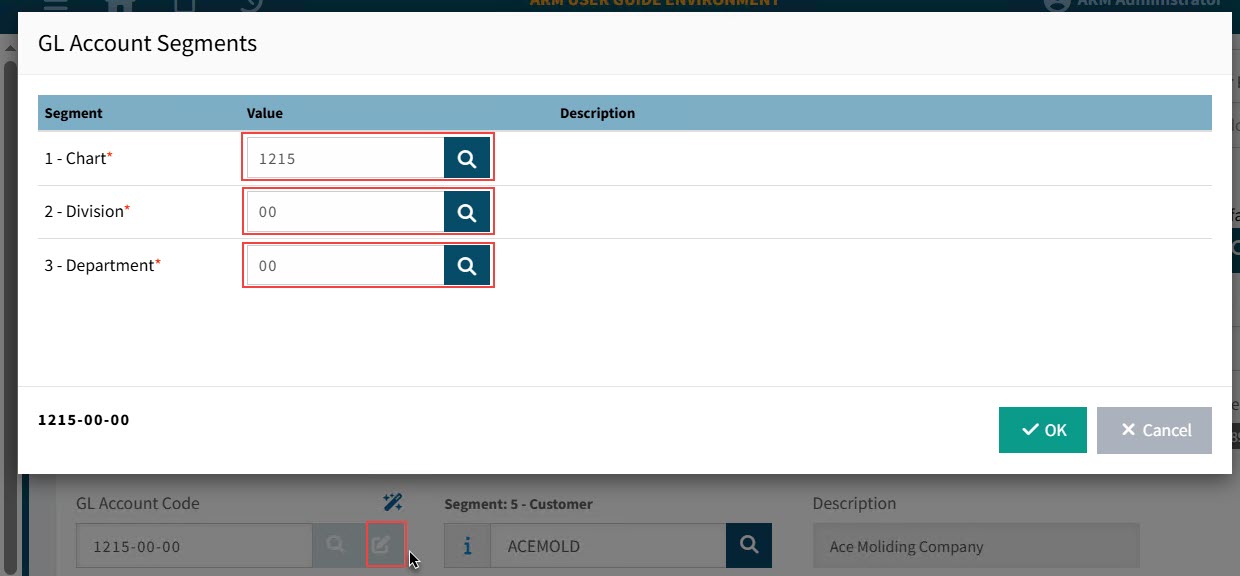
You may only select GL Account segments for which you have edit permissions. See Editable GL Segments.
- GL Reference
-
Select a GL Reference from the drop-down list. This will be used as the default GL Reference in the line items.
- Project
-
Select a Project originating from Kinetic.
- Phase
-
Select a Phase belonging to the selected Project.
-
To close the Document Defaults section, click on the section header bar again.
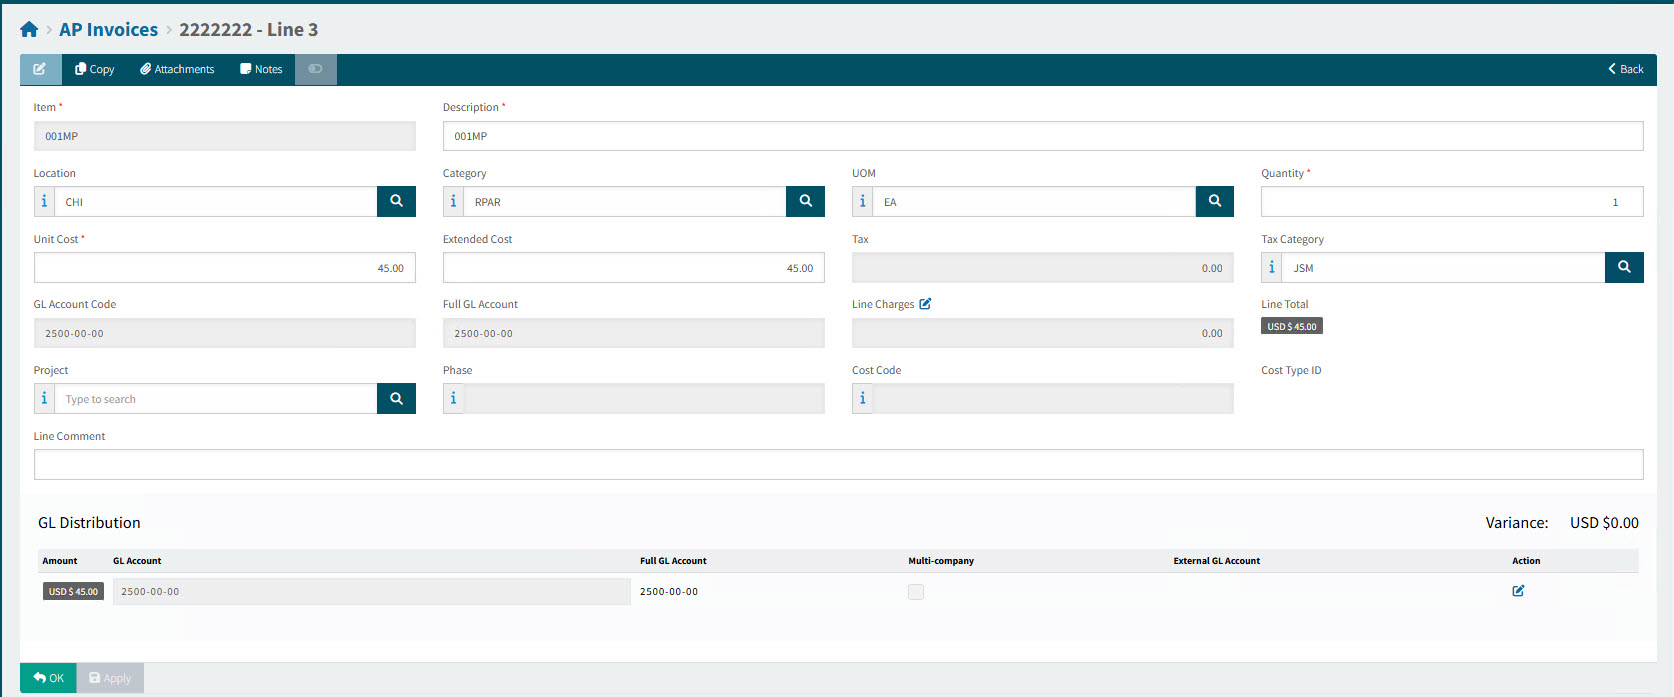
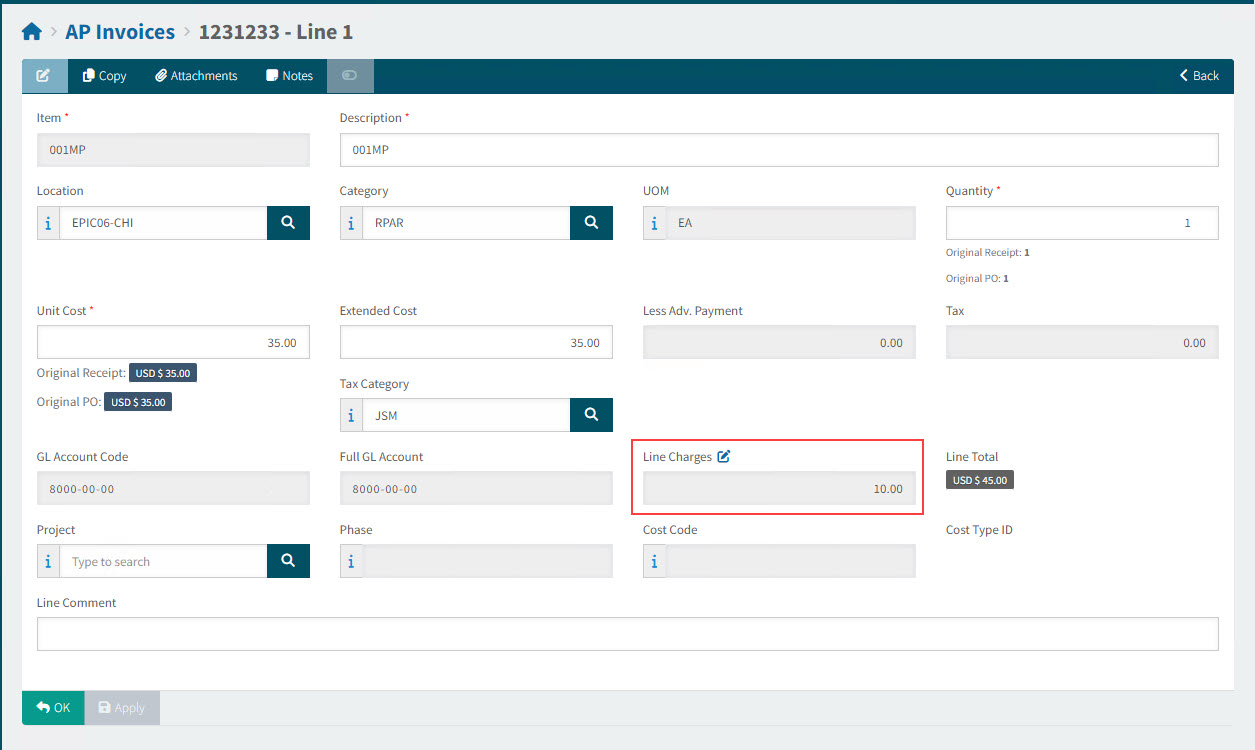
Editing Invoice Line Items
-
To edit any of the line details, including the GL Distribution for non-receipt lines, click the Edit
 button under the Options column for the line.
This opens the AP Invoice Line.
-
Review or edit the Invoice line fields.
Not all of these fields can be edited. This depends on the Line Type.
Optionally select or update any of the following fields:
Description Enter an item Description.
Location Select a Location.
Category Select a Category.
UOM Select a UOM.
Quantity Enter a Quantity.
Unit Cost Enter a Unit Cost.
Extended Cost The Extended Cost is calculated as the Quantity multiplied by the Unit Cost.
Tax Category Select a Tax Category.
GL Account Code ARM attempts to build a GL Account Code from the available account segments from the selected Vendor, Location, Category etc., according to the sequence stipulated in the GL Account Mask Sequence in Global Setting.
Line Charges See Line Charges.
Project, Phase, Cost Code Optionally select a Project, Phase, and Cost Code.
Line Comment Optionally enter a Line Comment.
-
Optionally edit the Line Charges.
-
Optionally edit the GL Distribution.
-
For Misc Lines, optionally edit the Allocations.
Line Charges
When an AP Invoice is created, any of the Draft Invoice lines with a Misc. Charge will get Line Charges on the corresponding Invoice Line.
You can also add Line Charges when editing an Invoice Line (excluding lines for Advance Payment).
View Example of Line Charges on an AP Invoice Line
Click on the Line Charges edit  button to open the Line Charges pop-up box. Here you can review the Misc Charges, and edit, add new, or delete existing Misc Charges.

- Charge Code
-
The Line Charge generated from the Draft Invoice line uses the Default Miscellaneous Charge Code for AP Invoice Lines from Company Settings as its default Charge Code, unless the Vendor has its own Default AP Invoice Line Misc. Charge which gets used instead. Click the Info
 icon to display the Charge Description.
 - Type
-
The Type is either a fixed Amount, or it is a Percentage of the Extended Cost for the line.
- Misc Amount
-
This is the fixed amount or the calculated percentage amount, depending on the selected Type.
- Action
-
Click the edit
button to edit the Misc. Charge. You can edit the Charge Code, Type, and Value here.Click the delete
 button to delete the Misc. Charge
-
Click + Add Misc Charge to add a new Misc. Charge using Misc Charge Entry.
-
Click Close to close the Line Charges pop-up box.
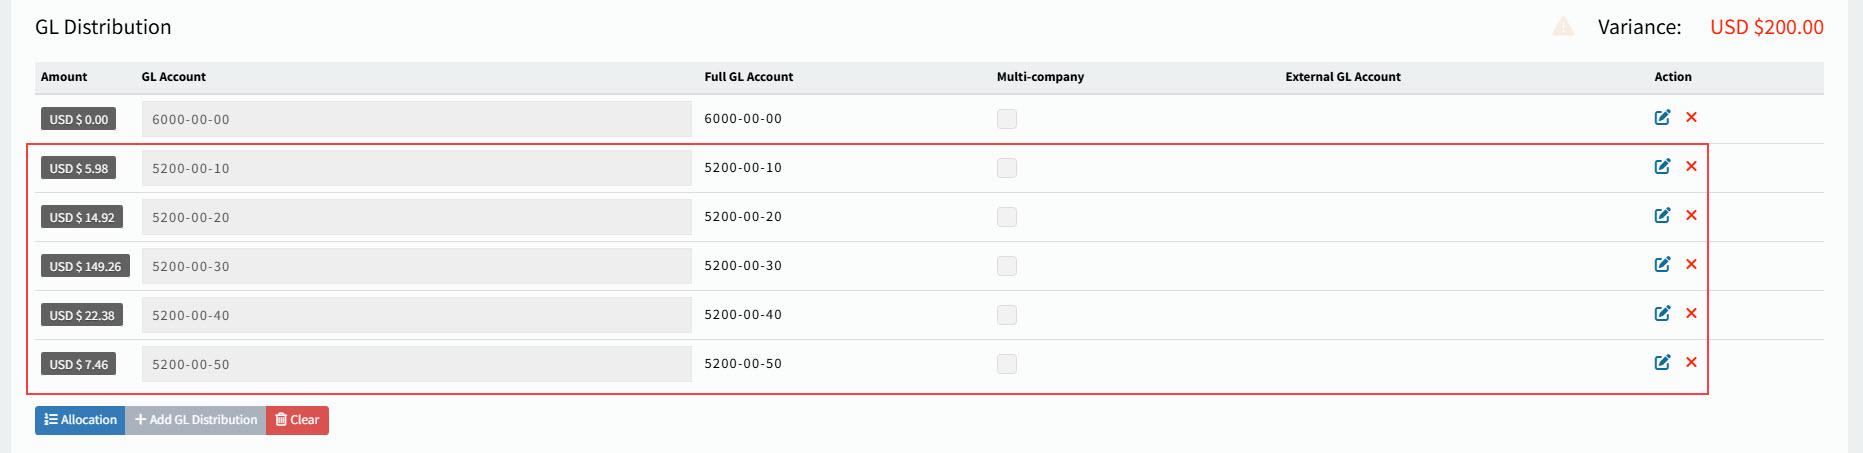
GL Distribution
You can edit the GL Distribution for all line types except Receipt R lines, which do not have a GL Distribution.
Updating GL Distribution
-
To edit the GL Account information in the GL Distribution Entry pop-up, click the Edit
button.In the GL Distribution Entry pop-up:
-
Edit the Amount.
-
Select a Reference.
-
Optionally select the Multi-company check box.
-
Click OK.
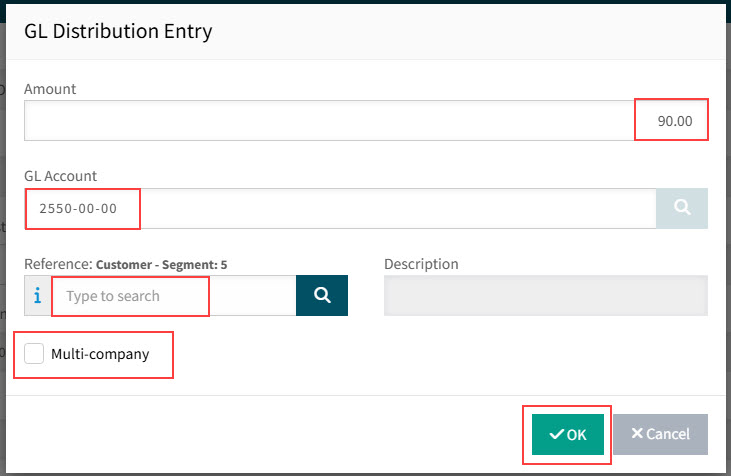
The GL Distribution is updated.
-
For Misc M lines you can also add a GL Distribution and clear the GL Distributions.
Adding a GL Distribution
-
To add a GL Account for part or all of the expense amount, click Add GL Distribution. Edit the GL Distribution fields, as described above.
Allocations
Allocations can only be added for Misc M lines.
-
To enter an allocation for part or all of the expense amount, click Allocation.
In the Allocation Entry pop-up:
-
Select an Allocation from the drop-down list.
-
Enter an Amount to be spread across the allocation.
-
Click OK.
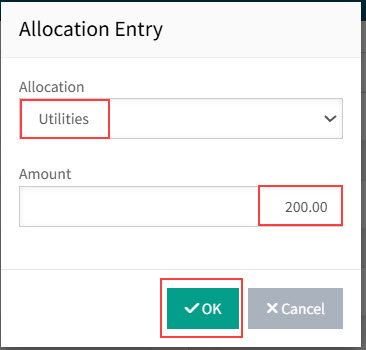
The amount is allocated by percentage across the different GL Accounts that form the allocation, according to each account’s percentage.
-
Adding Attachments to AP Invoice Header
An AP Invoice should always include attachments, such as the original Invoice.
To view, delete, or add an attachment:
-
Click
Attachments on the Menu Bar.This opens the [Document Type] > [Document No.] > Attachments page.
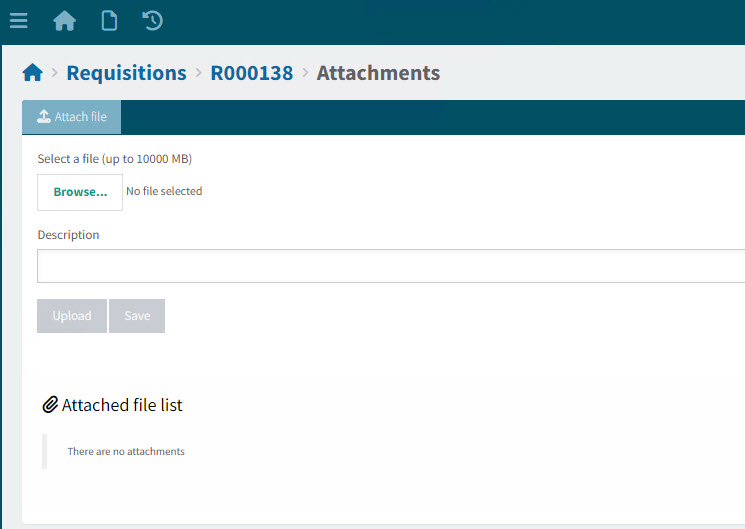
-
Click Browse… then browse and select a file to attach. Select Open.
-
Enter a Description (optional). This replaces the file name in the Attached file list.
-
Select Upload to upload the attachment.
The attachment is listed under the Attached file list.

-
Continue to add attachments, as required.
-
For files that are in the Attached file list, you can:
-
Click the
 Delete button to delete an attachment. (Permissions are required.)
 -
Select the Can be transmitted check box to ensure that the attached document is included in transmissions (for example, attached to emails).
-
Click the
 Download button to download a copy of the attachment.
-
-
When you have finished working with attachments, exit the Attachments page.
The number of attachments is indicated next to the Attachments button on the Menu Bar.

Read more about Attachments.