Global Settings
These are configured during the initial implementation of ARM but can be updated if required.
Permissions
You require a role with the Maintain Settings permission to access Global Settings.
See Permissions in ARM.
To update a Global Setting:
-
Click the Global Settings menu item on the Administration Page.
-
Search for the setting to update, by selecting from the Group drop-down list or entering text in the filter text box.
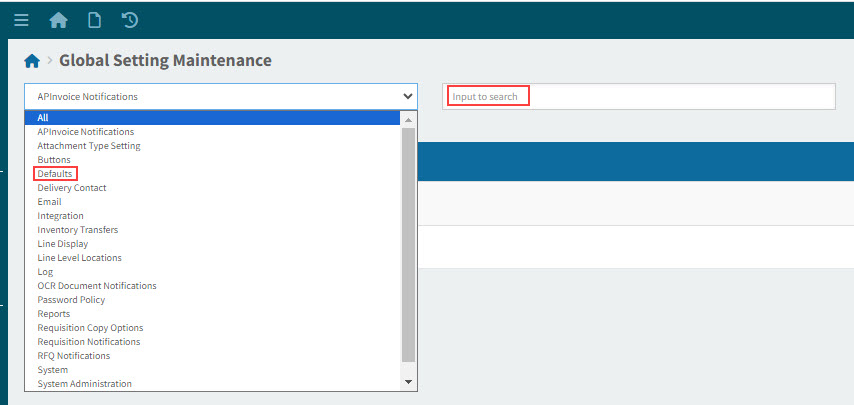
-
Select the setting to update it.
The Global Setting Maintenance > [setting name] page opens.
-
Change the setting Value. This will depend on the setting; for example, you might be able to select from a drop-down list or type a different value into the text box.
-
Select Apply to save the changes.
Some of the settings have many values to fill out. These are described in later sections.
List of Global Settings
Global Settings are categorized into different Groups. The following groups of settings are available:
All
-
Select All to display all settings.
APInvoice
| Setting | Description | Value (Example) |
|---|---|---|
Email APInvoice Creator On Denied Approval Lines |
Specifies whether to email the APInvoice Creator when one or more lines from their APInvoice has been denied during the approval process. |
Yes |
Enable APInvoice Workflow Notifications |
Global setting to control notifications sent in APInvoice workflow. |
Yes |
Enable Invoiced Receipt Sync |
When this is set to Yes, the job [Sync Invoiced Receipts From Backend] can be triggered to run manually. Note that this job should be run for the first time when ARM is connected to the Epicor back-end system and then turned off. |
No |
OCR Vendor |
The OCR solution being employed for AP Invoice. |
None |
The following APInvoice Global Setting is not available on the UI:
| Setting | Description | Value (Example) |
|---|---|---|
AP Invoice Worklist Folder |
Specifies the AP Invoices worklist folder for ARM to monitor. |
Attachment Type Setting
| Setting | Description | Value (Example) |
|---|---|---|
Attachment Storage Type |
Select a Storage Type (Provider) which is used to store attachments for documents in ARM. There are three storage type systems to choose from, and the settings that go with each of these. For more details, see Setting the Attachment Storage Type. |
LocalFileSystem |
Buttons
| Setting | Description | Value (Example) |
|---|---|---|
Apply Button Text |
Specifies the text that appears on the Apply button throughout the application (Max length 12). |
Save |
Budget Indicator Text |
Specifies the Budget Indicator text used to warn when a Requisition Line goes over budget. |
Budget |
Cancel Button Text |
Specifies the text that appears on the Cancel button throughout the application (Max length 12). |
Close |
OK Button Text |
Specifies the text that appears on the OK button throughout the application (Max length 12). |
Save & Close |
Post Button Text |
Specifies the text that appears on the Post button on the Receiving screen. |
Receive |
Show OK Apply Cancel Buttons |
Specifies which of the buttons (OK, Apply and Cancel) to show throughout the application. |
OKApplyCancel |
Catalogue
| Setting | Description | Value (Example) |
|---|---|---|
Add from catalogue behaviour on change page |
Add from catalogue behaviour on change page. If a user makes changes to a requisition and then navigates to another page, the changes are lost, saved, or the user is prompted - depending on this setting selection. Options are:
|
Ignore entered values. |
Inventory Item import batch size |
The maximum number of records Inventory Item job imports from the Epicor back-end to ARM on each run. |
100 |
Restrict Parts to Part Classes flagged for Requisitions |
When set to "Yes": Part Classes not flagged for Requisitions shall not be integrated to ARM. Any Part with no Part Class specified, or belonging to Part Classes not flagged for Requisitions, shall be considered a restricted Part. Restricted Parts shall not be integrated to ARM. Note: If a Part Class was originally flagged for "Requisitions" and then subsequently changed to not be flagged for Requisitions, any of the above data may have already integrated into ARM and will have records in the database which may be visible in the ARM user interface. |
No |
Debug
These settings are not visible on the UI.
| Setting | Description | Value (Example) |
|---|---|---|
Display Page Load Times |
A flag to indicate that the page load times are displayed in the footer of each page. |
No |
Display Search Times |
A flag to indicate that the search times are displayed when performing searches. |
No |
Defaults
| Setting | Description | Value (Example) |
|---|---|---|
Attach PO to PO Creation Notification Email |
Specifies whether to attach a copy of the PO to the PO Creation Notification Email. |
Yes |
Attachments Maximum File Size |
Specifies the Maximum size, in Megabytes(Mb), of a file that can be loaded as an Attachment. This must be a numeric value. |
10 |
Auto Create PO with Non Catalogue Items |
Specifies the default value for automatically creating Purchase Orders from Requisitions that contain non-catalogue items |
Yes |
Auto-execute Search for Catalogue Items |
Select to preload search results on Add Catalogue Items search screen. |
Yes |
Default Active Flag Search Value |
Default value for the Active flag on the ARM search screens. |
Yes |
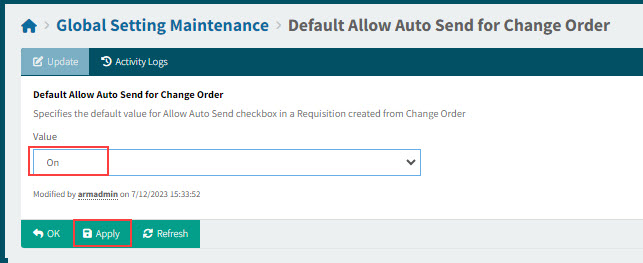
Default Allow Auto Send for Change Order |
Specifies the default value for the Allow Auto Send check box in a Requisition created from Change Order. |
On |
Default Allow Auto Send for PO |
Specifies the default value for Allow Auto Send check box in new Requisitions. |
On |
Default Line Type From |
Defaults the Requisition Line Type from the selected option. Options are:
|
Location |
Default Search Type |
Specifies the way a search is performed. This applies to input fields on all Search pages. The options are:
|
Contains |
Default Sort Order for Catalogue Search |
Specifies the default sort order to be used when searching for Catalogue items. Valid values are:
|
PartNo |
Default view mode for catalogue search screen |
Default view mode for catalogue search screen. Options are:
|
table |
Due Date Days from Today |
The Requisition Due Date field defaults to today’s date plus Due Date Days from Today. |
7 |
Enable On-charge Mark-up |
Enable On-charge Mark-up A series of new fields has been introduced in the Requisition Line screen that enables Mark Up details to be captured at the time of Requisition request. Select Yes to utilize On-charge Mark-up. |
No |
Max Search Records |
The maximum number of records returned in one search result set. |
25 |
Show Extended Cost |
Specifies whether Extended Cost is displayed on Requisition, PFO, and PO lines. (Extended Cost = Quantity x Unit Cost). |
No |
Show Vendor Description |
Specifies whether, across the ARM application, the Vendor Description is displayed. If you select No the Vendor Code will be used for display in ARM. |
No |
Show Vendor Group Description |
If Yes, the Vendor Group Description is displayed in ARM. If No, the Vendor Group Code is displayed instead. |
No |
Delivery Contact
| Setting | Description | Value (Example) |
|---|---|---|
Default Delivery Contact From |
Specifies where the Delivery Contact information will default from. Options are:
|
From Inventory Location |
Print Delivery Contact on PO |
Specifies whether Delivery Contact information is recorded against the PO and displayed on the printed PO forms. |
Yes |
Draft Invoice
| Setting | Description | Value (Example) |
|---|---|---|
Require Category on Draft Invoice Misc Lines |
Category required on miscellaneous Draft Invoice lines. |
No |
Require Location on Draft Invoice Misc Lines |
Location required on miscellaneous Draft Invoice lines. |
No |
| Setting | Description | Value (Example) |
|---|---|---|
Active message channel type |
The message channel type which is being used. Possible value is Email, InApp Notes:
|
Email,InApp |
CC Purchase Order Email to PO Creator |
When set to Yes, any PO that is emailed to a supplier will also be CC’d to the email address configured on the PO Creator ARM User. |
No |
CC Purchase Order Email to Requisition Creator |
When set to Yes, any PO that is emailed to a supplier will also be CC’d to the email address of the Requisitioners. |
No |
Email System Administrator on Delegation Updates |
Specifies whether the System Administrator Email Address will be copied in on the Delegation Email. |
No |
Notify Approvers on Auto-Advance Approval |
Notify Approvers on Auto-Advance Approval. |
No |
Integration
| Setting | Description | Value (Example) |
|---|---|---|
Email Integration Errors |
When set to Yes, integration errors will be sent to users defined in Email Integration Errors To. |
Yes |
Email Integration Errors To |
The list of users who will receive emails when there are integration errors. |
|
IM Controller Server |
The name of Integration Manager Server. |
'http://arm-integration-manager-api:8080' |
The following Integration Global Settings are not available on the UI:
| Setting | Description | Value (Example) |
|---|---|---|
IM Controller Service API Login |
Encrypted API Login for use in IM Controller Service. |
abcdefg |
IM Controller Service API Passwd |
Encrypted API Passwd for use in IM Controller Service. |
abcdefg |
IM Controller Service Binding |
Binding type of Integration Manager Service. |
NetTcp |
IM Controller Service Port |
Port Number of Integration Manager Service. |
17100 |
Inventory Transfers
| Setting | Description | Value (Example) |
|---|---|---|
Enable Inventory Transfers |
Specifies whether inventory transfers will be allowed. |
Yes |
The following Inventory Transfer Global Settings are not available on the UI:
| Setting | Description | Value (Example) |
|---|---|---|
Supply Location Validation |
Determines when validation of the Supply Location should occur. |
Submit |
Line Display
| Setting | Description | Value (Example) |
|---|---|---|
Enable Auto Send |
Specifies whether the Auto Send check box in Requisitions is displayed. |
Enabled |
PO Line Display Order |
Purchase Order lines are ordered by PO Line Display Order on the screen and on the Print View. Order by options are:
Select the option that makes it easiest to match items on the PO with goods received from the Vendor. NOTES:
When the PO is integrated into Kinetic Purchasing, the PO Lines will be in line number order; this is not affected by the PO Line Display Order setting. |
Line Number |
Show Destination Stock |
Specifies whether the Destination Stock column is displayed on Documents. |
No |
Show GL Account Code |
Specifies whether the GL Account Code column is displayed on Documents. |
Yes |
Show GL Account Description |
Specifies whether the GL Account Description column is displayed on Documents. |
No |
Show Item Descriptions on Requisition Lines |
Specifies whether item descriptions are displayed on requisition lines. |
Yes |
Show On Order |
Specifies whether the On Order column is displayed on Documents. |
No |
Show Source Stock |
Specifies the default whether the Source Stock column is displayed on Documents. |
No |
Show UOM Code |
Specifies whether the UOM Code column is displayed on Documents. |
No |
Show UOM Description |
Specifies whether the UOM description column is displayed on Documents. |
No |
Show Vendor Currency |
Specifies whether the vendor currency is displayed on the requisition line. |
No |
Line Level Locations
| Setting | Description | Value (Example) | ||
|---|---|---|---|---|
Line Level Locations |
Specifies whether Requisitions support line level locations. Also controls whether the Set Location button is displayed on Requisitions. When this setting is enabled, the Receiving Location on each Requisition line is used to determine the approval chain. Combined with security based on Locations on User Profiles, this setting will affect search screen results and will also affect whether a user can view or perform functions on lines on a Requisition, PFO and PO.
Possible problem scenarios include:
|
Enabled |
||
PFO Combining |
Defines how requisition lines are combined into PFOs. The options are:
If set to Vendor and Location, Requisition lines for the same Vendor with different receiving locations will be split out into separate PFOs. If set to Vendor Only, all Requisition lines for the same Vendor will be combined onto a single PFO (regardless of different Receiving locations on each line). If set to Do Not Combine, new PFOs will be created based on Requisition ID. PFOs will be split if there are different vendors on different lines but they will not be combined with existing PFOs. |
Vendor Only |
Mail Settings
| Setting | Description | Value (Example) |
|---|---|---|
Email Send Timeout |
Timeout in seconds for sending email via SmtpClient or SendGridClient or MSGraphClient |
60 |
Mail Application Name |
The default Mailer system uses to send email.
The Global Setting Maintenance > Mail Settings Maintenances page opens. See Mail Settings Maintenance. |
OCR Document Notifications
| Setting | Description | Value (Example) |
|---|---|---|
Enable OCR Document Workflow Notifications |
Global settings to control notification send in OCR Document workflow. |
Yes |
The number of day(s) Draft Invoice validation notification will be reset |
To trigger the resend of Draft Invoice validation notifications have been sent to users after the n day(s) set in this setting. |
10000 |
RFQ Notifications
| Setting | Description | Value (Example) |
|---|---|---|
Enable RFQ Workflow Notifications |
Global settings to control notification send in RequestForQuote workflow. |
Yes |
Reports
| Setting | Description | Value (Example) |
|---|---|---|
ARM Report Root Folder |
Path to the root folder where all ARM reports are stored. |
Reports |
Auto Email Directory |
Specifies the full path of the email export directory, in which to place the Purchase Order files to email. Used with the Auto Email option. Ensure that the path ends with a backslash (\). |
C:\Inetpub\ARM\Api\Content\EmailOut\ |
Auto Email Transfer Orders |
Specifies the default value for automatically emailing and printing (if configured) Transfer Orders by ARM Integration Manager. |
No |
Auto Fax Directory |
Specifies the full path of the auto fax directory on the server, in which to place the faxable Purchase Order files. Used with the Auto Fax option. Ensure that the path ends with a backslash (\). |
|
Auto Print Picking Slip on New Transfer Order |
Select Yes to automatically print picking slip report when a new Transfer is created in ARM. |
No |
Auto Print Receipt Docket on PO Receipt |
If Yes is selected, a Receipt Docket will be automatically sent to the specified printer when a PO is marked as Received. |
No |
Auto Print related Picking Slips on PO Receipt |
Automatically print the Pick Slip Report for each open transfer order that has a part that was received in a Purchase Order. Yes = On receipt of a PO, a check is performed to find any Open Transfer Orders containing a line for the parts/items that were just received. A pop-up dialog will inform the user that 'Open Transfer Orders containing parts in this Purchase Order receipt were identified. Related Transfer Orders will be automatically printed.' Note: If a Transfer Order is identified more than once it may print multiple times. A print request will be sent to the ARM Print Server for each identified Transfer Order. The request will send the Crystal report defined in the Auto Print Picking Slip Printer setting. (If left blank, the Print Server will use the default printer configured on the ARM Application server for the user profile that the PBS ARM Task Agent runs under.) No = No automatic Picking Slip printing will occur on receipt of a PO. |
No |
Auto Print related Picking Slips on TFO Receipt |
Automatically print the Pick Slip Report for each open transfer order that has a part that was received in a Transfer Order. Yes = On receipt of a Transfer Order a check is performed to find any Open Transfer Orders containing a line for the parts/items that were just received. A pop-up dialog will inform the user that 'Open Transfer Orders containing parts in this Transfer Order receipt were identified. Related Transfer Orders will be automatically printed.' Note: If a Transfer Order is identified more than once it may print multiple times. A print request will be sent to the ARM Print Server for each identified Transfer Order. The request will send the Crystal report defined in the Auto Print Picking Slip Printer setting. (If left blank the Print Server will use the default printer configured on the ARM Application server for the user profile that the PBS ARM Task Agent runs under.) No = No automatic Picking Slip printing will occur on receipt of a Transfer Order. Default is No. |
No |
Report Data Model Version |
The reporting service engine used to render report and PDF export. For on-premise value is default to SSRS. For SASS value is default to HTML. |
HTML |
Reporting Service Engine Type |
The data model version to be used to generate PDF report from the HTML template (i.e PurchaseOrder). Model version 1 is used by default. Model version 2 is supported starting from ARM 2025.2.2 and is suitable for new implementations. Customized PurchaseOrder report which uses model version 1 requires a technical upgrade if model version 2 is used. |
1 |
The following Reports Global Settings are not available on the UI:
| Setting | Description | Value (Example) |
|---|---|---|
Reporting Service Account |
Reporting Service Account |
administrator |
Reporting Service Domain |
Reporting Service Domain |
e102300rd |
Reporting Service Password |
Reporting Service Password |
abcdefg |
Requisition Copy Options
When copying a document, the Copy Options pop-up appears.
Default values for each option are determined by the values (Yes or No) defined in the Requisition Copy Options in Global Settings (except where the default value is not allowed).
| Setting | Description | Value (Example) |
|---|---|---|
Always Copy Tax |
Always copy tax information of the lines |
Yes |
Copy Header Only |
Only copy data in Requisition header and ignore the lines. |
No |
Copy Requisition & Template Quantities |
A flag used to indicate that quantities are copied from Templates and Requisitions when using copy/template functionality. |
Yes |
Fast Copy |
Copy Requisition lines without recalculating their default values. Notes:
|
No |
Include Attachments |
Include attachments from the existing Requisition when copying. This applies to both header and line level attachments. |
Yes |
Include Custom Data |
Include custom data from the existing Requisition when copying. This applies to both header and line level custom UDF field values. |
No |
Include Dates |
Copy the [Use Default] value for both the main date fields and the requisition line date fields; otherwise, the requisition line dates will be recalculated with the default value. |
No |
Include Notes |
Include notes from the existing Requisition when copying. This applies to both header and line level notes. |
Yes |
Include Recurring Setting |
Include recurring setting from the existing Requisition when copying. |
No |
Requisition Notifications
| Setting | Description | Value (Example) |
|---|---|---|
Email Requisition Creator on Approval Updates |
Specifies whether an email notification should be sent to the Requisitioner each time a Requisition moves from one Approver to another. The default setting is Yes. Emails are sent via the local mail server which is configured at installation time. Email details include a link to the actual requisition, PFO, or PO. |
Yes |
Email Requisition Creator on Denied Approval Lines |
Specifies whether an email notification should be sent to the Requisitioner whenever lines are denied. The default setting is Yes. |
Yes |
Email Requisition Creator on PFO Updates |
Specifies whether an email notification should be sent to the Requisitioner when a Pro Forma Order is Created or Rejected. The default setting is Yes. |
Yes |
Email Requisition Creator Status Updates |
Specifies whether an email notification should be sent to the Requisitioner each time the Requisition’s status changes. |
No |
Email Requisition Reviewer |
Specifies whether to email the next Reviewer when a Requisition is sent for Review. |
Yes |
Notify Requester on Approval Updates |
Specifies whether a Requisition Requester will be notified each time one or more of the lines from their Requisition has been Approved. |
Yes |
Notify Requester on Denied Approval Lines |
Specifies whether a Requisition Requester will be notified when one or more lines from their Requisition has been denied during the approval process. |
Yes |
Notify Requester on new Requisition Submitted |
Specifies whether a Requisition Requester will be notified when a user submits a Requisition for them. |
Yes |
Notify Requester on Pro-Forma Order Updates |
Specifies whether a Requisition Requester will be notified when the approved requisition is added to a Pro-Forma Order and when that Pro-Forma Order is created as a Purchase Order. |
Yes |
Notify Requester on Requisition Updates |
Specifies whether a Requisition Requester will be notified each time the status of their Requisition changes. |
No |
System
| Setting | Description | Value (Example) |
|---|---|---|
Allow User Self Registration |
New users can self-register upon their first login to the ARM system. |
No |
Auto Receive Blanket Order Releases |
If set to Yes then Blanket Order Releases will be received automatically. If set to No then releases can be manually received at any time after their creation in the Blanket Purchase Order screen. |
Yes |
Backend Erp System |
Specify whether ARM uses the backend ERP system or works as a standalone system. Options are:
|
Kinetic |
Due Date Required |
If set to Yes then the Due Date field on a Requisition will be mandatory and will default to blank. If set to No the Due Date field will still be displayed but will default to the current date and will not be mandatory, i.e. the user can clear it. |
No |
Enable AP Payment Method |
The AP Payment Methods are automatically imported from Epicor. This setting controls whether or not they are to be used in ARM. |
Yes |
Enable Buyer Mapping |
Enable specific buyer mapping when creating Purchase Orders. |
Yes |
Enable Community Care Purchasing |
Allow raising requisition with community care visit link. |
No |
Enable OCR Manual File Upload |
Allow user to upload files to the OCR worklist folder from browser. |
Yes |
Enable Purchase Discount |
Enable discount on purchases. |
No |
Enable User Export |
Export system users to a file. |
Yes |
Enable User Import |
Enable bulk user creation by importing users from a template file. |
Yes |
GL Account Mask Sequence |
Determines the sequence to apply GL Account Masks. Note that if a User has the option User Segments Override Defaults then the User Mask always takes precedence regardless of how it is set up here. For User Segments Override Defaults, see Maintaining Users - Assigned GL Accounts Tab. See how to select the settings: Setting the GL Account Mask Sequence. |
Vendor,User,Catalogue Item Location,Category,Location,Inventory Item Posting Code,Natural Account Options |
GL Reference Sequence |
Determines the sequence to apply GL References. Values to be sequenced are: User, Location, Category, Vendor, Natural Account Options. Note: GL Account Mask Sequence and GL Reference Sequence are independent of each other. The GL Account Mask sequence will be added first and then ARM will attempt to add the Reference. If the Reference does not match, the GL Account Mask Sequence validation will fail and the user will be required to add a GL Reference manually on the Requisition line. See how to select the settings: Setting the GL Reference Sequence. |
Natural Account Options,Location,Category,Vendor,User |
Intercompany GL |
Enable Intercompany GL mode. Set by enabling or disabling this functionality during ARM Installation. This field is read-only. |
No |
Kinetic Main Menu ID |
Main Menu ID of Epicor Kinetic. See how to select the settings: Setting the Kinetic Main Menu ID. |
MAINMENU |
Non-inventory Mode |
Enable Non-inventory mode. Set by enabling or disabling this functionality during ARM Installation. |
No |
Show Job on Requisition Lines |
Display and enable inline editing of Job information on Requisition Lines. |
Yes |
System idle time (minutes) |
Automatically log user out after the specified System idle time. The default value is 20 minutes. |
20 |
The following System Global Settings are not available on the UI:
| Setting | Description | Value (Example) |
|---|---|---|
Activity Code |
Specifies whether the Activity Code '1099' customisation is used. Used when the backoffice system is Epicor 7 only. |
No |
ARM NT Group Full Name |
The full name of an existing NT group that will hold all eReq users. Format: YourDomain\YourNTGroupName eg: PRECISE\eReqCommonGroup. |
|
Company Name |
The name of the company where the installation of ARM is located. |
|
Country Locale |
Specifies the Session Locale setting for the date and currency format eg: 3081. |
0 |
Enable fast user switching |
The setting to turn on/off fast user switching for debugging purpose. |
Yes |
License |
An encryted string that holds the current license information for this ARM installation. |
abcdefg |
License Key |
The customer’s unique key for retrieving license information from the encrypted license. |
|
NoOfMonthsApportionment ASP description |
The text description of the field displayed on RequisitionLine detail form. |
Number Of Months Apportionment |
NoOfMonthsApportionment Default Value |
The default value of the NoOfMonthsApportionment field. This must be a numeric value. For example: 12. |
1 |
Run Password Encryption |
Run Password Encryption During Installation or Upgrade. |
No |
Use Number Of Months Apportionment |
Specifies whether to use the field NoOfMonthsApportionment in RequisitionLine detail form. |
No |
System Administration
| Setting | Description | Value (Example) |
|---|---|---|
Attachment Upload File Filter |
Specifies which file types can be uploaded to ARM (extensions only and comma seperated eg: txt,doc,pdf,jpg). |
png,jpg,jpeg,bmp,gif,csv,txt,log,lic,doc,docx,xls,xlsx,ppt,pptx,pdf,pfx,json |
Enable Cost Codes |
When Enabled, APM Project Cost Codes are visible on the purchasing line. |
Enabled |
Enable log system notification event |
Log system notifications |
No |
Enable Project Budget Checking |
When Enabled, Requisition lines that have Project information are validated against a project budget. |
Disabled |
Environment Banner Text |
The banner text that displays on the top navigation bar of application. Usually to indicate the current application environment. Tip: Leave the value empty to indicate this is a production environment. |
|
Environment Login Banner Image |
The banner image that displays on the login screen. |
|
Project Budget Level |
Defines whether the budget is being checked as a total for the Project Phase or Cost Code, or if the budget is being compared for the Cost Type. |
Total Budget |
Project Budget Source |
Defines if budgets for comparison will be: the standard Epicor Project Costs, the Precise APM Project Analysis, or the Precise APM Project Budget Spread. |
Project Costs |
Requisition Reviewer List |
Specifies which users will be available in the Reviewer List. Options are: Requisition Related Users, All Reviewers. |
All Reviewers |
Review Complete Notification |
When a review is complete, these are the approvers who are notified. Options are: All Approvers, Current Approver(s) Only, Current and Future Approver(s). |
All Approvers |
Use Requisition Line Custom Forms |
Specifies whether Custom Forms are enabled on the Requisition Line. Options are:
|
Optional |
Use Requisition Types |
Specifies whether Requisition Types are used within the Application. |
No |
The following System Administration Global Settings are not available on the UI:
| Setting | Description | Value (Example) |
|---|---|---|
Active Directory Integration |
Specifies whether the system integrates with the user information from Active Directory. |
Off |
ARM Base API URL |
The base URL for web api url. User should not change this value. |
'http://qaarm2024-jsm:8040' |
ARM Path |
The full file system path on the Web Site directory e.g. C:\Program Files (x86)\Precise Business Solutions\ARM\Web Site\. |
C:\Inetpub\ARM\ |
ARM URL |
The base URL of ARM e.g. 'http://myserver/ARM/'. |
'http://qaarm2024-jsm:8040' |
Attachment File Location |
Optionally override the default attachment file location to a specified network path. |
|
Automatic Closing of PO Lines |
Specifies whether or not to close the Purchase Order when lines are received (E9 and above only). |
Yes |
Domain |
The name of the domain that ARM uses to interact with Active Directory. |
|
Project Budget Range Display Mode |
The range to calculate project budget check for requisition line. |
Full Budget |
System Scheduled Tasks
| Setting | Description | Value (Example) |
|---|---|---|
Enable Notification Clean Up |
Enable old notifications to be cleared out after days set in 'Overdue Notification Period' |
Yes |
Overdue Notification Period |
Specifies the time period to run the Clean Up of Notifications (in Days) |
15 |
Warnings
| Setting | Description | Value (Example) |
|---|---|---|
Require PO Received Date |
If this setting is set to Yes then the user will be required to enter the PO received date when posting. |
No |
Vendor Minimum Order Warning for PO Creator |
Specifies whether a warning message should be displayed to a Purchase Order Creator when vendor minimum orders are not reached. |
Yes |
Vendor Minimum Order Warning for Requisitioner |
Specifies whether a warning message should be displayed to a Requisitioner when vendor minimum orders are not reached. |
Yes |
Setting the Attachment Storage Type
Use this setting to select and configure a Storage Type (Provider) used to store attachments for documents in ARM.
-
To open Attachment Storage Type, select Attachment Type Setting from the drop-down list in the Global Settings Maintenance page. Click on the Attachment Storage Type Setting.
Read about Attachments in ARM: Attachments.
Update the Attachment Storage Type
|
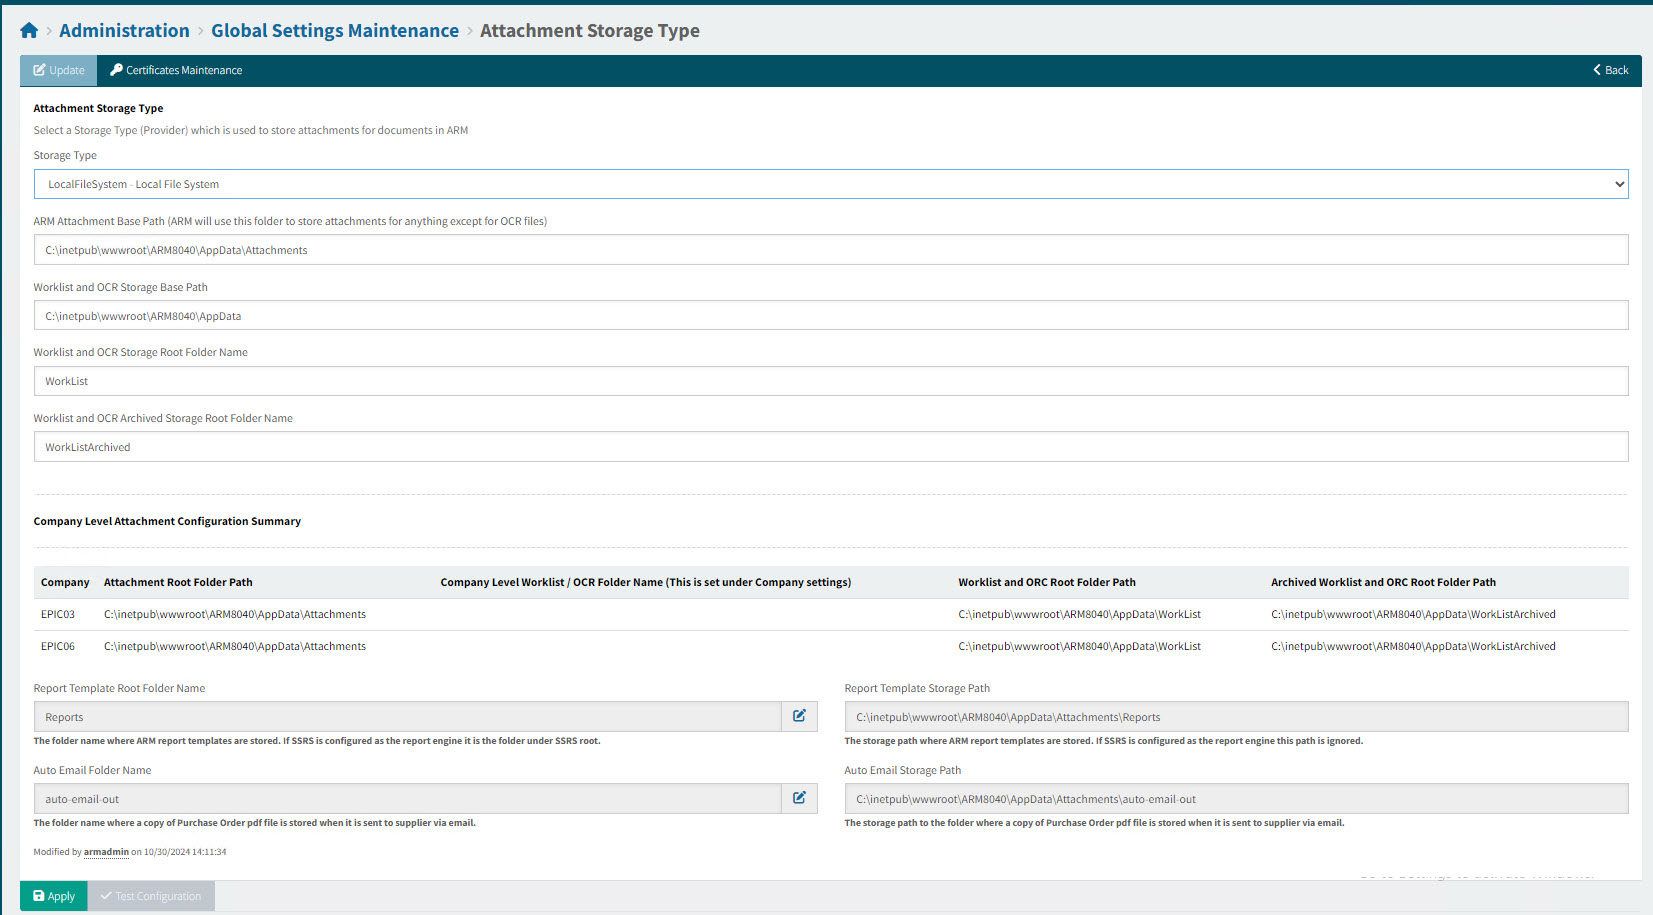
-
Select a Storage Type from the drop-down list.
The options are:
-
LocalFileSystem - Local File System
-
SharePoint - MS SharePoint Online
-
ECM - Epicor ECM (DocStar)
-
-
Fill out the field selections that appear with your choice of Storage Type.
Many of the fields come with explanations, and some show links to relevant help available on the Internet.
-
Click Apply to save changes.
On the Global Settings Maintenance page, the selected Storage Type appears in the Value column for the setting.
Mail Settings Maintenance
-
To open Mail Settings Maintenances, select Mail Settings from the drop-down list on the Global Settings Maintenance page. Click on the Mail Application Name Setting.
Update Mail Settings
|
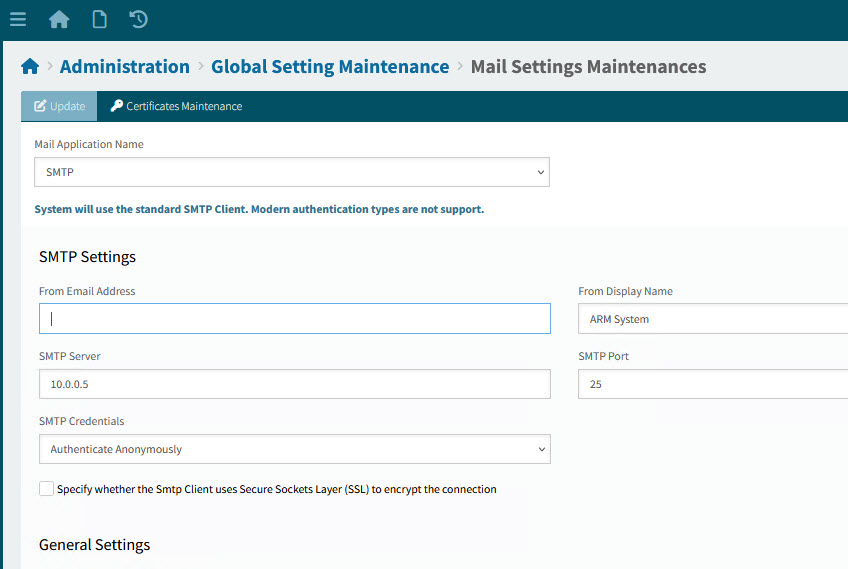
-
Select a Mail Application Name from the drop-down list.
The options are:
-
- No Mail Application
No email service has been configured. Email will be log to database table.
-
Microsoft 365 (Microsoft Graph)
This is the recommended client for sending email using Microsoft 365. The Azure App can be shared with the App configured for SharePoint storage.
-
Modern SMTP
System will use the SMTP Client that support various authentication types such as CRAM-MD5, DIGEST-MD5, LOGIN, NTLM, PLAIN, SCRAM-SHA-1[-PLUS], SCRAM-SHA-256[-PLUS], SCRAM-SHA-512[-PLUS].
-
SMTP
System will use the standard SMTP Client. Modern authentication types are not support.
-
Below are the instructions for setting up the SMTP Mail Application.
-
Update the SMTP Settings.
-
Enter a From Email Address.
-
-
Enter a From Display Name.
-
Enter an SMTP Server (the address of an available SMTP Server on the network). This is an optional setting for authenticating to the SMTP server using basic authentication.
-
Enter an SMTP Port (optional setting to override the default SMTP Server Port). Enter the address of an available SMTP Server on the network.
-
Select SMTP Credentials from the drop-down list.
-
For Use Specified Credentials, enter an SMTP User Name and an SMTP Password for basic authentication on the SMTP server.
-
-
Select the check box Specify whether the Smtp Client uses Secure Sockets Layer (SSL) to encrypt the connection if applicable.
-
-
Update the General Settings.
-
Enter System Admin Email Addresses. This is a list of email addresses (separated by semicolons) that errors and system information will be sent to. For example, support@precisebusiness.com.
-
Enter a From Email Address For Purchase Order Send To Supplier. This is a single email address that should be used in the From field of automatically emailed Purchase Orders to Suppliers. This could be same as [From Email Address].
-
-
Optionally send a test email.
-
Enter an email address in Send Test Email To.
-
Enter a message in Test Email Log.
-
Click Send Test Mail to send the email immediately. OR click Send Test Mail In Queue to generate multiple test emails to send via a queue.
-
-
Click Save to save changes to Mail Settings.
Setting the GL Account Mask Sequence
-
To open GL Account Mask Sequence, select System from the drop-down list in the Global Settings Maintenance page. Click on the GL Account Mask Sequence Setting.
Read about GL Account Mask Sequence in ARM: GL Account Mask Sequence.
Update the GL Account Mask Sequence
|
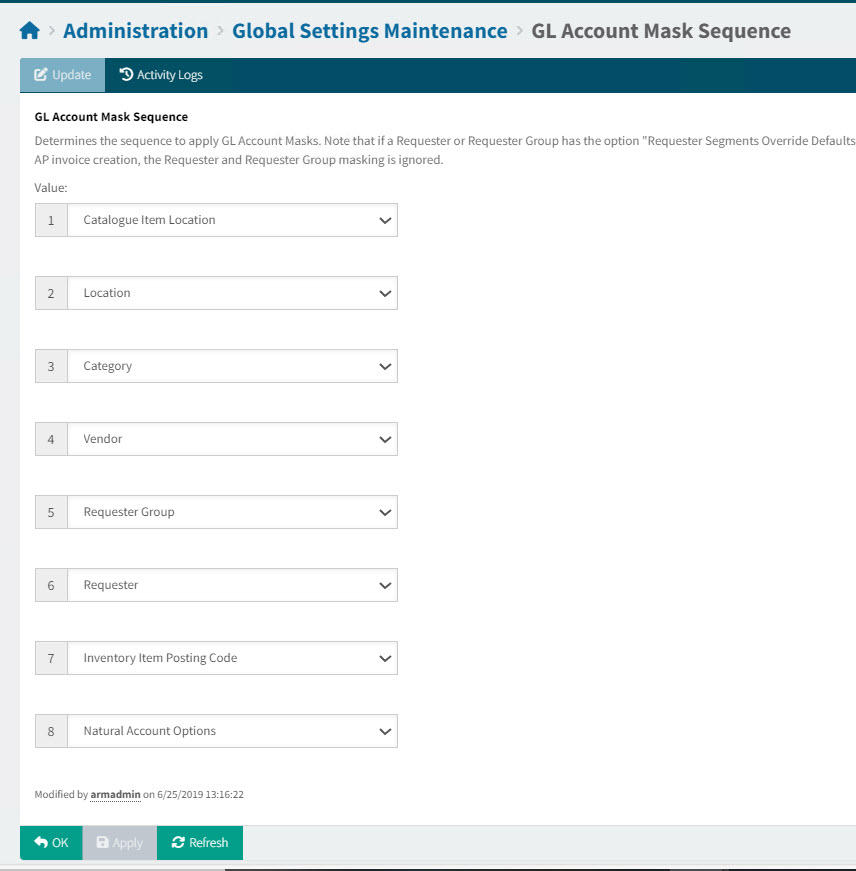
-
Select a value for each of the drop-downs, Values 1 to 8. This orders the sequence for the GL Account Mask.
The values to select are:
-
Requester Group
-
Catalogue Item Location
-
Location
-
Category
-
Vendor
-
Inventory Item Posting Code
-
Natural Account Options
-
Requester
Note that when you select a value, it is removed from any other selection.
-
-
Click Ok to save changes to GL Account Mask Sequence and return to the Global Settings Maintenance page.
The selected values appear in their order, comma-separated, in the Value column for the setting. For example: Catalogue Item Location,Location,Category,Vendor,Requester Group,Requester,Inventory Item Posting Code,Natural Account Options.
Setting the GL Reference Sequence
-
To open GL Reference Sequence, select System from the drop-down list in the Global Settings Maintenance page. Click on the GL Reference Sequence Setting.
Update the GL Reference Sequence
|
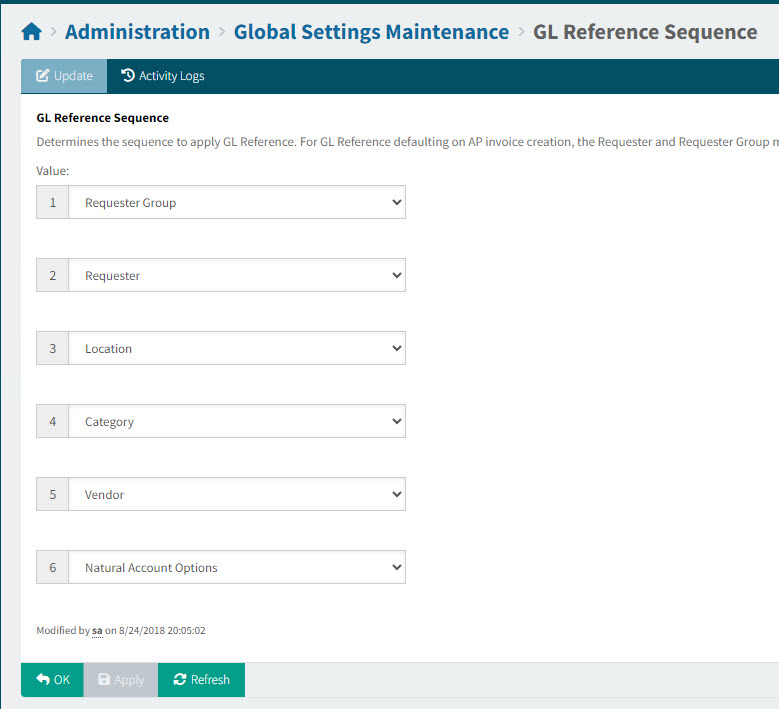
-
Select a value for each of the drop-downs, Values 1 to 6. This orders the sequence for the GL Reference.
The values to select are:
-
Requester Group
-
Location
-
Category
-
Vendor
-
Natural Account Options
-
Requester
Note that when you select a value, it is removed from any other selection.
-
-
Click Ok to save changes to GL Reference Sequence and return to the Global Settings Maintenance page.
The selected values appear in their order, comma-separated, in the Value column for the setting. For example: Requester Group,Requester,Location,Category,Vendor,Natural Account Options.
Setting the Kinetic Main Menu ID
Use this screen to create or update ARM menu items in Epicor Kinetic. This will be used to launch ARM from Kinetic.
-
To open Kinetic Main Menu ID, select Settings from the drop-down list in the Global Settings Maintenance page. Click on the Kinetic Main Menu ID Setting.
| Before proceeding, click the button Load Existing ARM Menu Items From Kinetic on the Footer Menu. Use this to verify that ARM menu items have been configured in Kinetic. |
Update the Kinetic Main Menu ID
|
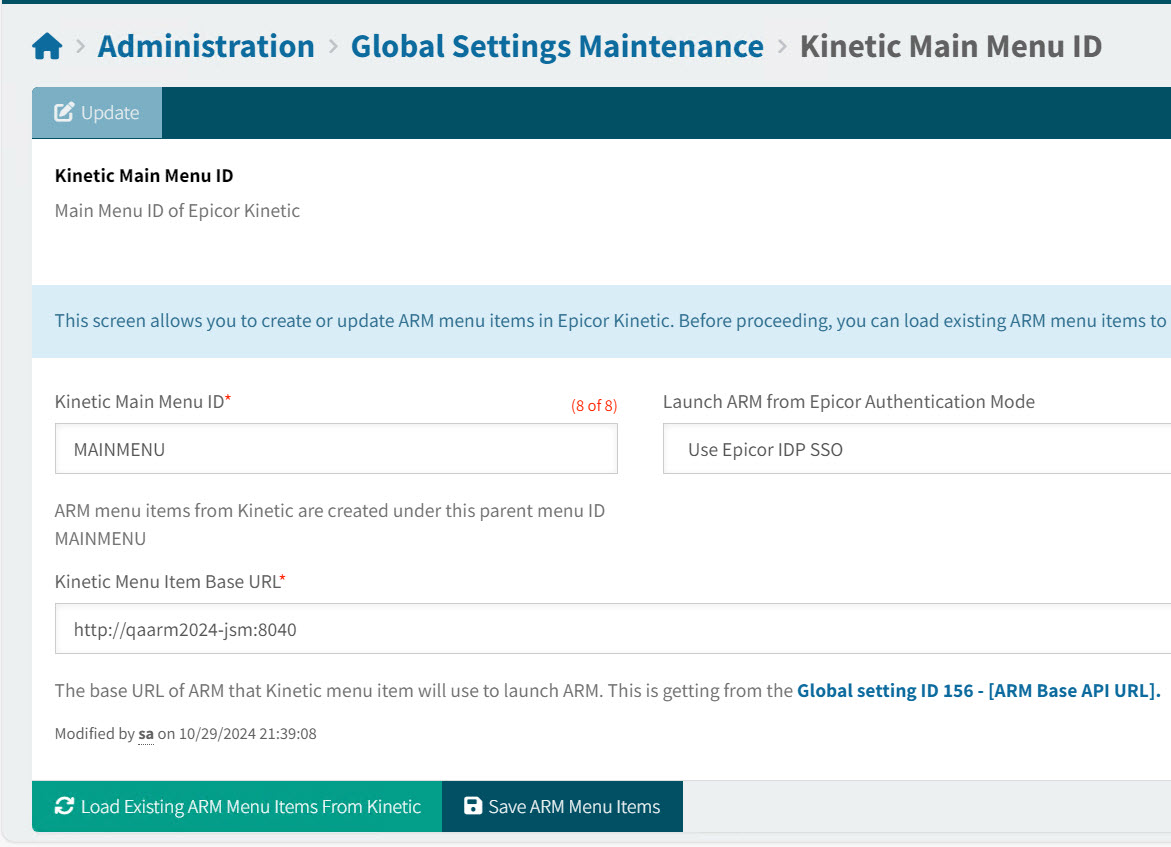
-
Update the Kinetic Main Menu ID settings.
- Kinetic Main Menu ID
-
In Kinetic, the ARM menu items are created under this parent menu ID.
- Launch ARM from Epicor Authentication Mode
-
Select a method of authentication for the user, when accessing ARM from a Kinetic menu. The following options are available:
- Use Epicor IDP SSO
-
Use the Kinetic single sign-on option.
- Use Microsoft 365 SSO
-
Use the Microsoft 365 single sign-on option.
- Use Windows Authentication
-
Use the user’s windows credentials to access ARM from Kinetic.
- Use Windows Authentication
-
Use the user’s windows credentials to access ARM from Kinetic.
- Do not use SSO
-
The user must log on to ARM with their ARM username and password.
- Kinetic Menu Item Base URL*
-
This is the base URL for ARM. The Kinetic menu item will use this to launch ARM. Find the URL in the Global Setting ARM Base API URL.
-
Click Save ARM Menu Items to save the changes.
Setting the Environment Login Banner
If you define an environment login banner in Global Settings, this displays above the login screen pop-up (see Logging in to ARM).
To set the environment login banner:
-
Select Environment Login Banner Image from the System Administration settings.
This opens the Administration > Global Settings Maintenance > Environment Login Banner Image page.
-
Select Choose File, then browse to the Login Banner image and select it, then select Open.
-
Select Upload.
The selected Login Banner image is displayed.
-
Click Apply.
| To remove the Login Banner image, select the Remove Image check box, then click Apply. |