Catalogue
The ARM Catalogue can include inventory items and non-inventory items.
-
Inventory items are set up and maintained in Kinetic, with some additional information maintained in ARM.
-
Non-inventory items are added in ARM. They can be added individually or imported in a batch using a csv file import.
Permissions
You require a role with the Maintain Catalogue permission to access Catalogue maintenance.
The View Catalogue permission allows you to view the catalogue list in Catalogue maintenance.
See Permissions in ARM.
Restricted Catalogue Items
If the Global Setting Restrict Parts to Part Classes flagged for Requisitions is enabled, then potentially some of Kinetic’s Parts will not be integrated into ARM as Catalogue items.
If this setting is enabled, then a Part is considered restricted and will not be integrated into ARM if it either belongs to a Part Class (Category) that has not been flagged for requisitions, or if it does not belong to any Part Class (Category).
In addition, the following data will not be integrated to ARM, if they contain restricted parts:
-
Restricted part classes (categories)
-
Job / Assembly / Materials for restricted parts
-
PO Suggestions for restricted parts
-
Sales Order lines for restricted parts
-
Purchase Orders created in Kinetic containing any lines with restricted parts
-
Receipts created in Kinetic for restricted parts
| If a Part Class was originally flagged for requisitions, then any of the above data may already be integrated into ARM, and may be visible in the ARM user interface. This also applies to data that was already in ARM prior to the setting being available and enabled. |
Maintaining the Catalogue
-
Select the Catalogue menu item on the Administration Page. See Administration Page.
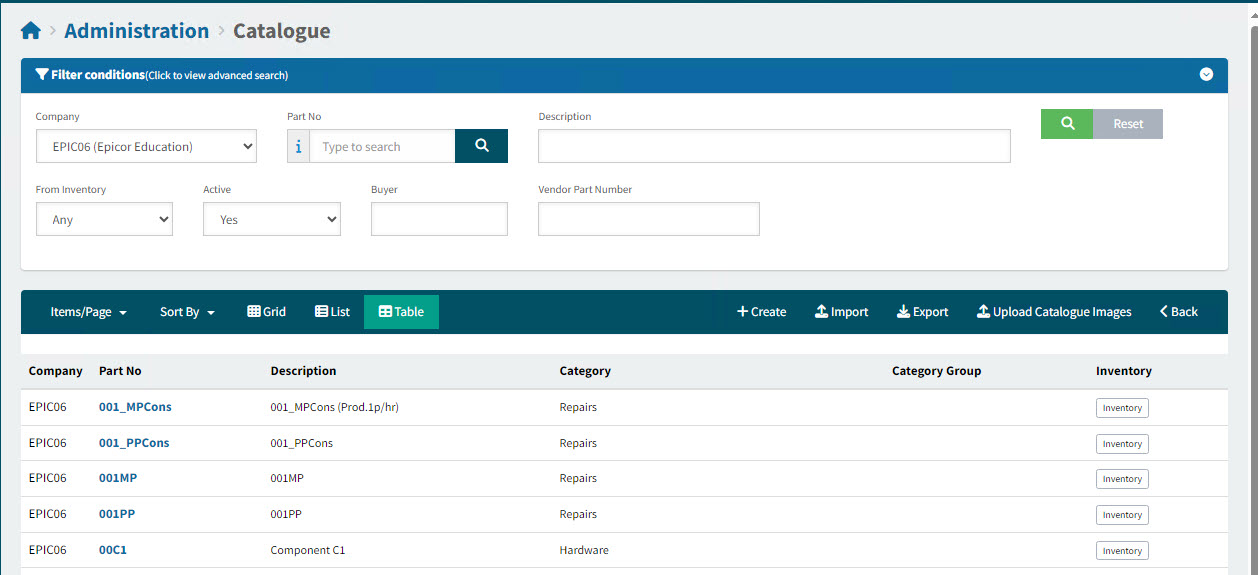
The Administration > Catalogue page opens.
-
Adjust the Filter conditions.
See Details
-
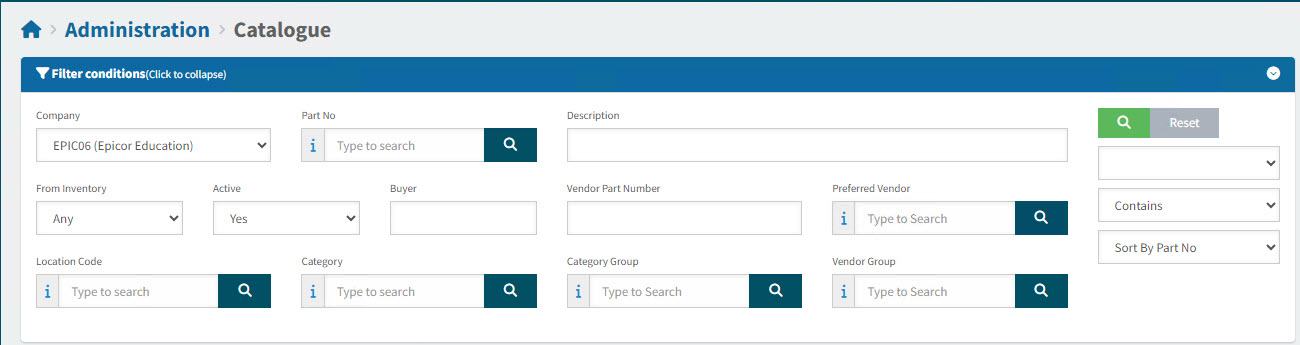
Expand the filter conditions in the top section of the page to search for a specific Catalogue or to narrow your search.
View filter conditions
-
Enter values in the edit boxes, or select from the search boxes. See the filter conditions, below.
Filter Conditions
- Company
-
Select a Company from the drop-down list.
- Part No
-
Select a Part No.
- Description
-
Type in all or part of the part’s description.
- From Inventory
-
Select Any, Yes, or No to select any part/those that are inventory items/those that are local to ARM.
- Active
-
Select Any, Yes, or No to select any/active/inactive parts.
- Vendor Part Number
-
Catalogue items with this Vendor Part Number.
- Preferred Vendor
-
Catalogue items belonging to locations where this is the Preferred Vendor.
- Location Code
-
Catalogue items with this as one of their Locations.
- Category
-
Catalogue items belonging to this Category.
- Category Group
-
Catalogue items belonging to this Category Group (that is, where the item’s Category is part of the Category Group).
- Vendor Group
-
Catalogue items with Prices for Vendors belonging to this Vendor Group.
Catalogue Items that match the filter conditions are listed in the grid.
-
-
Use the buttons on the menu bar to create, import, or export catalogue items. You can also upload catalogue images.

Upload Catalogue Images |
|||
Adding Local (Non-Inventory) Items to the Catalogue |
Importing Local (Non-Inventory) Items to the Catalogue |
Exporting Inventory Items |
Uploading Catalogue Images |
-
To open a catalogue item, click on the Part No. See Viewing and Updating Inventory Items.
Adding Local Items to the Catalogue
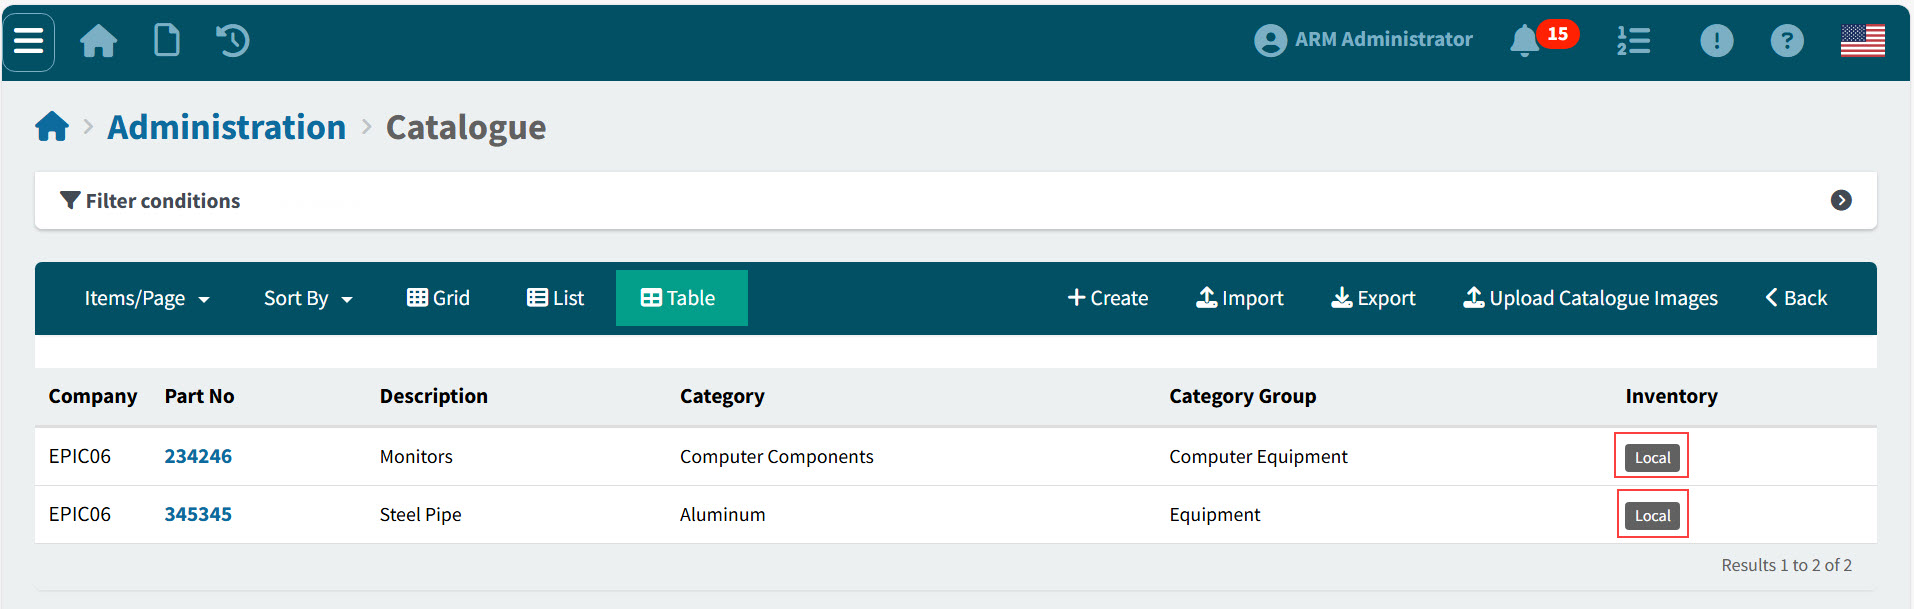
You can add local (non-inventory) items directly to the Catalogue. These items are displayed in the ARM Catalogue as Local.
| Items added here will not be integrated into the Epicor inventory. These items will be in the ARM Catalogue only. |
-
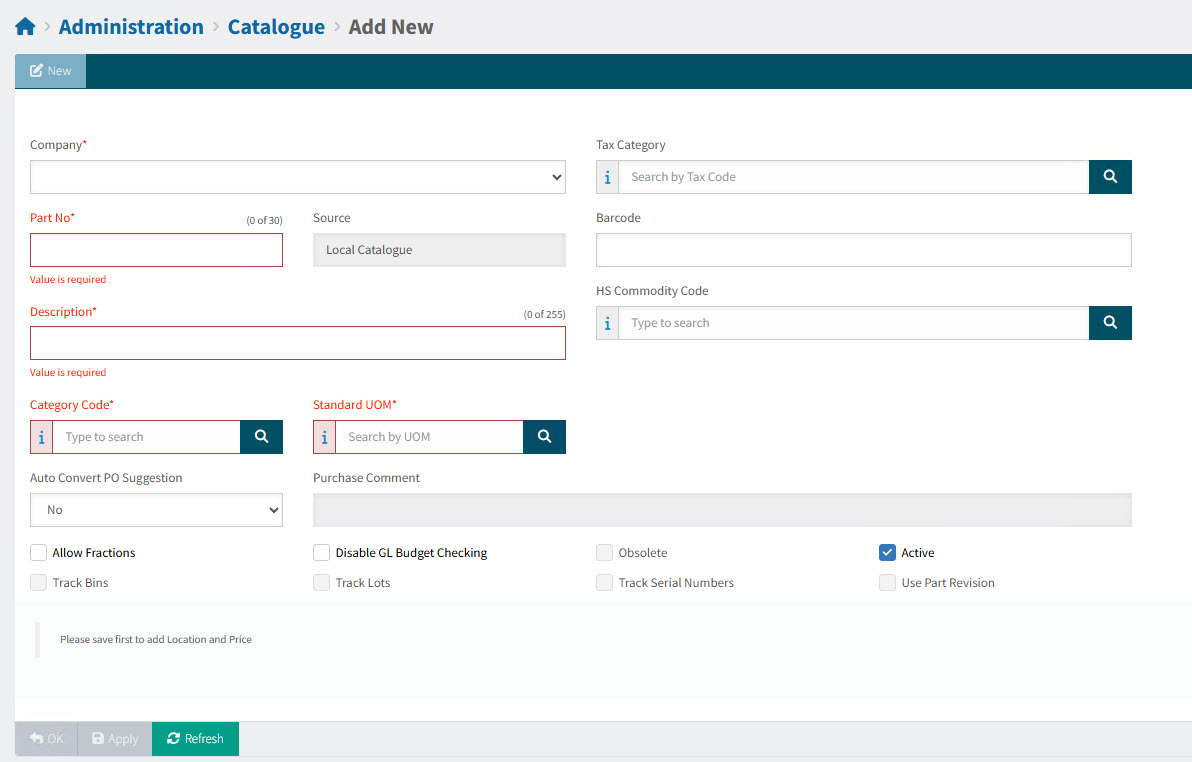
Click Create on the Catalogue menu bar.
-
Enter the required information on the Administration > Catalogue > Add New page. Where relevant, use the field search to look up values.
Catalogue Fields
Company Select a company ID.
Tax Category Used in the logic for System Default for Tax Category.
Part No Enter a part number of up to 30 characters. This can be a combination of numbers, letters and characters.
ARM will not allow you to enter a Non-Inventory item that holds the same Part code as that of an existing Catalogue (Inventory) part in Epicor. The part number provides a way of referring to this item. It could be the vendor’s part number (if there is only one vendor), an abbreviation of the item, or whatever convention your company uses.
After you have saved the catalogue item the Part No cannot be changed. Source The source will always be Local Catalogue for local items.
(Local Catalogue is for imported or miscellaneous items created by the user. These reside in their own table, LocalCatalogue, within the ARM database).
Barcode The number to be printed out for barcode scanning.
Description Enter an item description of up to 255 characters.
HS Commodity Code Optionally enter a valid HS Commodity Code. This is used in the default logic for the HS Commodity Code.
If HS Commodity Code is not required, the field does not appear in Catalogue.
Category Code Select a Category for the catalogue item to be grouped with.
Standard UOM Select the Unit of Measure (UOM).
Used in the logic for System Default for UOM.
Auto Convert PO Suggestions Specifies whether PO Suggestions for this item should be automatically converted to Requisitions or not.
If Inherited is selected, this value is inherited from the setting on the item’s Category.
Purchase Comment Disabled field.
Allow Fractions Select if the item can be ordered as a fraction of the UOM.
Disable GL Budget Checking Select to disable GL Budget Checking for this item.
Obsolete This is an Epicor setting and cannot be updated. If it is selected, it indicates that the item is inactive.
Active Selected by default. To make the item unavailable to Requisitioners, clear the check box.
Note: By default, inventory items set up in Kinetic are available to be requisitioned.
Track Bins, Track Lots, Track Serial Numbers, Use Part Revision All disabled fields.
-
Select Save to validate and save initial details.
-
Optionally add an image file for the new catalogue item.
Adding an Image
In the Image Upload section:
-
Click the Browse button to locate and select the file.
-
Select Upload.
-
-
Add one or more Locations.
-
An item can exist at more than one Location.
-
Locations represent the location this item can be purchased for and will be delivered to.
-
You can Edit or Delete a Location using buttons to the right of the Location’s detail line. For editing a location, see enter or edit the details for the Location.
Adding a Location
-
Click Add Location
-
Enter or edit the details applicable to the Catalogue Item at the Location.
Location Code* Select a Location Code.
Tax Category Used in the logic for System Default for Tax Category.
Purchase UOM Select a Purchase UOM for the item at this location.
Used in the logic for System Default for UOM.
Lead Time The Lead Time (in days) may affect how Due Date for Requisitions is calculated.
Preferred Vendor Code Select a Preferred Vendor for the location.
If a preferred vendor has been selected and pricing has been defined for the preferred vendor, this Vendor and Pricing will be used by default when the item is requisitioned.
GL Account Mask Any values selected here represent the default for this item.
GL Account Mask Used in the logic for System Default for GL Account Code.
-
Select Save to save the location details.
The Location is now displayed on the item details page. Repeat this process to add more than one Location.
-
-
Add one or more Prices.
-
Price breaks represent the price per quantity for each vendor this item can be purchased from.
-
Click Edit to edit the price, or click Delete to delete the price, on the right of the Price line. For editing a price, see enter or edit the details for Price.
Adding a Price
-
Click Add Price
-
Enter or edit the details for the Price.
Vendor Code Select the vendor that the price applies to.
Quantity Enter the minimum quantity to which this price applies.
UOM Select the UOM that this price applies to.
Used in the logic for System Default for UOM.
Effective Date Enter the start date for this price detail. Defaults to the current system date.
Expiry Date Enter the end date for this price detail.
Currency Code This field is automatically populated according to the base currency set for this Company in Epicor.
Price Enter the unit price.
Discount % Enter the unit discount percent.
Lead Time The Lead Time (in days) may affect how Due Date for Requisitions is calculated.
Vendor Part Number Enter the vendor stock keeping unit (SKU) if known.
Note Enter a note about this price if required. Information only.
-
Select Save to save the price details.
The Price is now displayed on the item details page. Repeat this process to add more than one Price.
-
-
Add one or more Vendor Part Numbers (SKUs).
-
Click Edit to edit the price, or click Delete to delete the vendor part number, on the right of the Vendor Part Number line. For editing a vendor part number, see enter or edit the vendor part number.
Adding a Vendor Part Number
-
Click Add Vendor Part Number (SKU)
-
Enter or edit the details for the Vendor Part Number (SKU).
Vendor Code Select the Vendor Code.
Vendor Part Number Enter the vendor stock keeping unit (SKU).
Reference Enter a reference.
Lead Time The Lead Time (in days) may affect how Due Date for Requisitions is calculated.
Default For Purchase Select the check box to default this Vendor Part Number.
-
Select Save to save the Vendor Part Number (SKU) details.
The Vendor Part Number is now displayed on the item details page. Repeat this process to add more than one Vendor Part Number.
-
-
Select Save & Close to save changes and return to the Catalogue page.
The new item is listed as a Catalogue item, denoted as Local.
Viewing and Updating Inventory Items in the Catalogue
To open an inventory item, first ensure that the Inventory column displays Inventory, and not Local.
-
To open a catalogue item, click on the Part No.
The item opens in the Administration > Catalogue > [Part No] page.
As with Local catalogue items, the Inventory items have a main section, and then separate sections for:
In addition, Inventory items have sections for
Most of the details here are maintained in Kinetic. Some edits are allowed, specifically for ARM.
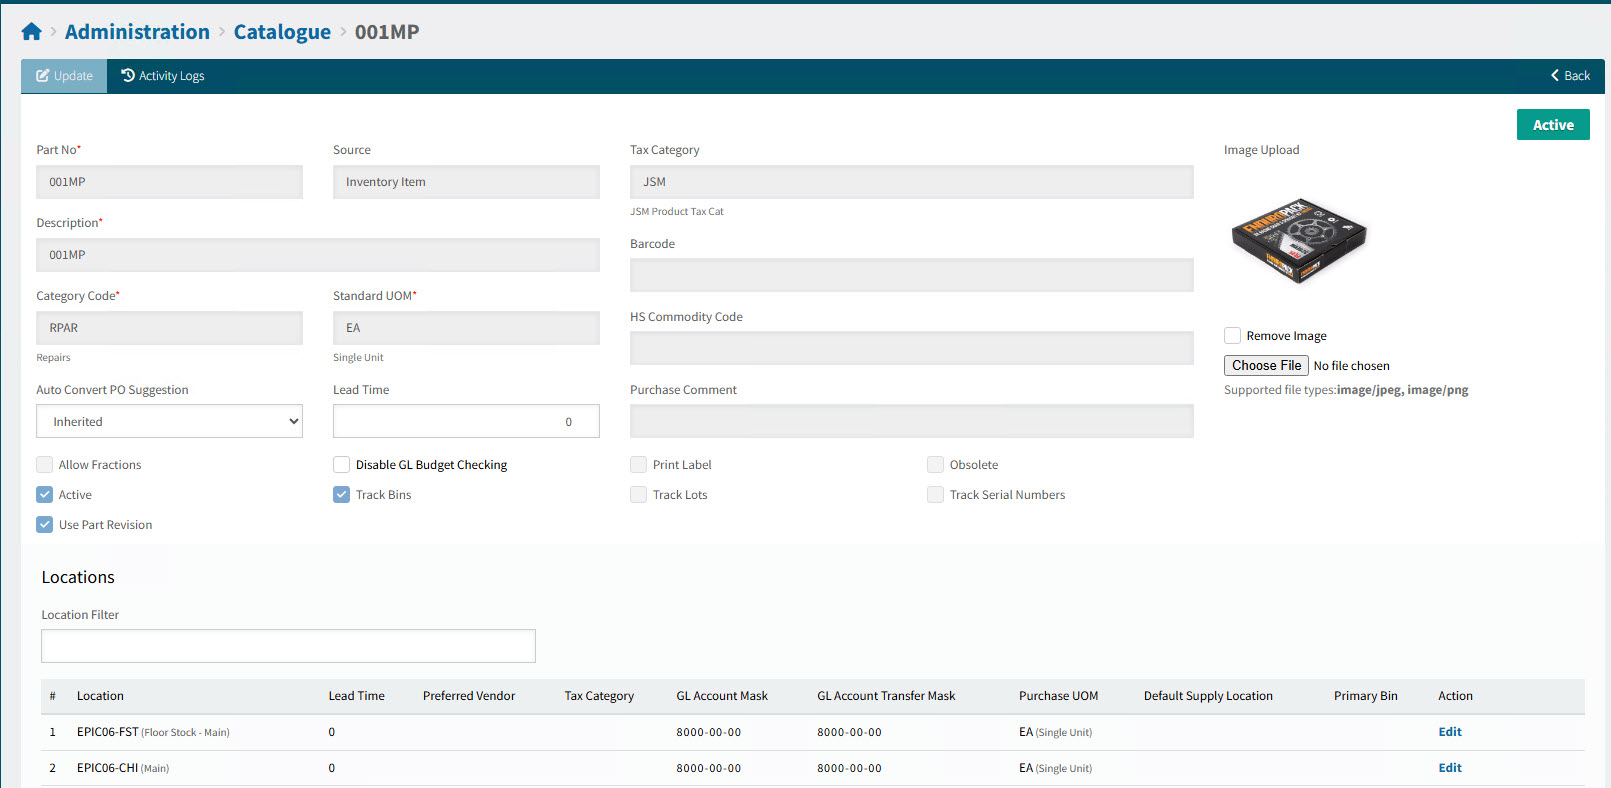
Main Details
-
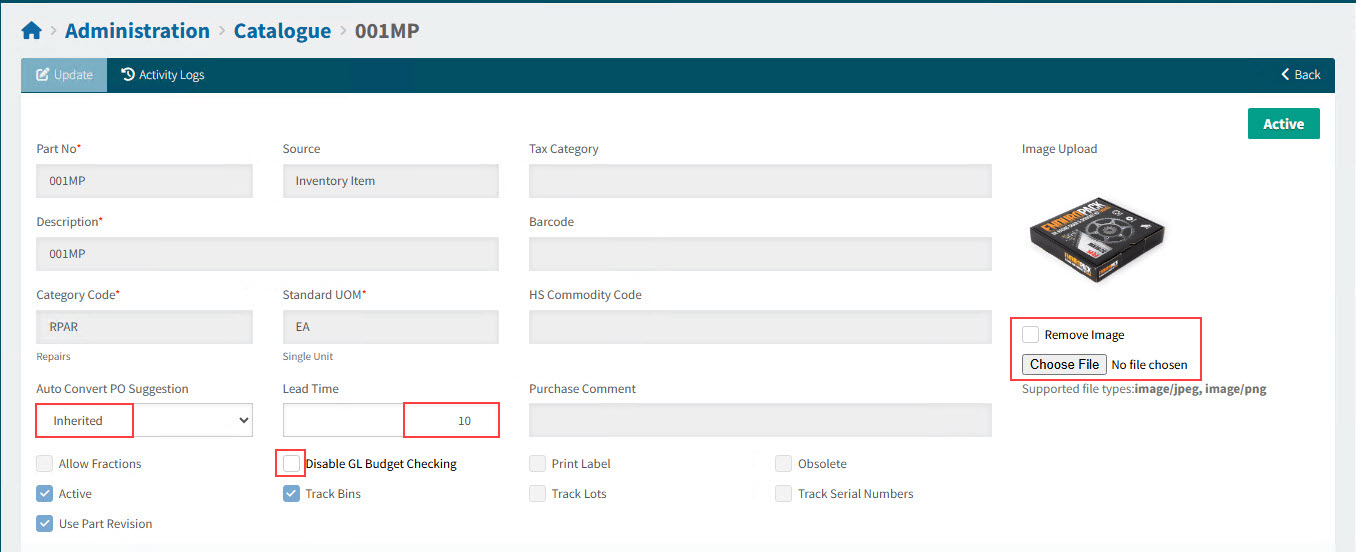
You can update any of the following details, specifically for ARM. You can also add, remove or replace the image. Click Save after making changes.
- Auto Convert PO Suggestion
-
Specifies whether PO Suggestions should be automatically converted to Requisitions. If Inherited is selected, this value is inherited from the setting on the item’s Category.
- Inherited
- Yes
- No
- Lead Time
-
The Lead Time (in days) may affect how Due Date for Requisitions is calculated.
- Disable GL Budget Checking
-
Select to disable GL Budget Checking for this item.
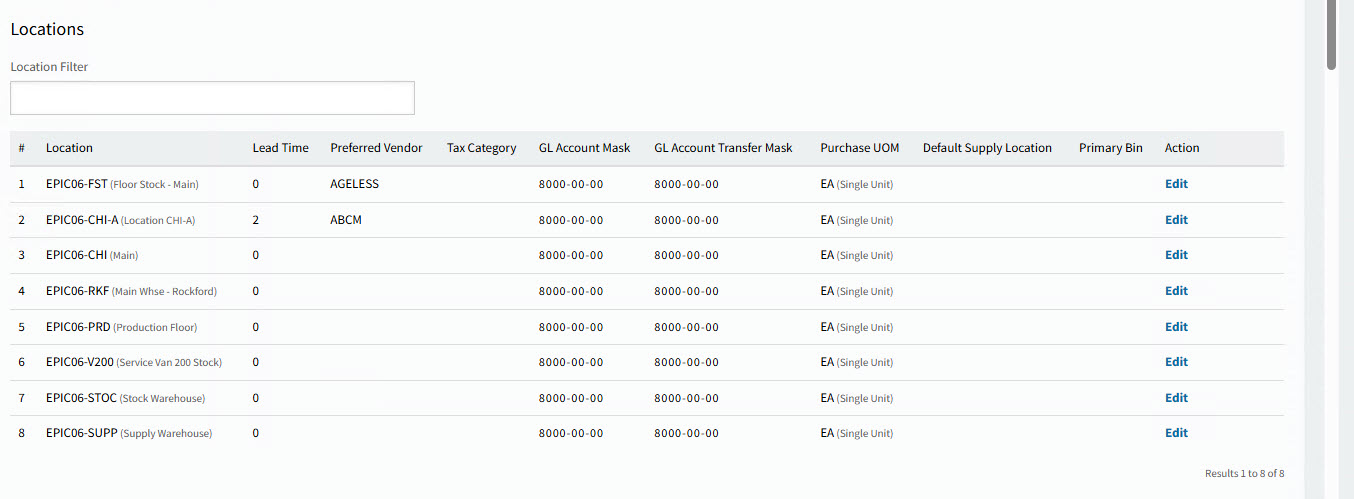
Locations Section for Inventory Items
Locations represent the location this item can be purchased for and will be delivered to. The Preferred Vendor (if available) for a Part No. for a Location is the default Source (Vendor) for a catalogue line item.
In Administration > Catalogue > [Part Number], locations are listed in the Locations section. To filter, you can enter a Location (or part of) in the filter edit box.
|
|
Locations for Inventory Item 001MP |
Location Details
- Location
-
A list of receiving locations for the Part No.
- Lead Time
-
The Lead Time (in days) may affect how Due Date for Requisitions is calculated.
- Preferred Vendor
-
The default Vendor (Source) on a Purchasing requisition catalogue line item for the Part No. and Location selection.
- Tax Category
-
Used in the logic for System Default for Tax Category.
- GL Account Mask
-
Used in the logic for System Default for GL Account Code.
- GL Account Transfer Mask
-
Used in the logic for System Default for GL Account Code for transfers.
- Purchase UOM
-
The Purchase UOM.
Used in the logic for System Default for UOM.
- Default Supply Location
-
For transfers, this is the default Supply Location.
- Primary Bin
-
The Primary Bin for the Warehouse that matches this Location. In Receiving, this is the Bin for Line Items where the Part No and Location match this Part No and Location.
- Action
-
Click Edit to edit a location for this Part No.
Part Sites and Warehouses in Kinetic:
In Kinetic, the Parts maintenance application has a list of Sites and, within these, Warehouses where the Part can be purchased and delivered to. Warehouses are Locations in ARM.
-
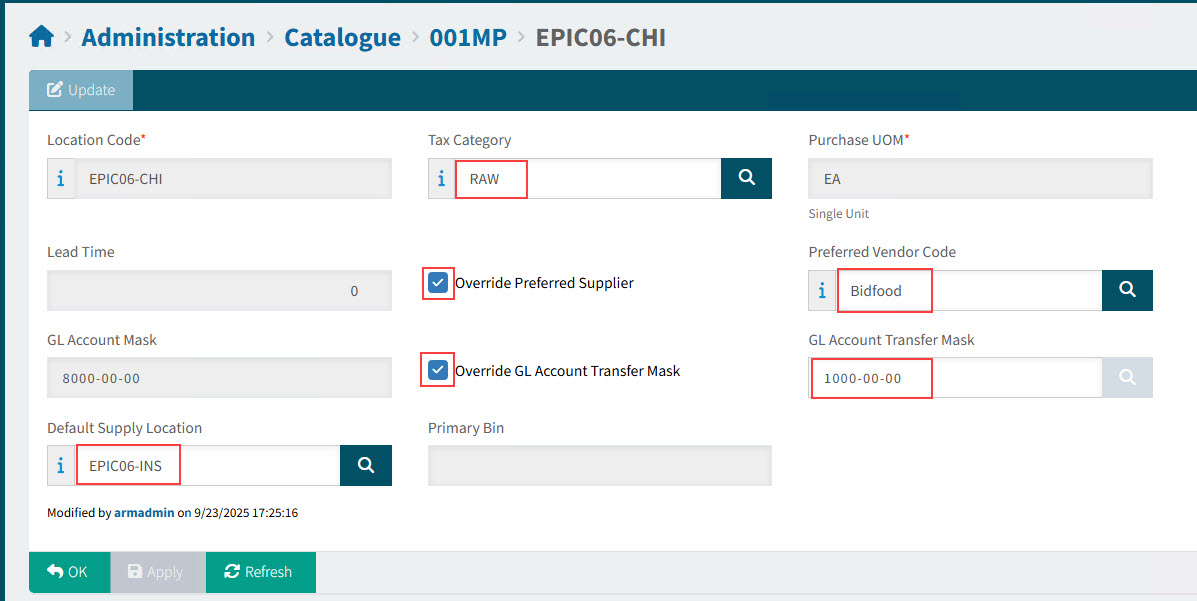
To edit a Location, click the Edit button in the Actions column.
This opens the Location page for the part number:
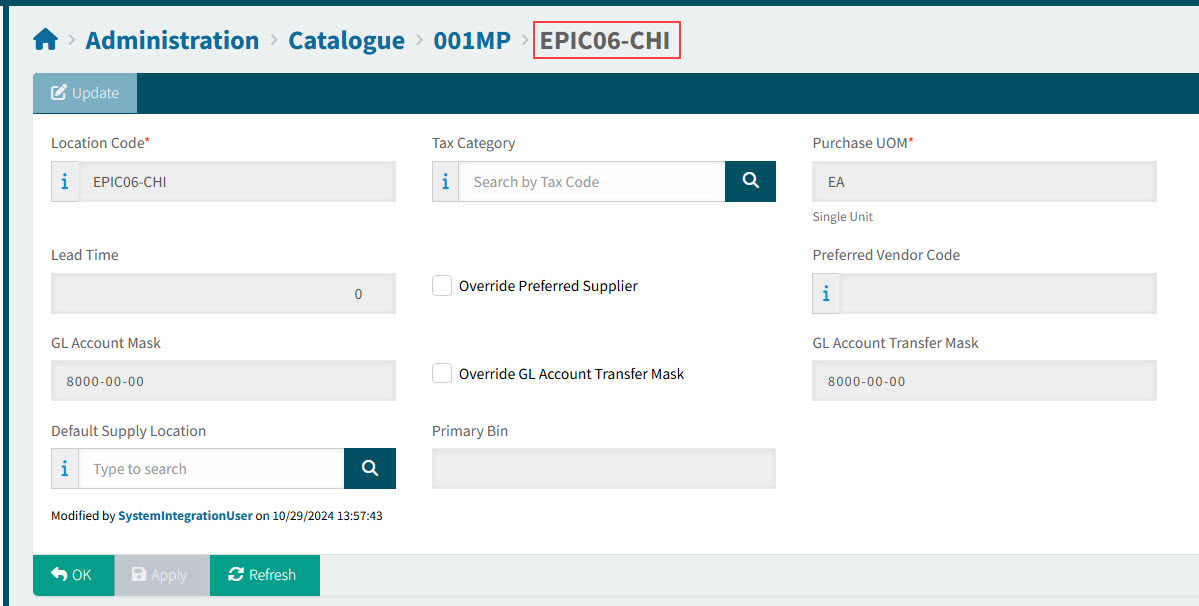
-
Make any updates to:
-
Enter a Tax Category.
-
Select Override Preferred Supplier and select a Preferred Vendor Code.
-
Select Override GL Account Transfer Mask and select a GL Account Transfer Mask.
-
Select a Default Supply Location.
-
-
Click Apply or OK to save the change.
View updated Location for Inventory Item:
Prices Section for Inventory Items
If you select a Vendor for a Part No in a catalogue line item on a requisition, the Price defaults to the Vendor Price for the Catalogue item.
In Administration > Catalogue > [Part Number], prices for different Vendors and Effective Dates are listed in the Prices section. To filter, you can enter a Vendor (or part of) in the filter edit box.
|
|
Prices for Inventory Item 001MP |
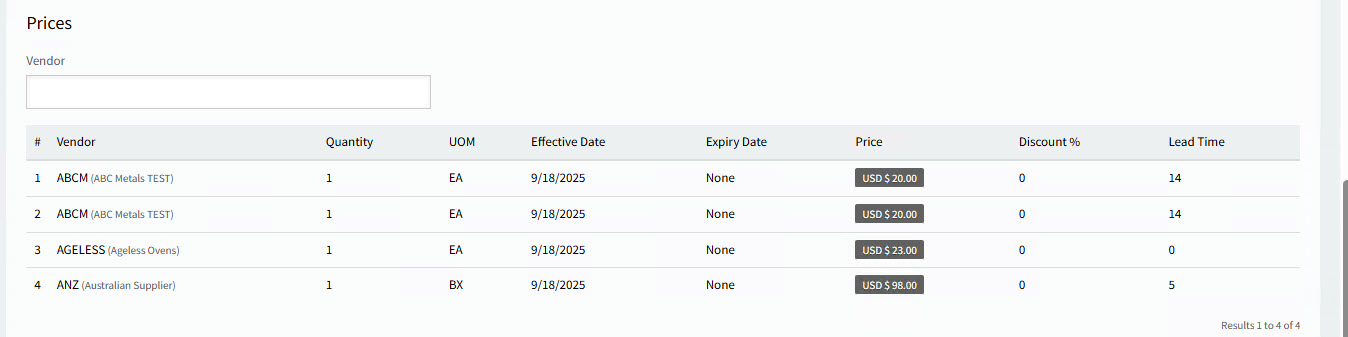
Price Details
- Vendor
-
Vendors listed here are available for selection on a requisition catalogue line item for the Part No.
- UOM
-
The Supplier UOM.
Used in the logic for System Default for UOM.
- Effective Date
-
The Supplier Price is only valid from this date.
- Expiry Date
-
The Supplier Price is only valid until this date.
- Price
-
The default Price on a requisition catalogue line item for the Part No. and Vendor selection.
- Discount %
-
The default Discount % on a requisition catalogue line item for the Part No. and Vendor selection.
- Lead Time
-
The Lead Time (in days) may affect how Due Date for Requisitions is calculated.
Maintaining the Supplier Price List in Kinetic:
The Supplier Price List is maintained in Kinetic’s Supplier Price List (Material Management > Purchase Management > Setup > Supplier Price List).
In Kinetic, Supplier Price List maintenance for a Supplier and Part for the Effective Date lists the Unit Price.
|
|
Supplier Price List in Kinetic |
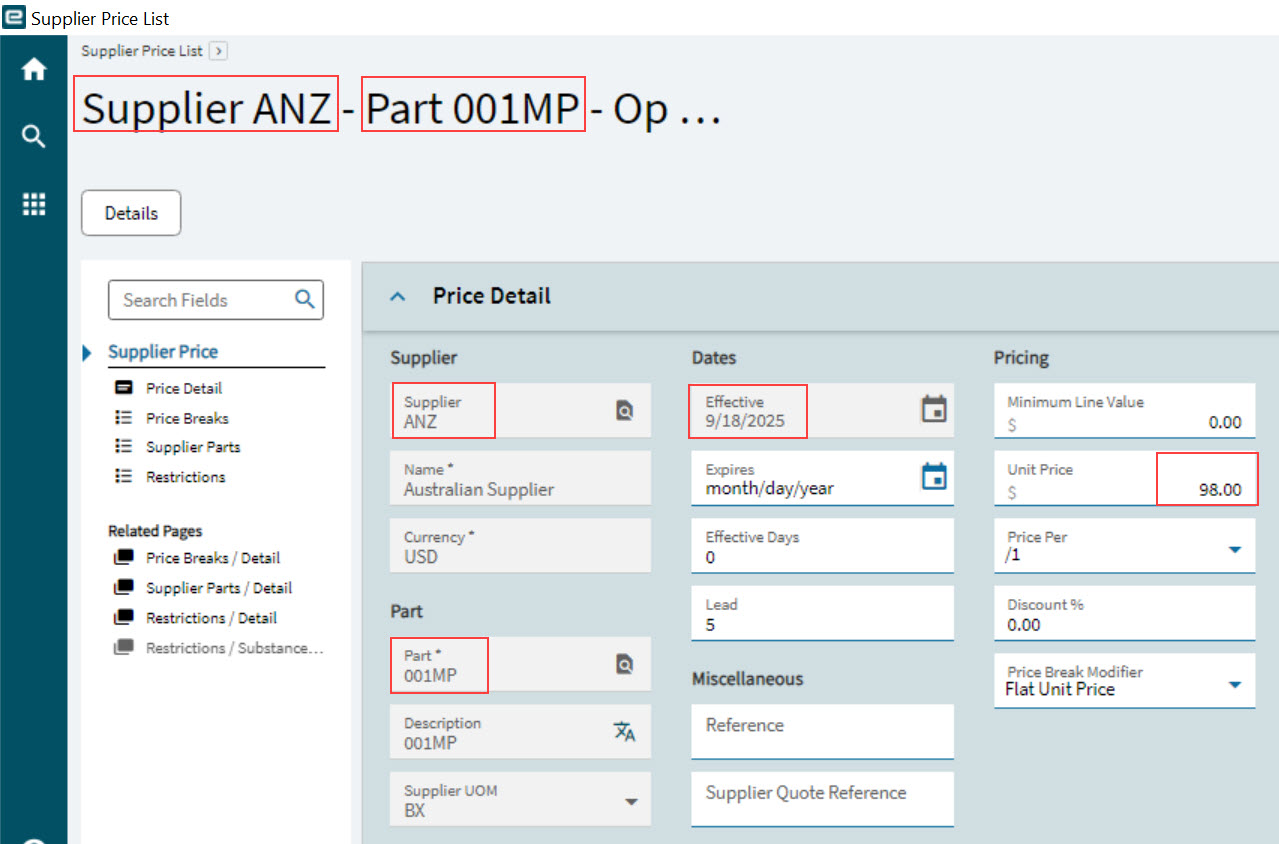
In ARM, this is the Price List for the corresponding Part No and Vendor for the Effective Date.
|
|
Prices in ARM |

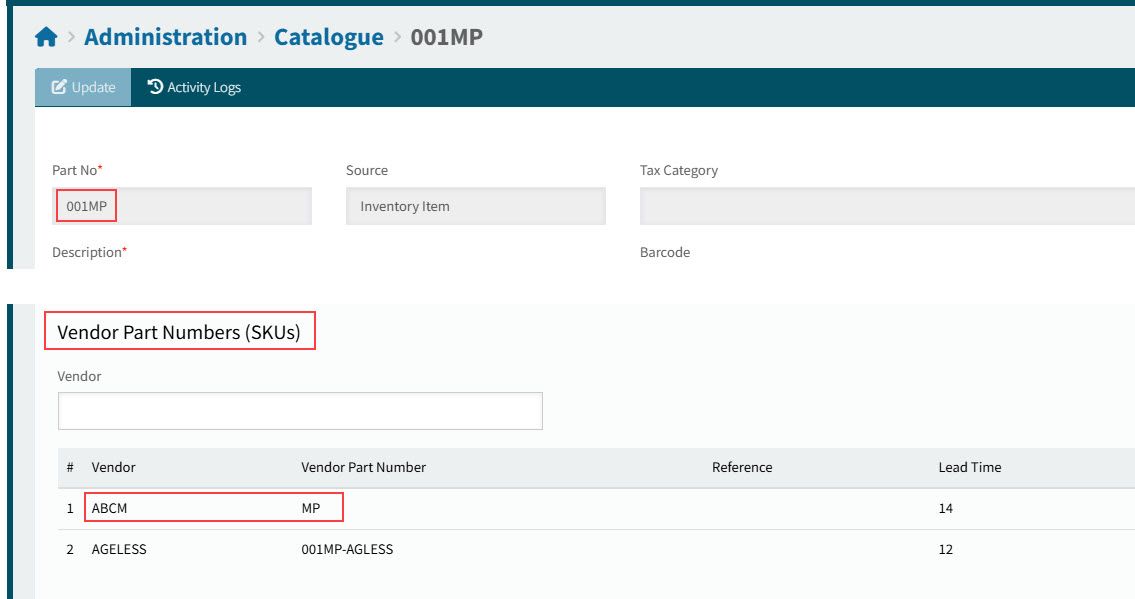
Vendor Part Numbers (SKUs) Section for Inventory Items
If you enter a Vendor Part Number as the Part Number for a non-catalogue item on a requisition, you are prompted to convert the line item to a Catalogue line item. If you accept the prompt, the catalogue Part No is used.
If you enter a Part No for a non-catalogue item on a requisition, then any cross-reference for the part is available for selection. The catalogue Part No is used.
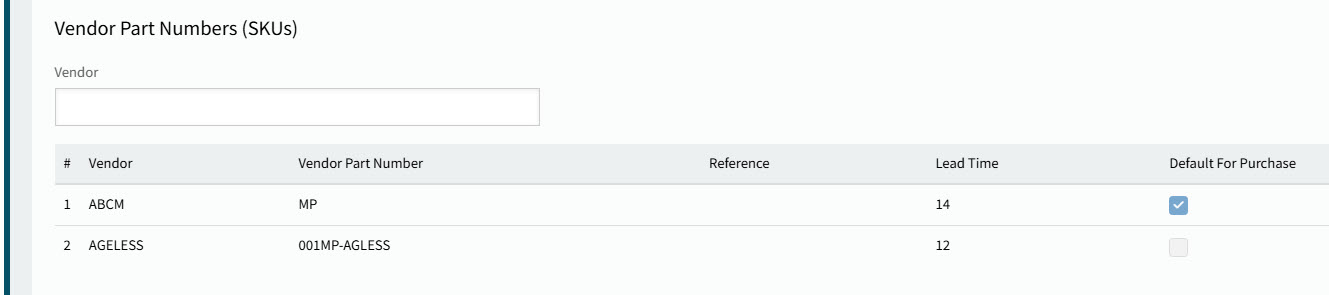
In Administration > Catalogue > [Part Number], Vendor Part Number (SKUs) are listed in the Vendor Part Numbers (SKUs) section. To filter, you can enter a Vendor (or part of) in the filter edit box.
|
|
Vendor Part Number for Inventory Item 001MP |
Maintaining the Vendor Part Number in Kinetic:
The Vendor Part Number is maintained in Kinetic’s Supplier Price List (Material Management > Purchase Management > Setup > Supplier Price List).
In Kinetic, Supplier Price List maintenance for a Supplier and Part lists the Supplier Part.
|
|
Supplier Price List in Kinetic |
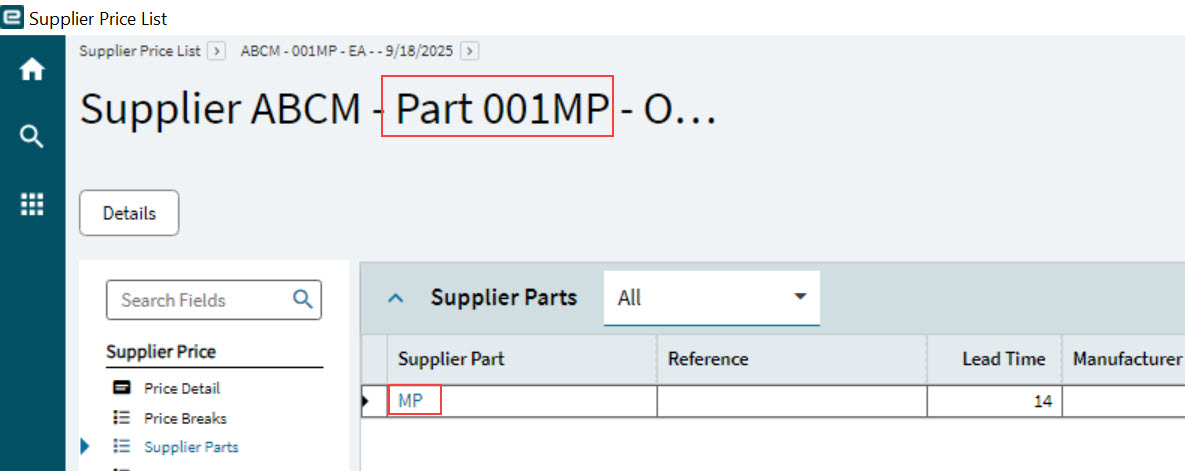
In ARM, this is the Vendor Part Number for the corresponding Part No and Vendor.
|
|
Vendor Part Numbers in ARM |
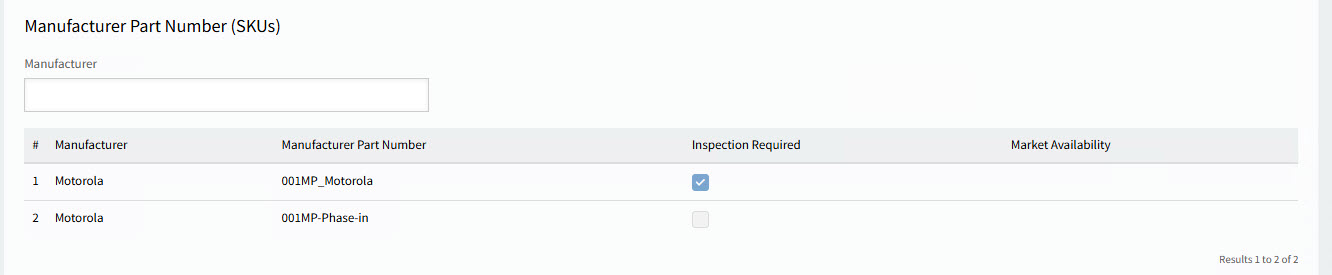
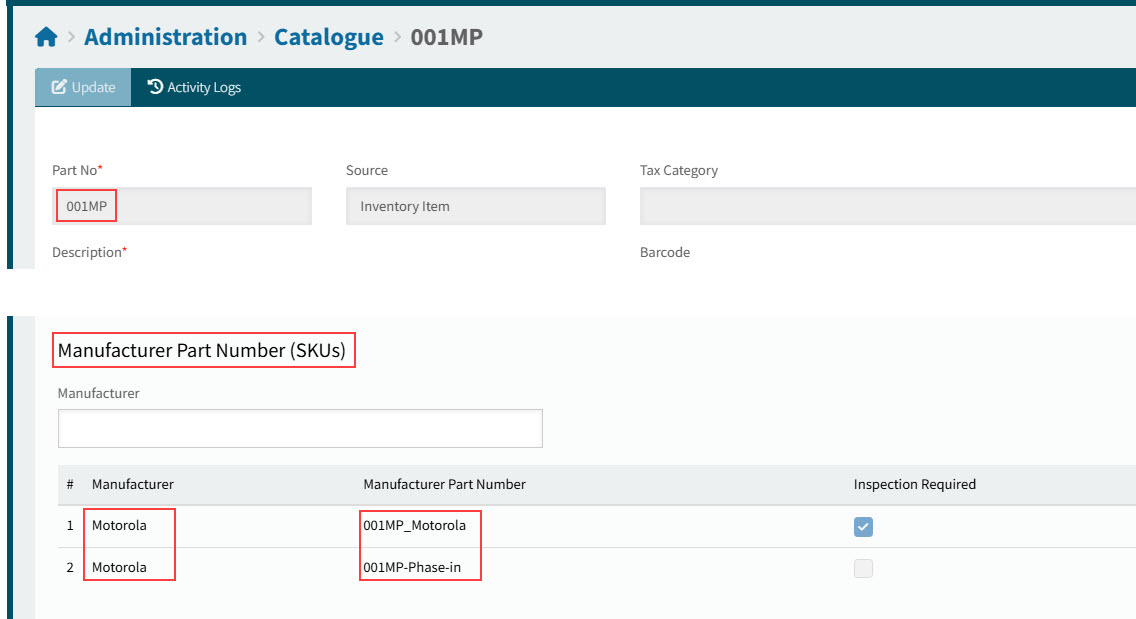
Manufacturer Part Number (SKUs) Section for Inventory Items
If you enter a Manufacturer Part Number as the Part Number for a non-catalogue item on a requisition, you are prompted to convert the line item to a Catalogue line item. If you accept the prompt, the catalogue Part No is used.
If you enter a Part No for a non-catalogue item on a requisition, then any cross-reference for the part is available for selection. The catalogue Part No is used.
In Administration > Catalogue > [Part Number], Manufacturer Part Number (SKUs) are listed in the Manufacturer Part Number (SKUs) section. To filter, you can enter a Manufacturer (or part of) in the filter edit box.
|
|
Manufacturer Part Number for Inventory Item 001MP |
Maintaining the Manufacturer Part Number in Kinetic:
The Manufacturer Part Number is maintained in Kinetic’s Qualified Manufacturer (Material Management > Purchase Management > Setup > Qualified Manufacturer).
In Kinetic, Qualified Manufacturer maintenance for a Manufacturer and Mfg Part lists the Manufacturer Part Number.
|
|
Qualified Manufacturers in Kinetic |
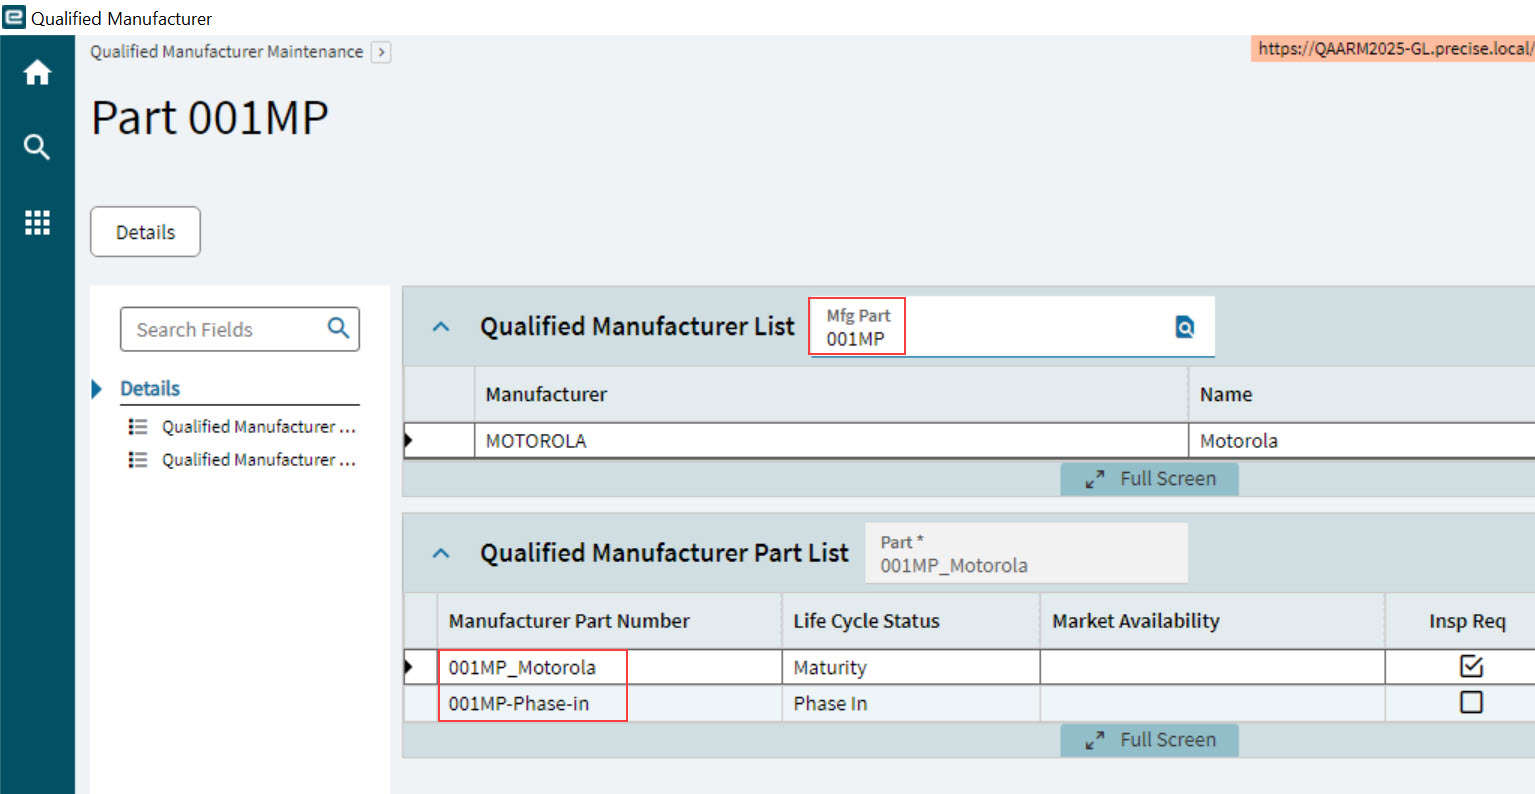
In ARM, this is the Manufacturer Part Number for the corresponding Part No and Manufacturer.
|
|
Manufacturer Part Number in ARM |
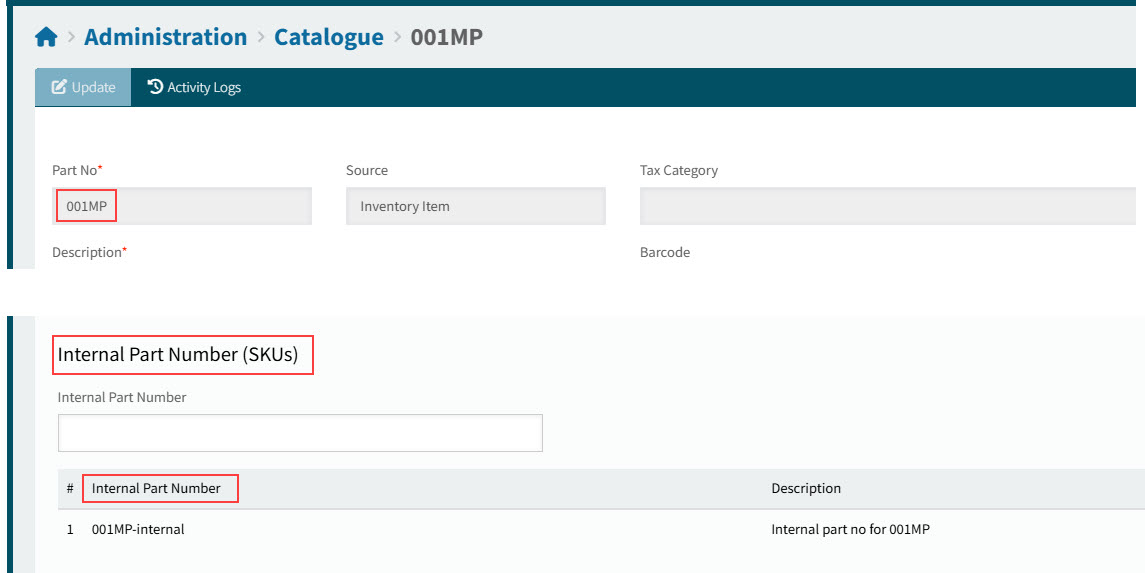
Internal Part Number (SKUs) Section for Inventory Items
If you enter an Internal Part Number as the Part Number for a non-catalogue item on a requisition, you are prompted to convert the line item to a Catalogue line item. If you accept the prompt, the catalogue Part No is used.
If you enter a Part No for a non-catalogue item on a requisition, then any cross-reference for the part is available for selection. The catalogue Part No is used.
In Administration > Catalogue > [Part Number], Internal Part Number (SKUs) are listed in the Internal Part Number (SKUs) section. To filter, you can enter an Internal Part Number (or part of) in the filter edit box.
|
|
Internal Part Number for Inventory Item 001MP |

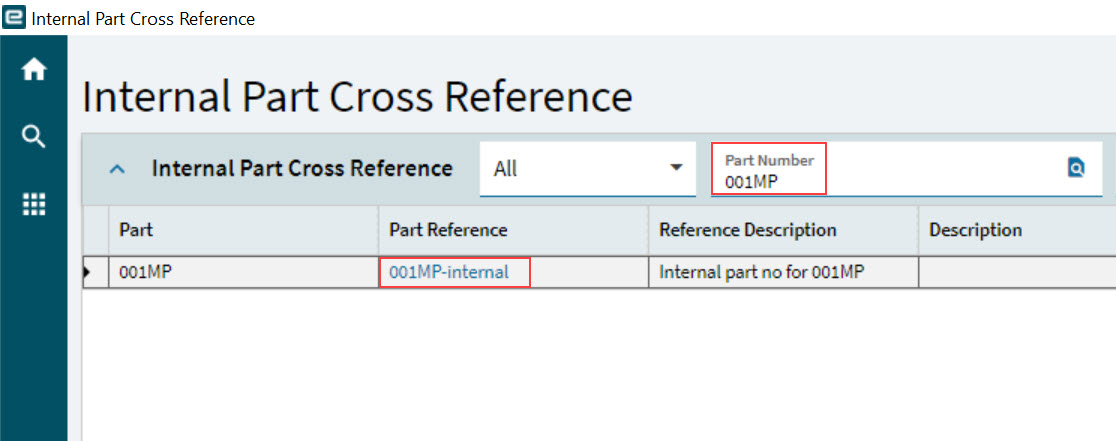
Maintaining the Internal Part Number in Kinetic:
The Internal Part Number is maintained in Kinetic’s Internal Part Cross Reference (Material Management > Inventory Management > Setup > Internal Part Cross Reference).
In Kinetic, Internal Part Cross Reference maintenance for a Part Number lists the Part References.
|
|
Part References in Kinetic |
In ARM, this is the Internal Part Number for the corresponding Part No.
|
|
Internal Part Number in ARM |
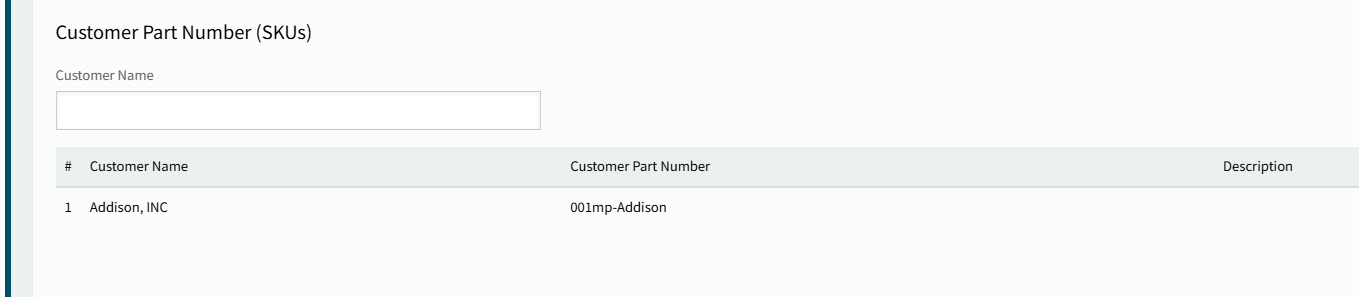
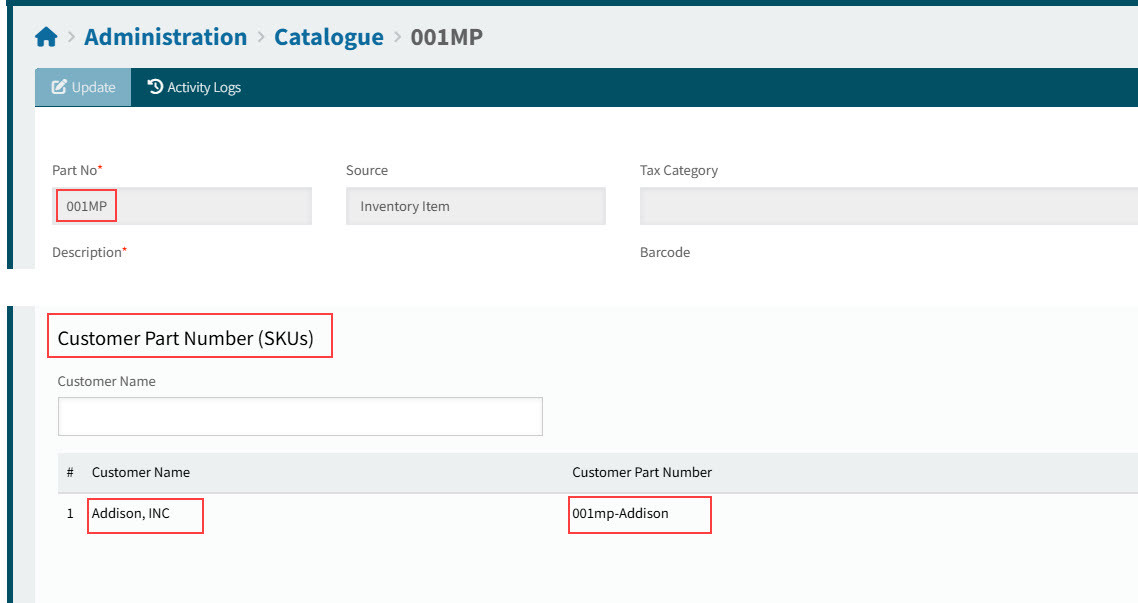
Customer Part Number (SKUs) Section for Inventory Items
If you enter a Customer Part Number as the Part Number for a non-catalogue item on a requisition, you are prompted to convert the line item to a Catalogue line item. If you accept the prompt, the catalogue Part No is used.
If you enter a Part No for a non-catalogue item on a requisition, then any cross-reference for the part is available for selection. The catalogue Part No is used.
In Administration > Catalogue > [Part Number], Customer Part Number (SKUs) are listed in the Customer Part Number (SKUs) section. To filter, you can enter a Customer Name (or part of) in the filter edit box.
|
|
Customer Part Number for Inventory Item 001MP |
Maintaining the Customer Part Cross Reference in Kinetic:
The Customer Part Number is maintained in Kinetic’s Customer Part Cross Reference (Sales Management > Order Management > Setup > Customer Part Cross Reference).
In Kinetic, Customer Part Cross Reference maintenance for a Customer ID and Part Number lists the Customer Part.
|
|
Customer Part in Kinetic |
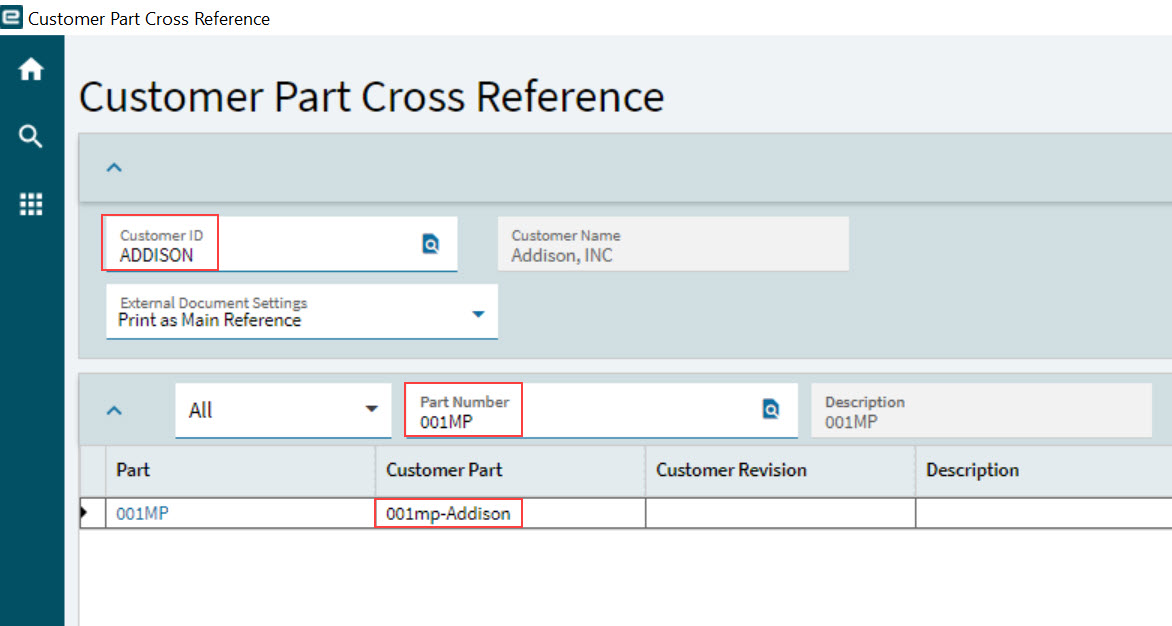
In ARM, this is the Customer Part Number for the corresponding Part No and Customer Name.
|
|
Customer Part Number in ARM |

Importing Non-Inventory Items to the Catalogue
Use the Catalogue Import function to import or update non-inventory catalogue items. Bulk updating is particularly useful for price and location updates.
| Items added here will not be integrated into the Kinetic inventory. |
You can use ARM Import File templates to create your import files. Specific rules apply to how Catalogue prices are used in a template or requisition.
-
Click Import on the Catalogue menu bar.
-
In the Templates section, download the five templates by clicking on each.
-
1. ARM Catalogue Details
-
2. ARM Catalogue Item Prices
-
3. ARM Catalogue Item Locations
-
4. ARM Location Batch Update
-
5. ARM Catalogue Item Vendor Part Numbers
-
-
Update the template files.
If your organization uses numeric vendor codes with leading zeroes, ensure the leading zeroes are saved either by maintaining the CSV import file using a text editor, or by changing the cell format for the Vendor Code column in the Microsoft Excel file to Text each time the CSV file is edited. 1. ARM Catalogue Details
This file is used to insert or update catalogue non-inventory items.
-
Open the downloaded ARM Catalogue Details file ('1 ARM Catalogue Details').
-
Enter catalogue item details.
Part Number Enter a part number of up to 30 characters. This can be a combination of numbers, letters and characters. Do not use the following characters: “ ‘ ? & * \ / < > |.
Description Enter an item description of up to 255 characters.
Category Code Enter a valid Category Code.
Tax Code Enter a valid Tax Code.
UOM Code Enter a valid UOM Code.
Allow Fractions If this item can be ordered as a fraction of the UOM enter Y. Default = Y. Options Y or N.
Image File URL Enter the URL for the image file to be displayed when a Requisitioner looks at the catalogue item details.
HS Commodity Code Enter a valid HS Commodity Code. This is the default HS Commodity Code that is used for the catalogue item, if HS Commodity Code is a requirement. See Company General Settings.
Active Enter Y to make this catalogue item visible to Requisitioners. Enter N if the item is no longer available to Requisitioners. Default = Y.
Disable GL Budget Checking If the global GL Budget Checking setting is enabled, entering Y disables GL Budget checking just for this item. Default = N.
All Locations Enter Y to make this item visible to all Locations or N to make it visible to no Locations. Default = Y.
On Update Blank means Ignore Field This column is only relevant for updates. Default = Y which means for any import fields with no value specified leave the existing catalogue item field values in ARM. N means clear the field value in ARM if it has been left blank on the import. Only non-mandatory fields can be cleared.
CompanyID Enter a valid Company ID.
*Remove All Locations This column is only relevant for updates. Default = N which means the locations currently associated with the part will remain intact. Enter Y to remove all locations associated with the part.
Vendor Code Enter a Vendor code to generate an initial Catalogue Item Price record for the part.
The default quantity will be 1 and the effective date will be today’s date. This data can be edited in the Catalogue Item Price record after import.
Price Enter a Price value to generate an initial Catalogue Item Price record for the part.
The default quantity will be 1 and the effective date will be today’s date. This data can be edited in the Catalogue Item Price record after import.
-
Save the file as a new file name. Do not use special characters, such as ? / \ | # & < > " :.
2. ARM Catalogue Item Prices
This file is used to insert or update catalogue non-inventory item prices.
-
Open the downloaded ARM Catalogue Item Prices file ('2 ARM Catalogue Item Prices').
-
Enter catalogue item price details.
Part Number Enter a valid part number.
Vendor Code Enter a valid Vendor Code.
Effective Date Enter the start date for this price.
Format [dd-mm-YYYY]
Qty Enter the minimum quantity for which this price applies.
UOM Enter the UOM that this price applies to.
Price Enter the price for each unit.
The number of decimal places is dependent upon the Epicor Configuration List Setting.
Vendor SKU Enter the vendor stock keeping unit (SKU) if known.
Note Enter a note about this price if required. Information only.
255 character limit.
-
Save the file as a new file name. Do not use special characters, such as ? / \ | # & < > " :.
3. ARM Catalogue Item Locations
This file is used to insert or update catalogue non-inventory item locations.
The file can also be used to insert/update for all locations for the specified part, if the keyword for all locations is used. -
Open the downloaded ARM Catalogue Item Locations file ('3 ARM Catalogue Item Locations').
-
Enter catalogue item location details.
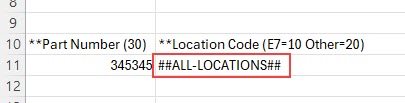
Part Number Enter a valid part number.
Location Code Enter a valid Location code.
For the insert/update to apply to all Locations for the part number, type the keyword ##ALL-LOCATIONS## for 'all locations' in the Location Code column.
Lead Time The Lead Time (in days) may affect how Due Date for Requisitions is calculated.
Tax Code Enter a Tax Code.
Preferred Vendor Code Enter a preferred vendor code.
GLAccountCode Enter a valid GL Account Code or GL Account Mask.
GL Account Mask Used in the logic for System Default for GL Account Code.
Available Y or N.
Purchase UOM Enter a valid UOM.
Used in the logic for System Default for UOM.
CompanyID Enter a valid Company Code.
-
Save the file as a new file name. Do not use special characters, such as ? / \ | # & < > " : except for the 'all locations' keyword, where you need to use the # special character.
4. ARM Location Batch Update
This file is used to insert or remove a Location (Warehouse) against all local catalogue parts in a single import line. The location must already exist in ARM.
-
Open the downloaded ARM Location Batch Update file ('4_ARM_Location_Batch_Update').
-
Enter location batch update details.
Part Number Enter a valid part number.
-
Save the file as a new file name. Do not use special characters, such as ? / \ | # & < > " :.
5. ARM Catalogue Item Vendor SKU
This file is used to insert or update catalogue non-inventory item vendor sku.
-
Open the downloaded ARM Catalogue Item Vendor Part Numbers file ('5_ARM_Catalogue_Item_Vendor_SKU').
-
Enter catalogue item details. *
-
Save the file as a new file name. Do not use special characters, such as ? / \ | # & < > " :.
-
-
Import the CSV files.
-
Ensure you import the ARM Catalogue Details file first, if the other files relate to the new catalogue items.
-
The template files must contain a number (1 thru 5) in the first row and column. This identifies the file type, for example item details or item prices.
-
Data in any of the file types must start from line 11 on. Data before line 11 will be ignored. Note that line 11 has example data for new files.
-