Purchase Orders
The Purchase Order is the final step in the Purchasing Process.
Some Purchase Orders are created automatically. To manually create a Purchase Order, see PO Creation.
To open the Purchase Orders page:
-
Select
 POs from the Side Menu to open the Purchase Orders page.
The Purchase Orders page opens.
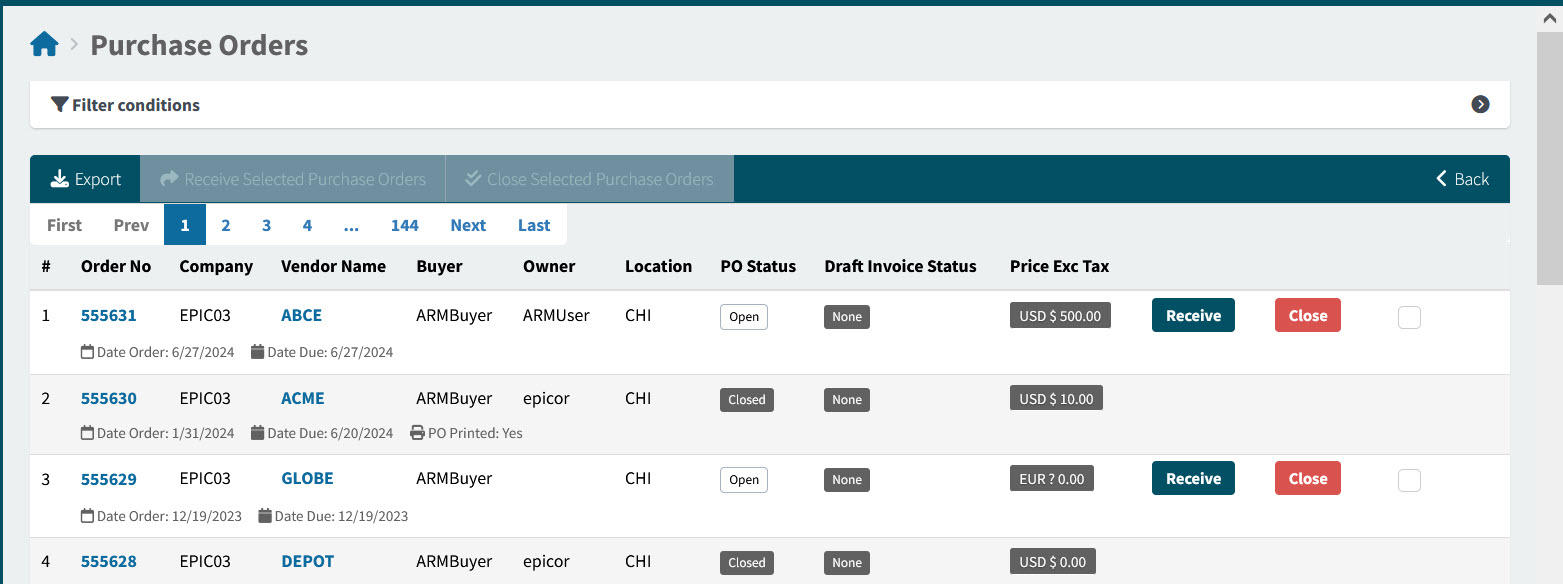
Order No The Purchase Order number. Click on the Order No to open the Purchase Order.
Company The Company that the Purchase Order belongs to.
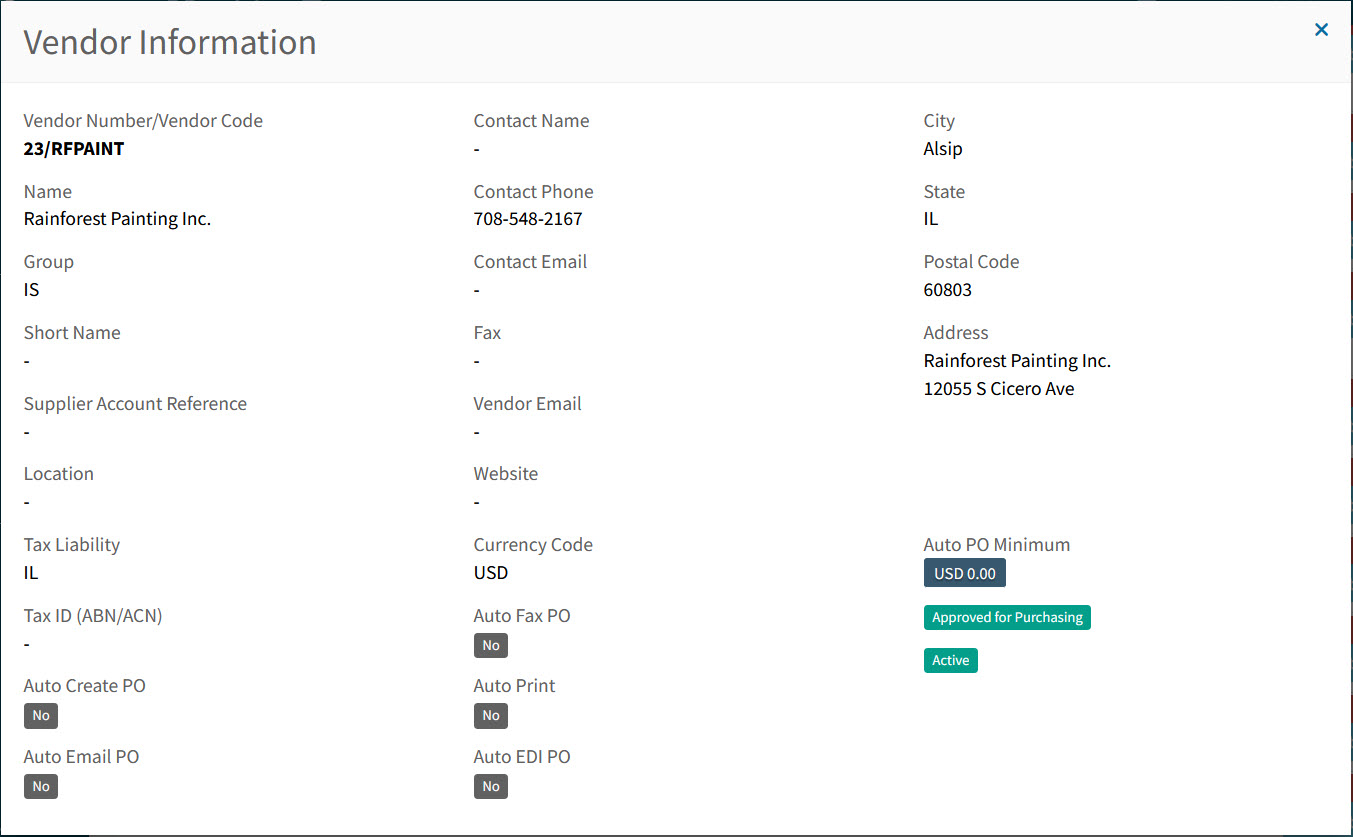
Vendor Name This is the Vendor that the Purchase Order is ordered from. Hover over a Vendor Code to view the full Vendor Name, or click on a Vendor Code to open the details in the Vendor Information pop-up screen.
Example
Buyer The Buyer can be assigned on the Requisition. If the Buyer field is blank on the Pro-Forma Order, it will default to the Buyer info on the Root Node of the relevant approval tree. This is the Buyer on the PO.
Owner The document owner. This is the User who created the document.
Location The location on the document header.
PO Status This could be:
-
Open
-
Closed
-
Hold
Draft Invoice Status This could be:
-
None
-
Awaiting Receipts
-
Awaiting Matching
Price Exc Tax This label shows the Order Total, excluding tax. The currency is included.
<buttons on the far right> Click one of the buttons or select the check box.
-
Receive
-
Close
-
Select check box.
-
-
Adjust the Search conditions.
See Details
-
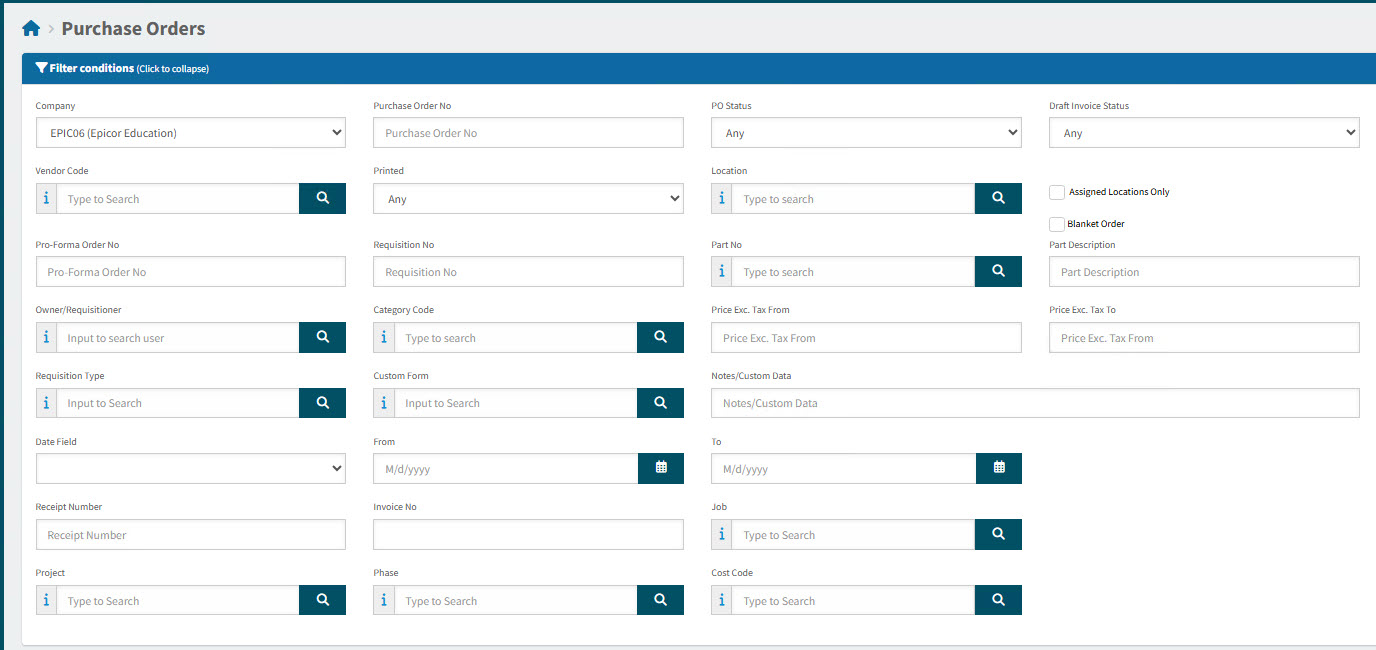
Expand the filter conditions in the top section of the page to search for a specific Purchase Order or to narrow your search.
View filter conditions
-
Enter values in the edit boxes, or select from the search boxes. See the filter conditions, below.
Filter conditions
Company Select a Company.
Purchase Order No Limits results to the PO with this number.
PO Status Select one of the following status values from the drop-down list:
-
Any
-
Open
-
Closed
-
Hold
Draft Invoice Status Select one of the following status values from the drop-down list:
-
Any
-
None
-
Awaiting Receipts
-
Awaiting Matching
Vendor Code Limits results to PO’s for this Vendor.
Printed Limits results to PO’s with a matching Print Status.
Location Limits results to PO’s with this Location.
Assigned Locations Only Select this check box to filter on documents with Locations assigned to your User Profile.
Blanket Order Limits results to PO’s that are belong to a Blanket Order.
Pro-Forma Order No Limits results to PO’s originating from this Pro-Forma Order.
Requisition No Limits results to PO’s originating from this requisition number.
Part No Limits results to PO’s that include this part number.
Part Description Limits results to PO’s that include this part description.
Owner/Requisitioner The document owner.
Category Code Limits results to PO’s with a line that has that category code.
Price Exc. Tax From Limits results to PO’s with a Price Exc. Tax for at least this amount.
Price Exc. Tax To Limits results to PO’s with a Price Exc. Tax for up to this amount.
Custom Form Search for PO’s originating from a requisition with this custom form.
Notes/Custom Data Search for PO’s where a note or custom data contains this text.
Date Field Select Order Date, or Due Date, then select a date range with From and To dates. The PO Order Date/ the PO Due Date must fall within the date range.
ERP PO Number Limits results to PO with a matching ERP PO Number.
Receipt Number Limits results to PO with matching receipt number.
Invoice No Limits results to PO with matching invoice number.
Job Limits results to PO’s with a line that includes the job.
Project Limits results to PO’s with a line that includes the project.
Phase First select a Project. The Phase limits results to PO’s with a line that includes the project and phase.
-
Purchase Orders that match the search conditions are listed in the grid.
-
Purchase Orders Header Menu
On the Header Menu Bar you can perform the following:
Header Menu Bar

 Attachments
-
Use this function to upload files. See Adding Attachments to Header.
The Global Setting Attachment Upload File Filter stores the file types that can be uploaded as Attachments.
- Notes
-
Use this function if you want to add multiple Internal notes, or a single External note. Notes can be deleted if you have the permission Can Delete Own Internal Notes or Can Delete Any Internal Note. See Adding Notes.
 Tracker
-
Click to view the Tracker for this document. Read more about Trackers.
 View
View-
Downloads a copy of the document that can be printed off. Only enabled once the document has one or more lines.
 Docket
-
Downloads a copy of the Delivery Docket.
 Back
Back-
Click Back to return to the search page.
Purchase Orders Footer Menu
Footer Menu

| Save & Close |
Save the current changes and return to the previous page. |
| Save |
Click this button to apply the changes and keep the form open. |
| Refresh |
Click this button to refresh unsaved data. |
Purchase Order Functionality
-
Adding a Change Order. See Change Order.
-
Editing a Purchase Order. See Editing a Purchase Order.
-
Adding an Append Order. See Append Order.
-
Including a Signature on Purchase Orders. See Signature On Purchase Orders.
-
Overdue Purchase Orders. See Overdue Purchase Orders.
-
For Receiving, Closing, View Receipts, and View Send to Supplier History see Receiving Functions.
-
See how to search for Purchase Orders. See Searching for a Purchase Order.
Change Order
Use Change Order functionality to make changes to Open Purchase Orders (with or without partial receipts).
| Change Order is currently not supported for Blanket Orders, or Purchase Orders with split GL lines. |
Permissions
The permission Can Perform Change Order is required. Users with this permission can perform a Change Order for POs within their authority.
Initiating the Change Order
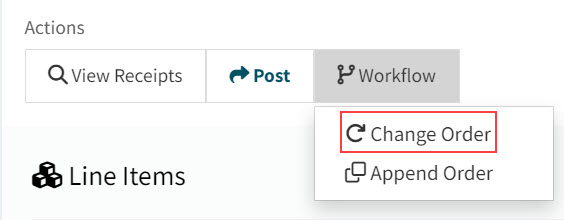
To initiate a Change Order, select  Change Order from the
  Workflow Actions menu for the Purchase Order.
|
When a change order is initiated:
-
A new linked Requisition is created with the header, line and receipt detail copied over from the Purchase Order.
-
The Purchase Order status changes from 'Open' to 'Change Order in Progress'. (Open lines on the affected original purchase order are not locked and may not be received or invoiced.)
Making Updates to the Header
Header details can be changed, including Requisition Types if these are in use. The Buyer field is non-editable, where Buyer Mapping is enabled and in use.
Making Updates to Existing Lines
The existing lines can be altered or deleted.
| Lines with Onetime Vendor data populated will display the values but cannot be edited. |
After Submission
-
The submitted Requisition requires approval under the standard approval tree process.
-
After the Requisition is approved, the resulting Pro Forma Order displays a new action titled Merge Order, under the Workflow menu.
To merge the change order, select Merge Order from the
Workflow Actions menu for the Pro-Forma Order.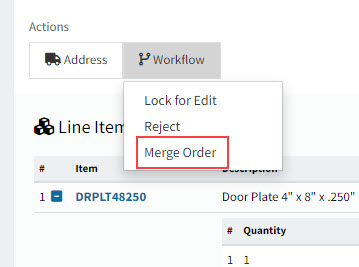
Merge Order merges the changes back to the original Purchase Order. The status of the Purchase Order returns to 'Open'.
Any lines that are added through the Change Order process that hold a different Vendor or Location to the original PO will adhere to the PFO Combining logic, contained in the PFO Combining setting (see Line Level Locations in the Global Settings section).
Auto Send
Users can configure Change Orders to be sent automatically or manually.
There are two settings controlling Auto Send, in Global Settings in the Defaults Group.
- Default Allow Auto Send for Change Order
-
Specifies the default value for the Allow Auto Send check box in a Requisition created from Change Order.
- Default Allow Auto Send for PO
-
Specifies the default value for the Allow Auto Send check box in new Requisitions.
Other
Change Orders will now be merged into the original Purchase Order (no new PO will be created).
Deleted Change Order lines will be treated as a ‘closed’ lines in the merging process.
For the approval process, the Change Order approval value will include the receipted total if Include Received Lines in Change Order Approvals is set to Yes, in the Requisition Document Type Configuration, otherwise not.
Editing a Purchase Order
A Purchase Order can be edited unless it is already Closed.
Permissions
To edit these fields, users need permission to receive a Purchase Order.
Company Settings
- Ship Via is Required for Purchase Orders
-
Specifies whether Ship Via is Required for Purchase Orders.
You can update the following fields on the Purchase Order header. There is two-way integration for these fields.
- Confirmed
-
This is selected by default, if the Vendor has Auto Confirm PO selected. Confirmed indicates if the purchase order has been confirmed for shipment.
- Promise Date
-
Optionally select a Promise Date from the date picker.
This is the date by which the Vendor has promised to ship the entire purchase order.
Append Order
You can append a new Requisition to an open Purchase Order (with or without partial receipts), if you have the permission for this.
Permissions
The permission Can Append to Open Purchase Orders is required. Users with this permission can append to open Purchase Orders. See Permissions in ARM.
Append Order works in the same way as a Change Order, except that you can:
-
Receive and Invoice Open Lines
-
Append Multiple Orders
Receiving and Invoicing Open Lines
Open lines (that are not locked) on the original Purchase Order can be received and invoiced while the Append Order is in progress.
Multiple Append Orders
Multiple Append Orders can be created and be in progress simultaneously, against the same Purchase Order.
Initiating the Append Order
You can initiate an Append Order from two places:
-
From the Requisitions > Add New page
-
From the open Purchase Order that you want to append to, on the Purchase Orders page.
Initiating the Append Order from the Requisitions Page
-
Create a new Requisition document.
-
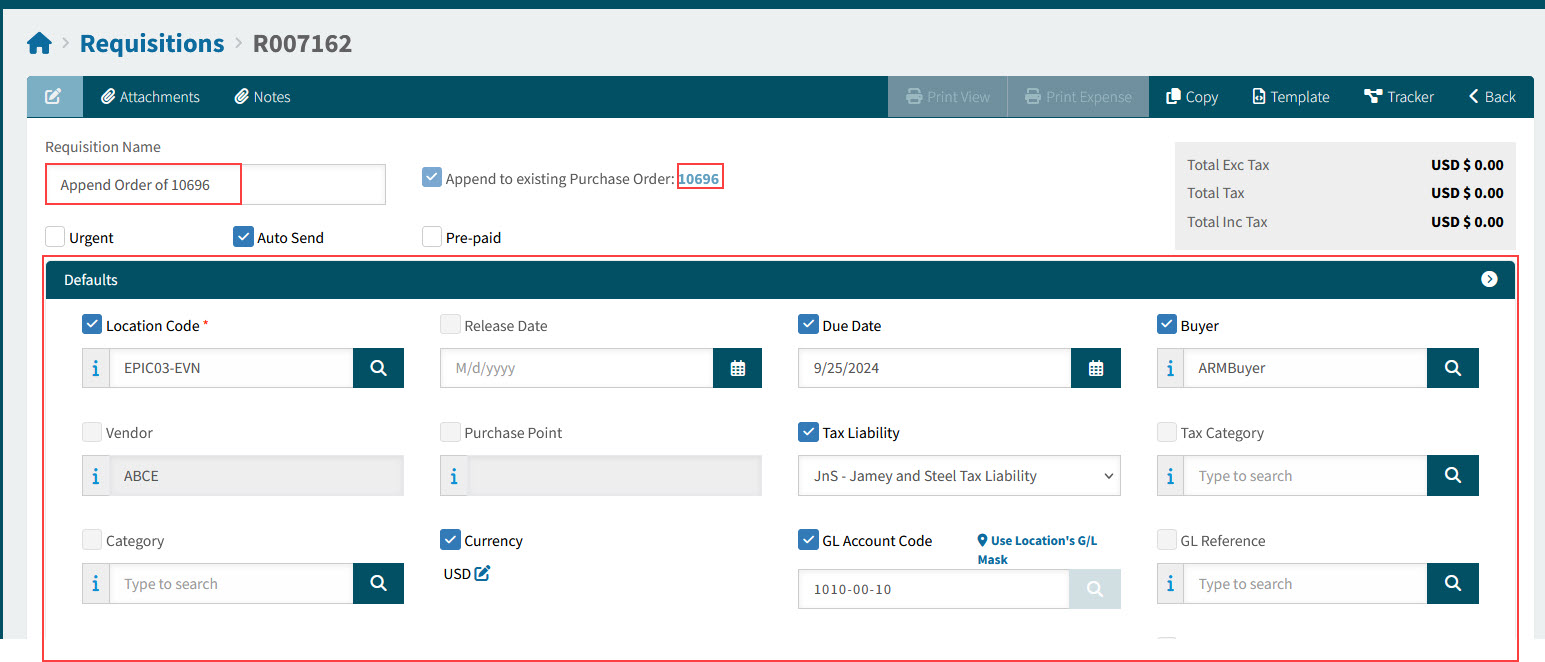
Select Append to existing Purchase Order.
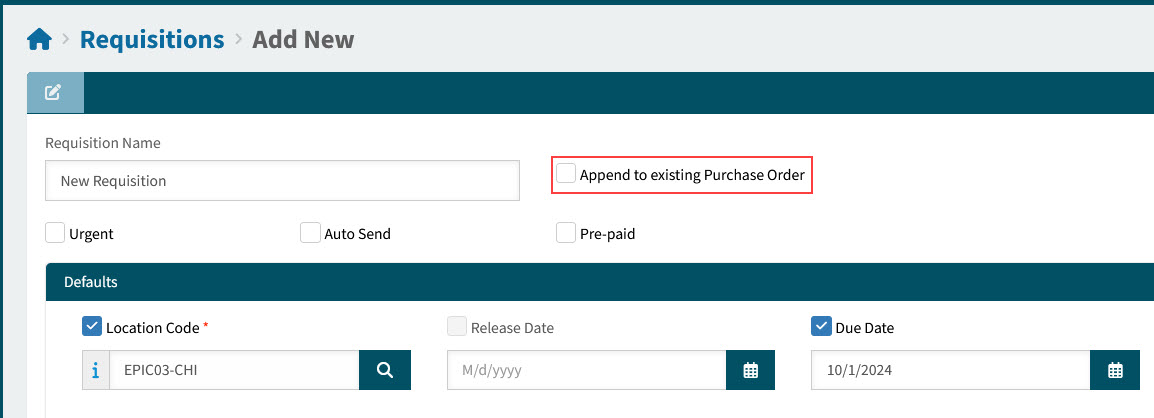
The Purchase Order pop-up screen opens, displaying open Purchase Orders (with or without partial receipts).
-
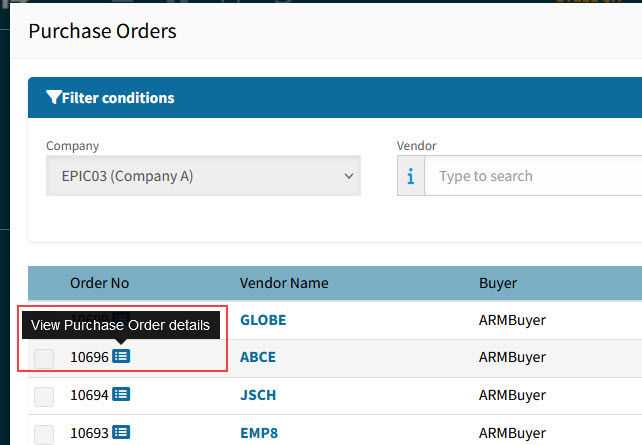
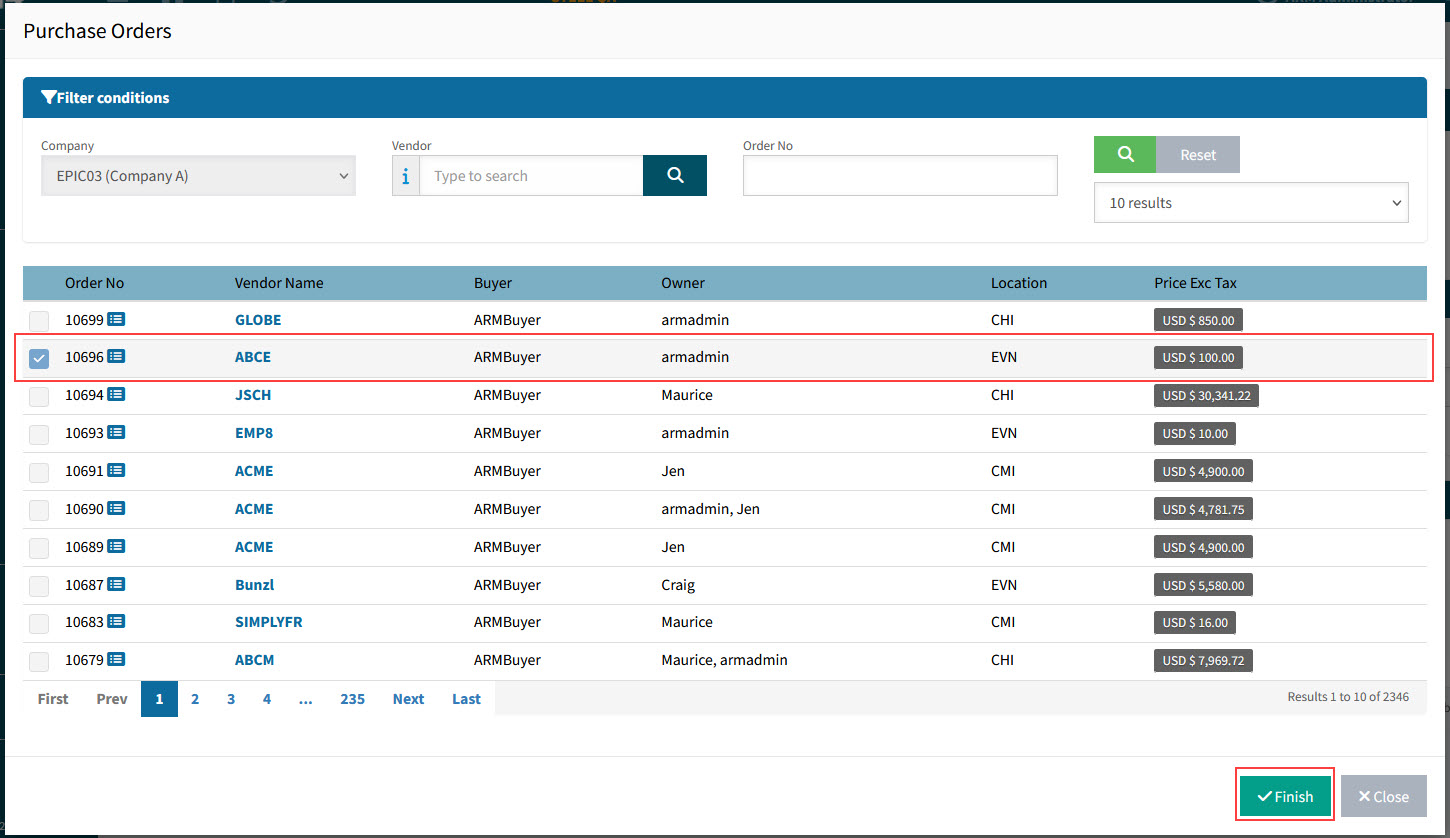
Select a Purchase Order from the Purchase Order pop-up.
Selecting a Purchase Order:
-
Select filter conditions and
 search.
 -
Select the purchase order from the search results grid.
You can also view the Purchase Order details, if you select the
 button next to the Order No.
Details
-
Select
 Finish.
Details
A new Requisition is created, with the name "Append Order of [PO number]". All other header details are copied, such as the Location Code, Release Date, Buyer, and Due Date.
Details
-
Initiating the Append Order from the Purchase Order Page
-
Open the Purchase Order you want to append to.
-
Select
 Append Order from the Workflow Actions menu.
Details
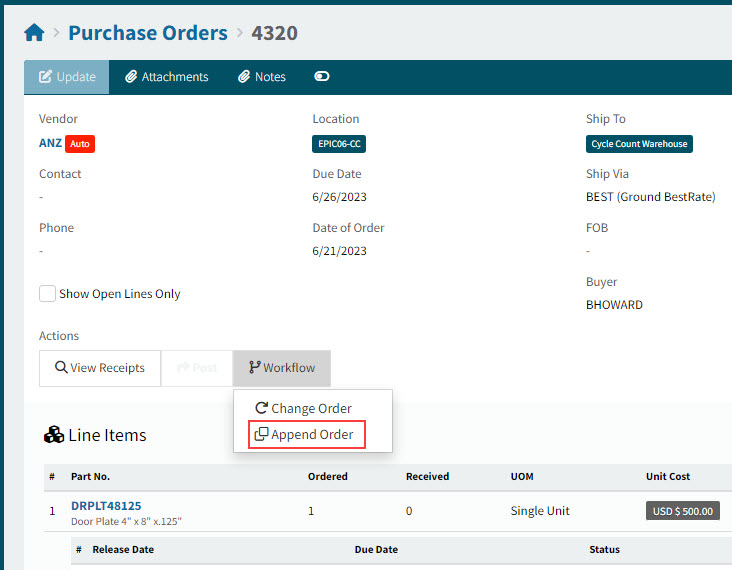
A new Requisition is created, with the name "Append Order of [PO number]". All other header details are copied, such as the Location Code, Release Date and Due Date.
Updating and Submitting the New Requisition
-
Add Line Items to the new Requisition. Note that the Vendor/Supply Loc. of the original Purchase Order is the one used as the Vendor/Supply Loc. for each line item.
-
Submit the new Requisition when ready.
-
The submitted Requisition requires approval under the standard approval tree process.
-
After the Requisition is approved:
-
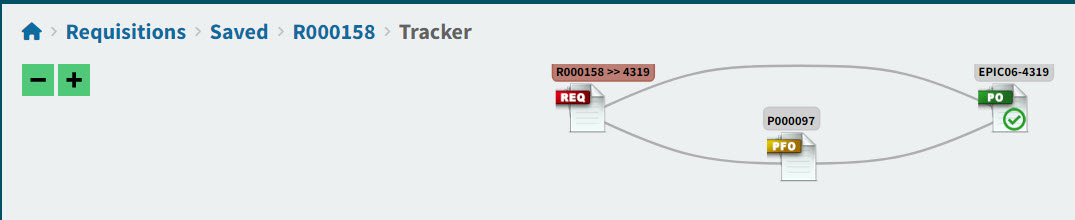
The new requisition line items are appended to the original Purchase Order, if Auto PO is selected for the Vendor.
See the Tracker for the details:
-
A Pro-Forma Order is created, if Auto PO is not selected for the Vendor. You can merge the new PFO to the PO.
-
-
Merging the PFO
If the submitted Requisition goes through the PFO stage first, you will need to merge the Order to the original Purchase Order.
Merging the PFO
-
Open the Pro_Forma Order.
-
Select Merge Order from the Workflow action.

-
Select Yes at the confirmation dialogue "You are about to create a purchase order from this Pro-forma Order".
The Pro-Forma status is 'PO Created' and the items from the Pro-forma Order are appended to the original Purchase Order.
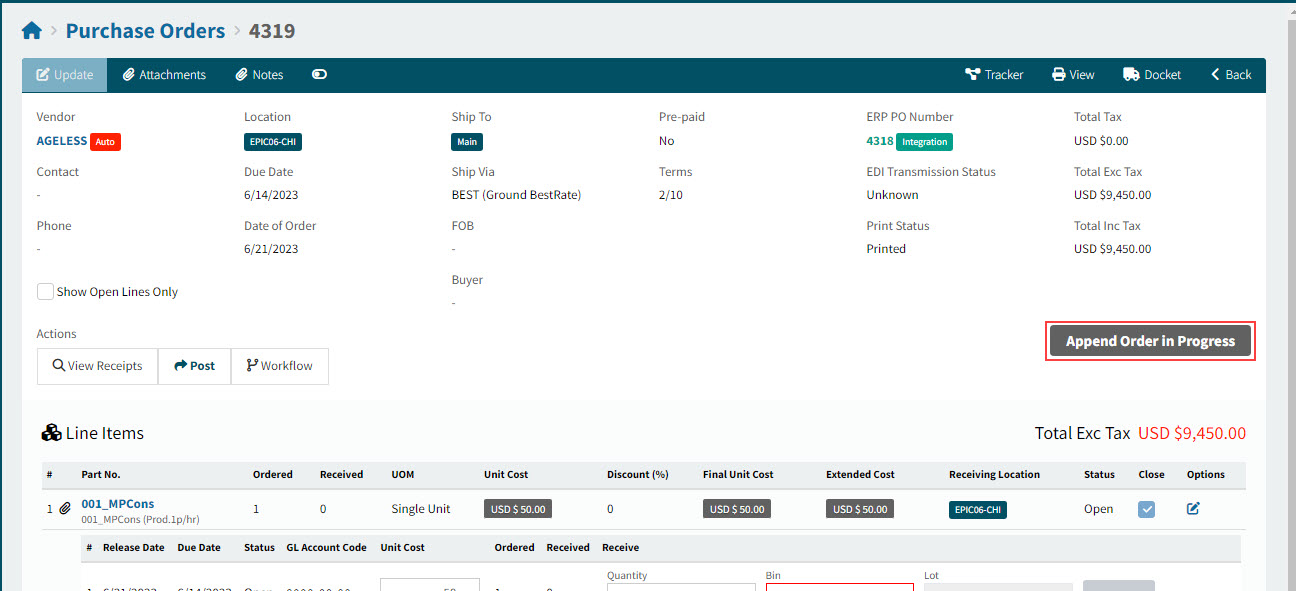
The Purchase Order
The Purchase Order now includes the new requisition lines and has a status of 'Append Order in Progress'.
See Details
| You may not initiate a Change Order while there are Append Orders in progress. If you attempt this, you will receive a message and will not be able to proceed with a Change Order. You may continue to initiate further Append Orders. |
Continue with Receiving and Invoice the Purchase Order, as you would normally do.
Signature on Purchase Orders
An image file of the signature of the Purchase Order Creator can be included on the Purchase Order report.
Users can upload a scanned signature file of type .jpeg, .gif, or .png to their ARM User’s details, for this purpose. See Maintaining Users - Information tab for details on uploading a Signature File.
Overdue Purchase Orders
If a Purchase Order is overdue, you may supply a reason on the Purchase Order Line.
-
Open the Purchase Order Line.
-
Select an Overdue Reason from the drop-down list.
This populates the Overdue Reason Description.
-
Click the little tick next to the Overdue Reason to save.

| The Overdue Reasons list is maintained in Value Lists by the Administrator. See Value Lists. |
Purchase Order Due Date
A Purchase Order is overdue if its Due Date is earlier than the current date.
When the Purchase Order is created its Due Date defaults to the current date plus the number of days specified in the Global setting Due Date Days from Today.
Notifying the Requisition Owner
As soon as a PO Receipt is overdue, a notification is sent to the Requisition owner, provided the setting Notify Req Owner When PO Receipt is Overdue is enabled. This setting is maintained by the Administrator in Scheduled Jobs. See Scheduled Jobs.
Searching for a Purchase Order
-
Select
POs from the Side Menu to open the Purchase Orders page.The Purchase Orders page opens.
-
Adjust the Search conditions.
See Details
-
Expand the filter conditions in the top section of the page to search for a specific Purchase Order or to narrow your search.
View filter conditions
-
Enter values in the edit boxes, or select from the search boxes. See the filter conditions, below.
Filter conditions
Company Select a Company.
Purchase Order No Limits results to the PO with this number.
PO Status Select one of the following status values from the drop-down list:
-
Any
-
Open
-
Closed
-
Hold
Draft Invoice Status Select one of the following status values from the drop-down list:
-
Any
-
None
-
Awaiting Receipts
-
Awaiting Matching
Vendor Code Limits results to PO’s for this Vendor.
Printed Limits results to PO’s with a matching Print Status.
Location Limits results to PO’s with this Location.
Assigned Locations Only Select this check box to filter on documents with Locations assigned to your User Profile.
Blanket Order Limits results to PO’s that are belong to a Blanket Order.
Pro-Forma Order No Limits results to PO’s originating from this Pro-Forma Order.
Requisition No Limits results to PO’s originating from this requisition number.
Part No Limits results to PO’s that include this part number.
Part Description Limits results to PO’s that include this part description.
Owner/Requisitioner The document owner.
Category Code Limits results to PO’s with a line that has that category code.
Price Exc. Tax From Limits results to PO’s with a Price Exc. Tax for at least this amount.
Price Exc. Tax To Limits results to PO’s with a Price Exc. Tax for up to this amount.
Custom Form Search for PO’s originating from a requisition with this custom form.
Notes/Custom Data Search for PO’s where a note or custom data contains this text.
Date Field Select Order Date, or Due Date, then select a date range with From and To dates. The PO Order Date/ the PO Due Date must fall within the date range.
ERP PO Number Limits results to PO with a matching ERP PO Number.
Receipt Number Limits results to PO with matching receipt number.
Invoice No Limits results to PO with matching invoice number.
Job Limits results to PO’s with a line that includes the job.
Project Limits results to PO’s with a line that includes the project.
Phase First select a Project. The Phase limits results to PO’s with a line that includes the project and phase.
-
Purchase Orders that match the search conditions are listed in the grid.
-