Editing a Manually Created Draft Invoice
A manually created draft invoice does not have suggestions shown in drop-down lists, as the auto-created one does.
| For automatically generated draft invoices, see Editing an Automatically Generated Draft Invoice. |
-
To open a manually created Draft Invoice, click on the File Name.
View Draft Invoices page
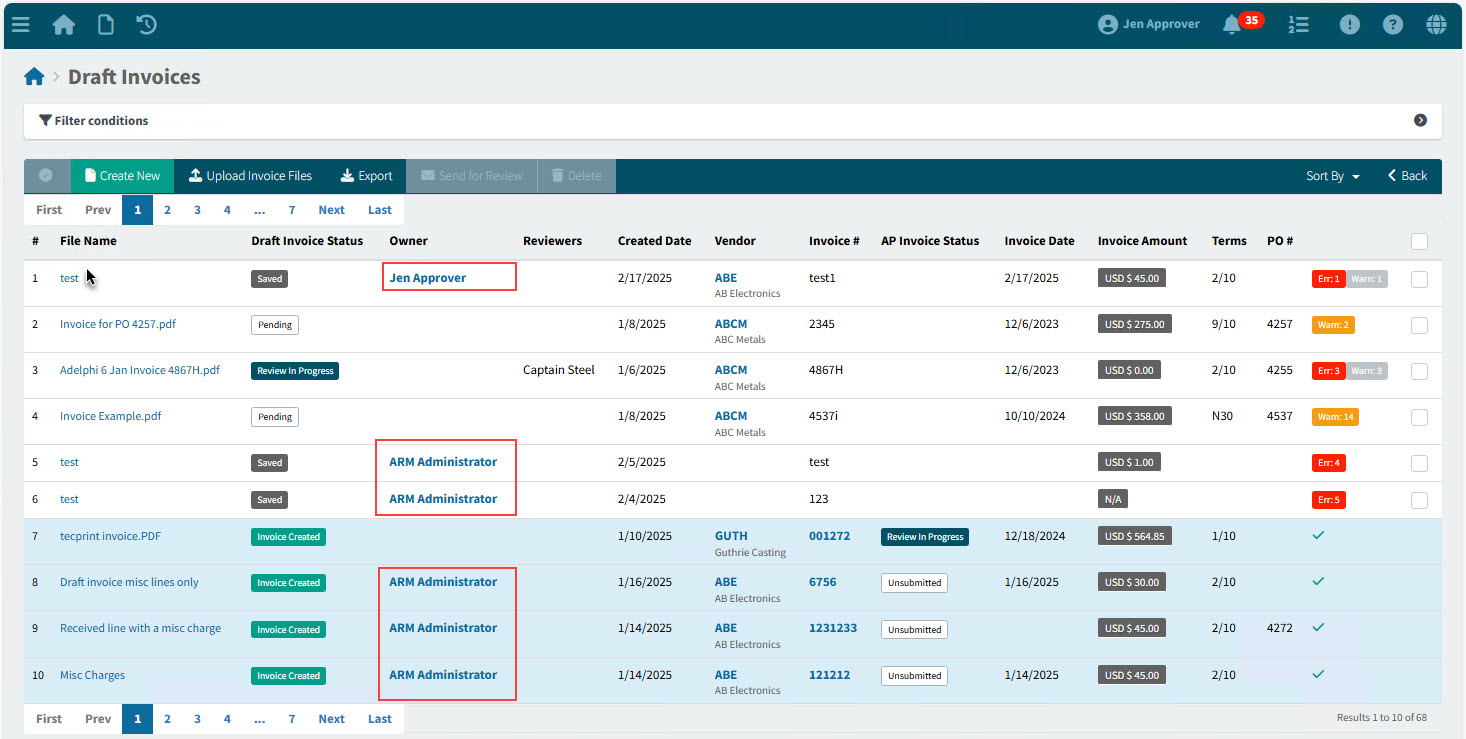
Identify Draft Invoices that were automatically generated by those missing the Owner field. The Draft Invoices > [File Name] page opens.
-
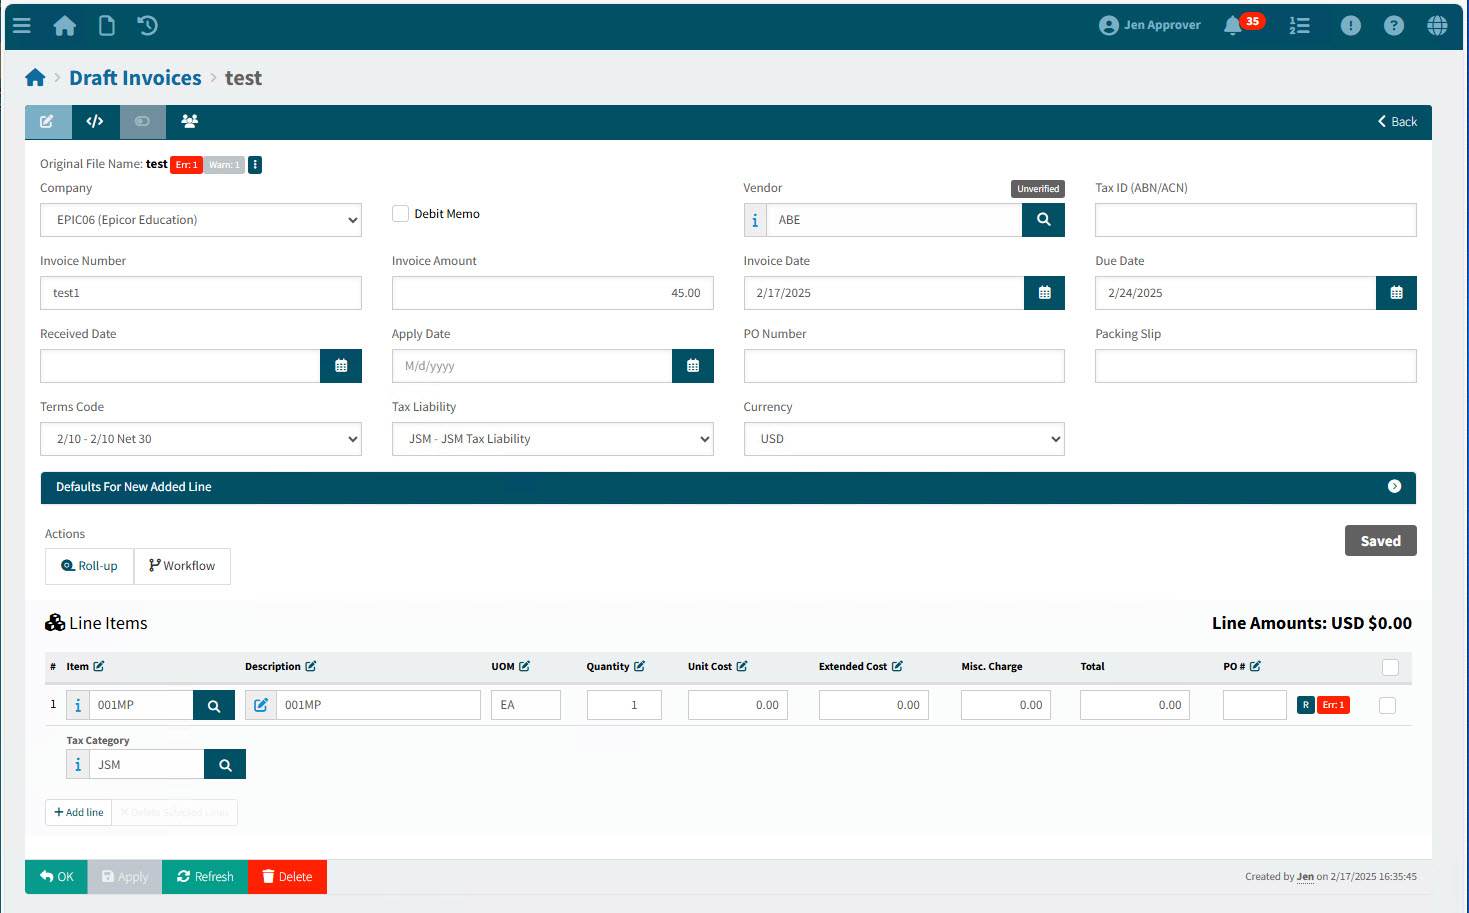
Edit the Invoice Header fields.
Header Details
- Description
-
Optionally enter a description.
- Company
-
Select a Company from the drop-down list.
- Site
-
Select from the available sites.
Note: Only your assigned sites that also belong to the selected Company are available for selection.
- Debit Memo
-
If this is a Debit Memo, select the Debit Memo check box.
- Vendor
-
Select the Vendor who sent the Invoice.
Verified Tag
If Smart Risk Analysis is used, a verification tag is displayed above the Vendor:
-
Unverified
-
Self-verified
-
Verified
See Verified Vendors
Only Vendors belonging to your assigned Vendor Groups are available for selection. -
- Tax ID (ABN/ACN)
-
The Tax ID (ABN/ACN) is verified against the Vendor’s Tax ID (ABN/ACN), if this is available on the Vendor maintenance page. If there is no match, a Warning is raised.
- Invoice Number
-
The Invoice Number as it appears on the original Invoice.
- Invoice Amount
-
The Total Due, as it appears on the original Invoice.
- Invoice Date
-
The Date on the original Invoice. This could be an Invoice Date, or a Billing Date.
Note: There is no Invoice Date if you select the Debit Memo check box.
- Due Date
-
Enter a Due Date. This could appear as the Due Date, or the Ship Date/ Shipment Date on the original Invoice.
Note: There is no Due Date if you select the Debit Memo check box.
- Received Date
-
Enter the Received Date, if known. This could also appear as the Date on the original Invoice.
- Apply Date
-
Enter the Apply Date, or select System Default. The Apply Date defines the date used to book journals created from the transactions, in Kinetic.
- Apply Date
-
This enters the current date into Apply Date.
For AP Invoices, the date at final approval will be recorded against the invoice.
- PO Number
-
Enter the PO Number as it appears on the original Invoice.
- Packing Slip
-
Enter the Packing Slip number if it appears on the original Invoice.
If you are editing an automatically generated draft invoice: For Vendors that have Never Use a PO as their Automation Matching Requirements (see Matching Requirements), the PO Number and Packing Slip do not appear on the header.
- Terms Code
-
The Vendor Terms populates this field when you select the Vendor. Check that this is the same as the Terms that appears on the original Invoice.
- Tax Liability
-
The Vendor Tax Liability populates this field when you select the Vendor.
- Currency
-
The Vendor Currency populates this field when you select the Vendor. If possible, check that this is the same as the Currency on the original Invoice.
- Custom Data fields
-
Custom fields will display on the Draft Invoice page, provided the company setting AP Invoice Header’s Custom Data has a value. The custom field values are transferred from the Draft Invoice to the AP Invoice.
Example of Custom Data Fields
- Reference No
-
Optionally enter a reference number for the invoice.
- Remark
-
Optionally add a remark for the invoice.
-
Optionally update the Document Defaults. See Setting Document Defaults.
-
Edit one or more Line Items.
Line Items
Item Select an item from the Item drop-down list, or click the
 Search button to open the Catalogue Search pop-up.
Description The item’s Description from the Catalogue is displayed here. To edit the Description, click on the
 edit button to the left of the edit box and update the contents of the pop-up, or edit a short Description directly in the edit box.
UOM This defaults to the item’s Standard UOM. To update the UOM, clear the edit box, then select from the drop-down list.
Quantity This defaults to 1. Update in the edit box.
Unit Cost This defaults to 0.00. Update in the edit box.
Extended Cost This updates to the Unit Cost multiplied by the Quantity when the line is saved. Alternatively, update the Extended Cost. The Unit Cost updates to the Extended Cost divided by the Quantity.
Misc. Charge Enter a Misc. Charge if applicable.
Total This updates the Extended Cost plus the Misc. Charge when the line is saved.
PO # For Receipt Lines (R), you need to enter a PO#.
 or
or 
You can switch the line type between Misc and Receipt, depending on what is permissible for this document. See Receipt Lines and Miscellaneous Lines - Restrictions.
Tax Category If you have a Document Default Tax Category, then this is selected, otherwise the System Default Tax Category is selected.
If you select a Tax Category, this clears the System Default check box.
- Tax Category
-
For Catalogue items, the Tax Category defaults to the first available of:
-
The Tax Category for the Catalogue item for the Location matching the Receiving Location Code
-
The Tax Category for the Catalogue item
-
The Tax Category for the Catalogue’s Category
-
The Default Product Tax Category Code defined in Company Settings.
For items not in the Catalogue, the Tax Category defaults to the Default Product Tax Category Code defined in Company Settings.
-
HS Commodity Code Overwrite the HS Commodity Code, if necessary. This field is required if the Company General Setting for HS Commodity Code Required setting is Yes.
Location Select a Location. This field applies to Miscellaneous Lines (M) only.
If the header has a Site, then only Locations belonging to this site can be selected. If there is a discrepancy between Site and Location, then a warning is raised.
Category Select a Category. This field applies to Miscellaneous Lines (M) only.
-
Optionally add or remove line items. See Add one or more invoice Line Items.
-
Save your changes.
-
Apply updates to the line, as necessary. See Apply updates to line items.