PFOs
When a requisition has completed its path through the approval process (i.e. its status is Approved), the items on the requisition are automatically included on one or more Pro-Forma Orders (PFOs).
Pro-Forma Orders are created automatically, following a set of rules that determine combining and splitting. See Pro-Forma Order Creation Rules.
To work with PFOs:
-
Select
 PFOs from the Side Menu to open the Pro-Forma Orders page. See Side Menu.
The Pro-Forma Orders page opens.
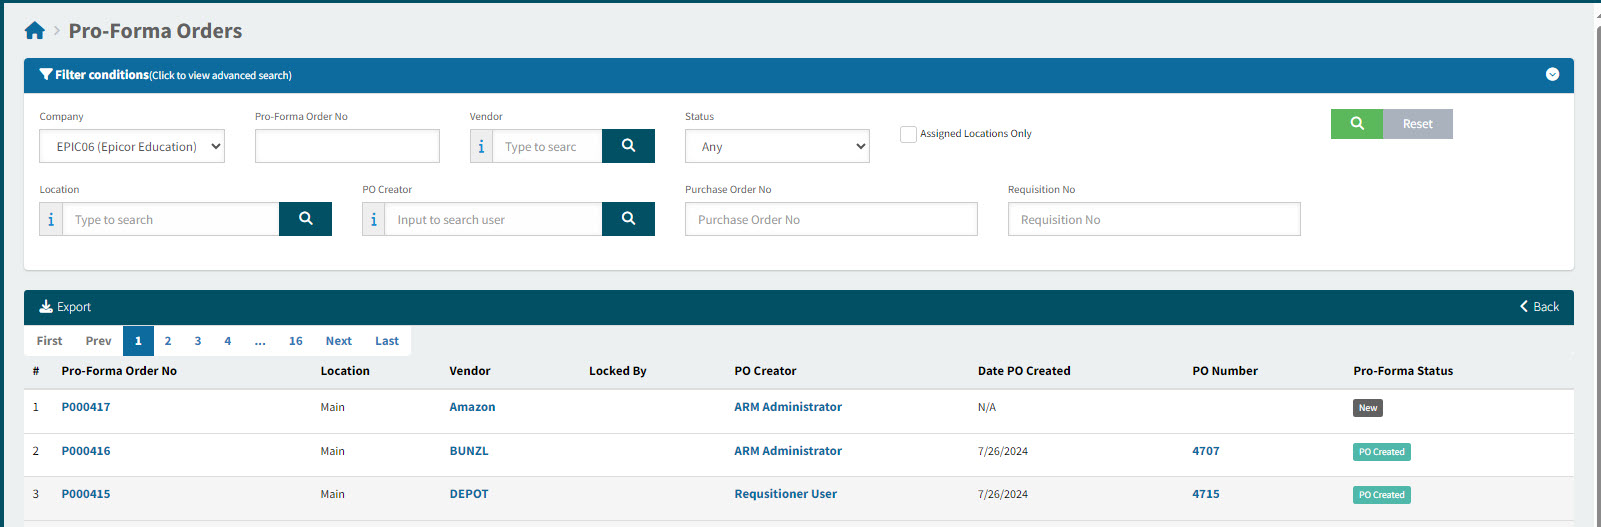
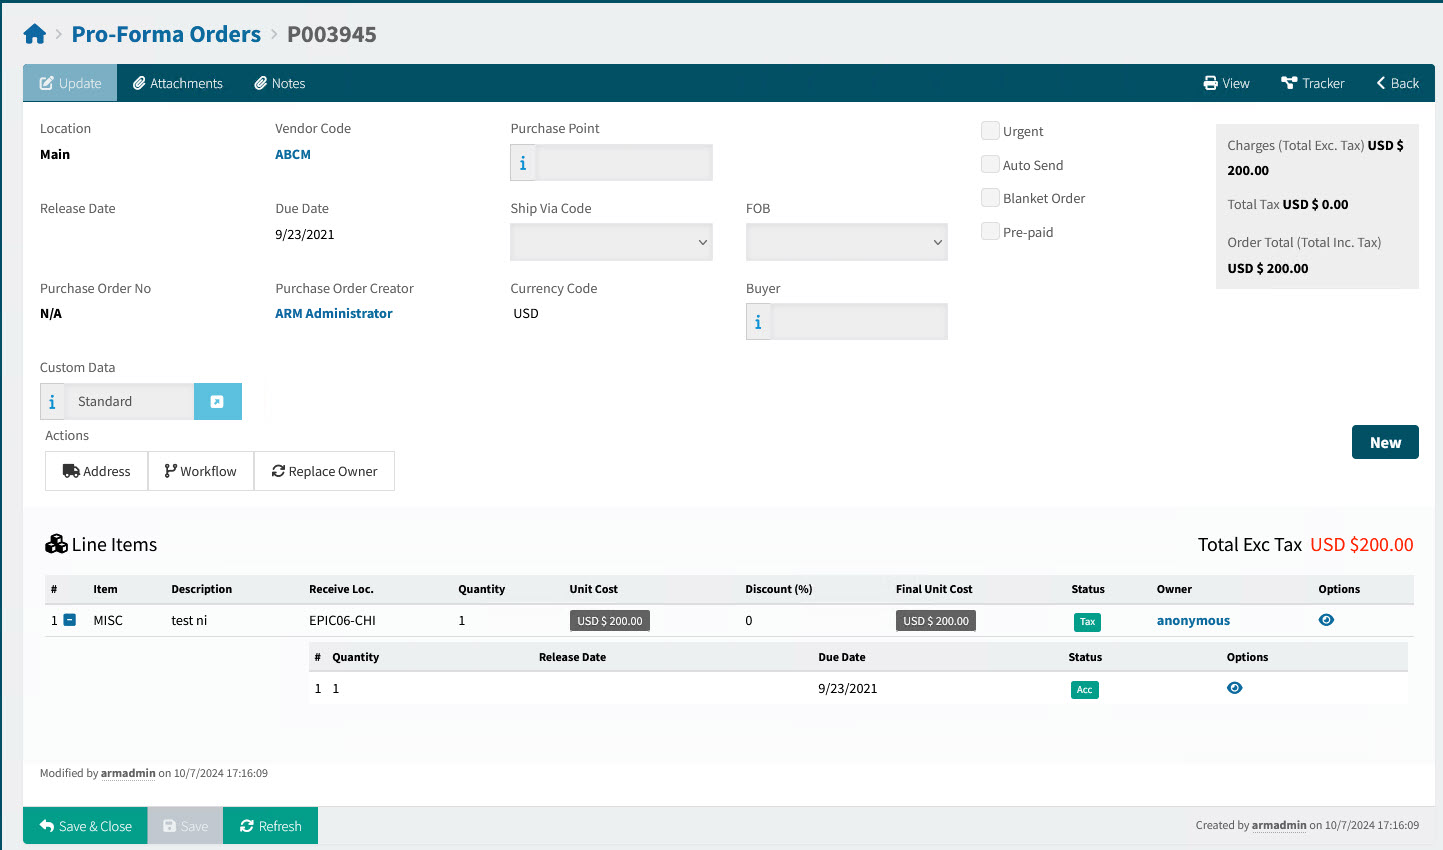
Pro-Forma Order No The order number for this document. Click on the Pro-Forma Order No to open the Pro-Forma Order.
Location The location on the document header.
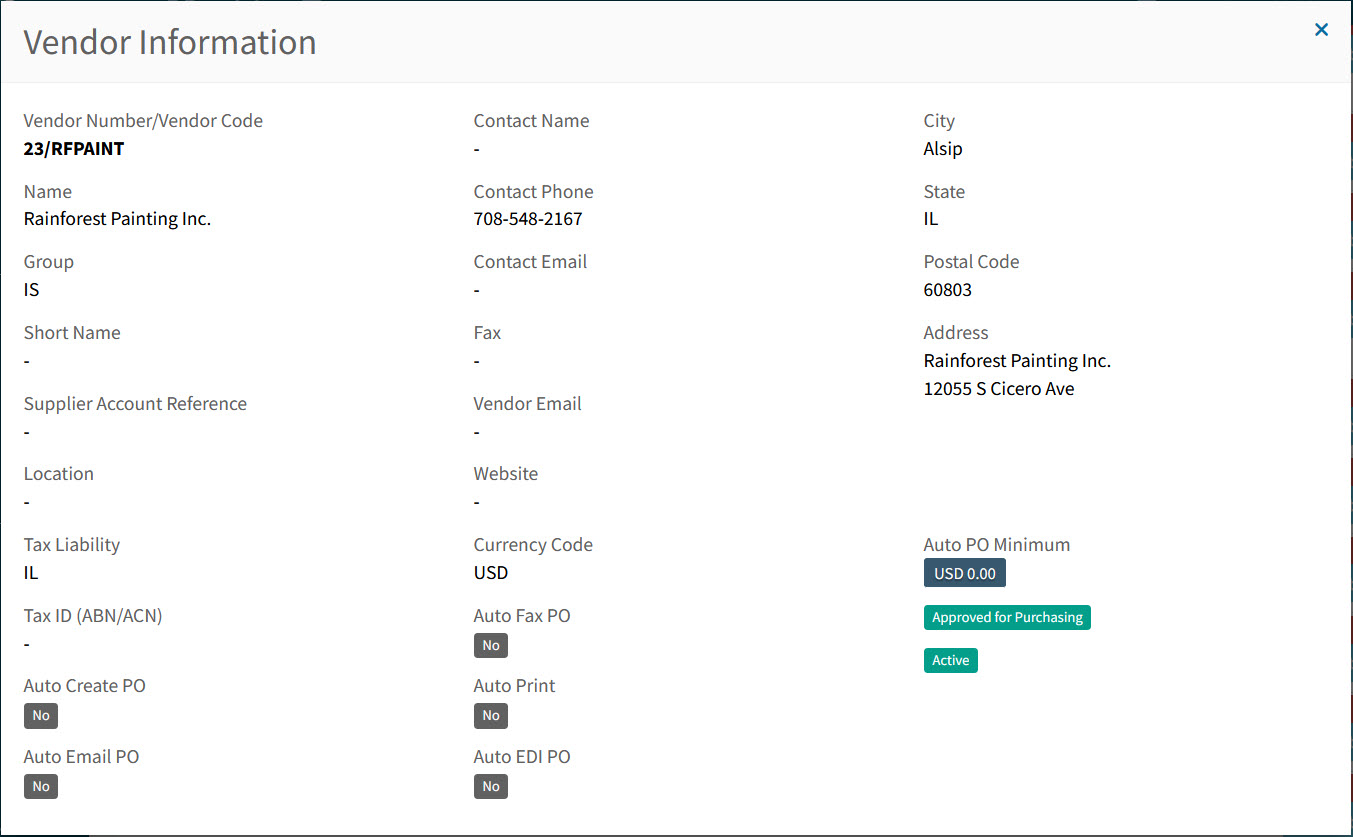
Vendor The Vendor Code for the lines in this document. Hover over a Vendor Code to view the full Vendor Name, or click on a Vendor Code to open the details in the Vendor Information pop-up screen.
Example
Locked By The User who locked the PFO (applicable to locked PFOs only).
PO Creator If a User created a PO from this document, then they are the PO Creator.
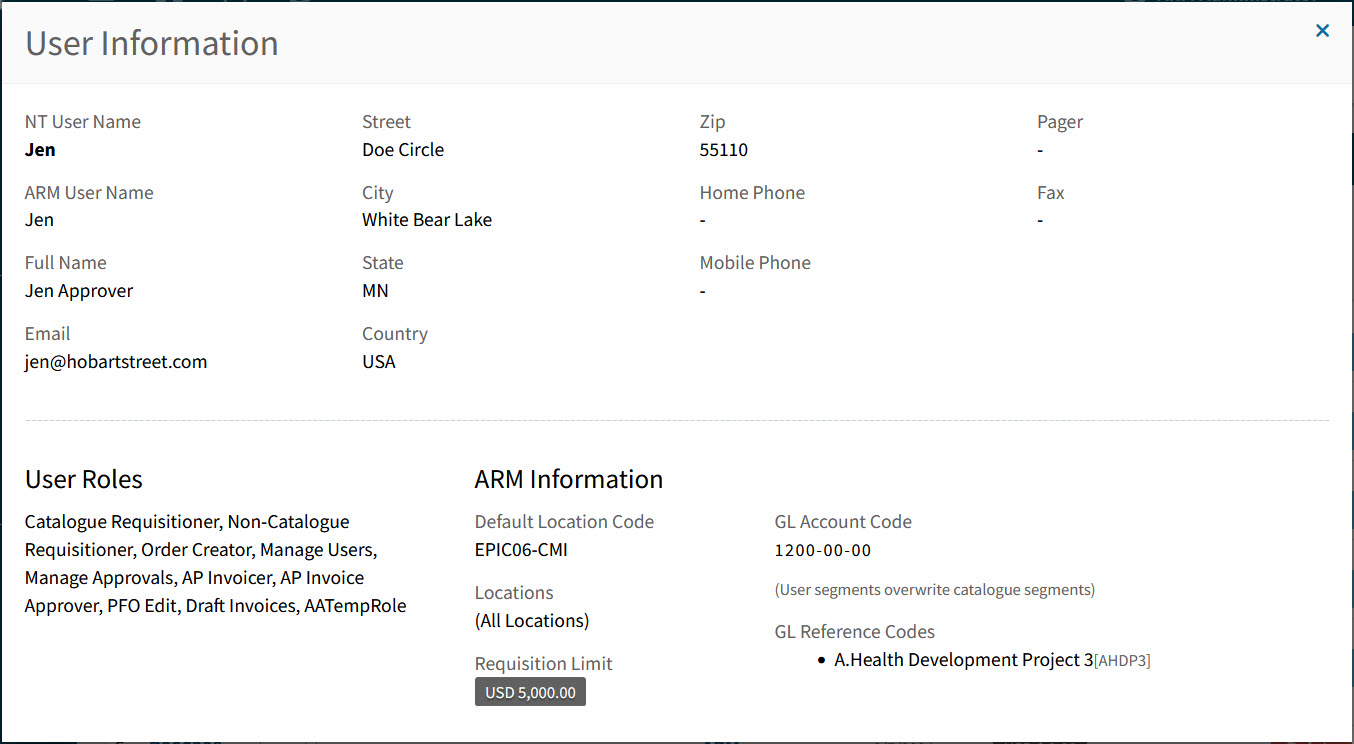
PO Creators are in blue. Hover over a PO Creator to view the full Name, or click on a PO Creator to open the details in the User Information pop-up screen.
Example
Date PO Created The date a PO was created from this PFO.
PO Number The Purchase Order number, if one has been created.
Click on the PO Number to open the Purchase Order.
Pro-Forma Status The Pro-Forma Status could be:
-
Rejected
-
New
-
PO Created
-
-
Adjust the Search conditions.
See Details
-
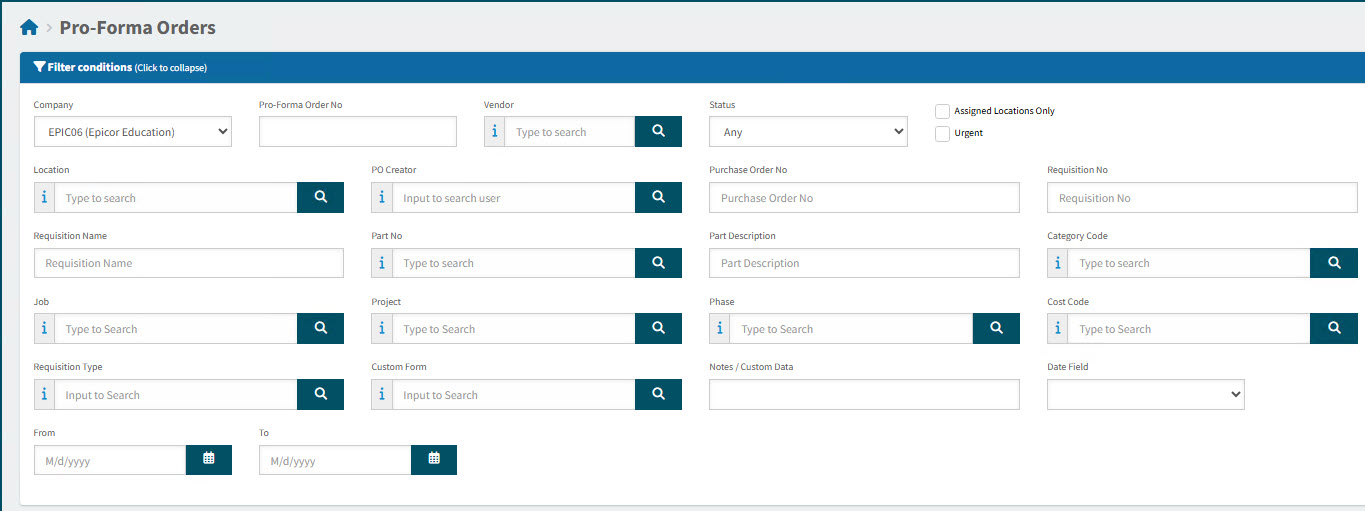
Expand the filter conditions in the top section of the page to search for a specific Pro-Forma Order or to narrow your search.
View filter conditions
-
Enter values in the edit boxes, or select from the search boxes. See the filter conditions, below.
Filter conditions
Company Select a Company.
Pro-Forma Order No Type in the Pro-Forma Order No if known, or do a partial search using part of the number followed by %.
Vendor Select a Vendor Code.
Status Select one of the following status values from the drop-down list:
-
Any
-
Rejected
-
New
-
PO Created
Assigned Locations Only If this check box is selected only documents for Locations assigned to the User in their User Profile will be displayed.
Location Code Select a Location Code to filter from.
PO Creator Select the name of the PO Creator. Only applicable for PO Created.
Purchase Order No Enter the PO Number, if known. Only applicable for PO Created.
Requisition No Limits results to PFOs originating from this requisition number.
Requisition Name Limits results to PFOs originating from requisitions with this name.
Part No Limits results to PFOs that include this part number.
Part Description Limits results to PFOs that include parts with this name.
Category Code Limits results to PFOs with a line that has that category code.
Job Limits results to PFOs with a line that includes the job.
Project Limits results to PFOs with a line that includes the project.
Phase First select a Project. The Phase limits results to PFOs with a line that includes the project and phase.
Notes / Custom Data Search on Notes / Custom Data.
Date Field Select Date Created, or Date Modified, or Date PO Created, then select a date range with From and To dates.
-
PFOs that match the search conditions are listed in the grid.
-
Viewing a Pro-Form Order No
-
Locate the pro-forma order you want to view or edit. See Searching for a PFO.
-
Click on a Pro-Forma Order No link to open Pro-Forma Order No.
The Pro-Forma Order > [Pro-Forma Order No] page opens.
Pro-Forma Order Header Menu
On the Header Menu Bar you can perform the following:
Header Menu Bar

 Attachments
-
Use this function to upload files. See Adding Attachments to Header.
The Global Setting Attachment Upload File Filter stores the file types that can be uploaded as Attachments.
- Notes
-
Use this function if you want to add multiple Internal notes, or a single External note. Notes can be deleted if you have the permission Can Delete Own Internal Notes or Can Delete Any Internal Note. See Adding Notes.
 View
View-
Downloads a copy of the document that can be printed off. Only enabled once the document has one or more lines.
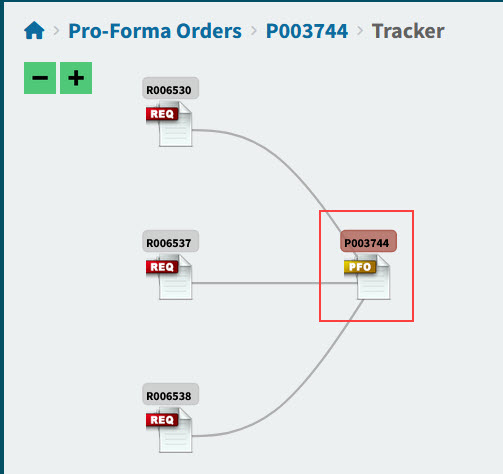
 Tracker
-
Click to view the Tracker for this document. Read more about Trackers.
 Back
Back-
Click Back to return to the search page.
Pro-Forma Order Footer Menu
Footer Menu

| Save & Close |
Save the current changes and return to the previous page. |
| Save |
Click this button to apply the changes and keep the form open. |
| Refresh |
Click this button to refresh unsaved data. |
Most of the PFO functionality is accessed from the Actions section, as described in the next section.
Working with Pro-Forma Orders
See how to:
-
Lock and Unlock a Pro-Forma Order. See Locking a Pro-Forma Order.
-
Edit a Pro-Forma Order. See Editing a Pro-forma Order.
-
Deny Line Items on a Pro-forma Order. See Denying Line Items on a Pro-forma Order.
-
Reject a Pro-Forma Order. See Rejecting a Pro-forma Order.
-
Replace the Owner on a Pro-forma Order. See Replacing the Owner on a Pro-forma Order.
-
Create a PO from a Pro-Forma Order. See Creating a PO from a Pro-forma Order.
-
Split GL Accounts on a Pro-Forma Order. See Splitting GL Accounts on a Pro-forma Order.
See how to search for a PFO: Searching for a PFO.
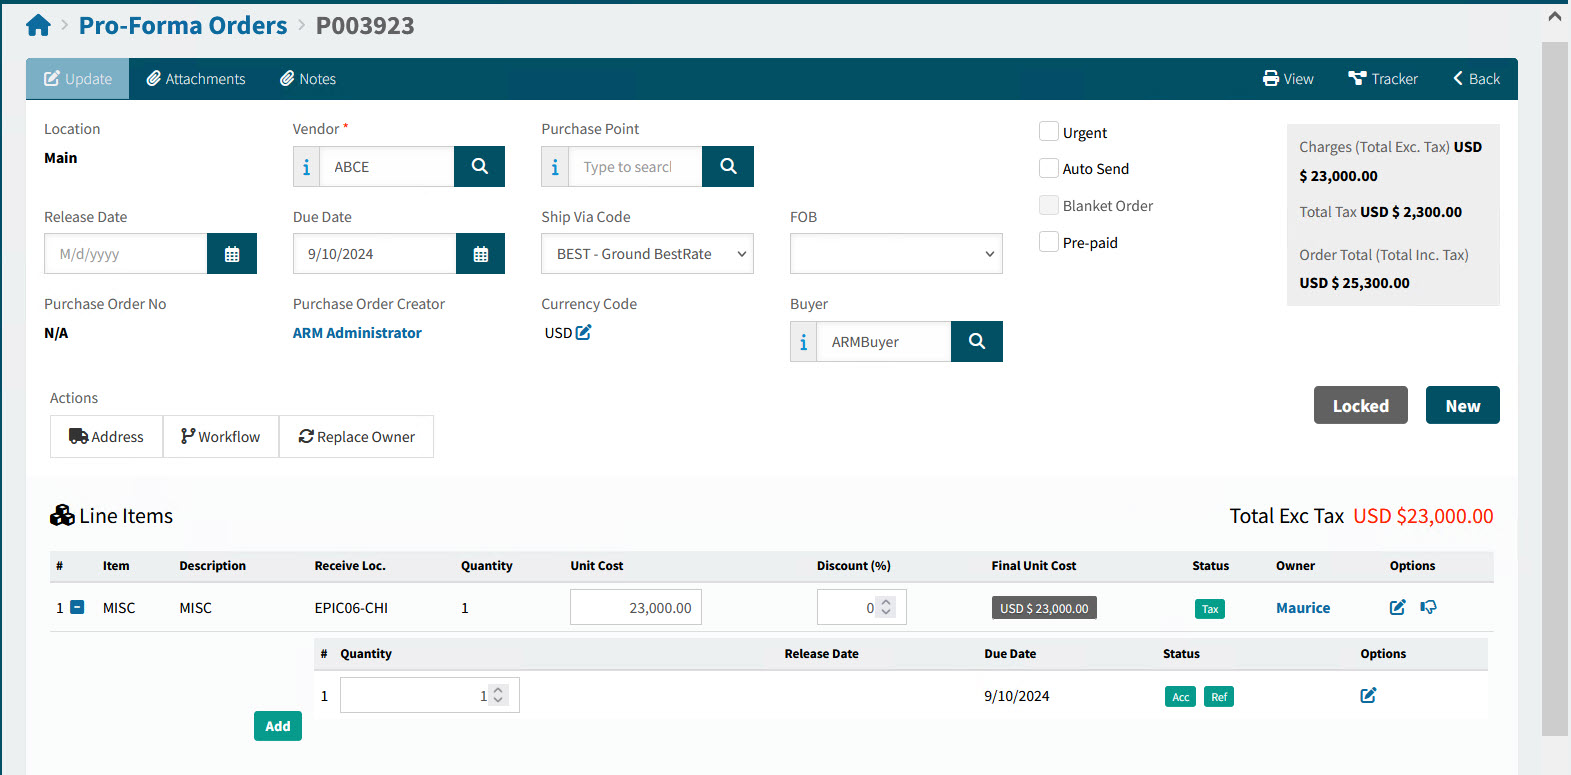
Locking a Pro-Forma Order
Before editing a pro-forma order, first lock it. While a pro-forma order is locked for editing, the system cannot add approved requisition lines to it.
To Lock a Pro-Forma Order
-
Open the pro-forma order in the Pro-Forma Orders page.
-
In the Actions section, click
 Workflow, then Lock for Edit.
Details

All fields on the screen become editable, the View button  on line items is replaced by an Edit button
  and a Deny button
  , and the Lock For Edit Workflow menu item is replaced by Unlock.
Example
Editing a Pro-forma Order
You can edit a Pro-Forma Order with a status of New.
Before you edit a Pro-Forma Order, you need to lock it.
-
Open the pro-forma order in the Pro-Forma Orders page.
-
In the Actions section, click
Workflow, then Lock for Edit.Details
You can also deny an individual line (see below).
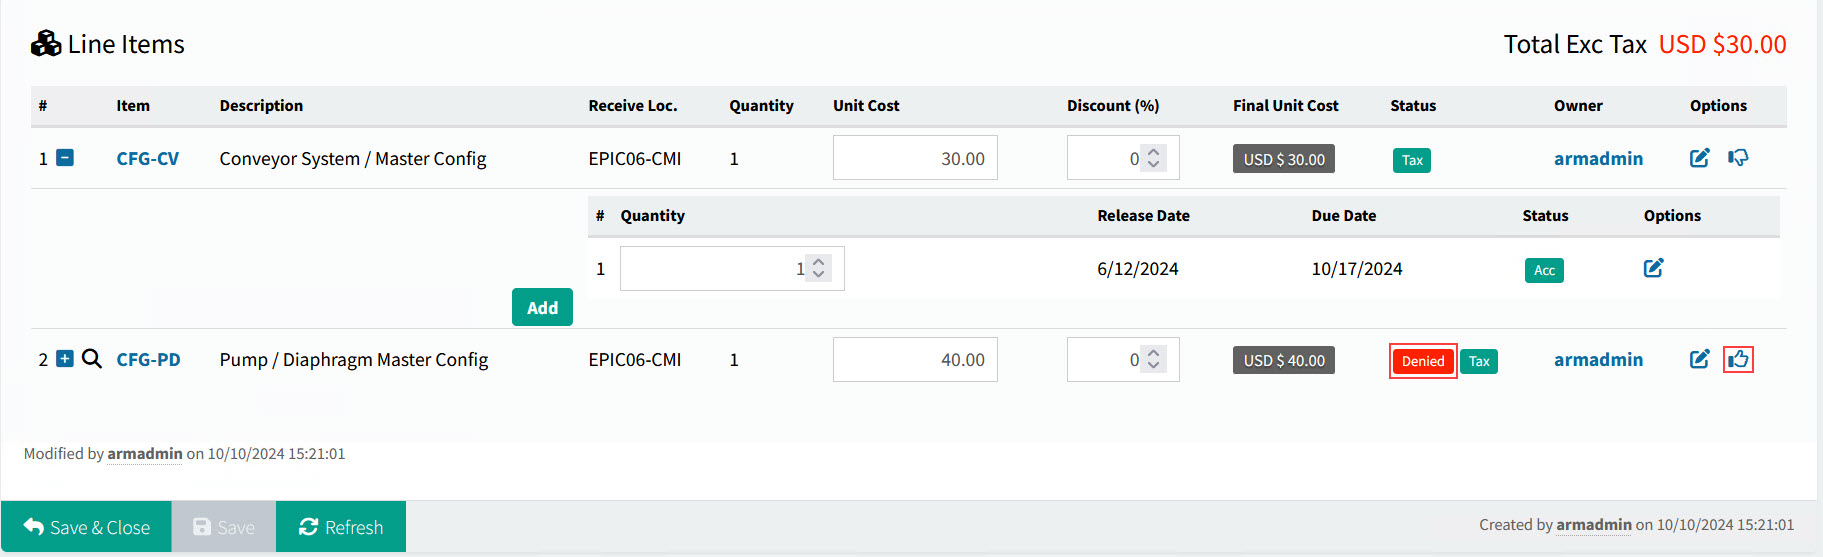
Denying Line Items on a Pro-forma Order
To deny a single line item, ensure that you can edit (a New PFO that is Locked).
-
Click the Deny
 icon at the end of the row to deny the line item.
A pop-up called Rejecting Item [item number] appears.
-
Enter a denial reason, then click OK.
The row gets a Denied status and the Deny icon changes to an Allow
 icon. Hover over the Denied label to see the denial reason.
Details
-
To allow the denied line item again, click the Allow
icon. -
Click Yes on the confirmation dialog.
The line item is no longer denied.
-
Unlock the PFO if you would like more lines to be added from new requisitions.
Rejecting a Pro-forma Order
When you reject the PFO, you permanently deny all line items (they cannot be allowed again).
-
In the Actions section, click
Workflow, then Reject. -
In the confirmation dialogue, click OK.
-
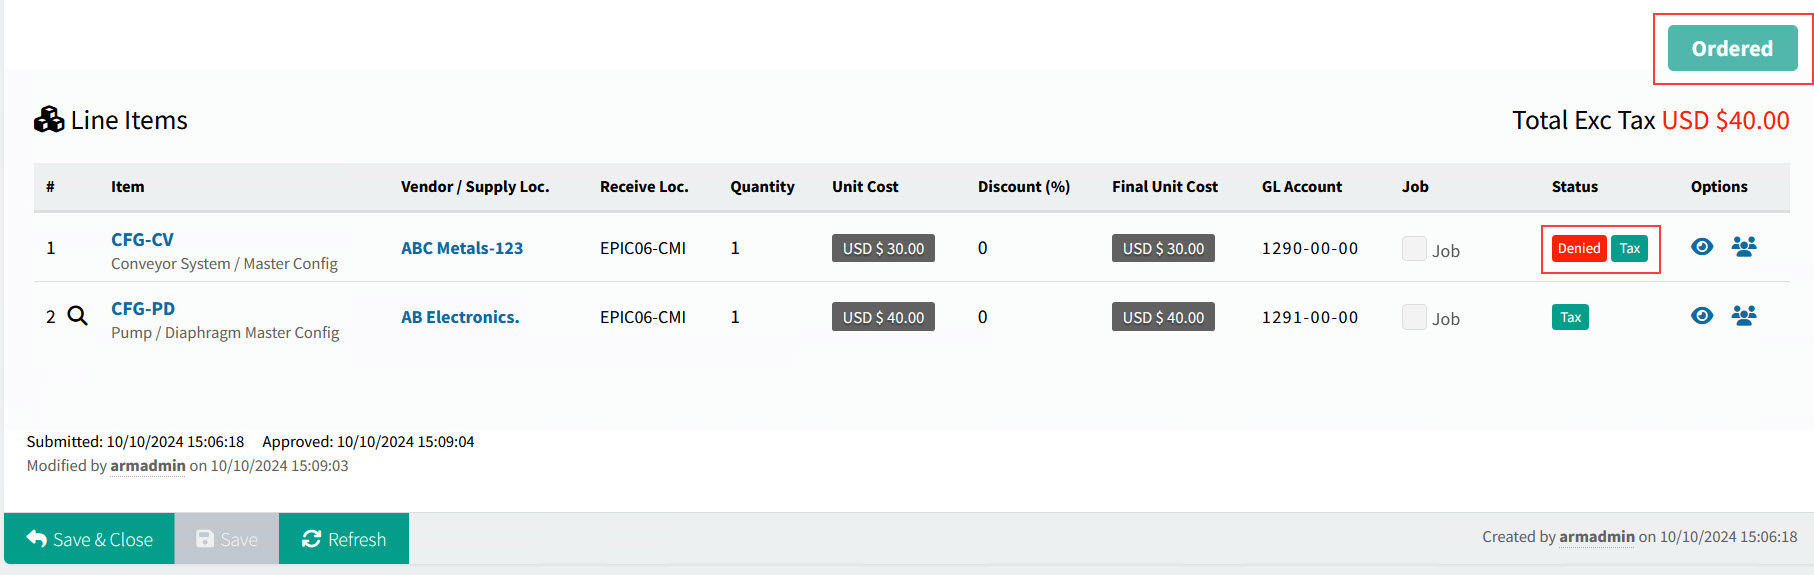
The PFO is rejected and its status updates to Rejected. Each line item gets a status of Denied.
-
You cannot edit the PFO any further.
-
You cannot create a PO from this PFO.
-
The status of affected lines on originating requisitions is updated to Denied and the status of originating requisitions updates to Rejected.
If the PFO affecting a different line on the requisition is ordered, the Requisition status changes to Ordered.
See example of a requisition with one line denied and the other line ordered:
-
Replacing the Owner on a Pro-forma Order
You can replace the owner on a PFO regardless of its status - even after the PO is created.
Permissions
The permission Replace Line Owner of Proforma Order is required.
-
Click Replace Owner in the Actions section.
-
Select a new owner from the pop-up dialog, then click OK.
The new owner appears on each line item of the PFO and on the Purchase Order. The owner on the requisition form remains the same.
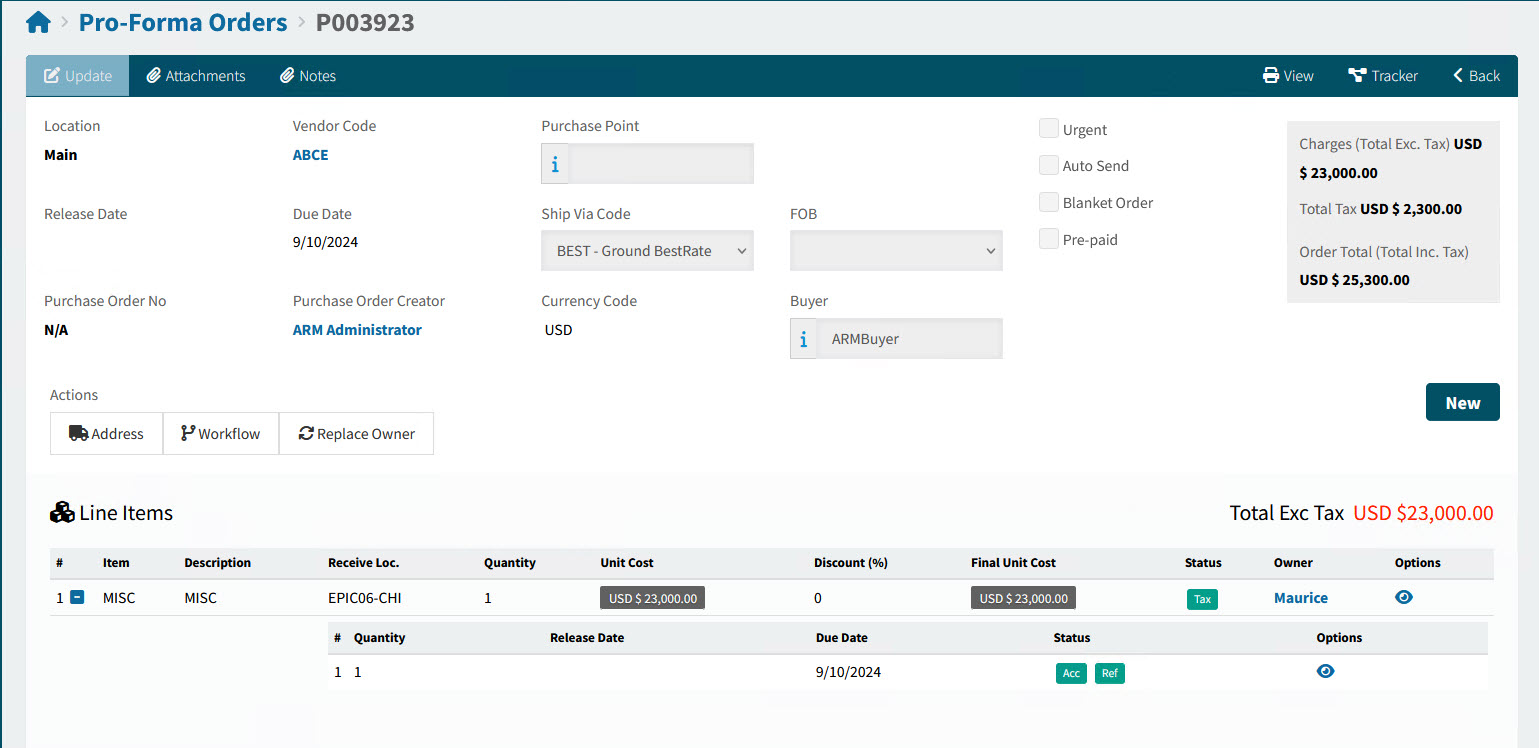
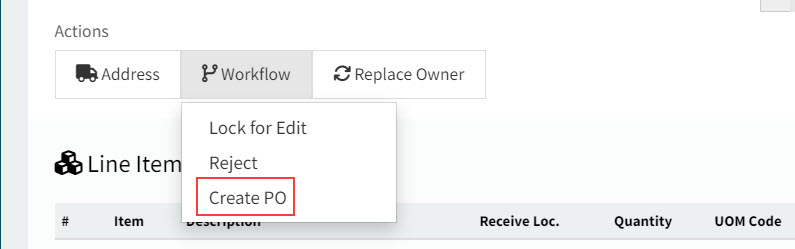
Creating a PO from a Pro-forma Order
You can create Purchase Orders from any of the PFOs listed in the Pro-Forma Orders > Creation page, or select Purchase Orders that are ready to be created in the Pro-Forma Orders page.
When you create a PO from a PFO, all lines that have not been denied are included in the PO.
-
Click on a Pro-Forma Order No to open the detail.
-
In the Actions section, click
Workflow, then Create PO.View Detail
-
Click Yes on the confirmation pop-up dialog.
-
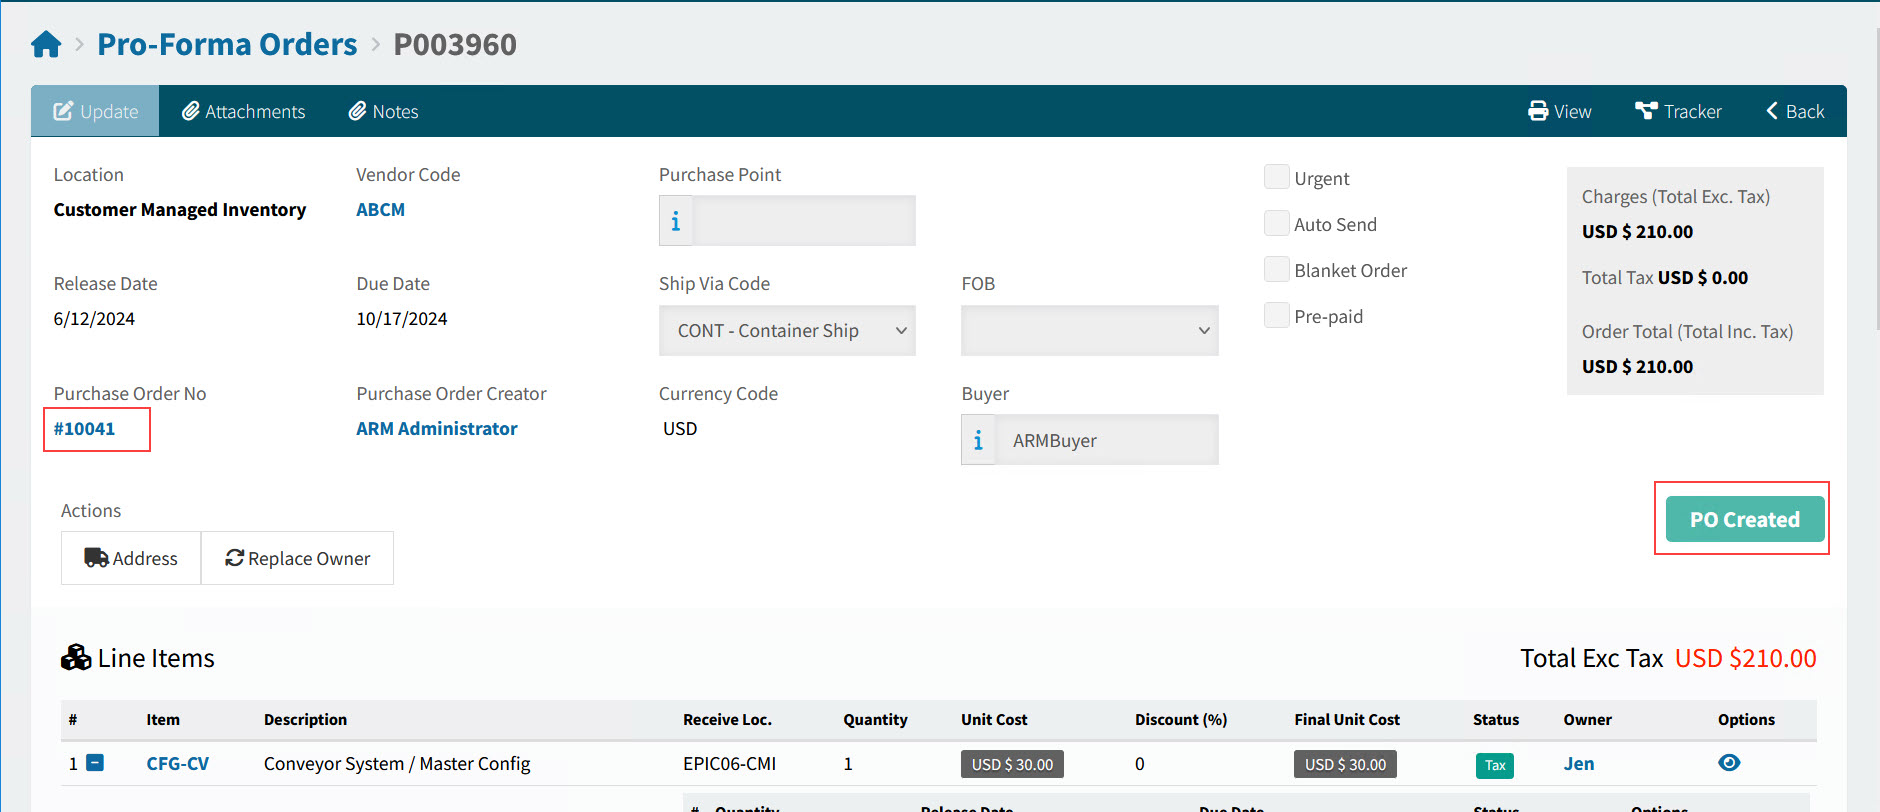
The PFO status updates to PO Created.
-
The PO number is displayed as a link to the PO, in the Purchase Order No field on the PFO header.
View example
-
| Sometimes POs are created automatically from PFOs. See Automatic Purchase Orders for Vendors. |
Splitting GL Accounts on a Pro-forma Order
This functionality allows you to split the cost of line items across multiple GL Account Codes, by creating additional line releases against a purchase order line.
For a line release, you can edit the quantity, specify an individual GL Account Code, and set a new release date or due date. You can also link the line release to a Sales Order.
To split a GL Account on a Pro-forma Order line, or to add a new release line, you need to first lock the Pro-forma Order to edit it.
-
Open the pro-forma order in the Pro-Forma Orders page.
-
In the Actions section, click
Workflow, then Lock for Edit.Details
-
You can expand the Pro-forma line by clicking the expand
 button to the left of it, or collapse it by clicking the collapse
  button.
 -
Click the Add button.
Details
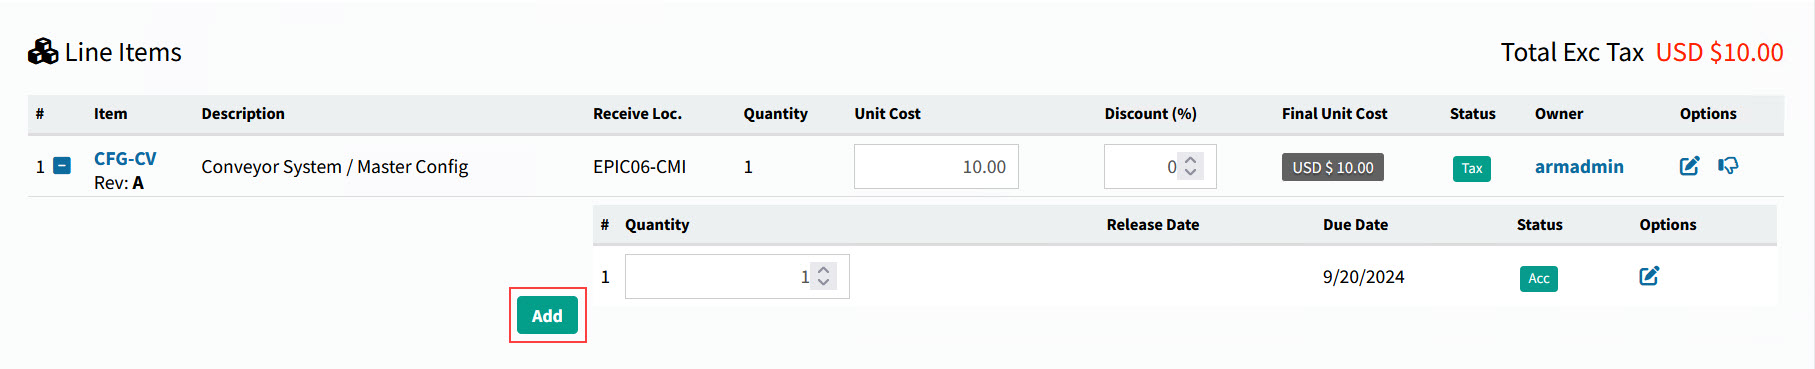
The Edit Pro-forma Order Line Release dialog is displayed.
-
Add the new Pro-forma Order Line Release details.
Details
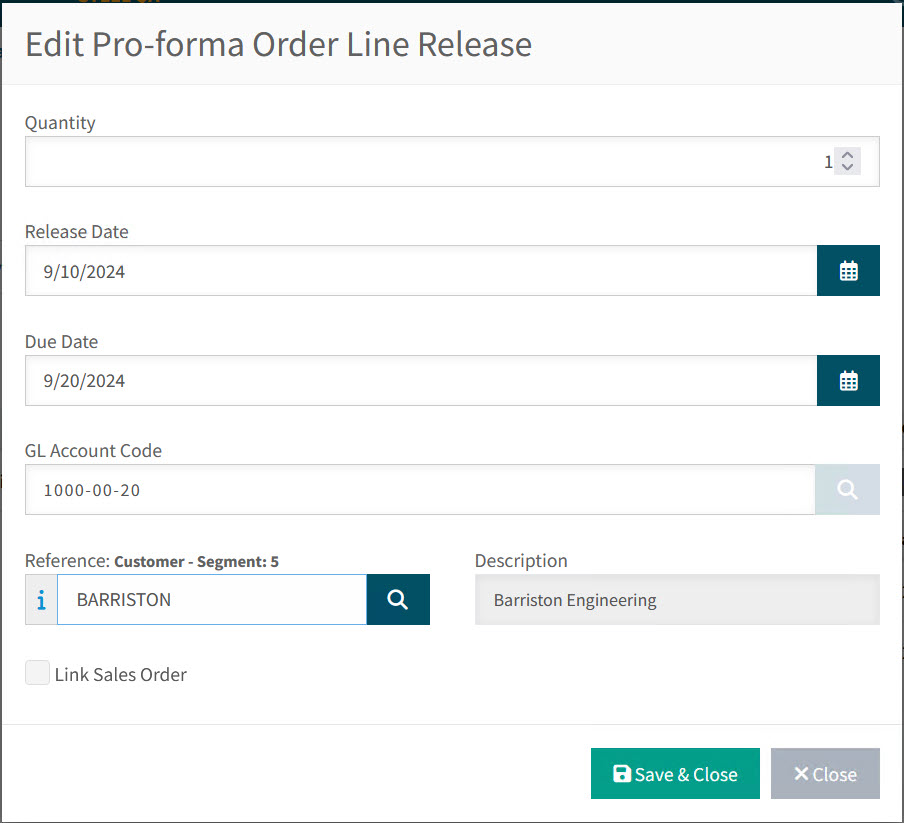
-
Quantity.
-
Release Date.
-
Due Date.
-
GL Account Code.
-
Reference fields:
-
Reference: Customer
-
Reference: Employee
-
Reference: Vehicles
-
-
Link Sales Order if required.
Click Save & Close.
The line has been split into separate Line Releases.
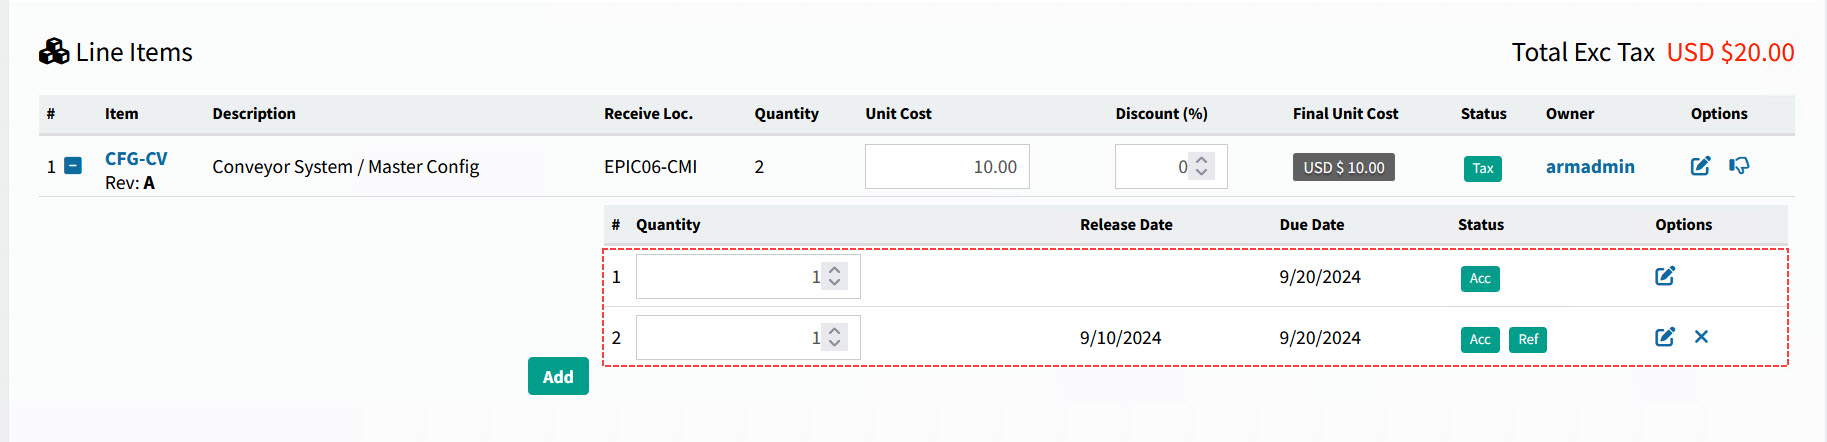
Note that you can delete the added release line by clicking the cross  on the right of the line.
-
-
Continue to add release lines, as needed.
-
When you have finished editing, select Unlock from the Workflow menu in the Actions section.
Searching for a PFO
Search for a PFO that you want to edit or view.
-
Select
PFOs from the Side Menu to open the Pro-Forma Orders page. See Side Menu.The Pro-Forma Orders page opens.
-
Adjust the Search conditions.
See Details
-
Expand the filter conditions in the top section of the page to search for a specific Pro-Forma Order or to narrow your search.
View filter conditions
-
Enter values in the edit boxes, or select from the search boxes. See the filter conditions, below.
Filter conditions
Company Select a Company.
Pro-Forma Order No Type in the Pro-Forma Order No if known, or do a partial search using part of the number followed by %.
Vendor Select a Vendor Code.
Status Select one of the following status values from the drop-down list:
-
Any
-
Rejected
-
New
-
PO Created
Assigned Locations Only If this check box is selected only documents for Locations assigned to the User in their User Profile will be displayed.
Location Code Select a Location Code to filter from.
PO Creator Select the name of the PO Creator. Only applicable for PO Created.
Purchase Order No Enter the PO Number, if known. Only applicable for PO Created.
Requisition No Limits results to PFOs originating from this requisition number.
Requisition Name Limits results to PFOs originating from requisitions with this name.
Part No Limits results to PFOs that include this part number.
Part Description Limits results to PFOs that include parts with this name.
Category Code Limits results to PFOs with a line that has that category code.
Job Limits results to PFOs with a line that includes the job.
Project Limits results to PFOs with a line that includes the project.
Phase First select a Project. The Phase limits results to PFOs with a line that includes the project and phase.
Notes / Custom Data Search on Notes / Custom Data.
Date Field Select Date Created, or Date Modified, or Date PO Created, then select a date range with From and To dates.
-
PFOs that match the search conditions are listed in the grid.
-
Pro-Forma Order Creation Rules
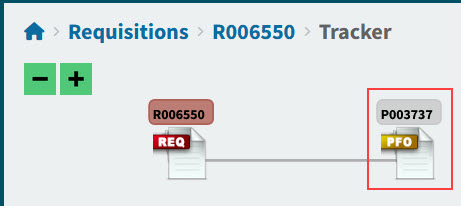
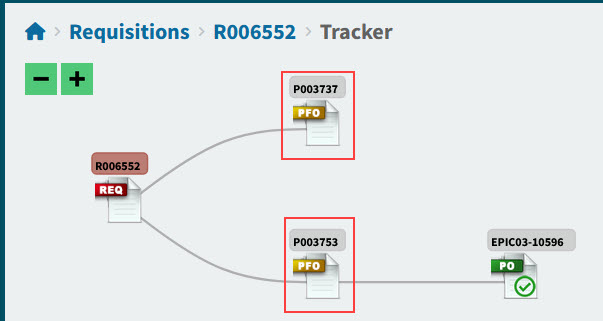
A single requisition can result in one or more pro-forma orders (splitting).
Example
Single requisition, single PFO |
|
|
|
Single requisition, multiple PFOs |
|
|
Lines from a requisition can also be added to one or more existing pro-forma orders (combining). (Note that this will not work if the Global Setting Use Requisition Types is enabled.)
Example
Lines from Multiple Requisitions Added to a PFO |
|
|
Combining and splitting are subject to the PFO Combining Setting, as well as the values in the different requisition lines (see PFO Combining or Splitting).
Auto Create PO
If a Vendor has Auto PO selected, then a Purchase Order is automatically created from a PFO for that Vendor, provided the Total Exc Tax is at least that of the Vendor’s Auto PO Minimum (if one has been set). Until the Purchase Order is created, lines from other requisitions can be added to this PFO (using combining).
If there is no Auto PO Minimum (that is, if Auto PO Minimum = 0.00), the Purchase Order is created straight after the PFO is created. This means that no additional lines from other requisitions can be added to the PFO. Read more about Auto PO Minimum.
PFO Combining Setting
If the Global Setting, PFO Combining, is enabled then lines from separate requisitions can be combined into a single pro-forma order. This setting also determines how requisition lines from a single requisition are split or combined.
The behavior of each PFO Combining option is described below.
| If you are using Requisition Types, PFO Combining will not function. This feature must be disabled if you wish to combine PFOs. |
- PFO Combining set to Vendor Only - Vendor
-
Requisition lines from one or more requisitions go onto the same PFO, providing they have the same Vendor. It does not matter what the Receiving Location is.
- PFO Combining set to Vendor and Location
-
Requisition lines from one or more requisitions go onto the same PFO, providing they have the same Vendor and Receiving Location.
- PFO Combining set to None - Do not Combine
-
There is no combining from more than one requisition. Lines from a single requisition can still go into the same PFO, providing they have the same Vendor.
PFO Combining or Splitting
|
The various forms of PFO combining (adding requisition lines to a PFO) and splitting (splitting requisition lines into different PFOs) are determined by various settings from around the system, as well as the contents of requisitions, and the approval workflows used. See details below.
Location
- Line Level Locations set to Disabled
-
Lines from one or more requisitions that have a different Location Code on the requisition header can only combine on a PFO if PFO Combining is set to Vendor Only - Vendor.
- Line Level Locations set to Enabled
-
Requisition lines that have different Receiving Locations can only combine on a PFO if PFO Combining is set to Vendor Only - Vendor.
| See also how Location may determine the approval workflow, thus determining the Purchase Order Creator or Buyer needed for the PFO. See Entry Node for an Approval Workflow. |
Terms
A requisition line can only be combined with a PFO with matching Terms.
Example
Example of Terms on a PFO |
|
|

Vendor
There can only be one Vendor on a PFO. Therefore, requisition lines with different Vendors will always go onto separate PFOs.
PunchOut
A requisition punchout line can be combined with a PFO with a matching Vendor, provided that Vendor does not have auto EDI.
Purchase Order Creator
A requisition line can only be combined with a PFO where the Purchase Order Creator on the root node of the approval workflow for that requisition line matches the Purchase Order Creator on the PFO.
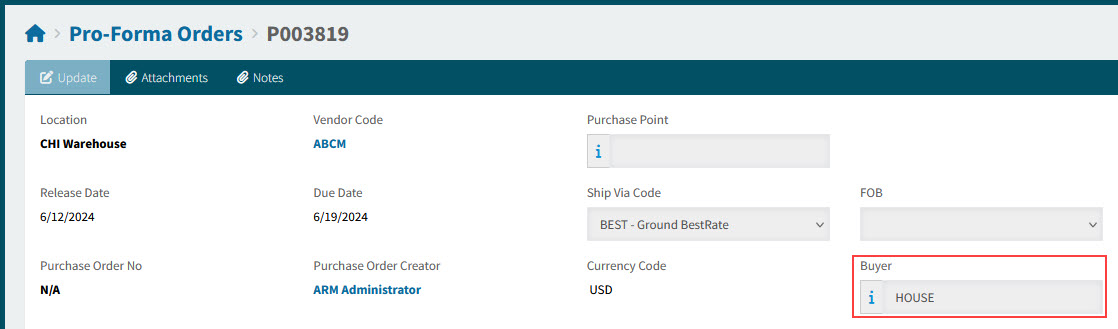
Buyer
A requisition line can only be combined with a PFO with a matching Buyer.
| The Buyer field is only available if the Enable Buyer Mapping setting is set to Yes. |
Example
Example of a Buyer on a PFO |
|
|
- Buyer on the Requisition Line
-
If no Buyer is selected on the requisition line, it updates to the Buyer from the requisition header during final approval.
If there is no Buyer on the requisition header, it updates to the Buyer on the applicable root node, during final approval. See how an approval workflow is chosen: Entry Node for an Approval Workflow.
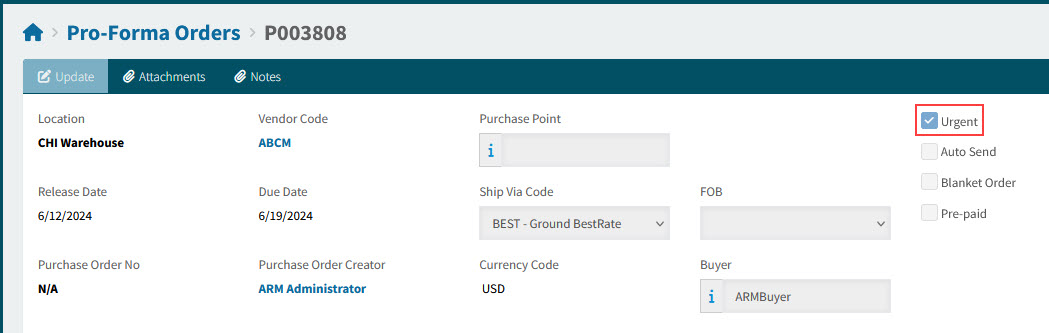
Urgent Requisitions
Urgent requisitions can only be added to PFOs that are also marked Urgent.
Example
Example of a PFO marked Urgent |
|
|
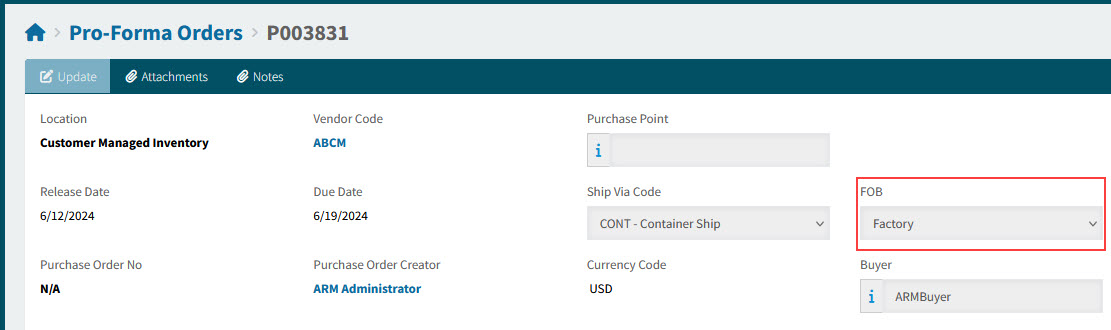
FOB
Requisition lines can only be added to PFOs with a matching FOB.
Example
Example of a PFO FOB |
|
|
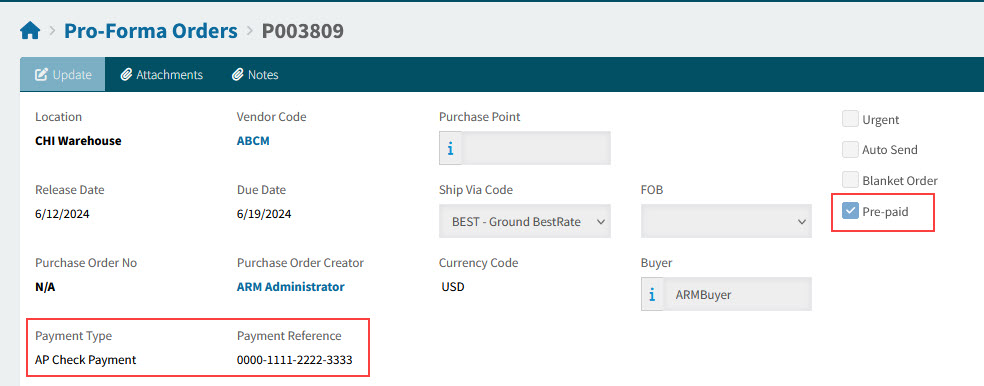
Pre-paid Requisitions
If a requisition is Pre-paid, it can only be added to a PFO that is also Pre-paid, with the same Payment Type and Payment Reference (where applicable).
Example
Example of a PFO marked Pre-paid |
|
|
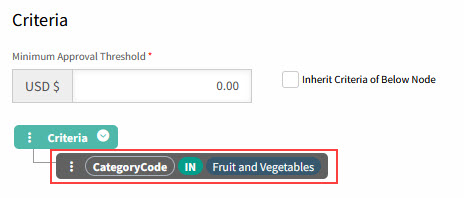
Entry Node for an Approval Workflow
The entry node for an approval workflow determines what the root node will be. The contents of a requisition/ requisition line determine the entry node, depending on the type of approval tree.
- Advanced Approval Tree
-
For an Advanced Approval Tree, there are many criteria available to the tree nodes.
Thus, depending on the approval nodes in use and the criteria applied, any of these could potentially determine which Purchase Order Creator (and which Buyer) is used for the pro-forma order:
See list of criteria
-
GL Account Code
-
Location Code
-
Category Group
-
Requisition Type
-
Buyer
-
Project
-
Vendor Group
-
Vendor Code
-
Category Code
-
Part No
-
GL Company
-
GL Budget
-
Custom Form
-
Created By
Example of criteria for an entry node
This is for the category code of 'Fruit and Vegetables'
-
- Location Tree
-
For a Location tree, the Location on the requisition (or the Location on a requisition line, if Line Level Locations is enabled) determines the root node used for final approval, and thus the Purchase Order Creator (and the Buyer) used for the pro-forma order.
PFO Combining can also affect how Locations are used. See PFO Combining Setting. - Category Tree
-
For a Category tree, the Category Code on the requisition line determines the root node used for final approval, and thus the Purchase Order Creator (and the Buyer) used for the pro-forma order.
- GL Tree
-
For a GL Tree, the GL Account Code on the requisition line determines the root node used for final approval, and thus the Purchase Order Creator (and the Buyer) used for the pro-forma order.
| See more about Approvals Maintenance. |
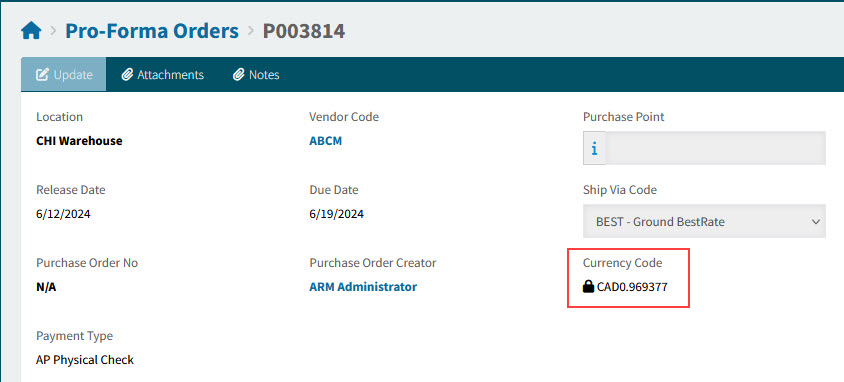
Currency
A requisition line can only be added to a PFO with a matching Currency.
Example
Example of a Currency Code on a PFO |
|
|
Tax Liability
A Requisition line can only be combined with a PFO with a matching Tax Liability (not shown on the PFO header).
Tax Category
A requisition line can only be combined with a PFO where the Line Items have a matching Tax Category.
Company
The Company ID must match for PFO combining.
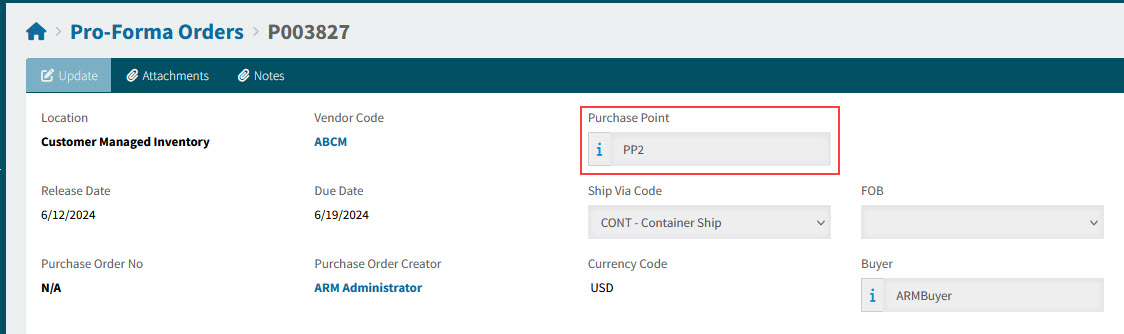
Purchase Point
A requisition line can only be combined with a PFO with a matching Purchase Point.
Example
Example of a PFO with a Purchase Point |
|
|
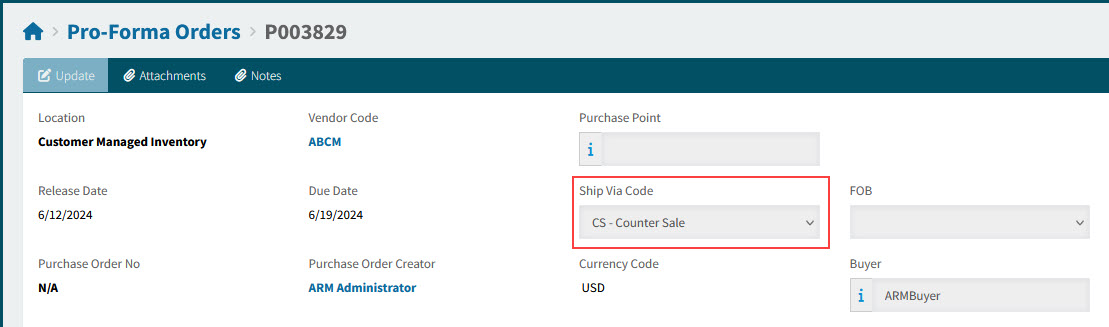
Ship Via
A requisition line can only be combined with a PFO with a matching Ship Via.
Example
Example of a Ship Via on a PFO |
|
|
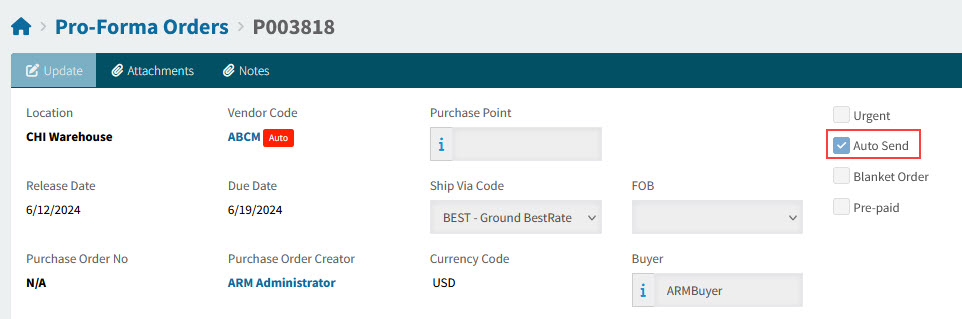
Auto Send
When a requisition line from an Auto Send requisition is added to a PFO, that PFO becomes Auto Send as well.
Example
Example of a PFO marked Auto Send |
|
|
Listed below are some of the fields that make no difference to how a PFO gets combined:
-
Owner
-
Purchase for Project
-
Inspection Required
-
Purchase for Job
-
Link Sales Order
-
References, e.g. Reference Customer
-
Catalogue vs Non-catalogue
-
Regular versus PunchOut: If Auto Email and Auto EDI are both enabled on the Vendor, a Purchase order with a combination of both normal and PunchOut lines will send the PunchOut lines via EDI and send the normal lines out via Email.