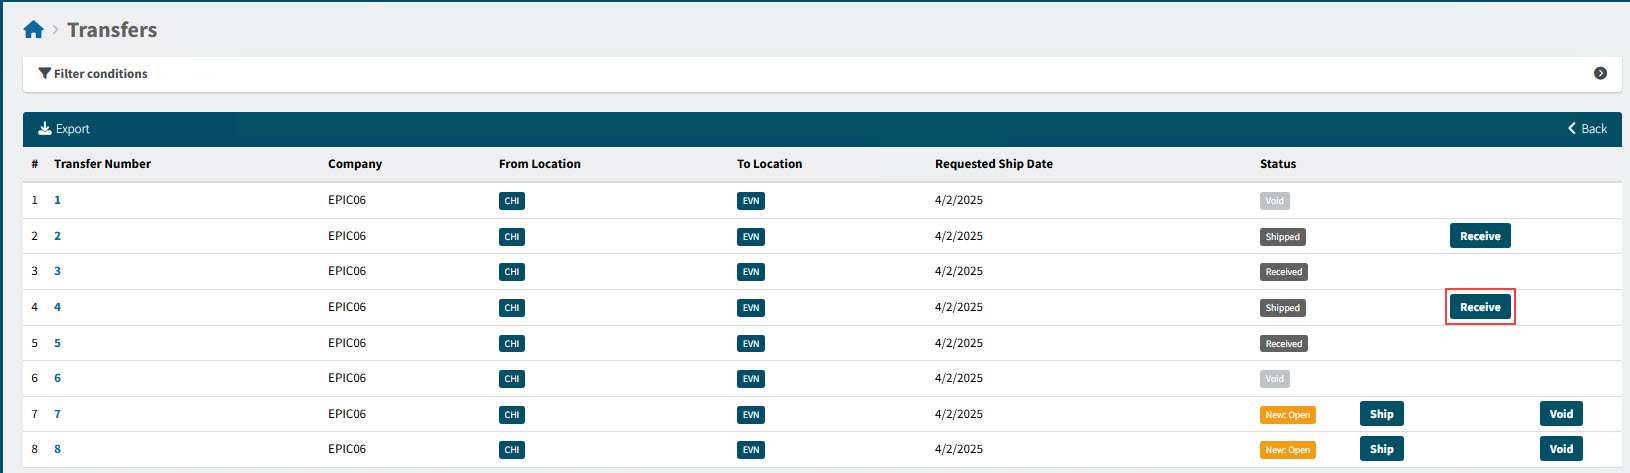
Transfers Page
To create a new transfer, you need to add a requisition that includes transfer line types. See how to add a new requisition: New Requisition.
|
Source Stock and Destination Stock values are displayed when adding a catalogue line, if the Global Settings for Show Destination Stock and Show Source Stock, respectively, are set to Yes. Example: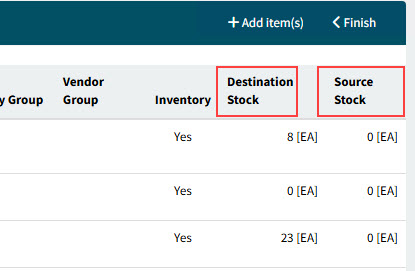
|
Only Catalogue line items can be used for transfers.
Prerequisites for adding transfer lines:
In order to transfer an item from one location to another:
-
You need to be licensed for Transfers, for the Transfer option to appear in the Line Type drop-down list for a new catalogue line.
-
The Global Setting Enable Inventory Transfers must be set to Yes, for the Transfer option to appear in the Line Type drop-down list for a new catalogue line.
-
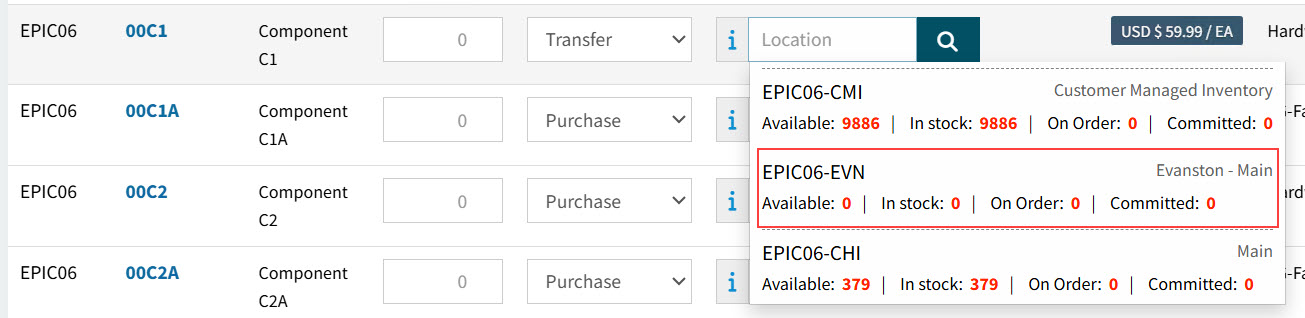
A catalogue item can be transferred from one of its locations to another. You can see the locations for a catalogue on the Catalogue page. (In Kinetic, add Sites and Warehouses to Parts.)
-
To use a location as a Source Location, it must have the Transfer Supply Location check box selected.
-
If the source location has no stock, a warning is issued when the line item is added. However, the requisition can still be submitted and ordered.
Example:
Default Supply Location
When you add a catalogue item for a transfer line type, the Default Supply Location (if available) for the Catalogue > Location is used as the default Source (where Location is the Receiving Location).
After the transfer lines are submitted and approved, transfers are created and can be accessed in the Transfers page.
-
Select
 Transfers on the Side Menu to open Transfers. See Side Menu.
The Transfers page opens.
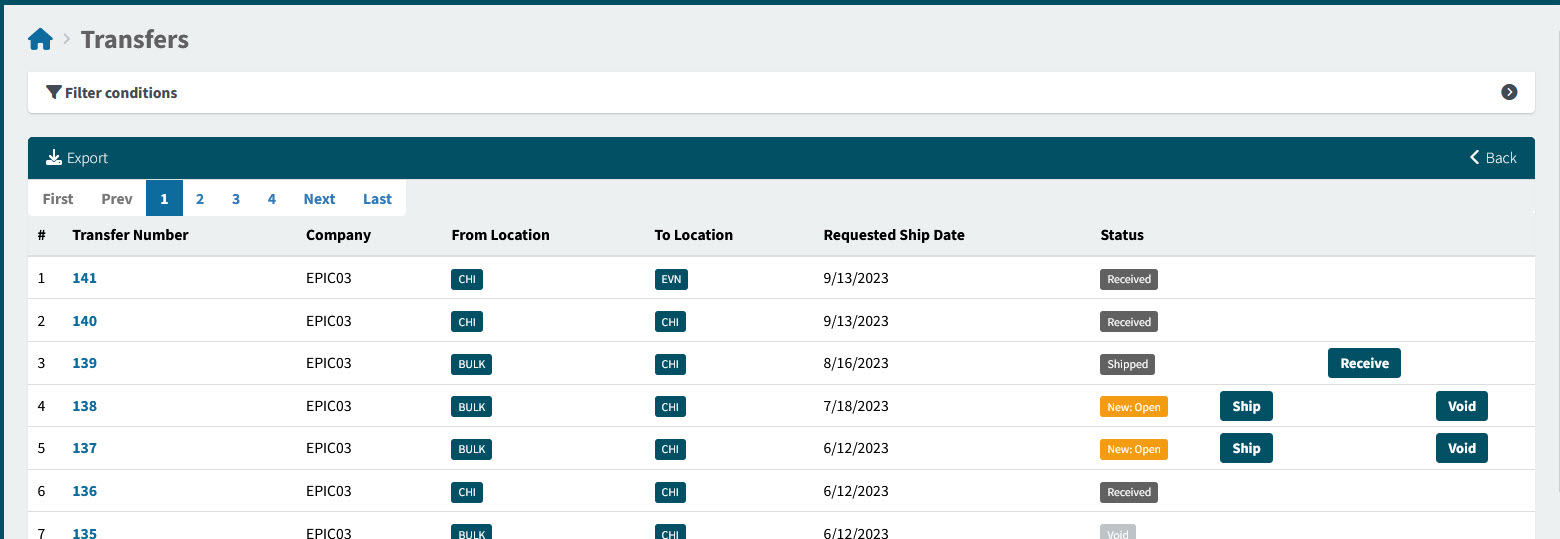
Transfer Number Click on the Transfer Number to open the Transfer page.
Company The Transfer is between locations within this Company.
From Location The Line Item is transferred from this location.
To Location The Line Item is transferred to this location.
Requested Ship Date This is the Requested Ship Date on the document header.
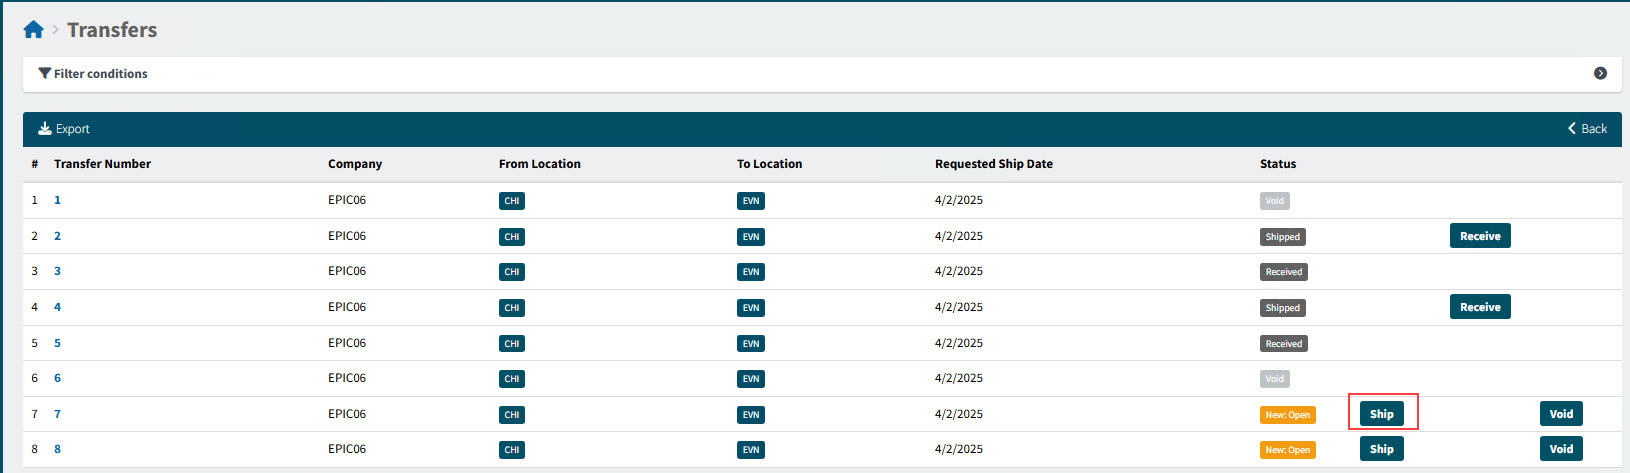
Status This can be:
-
New: Open
-
Received
-
Void
-
Shipped
-
Printed
<buttons on the far right> Click one of the buttons or select the check box. Note that these options are only available at the summary level if you have the Permissions Quick Ship Transfers, Quick Receive Transfers and Quick Void Transfers, respectively.
-
Ship (available for transfers with the New: Open status)
-
Receive (for transfers with the Shipped status)
-
Void (available for transfers with the New: Open status)
-
-
Optionally adjust the filter conditions.
See Details
-
Expand the filter conditions in the top section of the page to search for a specific Transfer or to narrow your search.
View filter conditions

-
Enter values in the edit boxes, or select from the search boxes. See the filter conditions, below.
Filter conditions
- Company
-
Select a Company from the drop-down list.
- Transfer No
-
Limits results to the Transfer with this number.
- Status
-
Select one of the following status values from the drop-down list:
-
Any
-
Open
-
Shipped
-
Received
-
Void
-
Printed
-
- From Location
-
Limits results to Transfers from this location.
- Requisition No
-
Limits results to Transfers originating from this requisition number.
- ERP TO Number
-
Limits results to Transfers with a matching ERP TO Number.
- Part No
-
Limits results to Transfers that include this part number.
- To Location
-
Limits results to Transfers to this location.
- Part Description
-
Limits results to Transfers that include this part description.
- Assigned Locations Only
-
Select this check box to filter on documents with Locations assigned to your User Profile.
- Date Field
-
Select Date Created, Requested Ship Date, Scheduled Shipped Date,Shipped date or Received Date, then select a date range with From and To dates. The selected date field’s date must fall within the date range.
Transfers that match the filter conditions are listed in the grid.
-
See how to:
|
Notes on Transfers:
|
Searching for a Transfer
-
Select
Transfers on the Side Menu to open Transfers. See Side Menu.The Transfers page opens.
-
Optionally adjust the filter conditions.
See Details
-
Expand the filter conditions in the top section of the page to search for a specific Transfer or to narrow your search.
View filter conditions
-
Enter values in the edit boxes, or select from the search boxes. See the filter conditions, below.
Filter conditions
- Company
-
Select a Company from the drop-down list.
- Transfer No
-
Limits results to the Transfer with this number.
- Status
-
Select one of the following status values from the drop-down list:
-
Any
-
Open
-
Shipped
-
Received
-
Void
-
Printed
-
- From Location
-
Limits results to Transfers from this location.
- Requisition No
-
Limits results to Transfers originating from this requisition number.
- ERP TO Number
-
Limits results to Transfers with a matching ERP TO Number.
- Part No
-
Limits results to Transfers that include this part number.
- To Location
-
Limits results to Transfers to this location.
- Part Description
-
Limits results to Transfers that include this part description.
- Assigned Locations Only
-
Select this check box to filter on documents with Locations assigned to your User Profile.
- Date Field
-
Select Date Created, Requested Ship Date, Scheduled Shipped Date,Shipped date or Received Date, then select a date range with From and To dates. The selected date field’s date must fall within the date range.
Transfers that match the filter conditions are listed in the grid.
-
Submitting a Transfer
Submit a transfer as you would submit any other requisition. You can even have transfer line items on a requisition alongside regular purchase lines.
After submitting a requisition with transfer lines, an approval process is followed as usual.
Approving a Transfer
Approve a transfer as you would approve any other requisition. See Approving a Requisition.
Approved transfer lines result in a PFTO (Pro-Forma Transfer), unlike the purchase line’s Pro-Forma Order.
See example:
|
If you have transfer line items on a requisition alongside regular purchase lines, approving the requisition results in a split: Purchasing line types go to a Pro-Forma Order (PFO), while Transfer line types go to a Pro-Forma Transfer (PTFO).
See example:
|
A transfer is created from the PTFO.
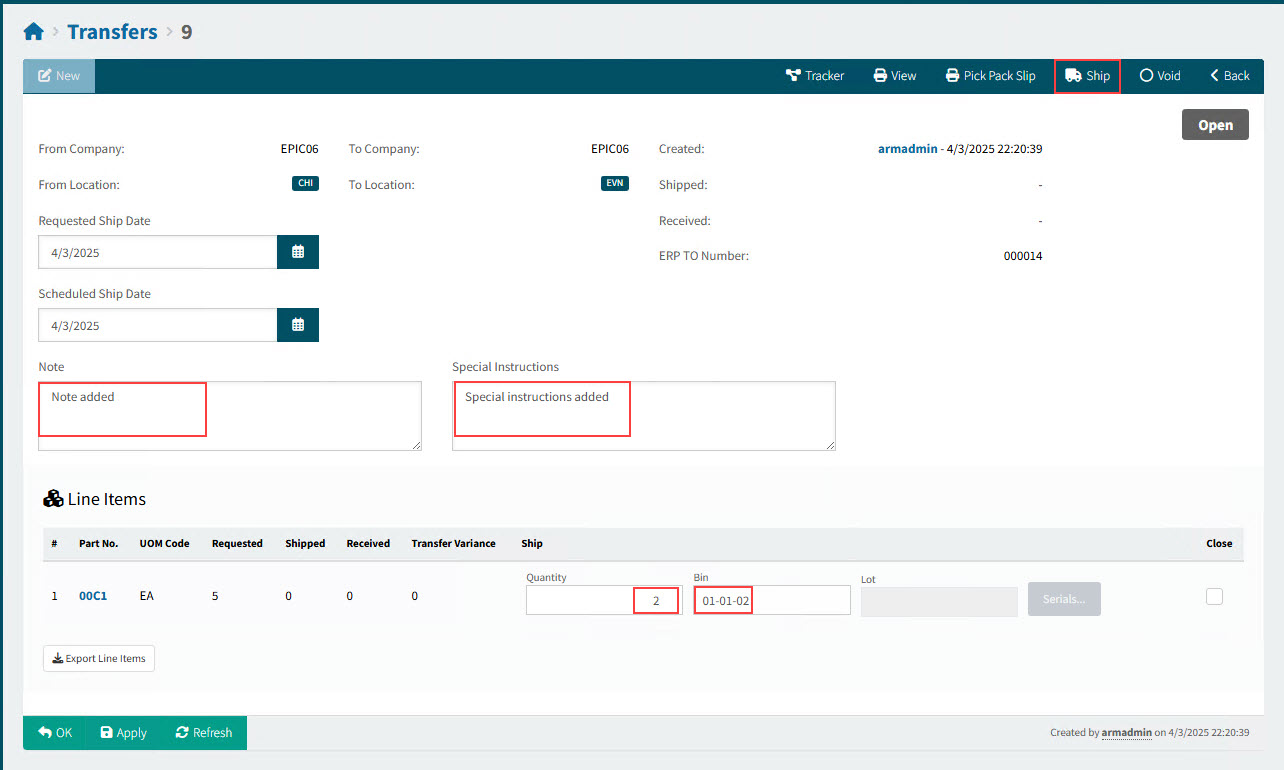
Shipping a Transfer
You can ship a transfer if its Status is Open.
-
Open the Transfers page.
-
In the search results, click on the Transfer Number to open the transfer detail page: Transfers > [Transfer Number].
-
Check the details for the transfer:
From Company The items will be transferred from this company.
To Company The items will be transferred to this company.
Created (Username and Date) Details from when the transfer was created.
From Location The items will be transferred from this location.
To Location The items will be transferred to this location.
-
Optionally enter a Note and Special Instructions.
-
For the line items you want to transfer, enter a Quantity and select a Bin, under the Ship column.
-
To complete all shipping on this transfer, select the Close check box. If the sum of Quantity for all shipments for a line is equal to or exceeds the Requested amount, the Close check box is selected automatically, and you cannot clear it.
Keep the Close check box clear if you want to ship more items later.
-
Click
 Ship on the menu bar.
Show details:
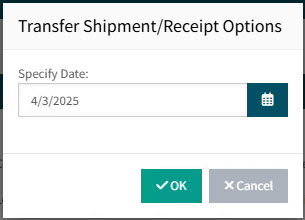
-
Select a date on the Transfer Shipment/Receipt Options pop-up, then click OK.
Show details:
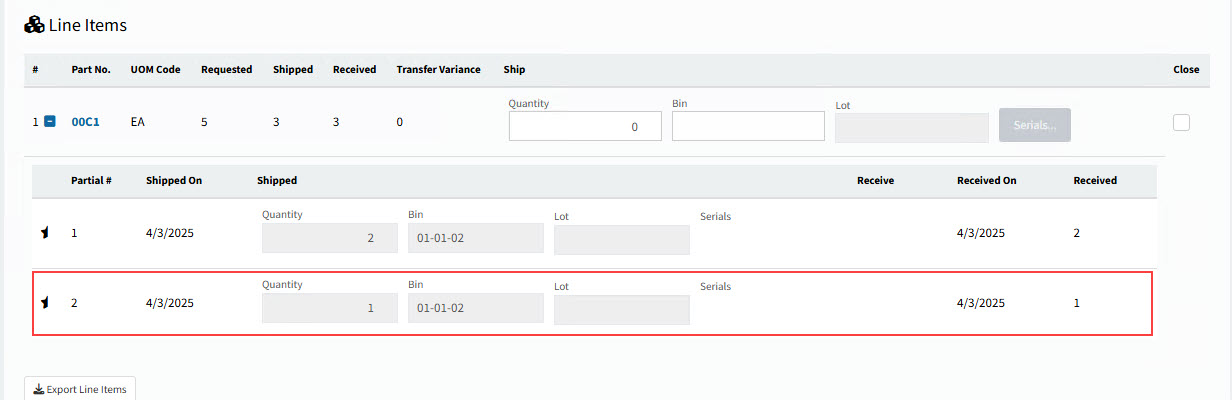
The selected quantity of items are shipped.
-
To view the details, click on the expand
 button next to the line item.
Below the line item, you can see the quantity you have just shipped. This quantity is automatically marked as received.

-
If you ship another quantity, you will see this listed below the first shipment:
Show details:
-
To ship a final quantity, ensure you select the Close button before you click Ship.
Show details:
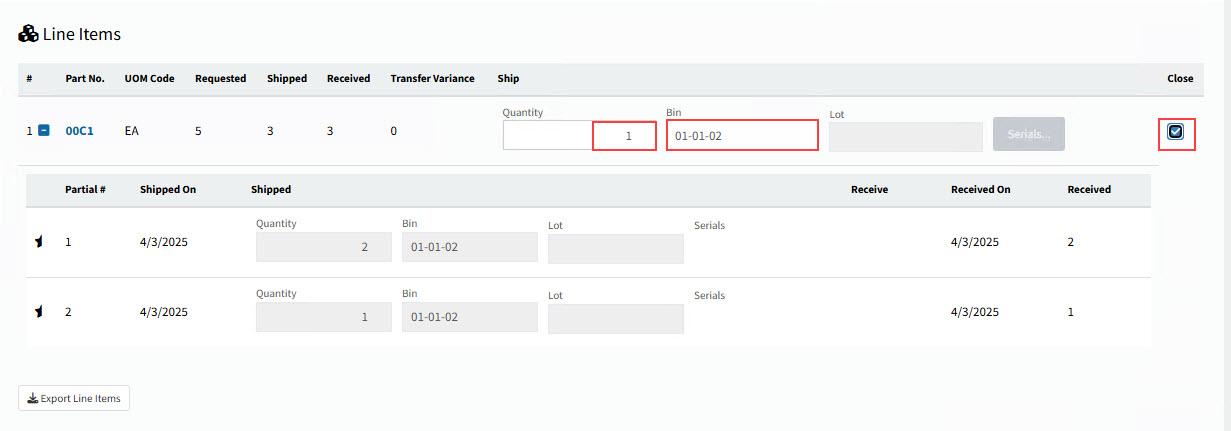
This updates the status to Received, and there can be no further shipping on this transfer.
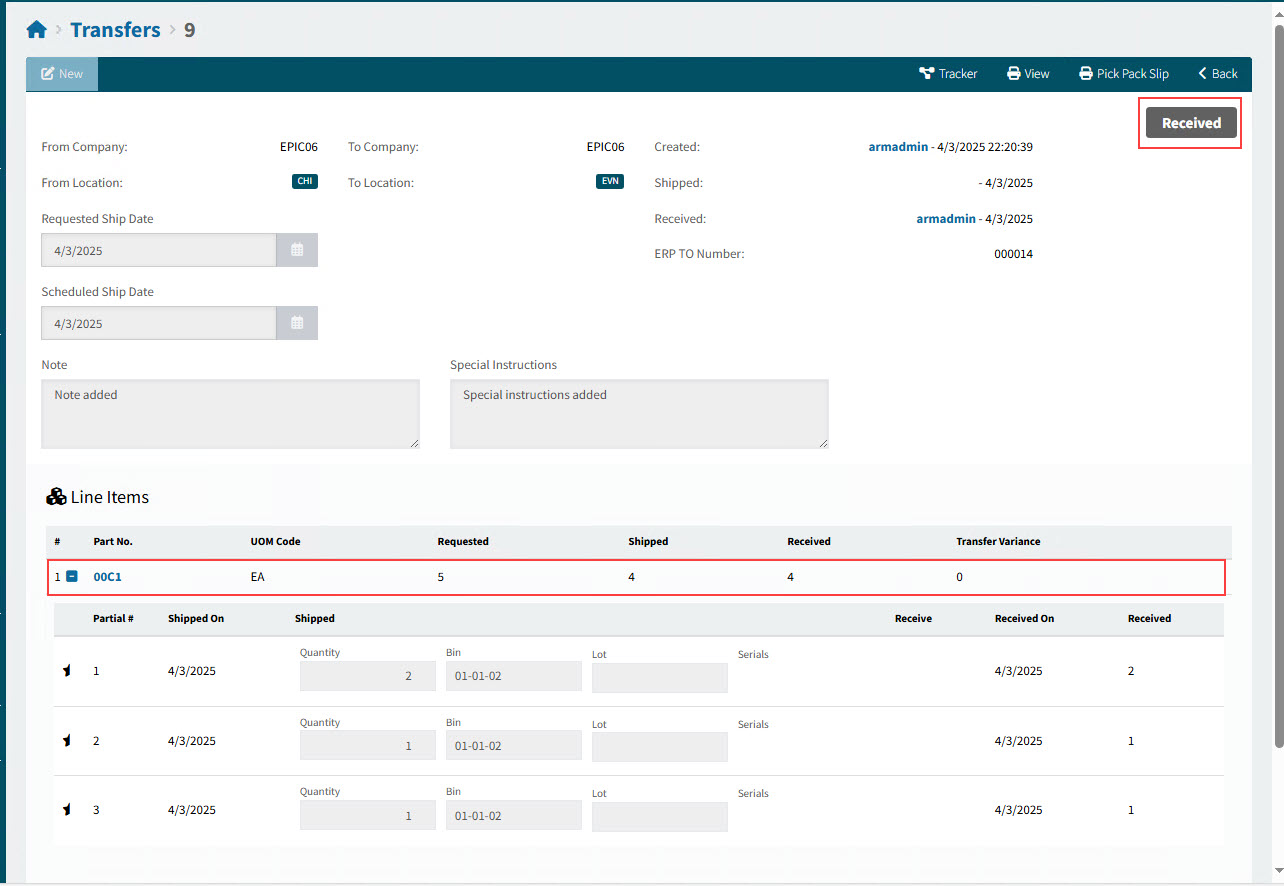
Alternatively, if the sum of Quantity for the partial shipments adds up to Requested, the transfer is also marked as Received.
| At any point after you ship a quantity, you can receive the transfer. See Receiving a Transfer. |
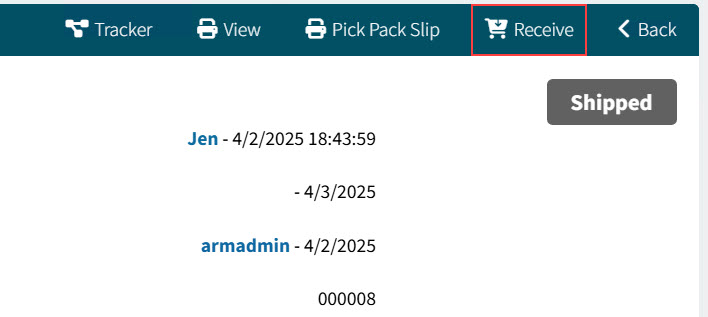
Receiving a Transfer
You can receive a transfer if its Status is Shipped. Note that when the total Shipped is the same or more as the Requested amount, the transfer status automatically updates to Received.
To receive a transfer:
-
Open the Transfers page.
-
In the search results, click on the Transfer Number to open the transfer detail page: Transfers > [Transfer Number].
-
Click
 Receive on the menu bar.
Show details:
-
Select a date on the Transfer Shipment/Receipt Options pop-up, then click OK.
Show details:
The date may not be before the Earliest Apply Date.
Earliest Apply Date
The Earliest Apply Date values can be viewed in Company Settings.
When receiving a transfer, ARM checks that Date is:
-
not before the Earliest Apply Date Base and
-
not before the Earliest Apply Date For Inventory (if available) and
-
not before the Earliest Apply Date For GL Journal (if available)
The Status updates to Received.
Show details:
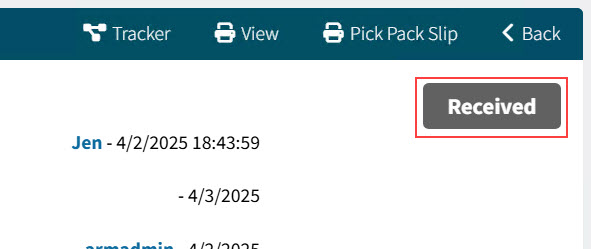
After the transfer is received, you cannot ship any further items against it.
-
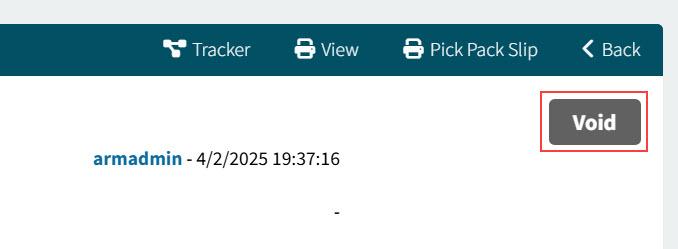
Voiding a Transfer
-
Open the Transfers page.
-
In the search results, click on the Transfer Number to open the transfer detail page: Transfers > [Transfer Number].
If the Status is Open, you can void the transfer.
-
Click
 Void on the menu bar.
Detail:
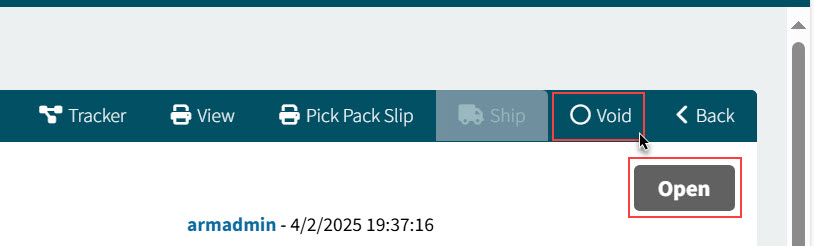
A Transfer Voided message appears on the bottom right of the screen.
The status updates to Void.
Detail: