Approvals Maintenance
Use the Approval Maintenance page to select and manage approval trees and configurations for the two document types: AP Invoice and Requisition.
This page also has menu links to all other pages relating to Approvals.
Permissions
You require a role with the Maintain Approval Hierarchy permission to view this page. See Permissions in ARM.
-
Select
 Administration in the side menu, to open the Administration page.
 -
On the Administration page, select Approvals Maintenance.
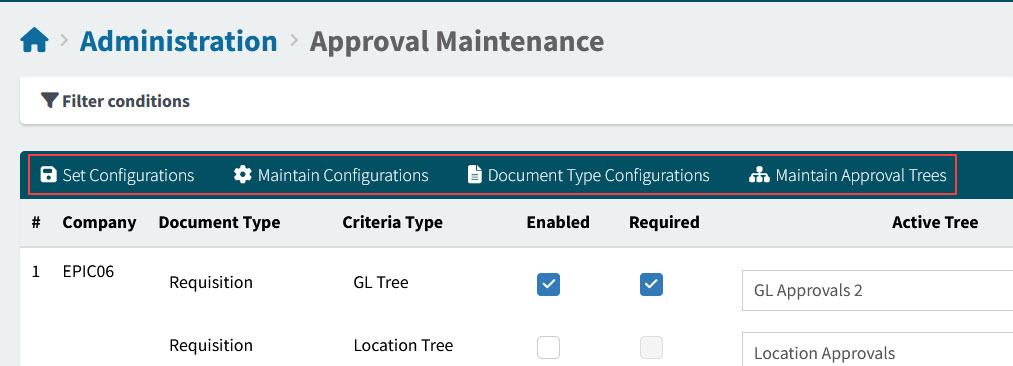
The Administration > Approval Maintenance page opens.
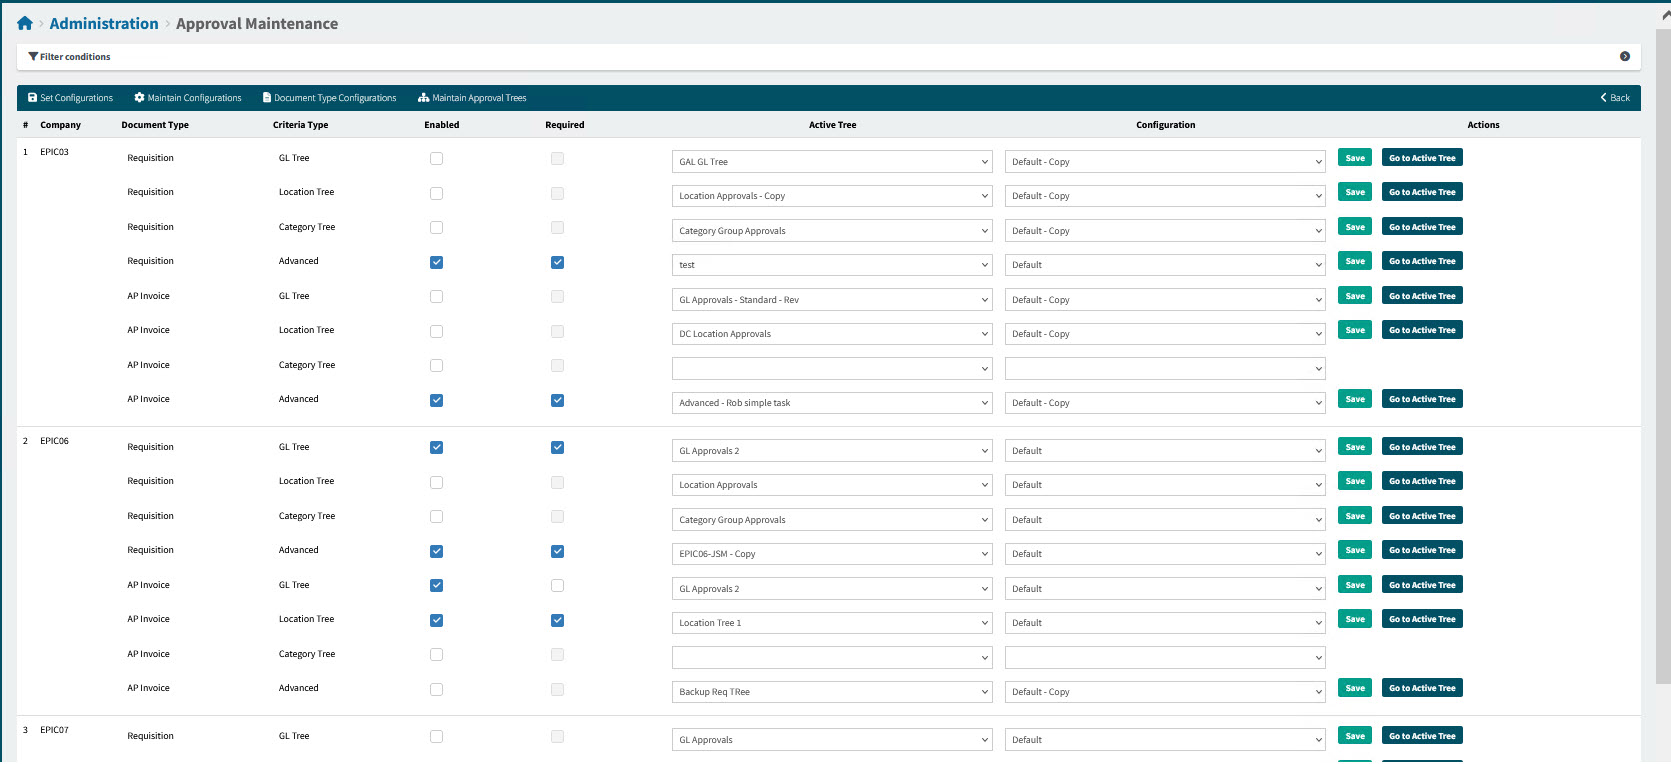
The Approval Maintenance grid is partitioned into the different Companies. Each Company has a section for the Requisition Document Type and a second section for the AP Invoice Document Type.
Each Document Type has four rows, for the four Criteria Types (GL Tree, Location Tree, Category Tree and Advanced).
View Example of Company with Document Types and Criteria Types


Company

Document Type

Criteria Type
Company There are four trees per document type listed under each Company.
Document Type There are two document types, Requisition and AP Invoice, listed under each Company.
Criteria Type There are four Criteria Types, one for each Company and Document Type:
-
GL Tree
-
Location Tree
-
Category Tree
-
Advanced
Enabled If a Criteria Type for a Company > Document Type has Enabled selected, then the Active approval tree for this Criteria Type is used when an approval workflow is created for a submitted document (of the Company and Document Type), provided a suitable entry node is found.
Required If a Criteria Type is Required, then the submitted document must go through the section of the approval workflow built from this approval tree.
If a suitable entry node is not available, the document Status remains as Saved. A message panel appears on the document, stating that the document has been suspended until a suitable entry node can be found.
Active Tree This is the Active Tree for this Criteria Type. The Active Tree is the one that will be used to build an approval workflow after a document is submitted.
Configuration Select a Configuration to be used for the Active tree.
Actions The applicable actions are listed on each row. These are detailed below.
-
-
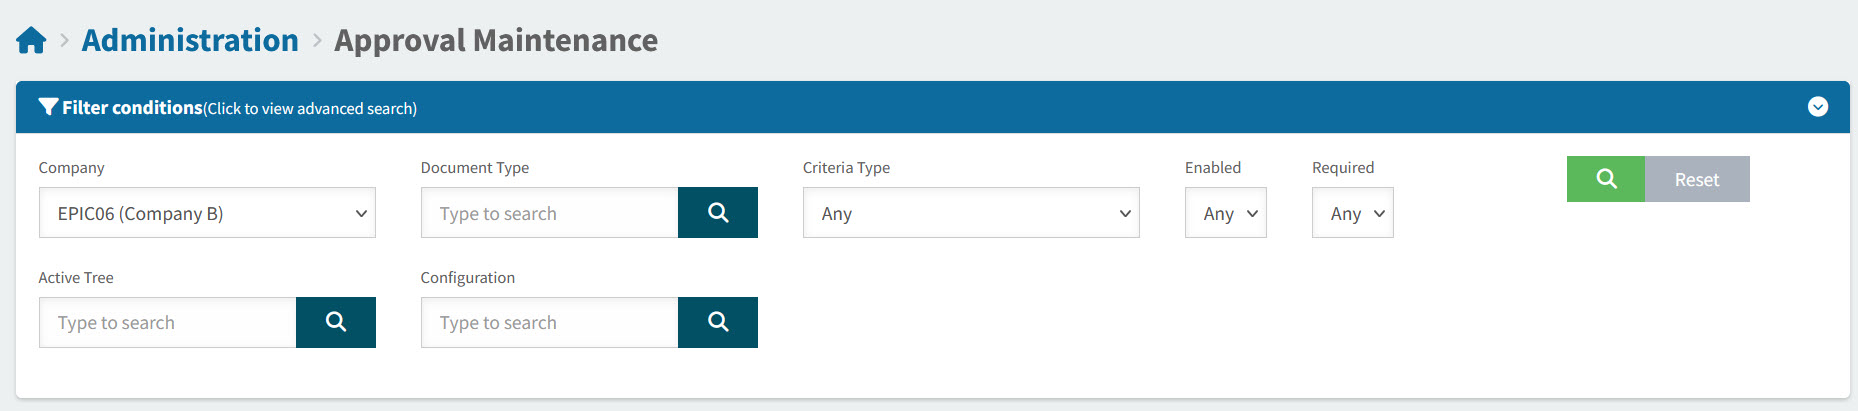
Adjust the filter conditions.
See Details
-
Expand the filter conditions in the top section of the page to narrow your search.
View filter conditions
-
Enter values in the edit boxes, or select from the search boxes. See the filter conditions, below.
Filter conditions
Company Leave blank, or select a Company to filter on.
Document Type Leave blank, or select one of the Document Types to filter on: AP Invoice or Requisition.
Criteria Type Select Any, or select a Criteria Type to filter on: GL Tree, Location Tree, Category Tree, or Advanced.
Enabled Select Any, Yes, or No.
Required Select Any, Yes, or No.
Active Tree Leave blank, or select an active tree from the drop-down list to filter on.
Configuration Leave blank, or select a configuration from the drop-down tree to filter on.
-
When you have entered the search criteria click on the green search
 button in the top right corner.
Rows that match the Filter Conditions appear in the grid.
-
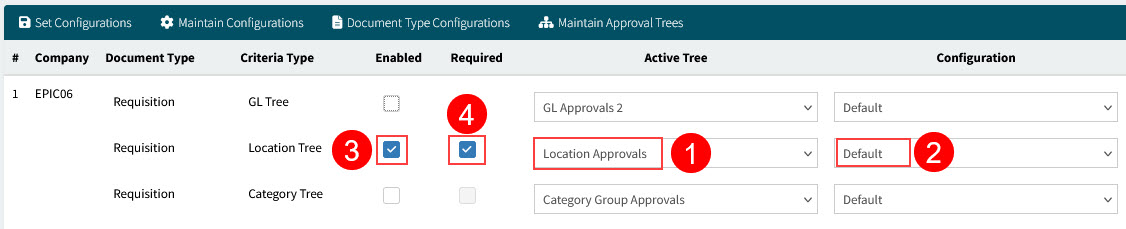
On the grid, you can do the following for each row that defines a Company > Document Type > Criteria Type:
|
Select an Active Tree from the drop-down list. This is the approval tree that will be used for approvals for the Company > Document Type > Criteria Type, once the row is Enabled. |
|
Select a Configuration from the drop-down list. This is the configuration that will be used to define the rules governing approvals for the Company > Document Type > Criteria Type, once the row is Enabled. |
|
To enable the selections for the Company > Document Type > Criteria Type, select Enabled. |
|
To enforce the approvals for the Company > Document Type > Criteria Type, select Required. |

See Grid
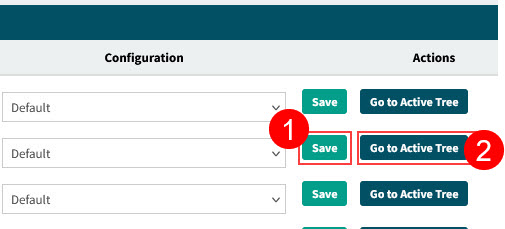
Under the Actions column, you can:
|
Click the Save button on the row, to save the changes. |
|
To view or edit the Active Tree, click Go to Active Tree. This opens the Active Tree on the Approval Trees page. If the tree is not Enabled, you can edit it. See Approval Tree. |
See Actions Column
On the Menu Bar, you can perform the following actions:
|
Set Configurations |
Set a Configuration for all the filtered Approval Trees. See Set Configurations. |
|
Maintain Configurations |
Copy, update, or delete Configurations. See Maintain Configurations. |
|
Document Type Configurations |
Update or view the settings for the AP Invoice and the Requisition Document Types. See Document Type Configurations. |
|
Maintain Approval Trees |
Maintain, add, view or delete the Approval Trees. See Maintain Approval Trees. |
See Menu Bar
Set Configurations
Use Set Configurations to apply a single selected configuration to all filtered approval trees, in Approval Maintenance.
Permissions
You require a role with the Maintain Approval Hierarchy permission to view this page. See Permissions in ARM.
-
Select
Administration in the side menu, to open the Administration page. -
On the Administration page, select Approvals Maintenance.
-
Optionally, update the Search conditions on Approvals Maintenance to filter the approvals before you set a configuration to the results.
-
Adjust the filter conditions.
See Details
-
Expand the filter conditions in the top section of the page to narrow your search.
View filter conditions
-
Enter values in the edit boxes, or select from the search boxes. See the filter conditions, below.
Filter conditions
Company Leave blank, or select a Company to filter on.
Document Type Leave blank, or select one of the Document Types to filter on: AP Invoice or Requisition.
Criteria Type Select Any, or select a Criteria Type to filter on: GL Tree, Location Tree, Category Tree, or Advanced.
Enabled Select Any, Yes, or No.
Required Select Any, Yes, or No.
Active Tree Leave blank, or select an active tree from the drop-down list to filter on.
Configuration Leave blank, or select a configuration from the drop-down tree to filter on.
-
When you have entered the search criteria click on the green search
button in the top right corner.
Rows that match the Filter Conditions appear in the grid.
These are the filtered approvals.
-
-
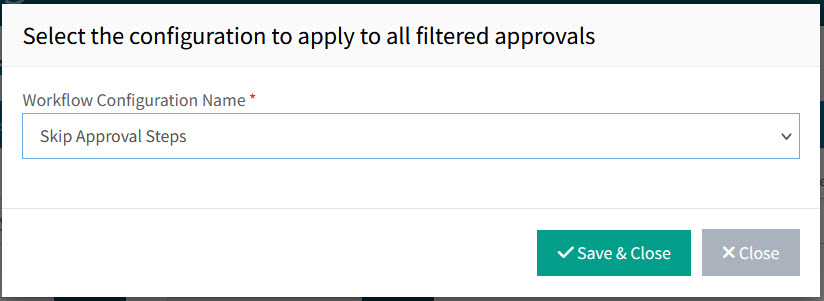
Click
 Set Configurations on the Approvals Maintenance menu bar.
A pop-up screen appears: Select the configuration to apply to all filtered approvals.
-
In the pop-up screen, select a Workflow Configuration Name from the drop-down list.
-
Select Save & Close.
The selected Configuration is applied to all the filtered approvals.
Maintain Configurations
A Configuration controls the behavior of its associated approval trees.
A Configuration’s rules are applied when the approval tree is in use. The rules determine, for example, whether to evaluate the individual line amount, or whether to evaluate the total requisition amount.
In Maintain Configurations, you can add, edit or delete configurations.
| You may only delete configurations that are not associated with any approval trees. |
Permissions
You require a role with the Maintain Approval Hierarchy permission to view this page. See Permissions in ARM.
To maintain configurations:
-
Select
Administration in the side menu, to open the Administration page. -
On the Administration page, select Approvals Maintenance.
-
Click
 Maintain Configurations on the Approvals Maintenance menu bar.
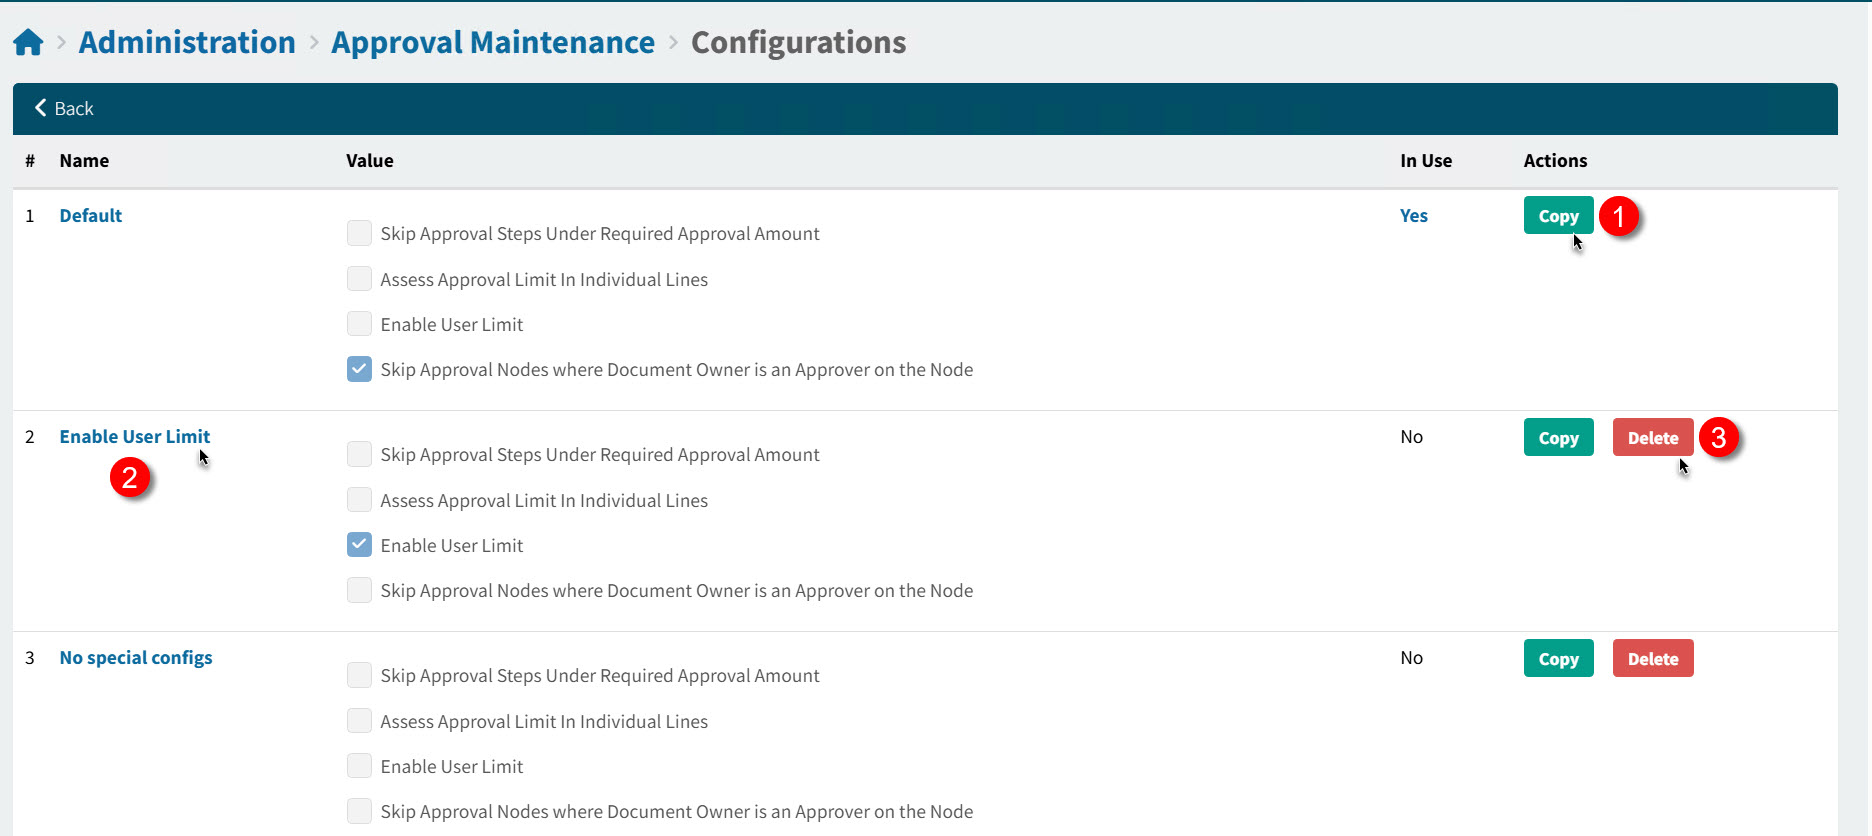
The Administration > Approvals Maintenance > Maintain Configurations page opens.
From this page you can:
|
|
Add a new Configuration, by copying an existing one |
|
|
Update a Configuration |
|
|
Delete a Configuration that is not in use |
See Detail
Updating a Configuration
You can update a configuration that is already associated with approval trees, or update a new (copied) configuration.
To update a configuration:
-
Locate it in the Configurations list.
-
Click on the configuration Name.
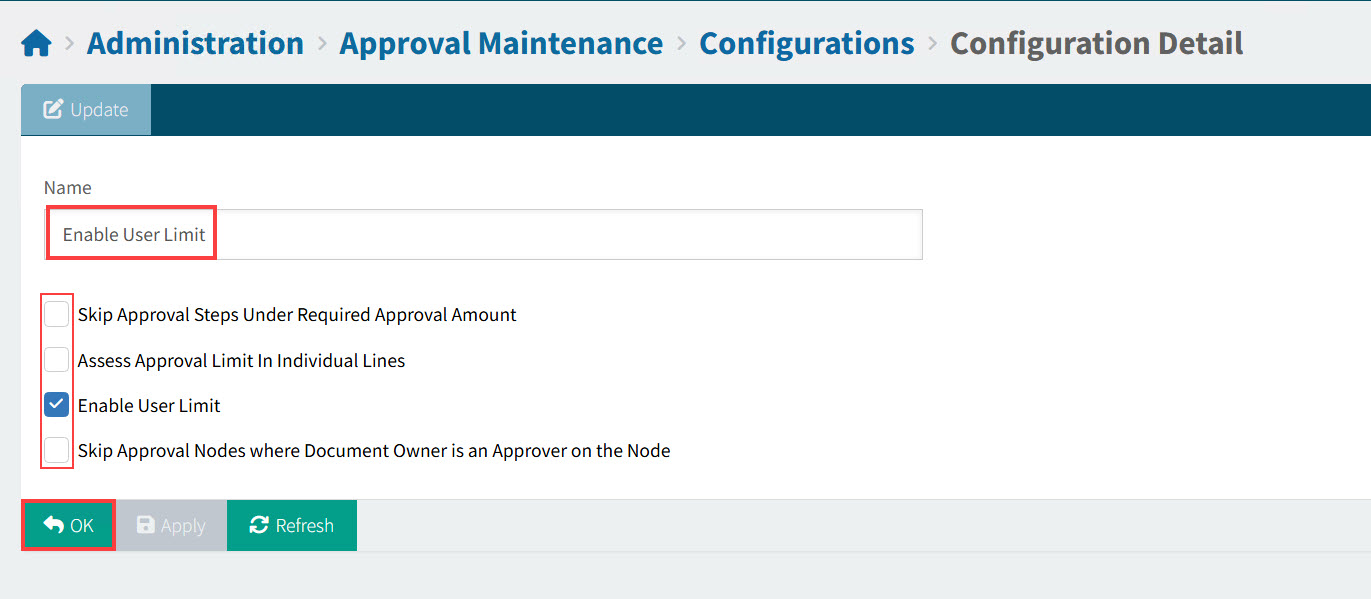
The Configuration Details opens:
See Detail
-
Optionally update the Name.
-
Choose configuration options, by selecting or clearing the check boxes.
Check Box Options
Option Explanation Skip Approval Steps Under Required Approval Amount
This functionality allows for Approval Nodes with the approval limit below the Requisition amount to be skipped over entirely.
If an approval user is configured to have an Authorisation Limit of 100 dollars and the requisition to be approved is over that amount, then approval will pass up the chain to an approver who can authorise this amount.
The user with the lower authorisation limit will not be presented with this requisition at all in any of their Notification hyperlinks.
See also Approval Process Rules - Skip Approval Steps Under Required Approval Amount.
Assess Approval Limit in Individual Lines
The approval process will be based on the individual line total amounts instead of the whole Requisition amounts.
See also Approval Process Rules - Assess Approval Limit in Individual Lines.
Enable User Limit
When this is enabled, amounts below the Requisition Limit are auto-approved.
Skip Approval Nodes where Document Owner is an Approver on the Node
When an approver submits a Requisition and the Requisition total is within the current node approval limit, the approval request can also be actioned by the other approvers configured on the same node (if these exist).
When disabled, the other approvers on the same node will also have to approve the Requisition. When enabled, the logic moves up the approval tree to the next node if relevant.
See also Approval Process Rules - Skip Approval nodes where Document Owner is an Approver on the Node.
-
Click OK.
The updated configuration applies its new rules to any associated approval trees. If the Name was updated, the new name appears in the Configuration column of any associated approval trees, in Approvals Maintenance.
-
Adding a Configuration
-
Click Copy on either the Default configuration, or another one that you want to copy.
A copy is created and appears at the end of the list of configurations. It has the same name as the copied configuration, appended by '- Copy'.
-
Click on the Name of the new Configuration to update it.
Deleting a Configuration
You may only delete a Configuration that is not in use. To see which approval trees are using the configuration, set the filter conditions with just the Configuration selected. You can then update those to a different configuration, either separately, or by using Set Configuration to apply to all filtered approvals.
When the Configuration is no longer in use, a Delete button appears next to it.
-
Click the Delete button to remove the Configuration.
-
Click Yes on the confirmation dialog.
Document Type Configurations
Each Company has a Document Type Configuration for each document type going through the approval process. The document types are: Requisition and AP Invoice.
The Document Type Configuration defines the validation and rules governing the approvals for that document type. For example, Vendor Validation occurs On Submit for the Requisition document type.
Permissions
You require a role with the Maintain Approval Hierarchy permission to view this page and maintain the document type configurations. See Permissions in ARM.
To maintain Document Type Configurations:
-
Select
Administration in the side menu, to open the Administration page. -
On the Administration page, select Approvals Maintenance.
-
Click
 Document Type Configurations on the Approvals Maintenance menu bar.
The Administration > Approvals Maintenance > Document Types Configuration page opens.
See below for details on how to:
-
Create a Document Type Configuration.
-
Edit a Document Type Configuration.
-
Understand the Configuration Settings.
Creating a Document Type Configuration
| You can only have one Document Type Configuration per Company > Document Type. If this has already been created, you can edit it if required. |
To create a new Document Type Configuration:
-
Select
 Create on the menu bar.
In the new Document Type Configuration:
-
Select a Company from the drop-down list.
-
Select a Document Type from the drop-down-list.
-
Select from the drop-down list for each of the conditions under the Options column header.
-
-
Select Save under the Actions column header. Otherwise, Cancel.
Editing a Document Type Configuration
To edit a Document Type Configuration:
-
Select Edit under the Actions column header for the Company > Document Type.
-
Update one or more of the Options. To update an Option, select a new value from its drop-down list.
-
Select Save under the Actions header. Otherwise, Cancel your changes.
Configuration Settings
| Company |
The Document Type Configurations only apply to the selected Company and Document Type. |
||||||||||||||||||||||||||
| Document Type |
There are two Document Types:
|
||||||||||||||||||||||||||
| Options |
For the Requisition Document Type: Details
For the APInvoice Document Type: Details
|
||||||||||||||||||||||||||
| Actions |
|
Maintain Approval Trees
There can be several Approval Trees defined in ARM, although only one Active approval tree per Tree Type (Criteria Type) is allowed for each Company > Document Type.
An Active approval tree that is In Use is used to create an approval workflow when a document is submitted.
Permissions
You require a role with the Maintain Approval Hierarchy permission to view this page and maintain approval trees. See Permissions in ARM.
To maintain approval trees:
-
Select
Administration in the side menu, to open the Administration page. -
On the Administration page, select Approvals Maintenance.
-
Click
 Maintain Approval Trees on the Approvals Maintenance menu bar.
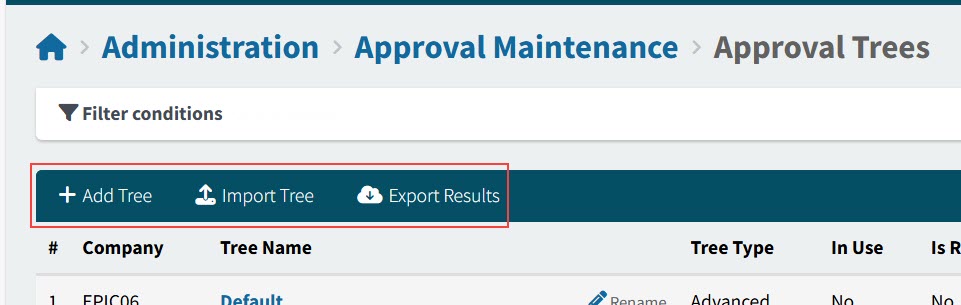
The Administration > Approvals Maintenance > Approval Trees page opens.
The Approval Maintenance grid lists all the approval trees for the search conditions, regardless of whether they are active or not.
Company The approval tree belongs to this Company.
Tree Name Click on the Tree Name to open the approval tree, for viewing/editing.
Tree Type There are four available Tree Types (Criteria Types), and all four types (if active and in use) can be used together to create the approval workflow, if their conditions are met. The four tree types are:
-
GL Tree: This is used to identify the approval process for the submitted document/lines based on its GL Account Code.
The entry node is the one with a GL Account Mask that matches the document’s GL Account Code, and where the GL Account Exclusion Masks do not match the document’s GL Account Code.
-
Location Tree: This is used to identify the approval process for the submitted document/lines based on its Location Code.
The entry node is the one with a Location Code matching the Receiving Location Code.
-
Category Tree: This is used to identify the approval process for the submitted document/lines based on its Category Code. The entry node is the one with a Category Group that includes the document’s Category Code.
-
Advanced: Use this to combine different criteria into a single tree. Criteria can be: Location Code, Buyer, Project, Part No, Category Code, etc. These make up part of logical conditions, using operators such as MATCHES, NOT MATCHES, =, IN, or NOT IN, and so on. Different conditions can then be combined into a more complex condition using operators OR, AND, or NOT.
In Use If Yes, this is an Active tree that is Enabled. Click Yes to see the tree listed in Approval Maintenance.
Is Referenced If Yes, this is an Active tree. Click Yes to see the tree listed in Approval Maintenance.
Actions There are a variety of actions. See below for a detailed description.
-
-
Adjust the filter conditions.
See Details
-
Expand the filter conditions in the top section of the page to narrow your search.
View filter conditions
-
Enter values in the edit boxes, or select from the search boxes. See the filter conditions, below.
Filter conditions
Company Leave blank, or select a Company to filter on.
Tree Name Leave blank, or select a Tree Name to filter on.
Tree Type Leave blank, or select a Tree Type to filter on: GL Tree, Location Tree, Category Tree, or Advanced.
In Use Select check box to filter on trees that are in use.
-
When you have entered the search criteria click on the green search
button in the top right corner.
Rows that match the Filter Conditions appear in the grid.
-
On the grid, you can do the following for each row:
|
Click on a Tree Name to open the Approval Tree for viewing or editing. See Editing or Viewing an Approval Tree. |
|
Click Rename to rename the tree. See Renaming an Approval Tree |
|
Click Yes for an In Use tree, to view it in Approval Maintenance. |
|
Click Yes for an Is Referenced tree, to view it in Approval Maintenance. |
|
Perform various actions under the Actions column. |

See Grid
|
Under the Actions column, you can:
|
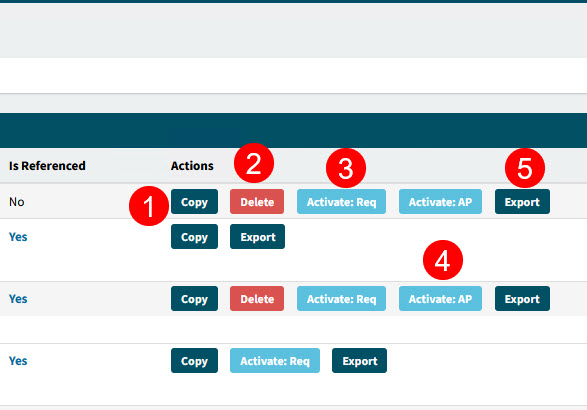
Copy the tree. |
Click to copy the Approval Tree. See Copying an Approval Tree. |
|
Delete the tree. |
Click the Delete button to delete the Approval Tree. See Deleting an Approval Tree. |
|
Activate:Req |
Click to activate the Approval Tree for the Requisition Document Type. The Requisition |
|
Activate:AP |
Click to activate the Approval Tree for the AP Invoice Document Type. The AP Invoice |
|
Export |
Click to export the approval tree. See Exporting an Approval Tree. |


See Actions Column
|
On the Menu Bar, you can perform the following actions:
|
Add Tree |
Add a new approval tree. See Adding an Approval Tree. |
|
Import Tree |
Import an approval tree. See Importing an Approval Tree. |
|
Export Results |
View export files. See Export Results. |
See Menu Bar
|
Adding an Approval Tree
When creating a new tree, you can choose the Advanced tree type, which uses combinations of different criteria, or you can choose from the Category, Location or GL tree types. You can have one active tree from each of the tree types, per Document Type, per Company.
To add a new approval tree:
-
On the Menu Bar, select
 Add Tree to add a new approval tree.
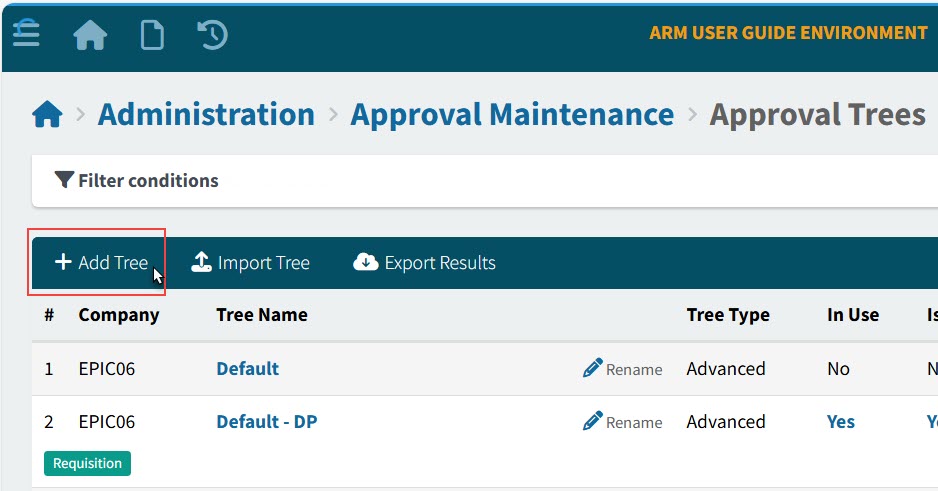
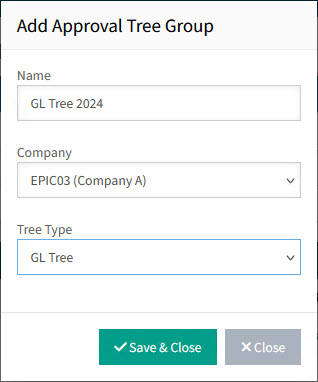
This opens the Add Approval Tree Group pop-up box.
-
Enter the details in the Add Approval Tree Group pop-up box.
-
Enter a Name for the new approval tree.
-
Select a Company for the approval tree to belong to.
-
Select a Tree Type.
-
Click Save & Close.
The Approval Maintenance>Approval Trees> [Tree Name]-[Company Name] page opens.
-
-
Now add root and child nodes to the new approval tree on the Approval Trees page. See Edit Approval Tree.
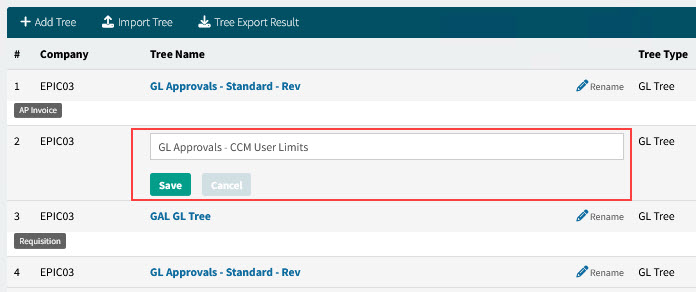
Renaming an Approval Tree
To rename an approval tree:
-
Click on the Rename button in the Approval Trees grid.

-
Type in the new tree name, then click Save.
Details
| Tree Names do not need to be unique. It’s a good idea to rename a tree with a duplicate name to avoid confusion. For copies of trees, you could use version numbering, for example. |
Copying an Approval Tree
To copy an approval tree:
-
Click the Copy button under the Actions column, for an approval tree in the Approval Trees grid.
-
In the Copy Approval Tree Group dialog, select a Company, update the Name, then click Save & Close.
The new approval tree opens in the Approval Trees page.
-
Edit the new approval tree on the Approval Trees page. See Edit Approval Tree.
Editing or Viewing an Approval Tree
To edit or view an approval tree:
-
Click on a Tree Name in the Approval Trees grid, to edit it or view the details.
The approval tree opens on the Approval Trees page.
-
Edit the approval tree on the Approval Trees page. See Edit Approval Tree.
| You cannot edit an approval tree while it is In Use. If you copy the In Use approval tree, you can edit the copy and then select this as the Active tree. |
Deleting an Approval Tree
To delete an approval tree:
-
Click the Delete button under the Actions column, for an approval tree in the Approval Trees grid.
-
Click Yes on the confirmation dialog.
The tree is deleted, and a Deleted successfully message appears on the bottom right of the screen.
| The Delete button is only available for Approval Trees that are not active. |
Importing and Exporting Approval Trees
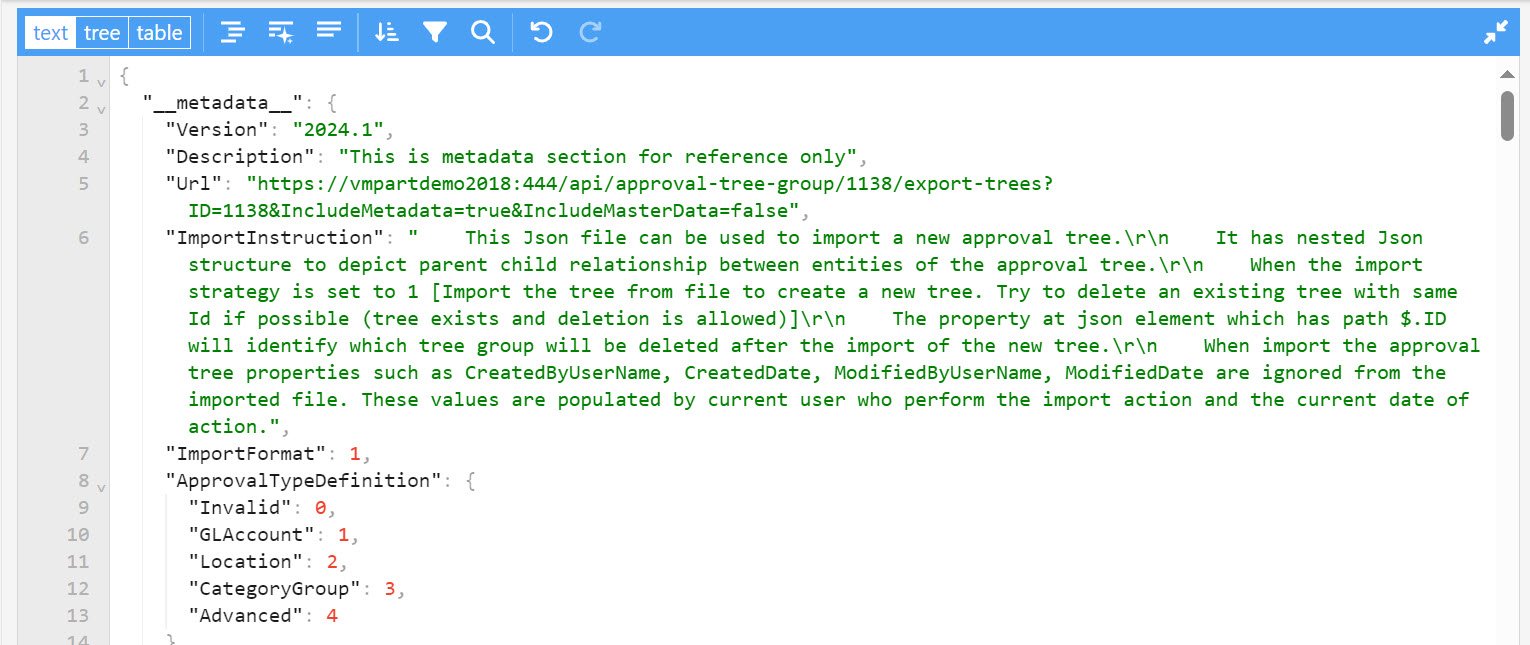
In ARM, you can export an existing tree (this exports a tree in JSON format), then make changes in the exported JSON file, and import that as a new tree.
Using a JSON editor, you can make extensive changes with editing features, such as search and replace, instead of editing an approval tree in ARM.
You can also export trees from one environment (such as a test environment) and then import them into a production environment.
-
To import an approval tree, first export an existing tree.
-
To keep a record of exported trees in ARM, ensure you select the option Run Export in Background Job, when you run the export. If you don’t select this option, the exported JSON file is saved directly to the Downloads folder.
-
To view the record of exported trees, select Tree Export Result on the menu bar.
These are the steps to take:
-
STEP 1: Locate the tree you want to export.
-
STEP 2: Export the tree. See Exporting an Approval Tree.
-
STEP 3: Download the JSON file.
-
If you exported the tree with Run Export in Background Job de-selected, the downloaded file is saved to the Downloads file. Locate it from here.
-
If you exported the tree with Run Export in Background Job selected, first access the file from the ARM directory, and download it from there. See Export Results.
-
-
STEP 4: Edit the JSON file. Note that there are instructions to follow, within the JSON file’s metadata.
-
STEP 5: Import the JSON file. See Importing an Approval Tree.
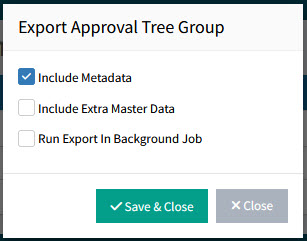
Exporting an Approval Tree
To export an approval tree:
-
Click the Export button under the Actions column, for an approval tree in the Approval Trees grid.
The Export Approval Tree Group dialog box appears.
-
Select from the following options:
Include Metadata If this is selected, the JSON file will include metadata describing the approval tree in more detail.
Include Extra Master Data If this is selected, additional master data is included in the export, giving context to the approval tree.
Run Export In Background Job If this is selected, the export file is stored within ARM. The job runs in the background, so you can continue with other work.
-
Click Save & Close.
See example snippet with Include Metadata selected:
|
See example snippet with Include Metadata de-selected:
|

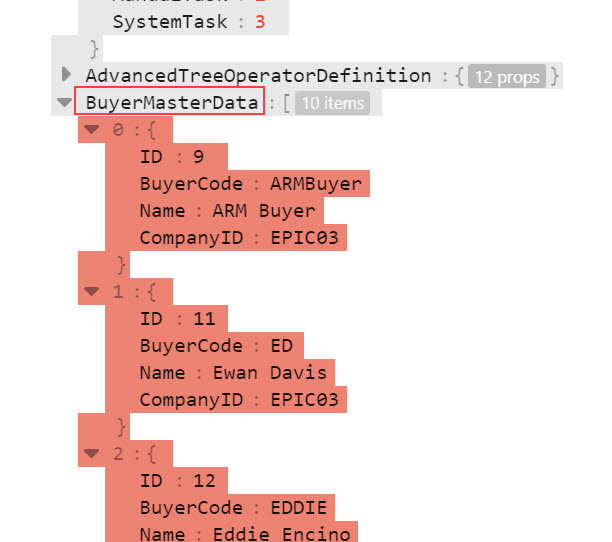
See example snippet with Include Extra Master Data selected:
|
Export Results
To see the export files saved to ARM:
-
Click
 Export Results on the Menu Bar.
The > Approval Trees Export Result page opens.
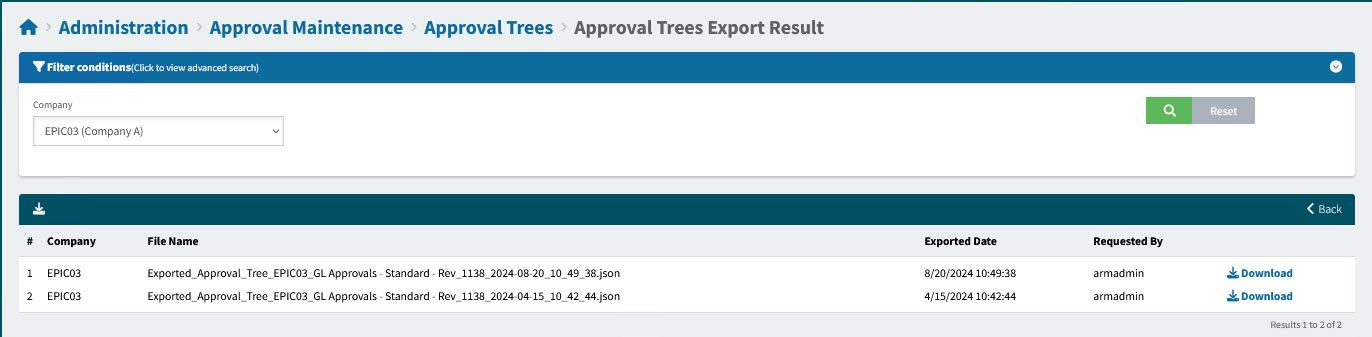
Company The Company that the exported approval tree belonged to.
File Name A file name identifying the tree.
Exported Date The date and time that the export file was created.
Requested By The name of the User who exported the approval tree.
Download Each file can be downloaded from ARM storage.
-
Optionally filter by Company.
-
Click on
 Download to download a file from ARM storage to the local Downloads folder.
Importing an Approval Tree
To import an approval tree:
-
Click
 Import Tree on the Menu Bar.
The > Import Approval Trees page opens.
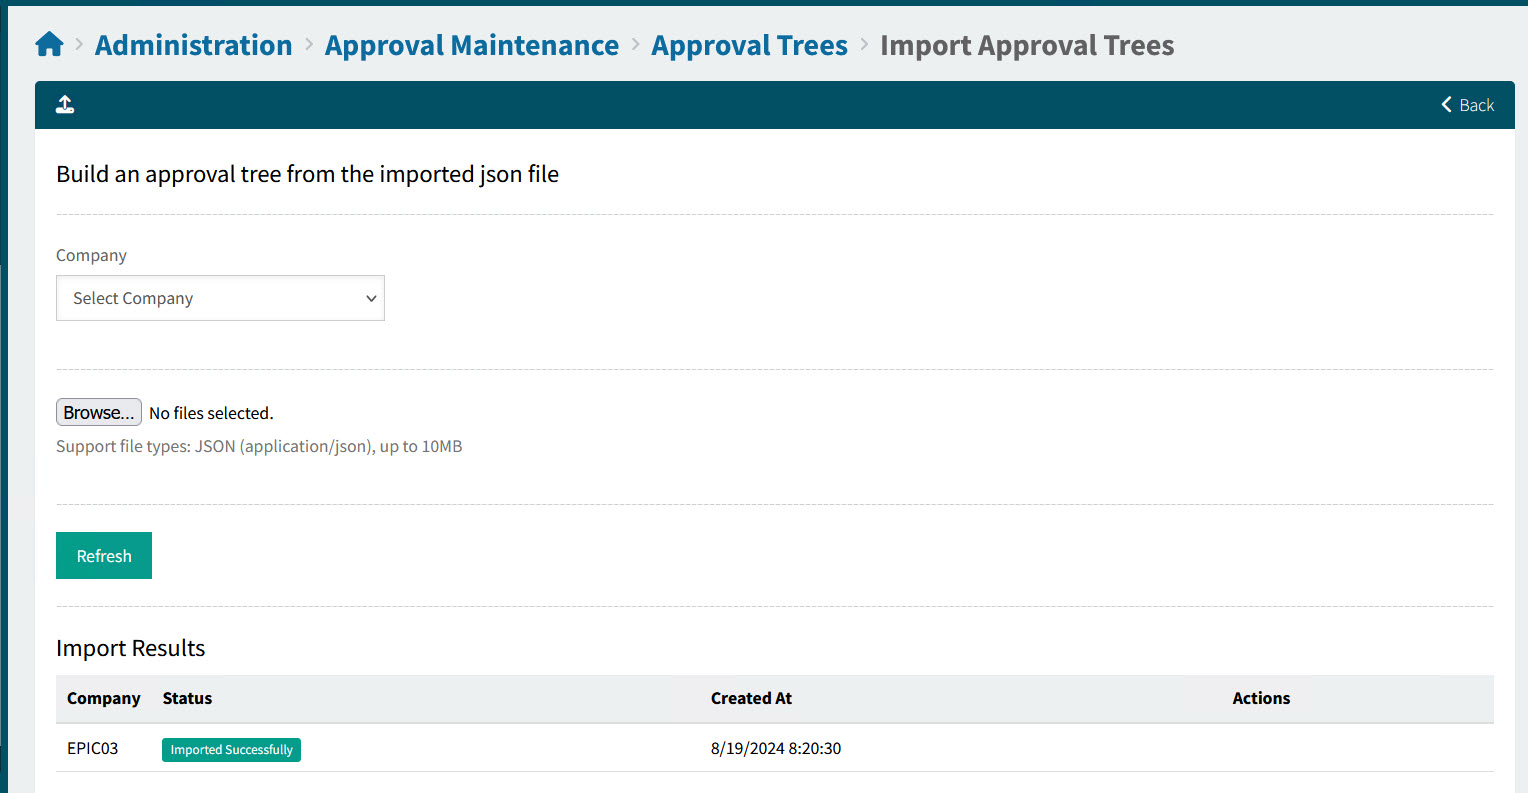
Make selections on the page to build an approval tree from the imported file.
-
Select a Company from the drop-down list. The approval tree will belong to this Company.
-
Click Browse to select one or more of the edited JSON approval tree files.
A new section called Upload Process appears, listing the selected file(s).
If you want to clear the list and start over, click Refresh, below the file list. -
Click Upload.
The import process begins. The import appears in the Import Results table, with a Status of Queued.
See Details
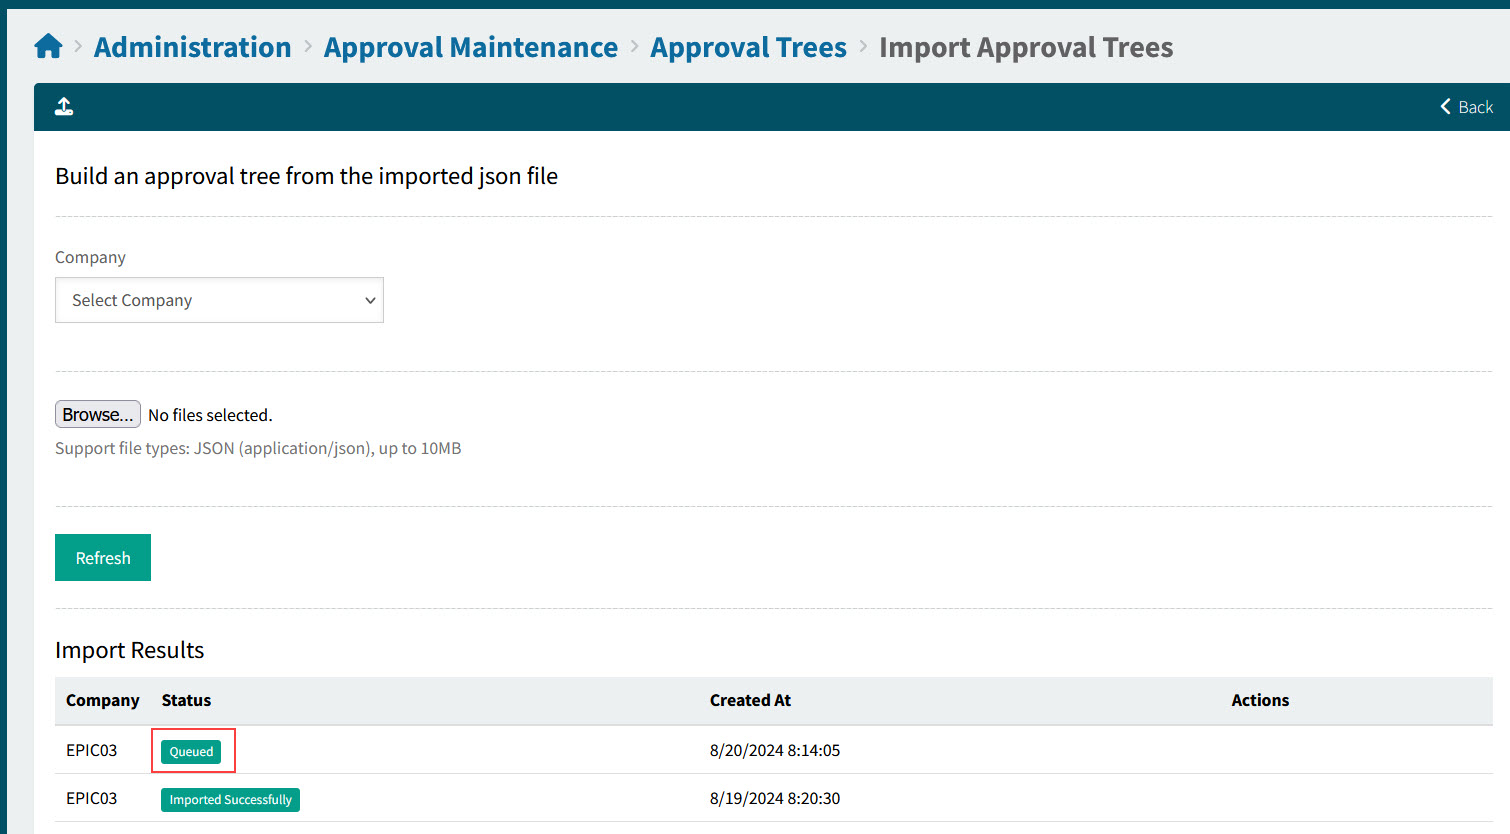
-
Click Refresh to see if the import was successful (the Status of each imported file should be Imported Successfully).
See Details
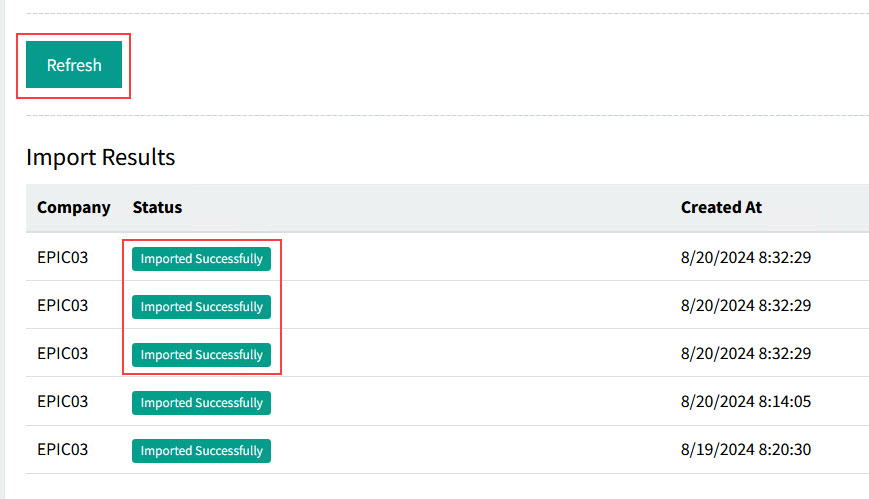
The date and time of the import are displayed under the Created At column.
Depending on the import strategy defined in the JSON file, the imported tree will either be created as an additional tree, or it will replace the tree it was exported from.
| A tree can only be replaced if it exists and if it may be deleted (is not in use). |
Approval Tree
The Administration > Approval Maintenance > Approval Trees > [approval tree name] page is where you edit or view an approval tree. This may be a new tree (created or copied), or an existing tree. You can also copy the currently selected tree.
An active approval tree may form part of the approval workflow that is created when a document is submitted. This is explained in the section Approvals Process.
The approval tree is made up of root, parent and child nodes.
Each node can be an approval node or a task node (see Task Nodes). A tree can have a combination of regular and task nodes, or it can consist of just one type of node (regular or task).
Open this page from either Administration > Approval Maintenance > Approval Trees, when you edit a tree or create a new tree/copy of a tree, or open it from Administration > Approval Maintenance by clicking Go to Active Tree for an active approval tree of a Company > Document Type > Criteria type.
| Note that In Use trees and Enabled trees cannot be edited, only viewed. Any tree can be copied. |
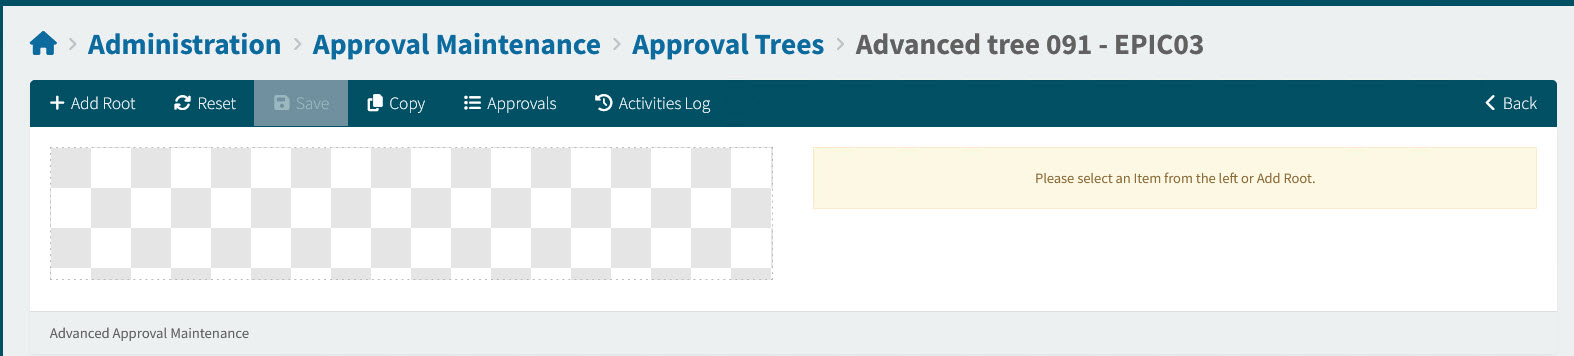
See an example of an Advanced Tree that already has nodes:
See an example of an Advanced Tree without nodes:
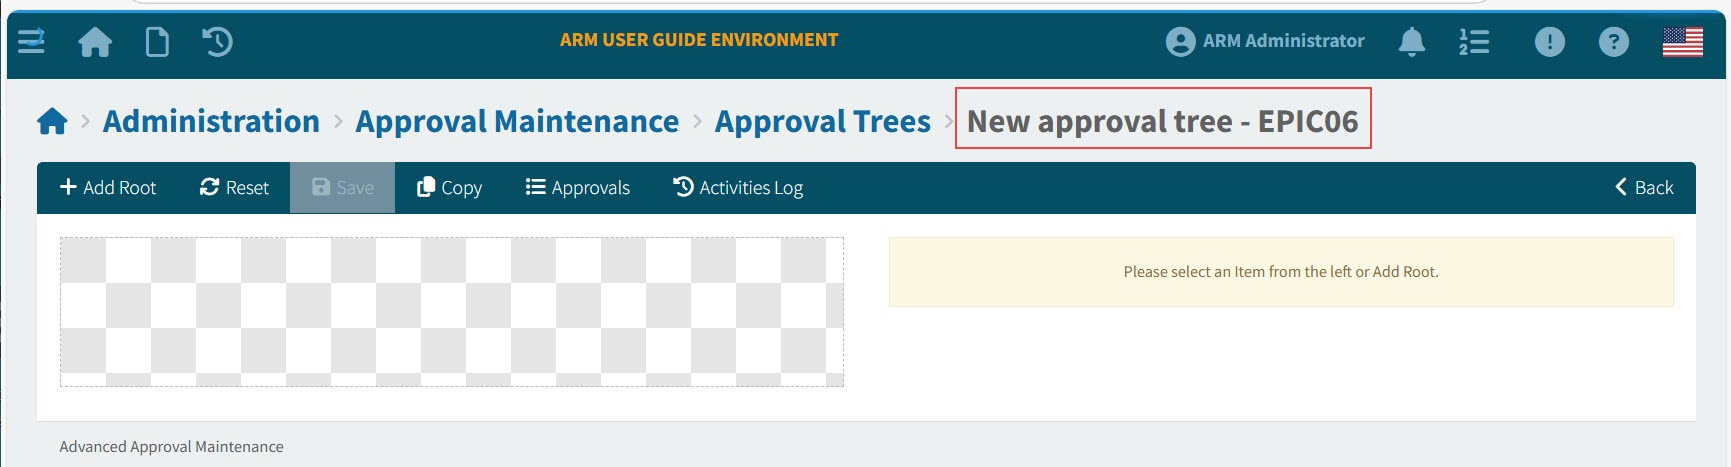
This tree has just been created and still requires nodes.
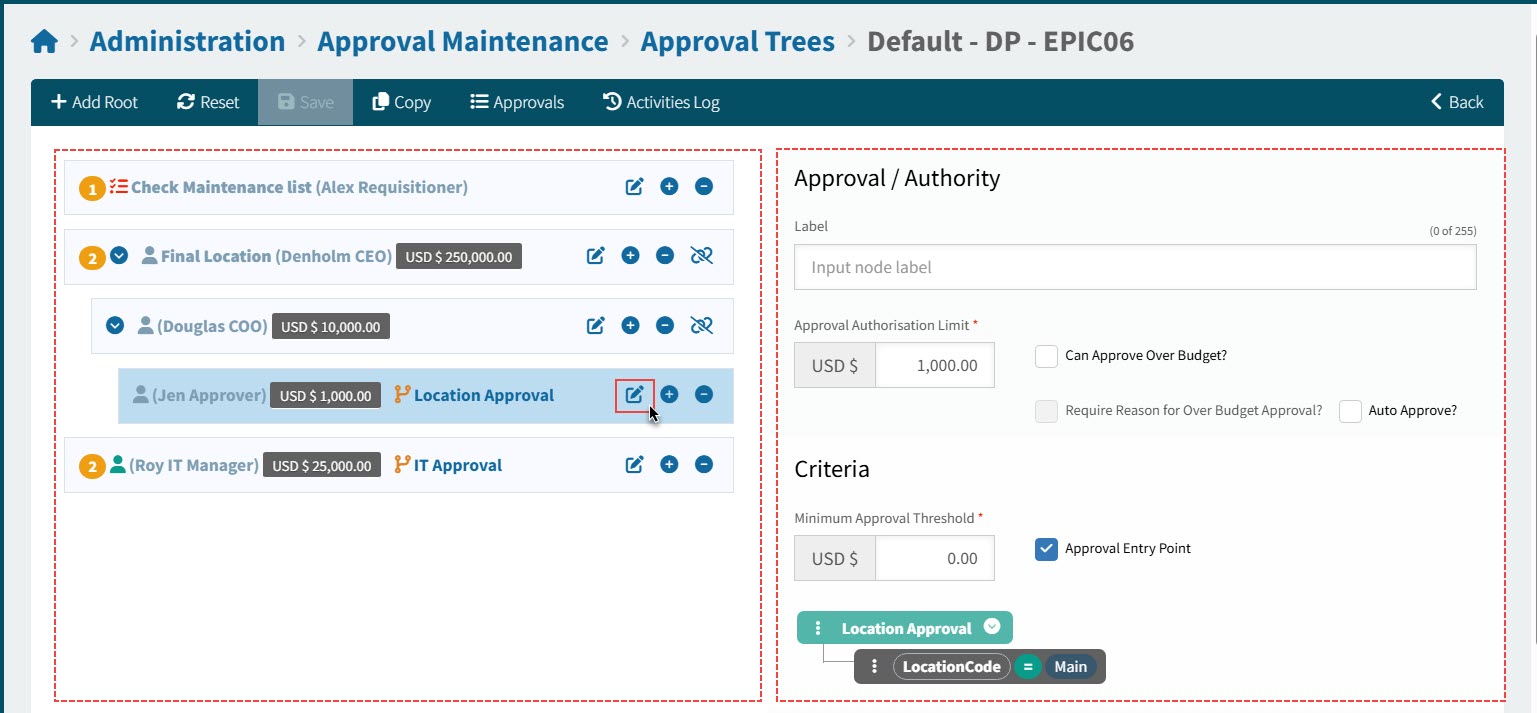
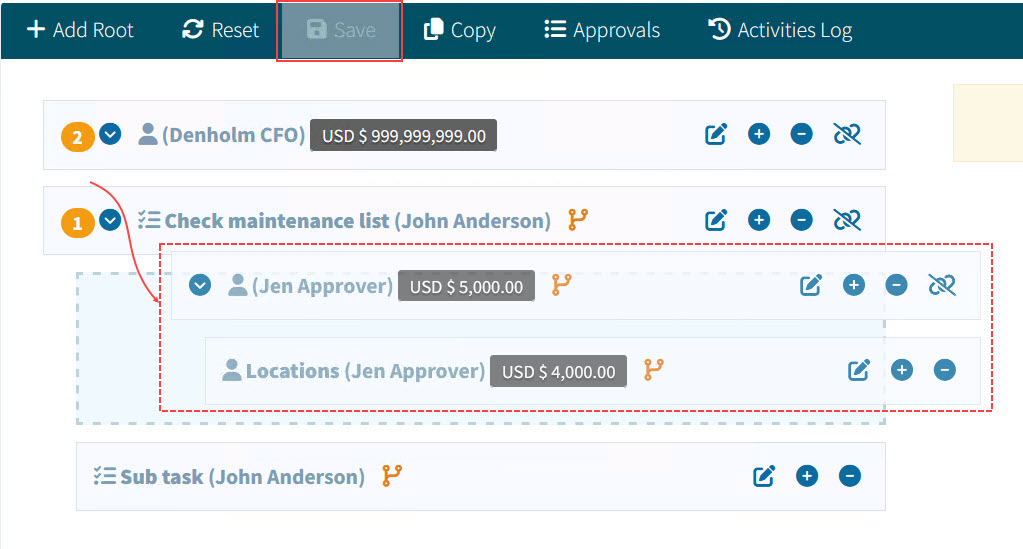
The Approval Tree page is split into two panels. On the left is the tree structure and on the right is an edit panel used for editing the individual nodes.
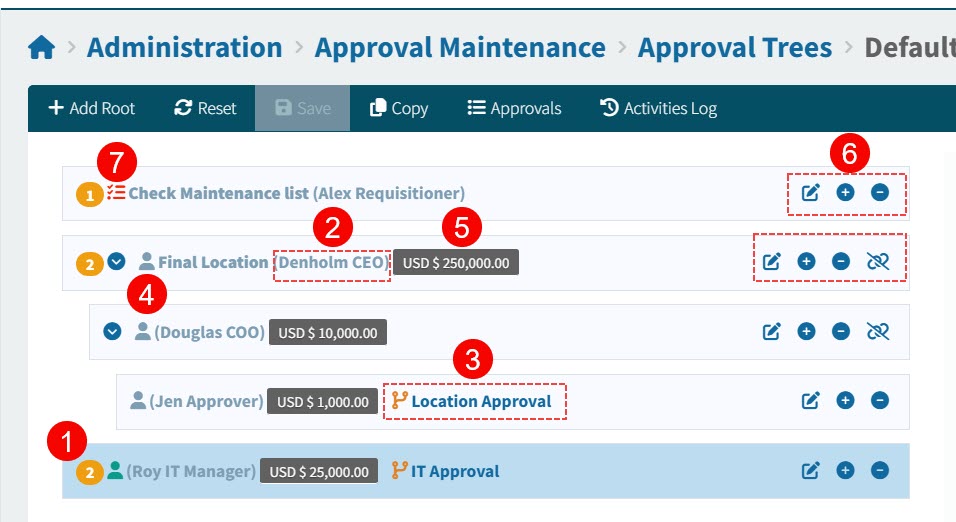
See detail of tree on left panel:
| This tree can be edited, as it is not currently Enabled. |
|
|
Approval Sequence |
Where a tree has more than one root node, the approvals occur in this sequence (starting from number 1). Approvals occur in parallel if they have the same approval sequence number. |
|
Approver |
The name of the first Approver for this node is listed here. If there is more than one approver, the Approver Name is followed by an ellipsis (…). Click on this to see the other approvers. |
|
Workflow |
This icon indicates that the node has criteria, and can therefore be an entry node. Hover over the icon to see the criteria label. Click on the icon to open the approval tree structure. |
|
Person |
A green |
|
Approval Authorisation Limit |
The authorization limit for this node. |
|
Node edit buttons |
Use these edit buttons to update the tree structure, or edit the current node.
|
|
Task node |
This node is a Task node. |


If you click the edit  button on a node in the tree panel, you can see the node details in the panel on the right.
See tree on left with edit panel on right:
|
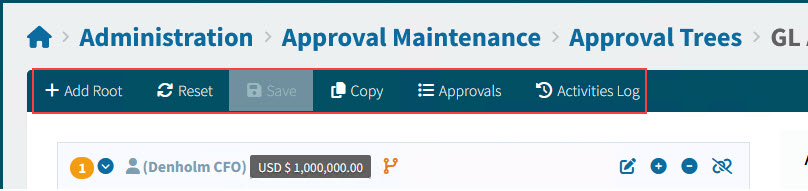
On the Menu Bar, you can perform the following actions:
|
Add Root |
Add a root node to the tree |
|
Reset |
Reset to cancel any changes made to the approval tree (before saving) |
|
Save |
Save changes to the approval tree |
|
Copy |
Copy the approval tree |
|
Approvals |
View approval nodes in listing (see View Approval Nodes in Listing). |
|
Activities Log |
View Activities Log (see details in the section below) |


See Menu Bar
|
View Approvals Nodes in Listing
-
Click
 Approvals on the Menu Bar.
Alternatively, link to this page by clicking the
Approvals button on the Menu Bar of the Users page.This opens the Administration > Approval Maintenance > Approval Trees > Approval List page.
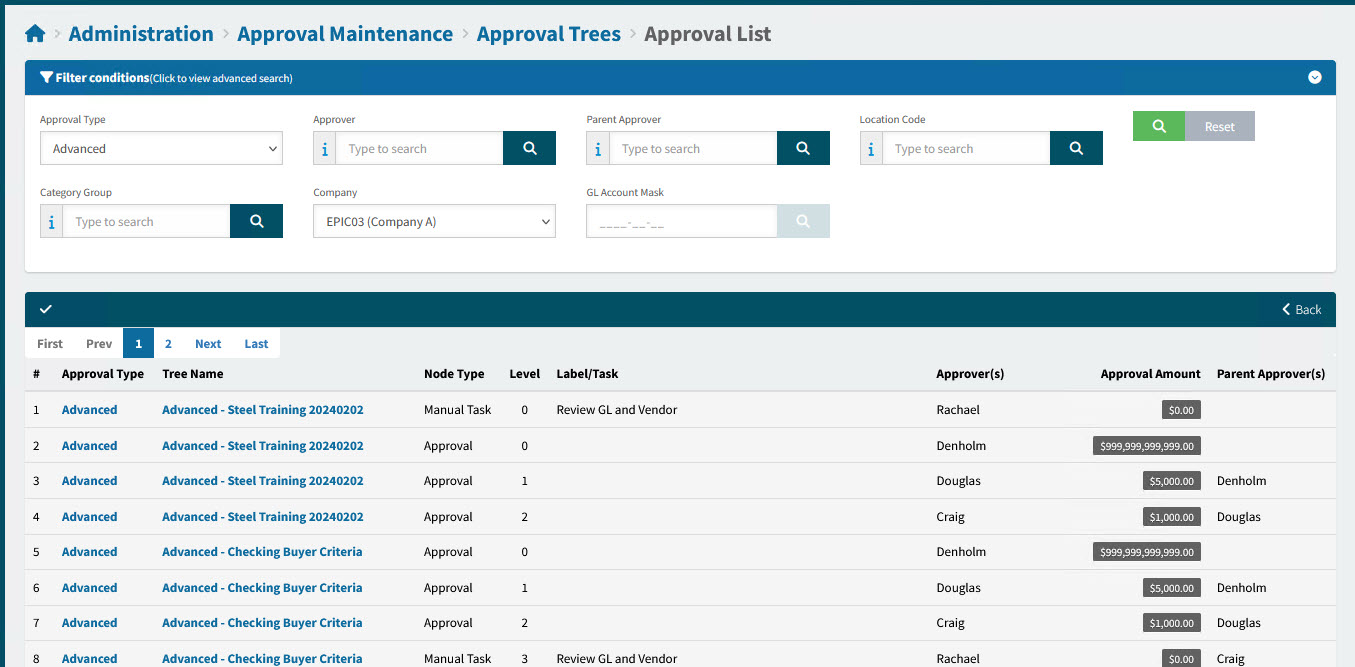
The page lists approval trees filtered by the filter conditions.
Each tree in the listing is displayed as a flat list, with the node levels displayed under the Level column. Approver(s) are listed for each node, as well as the Approval Amount (Approval Authorisation Limit), the Node Type (Manual Task or Approval). The Parent Approver(s) are also displayed, where applicable.
-
Click on a Tree Name to open the approval tree on the Approval Tree page. If the tree is not enabled, you can edit it, otherwise you can view it.
| By setting the filter conditions for Approver, you can get a list of approval trees where that user is an approver on a node. |
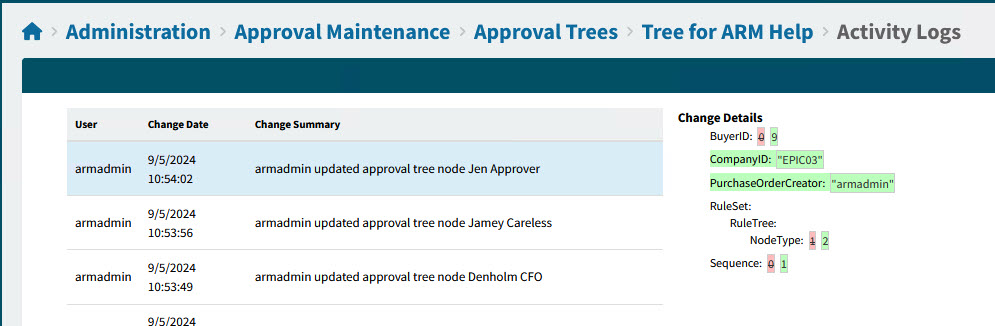
View Activities Log
To view the change log for the approval tree:
-
Click
 Activities Log on the Menu Bar.
This opens the Activity Logs page for the approval tree.
The logs are listed in the left panel, in order of most recent.
-
Click on a log to view its change details on the right panel.
See example
See below how to edit an approval tree.
Edit Approval Tree
The example below shows how to edit a new approval tree. The steps are the same when editing an existing approval tree.
-
Select
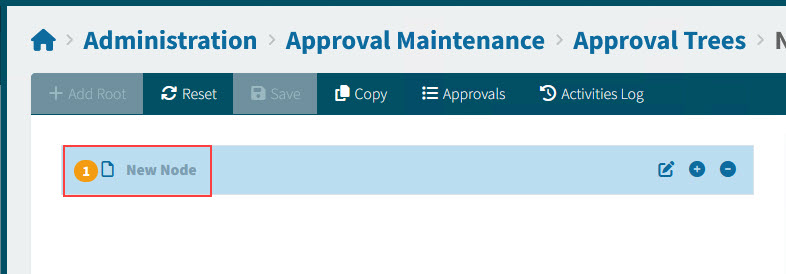
 Add Root on the Menu Bar.
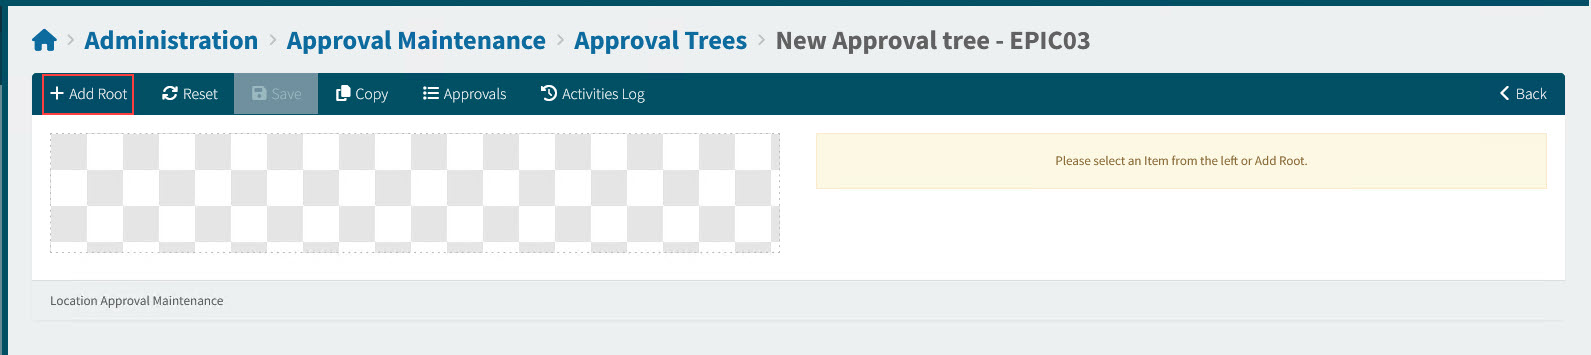
A New Node is added to the Approval Tree.
-
On the right-hand panel, edit the root node. See Edit Root Node.
-
On the left-hand panel, click the
 on the root node, to add a child node.
 -
Edit the child node. See Edit Child Node.
-
Continue to add child nodes, until the tree is complete.
You can have more than one root node. Add another root node if required. -
Finish editing the root and child nodes.
-
To move a child node to another part of the tree:
-
Click, drag and drop the node to the desired spot in the tree. Any of its child nodes will be moved as well.
-
Click Save on the Menu Bar to save the new tree structure, or click Reset to undo the changes.
See example
-
Edit Root Node
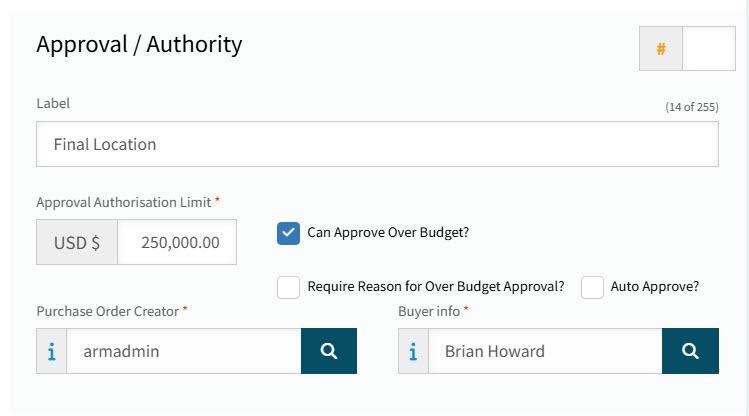
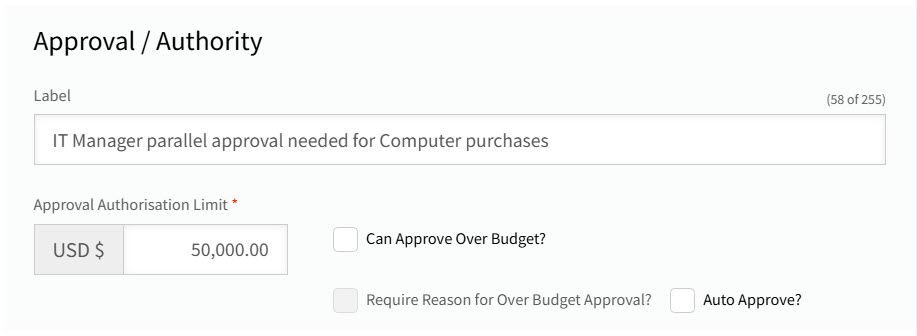
Edit the Approval / Authority section:
See detail
|
| Approval Sequence |
This is for Root Nodes only. When an approval workflow is built, the approvals occur sequentially in Approval Sequence order. Where there are root nodes with matching Approval Sequence numbers, these approvals occur in parallel. See also Approvals Process - Approval Sequence. 
|
| Task (only visible on a new node) |
Select the Task check box if this is a task. This changes the node to a Task node. See the instructions for editing a Root Task node: Edit Root Task Node. Or see how to edit a Child Task node: Edit Child Task Node. After you save the changes to this node, the Task check box no longer appears on the node. |
||
| Label |
Give the node an identifying label. This appears in the tree view alongside the Approver’s name. |
||
| Approval Authorisation Limit |
Enter the Approval Authorisation Limit for this Approval Node. See also Approvals Process - Approval Authorisation Limit. |
||
| Can Approve Over Budget? |
Select if Approver(s) on this node are allowed to approve Requisitions/AP Invoices that result in going over the GL Budget/Project Budget. See also Approvals Process - Can Approve Over Budget. This setting is only relevant if GL Budget Checking is Enabled (see GL Budget) or if Enable Project Budget Checking is enabled (see Global Settings).
|
||
| Require Reason for Over Budget Approval? |
Select if the approver needs to supply a reason when approving over budget. (This check box is only enabled if you first select Can Approve Over Budget.) |
||
| Auto Approve? |
Select if you want approvals to be done automatically for this Approver. This also means that this Approver will not get Notifications about approvals if the Notification service is in use. See also Approvals Process - Auto Approve. If you select this, then Require Reason for Over Budget Approval? will be cleared. |

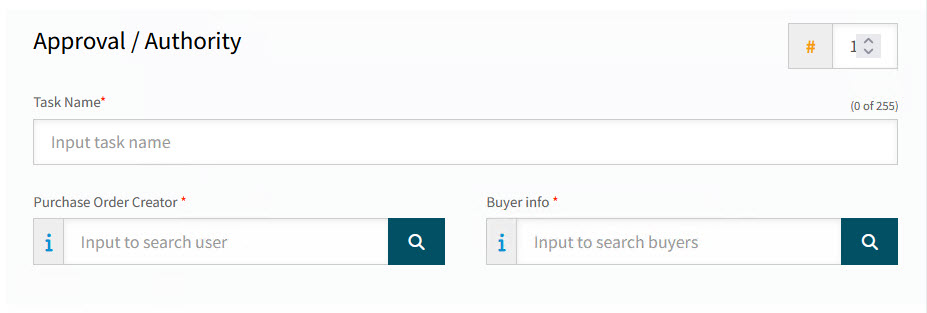
| Purchase Order Creator |
Select a User from the drop-down list. For requisition approvals: This is the Purchase Order Creator that is used on the pro-forma order, after a requisition line is approved. |
||
| Buyer Info |
Select a Buyer from the drop-down list. For requisition approvals: This is the Buyer used on the pro-forma order if there is no buyer set for the requisition line.
|
Edit the Criteria section.
|
The instructions here apply to the Advanced tree type. See how to set the Criteria section for:
|
This section has two options:
-
Either the node is not an Approval Entry Point (criteria is inherited)
-
or the node is an Approval Entry Point (with criteria)
Best practice is for the higher nodes to be non-entry nodes (inherit criteria) and for the lower (leaf) nodes to have be entry nodes (have criteria).
-
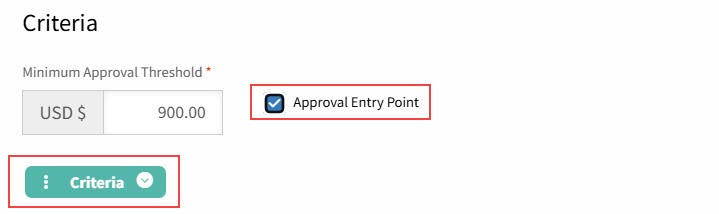
Enter a Minimum Approval Threshold: The amount being approved must be at least the Minimum Approval Threshold amount for this to be an approval node on an approval workflow.
-
To inherit the criteria of the below node, clear Approval Entry Point. With this check box cleared, if the criteria for any of the child nodes is met, then the criteria for this node is met.
See Detail

-
Alternatively, to make this an approval entry point, select Approval Entry Point, then select the criteria for this node.
See Detail
To select criteria:
-
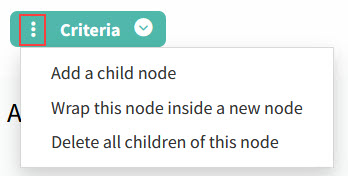
Click on the three vertical dots on the left of the root node, then select from:
-
Add a child node: Click to add a child node to this node.
-
Wrap this node inside a new node: Click to insert a parent node above this node.
-
Delete all children of this node: If this node has children, these will all be deleted. (For a new tree node, there will be no children here yet.)
-
-
Click on the Criteria label to update the Node Options.
See Detail
-
Optionally update the Label. The label appears on the criteria tree for this approval tree node and it also appears in the Workflow diagram when you hover over this node.
-
Select OR, AND or NOT as the operator for this node.
-
Click Close.
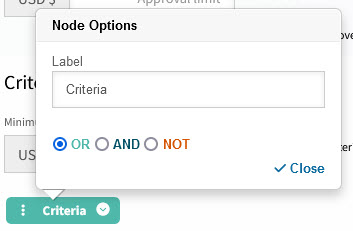
The Criteria button appears as light blue for OR, dark blue for AND, and red for NOT. The default operator is OR.
- OR
-
The OR operator is used between all operands (the children of this node). For example, if condition 1 is met, OR condition 2 is met, OR condition 3 is met, then the criteria for this node, the parent node, is satisfied (at least one condition must be met).
Example
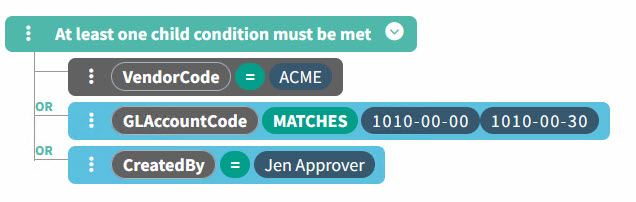
If there is only one child, then its condition must be met.
- AND
-
The AND operator is used between all operands (the children of this node). For example, if condition 1 is met, AND condition 2 is met, AND condition 3 is met then the criteria for this node, the parent node, is satisfied (all conditions must be met).
Example
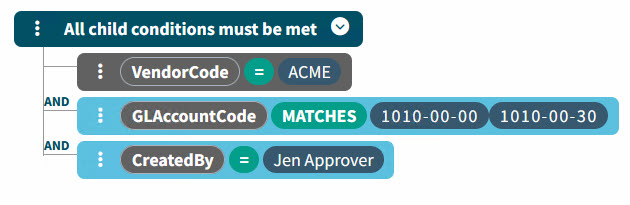
All child conditions must be met.
- NOT
-
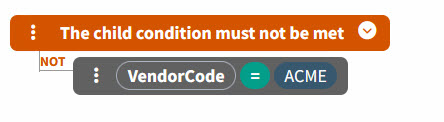
If a parent node has the NOT operator then it must have one, and only one, child node. If the condition for the child node is not met, then the criteria for the parent node is satisfied.
Example
-
-
Set the condition clause for each node.
See Detail
-
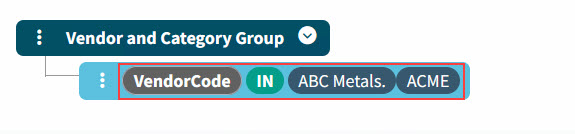
Click on the Select Field button, then select a field from the drop-down list. The field is selected as an operand (VendorCode for this example) and the default operator for that field is inserted (IN for this example).
See available fields in Approval Tree Criteria. -
Click on the operator to select from the list. Available operators depend on the selected field. For example, field GLAccountCode is restricted to operators 'MATCHES' and 'NOT MATCHES', whereas field LocationCode has 'IN', '=', 'MATCHES', 'IS BLANK' and others.
See Example Operators
-
IN
-
=
-
IS BLANK
-
NOT BLANK
-
MATCHES
-
NOT MATCHES
-
-
Click on Specify value to select a value. The options here depend on the selected field. Sometimes you can add multiple values, for example where there is an IN operator.
If you are editing the criteria tree, you can select a different field, operator, and value(s) to change the condition for a node. -
-
Continue to add nodes and set their conditions, until the tree node Criteria section is complete.
-
You can manipulate the criteria tree by adding child nodes, deleting nodes, etc. To create a new branch, select Wrap this node inside a new node.
-
For a node without child nodes you can:
-
Copy this node
-
Insert a node above
-
Insert a node below
-
Wrap this node inside a new node
-
Delete this node
-
-
For a node with child nodes you can:
-
Add a child node
-
Insert a node above
-
Insert a node below
-
Wrap this node inside a new node
-
Delete this node
-
Delete all children of this node
-
Delete this node and its children
-
-
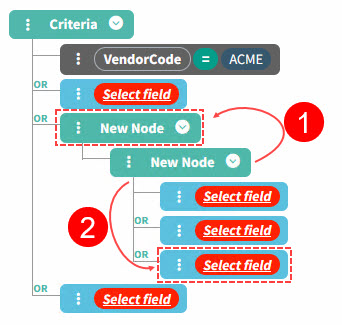
See example
(1) Wrap this node inside a new node.
(2) Add a child node.
-
See an example of a Criteria tree with multiple nodes:
|
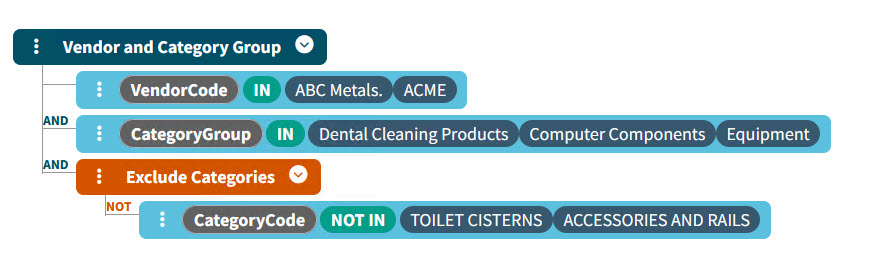
In summary, the Criteria section is where you define the criteria for an entry node in an approval workflow. For example, if there is a Minimum Approval threshold of $ 1,000 and the criteria is for LocationCode IN (Location A, Location B, Location C) then the approver on this node is responsible for approving requisitions of at least $ 1,000 for Locations A, B, or C.
Edit the Approver(s) section:
Detail
|
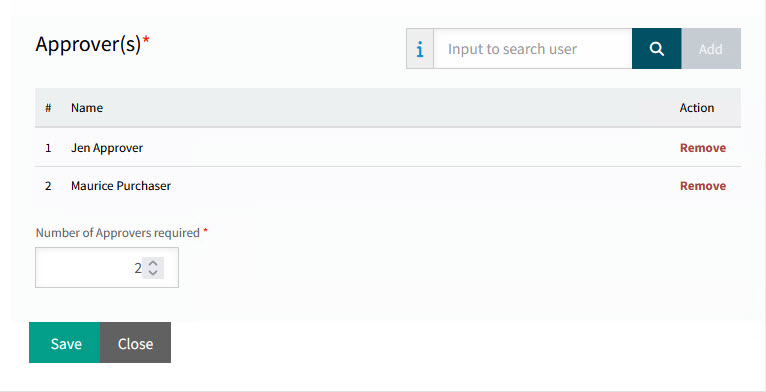
| Approver |
Add one or more Approvers. Search for a user in the Input to search user search box, then select Add. |
||
| Number of Approvers required |
This edit box only appears if there is more than one approver, and defaults to the number of approvers listed (all approvers are required). Select any number from 1 to [total number of approvers listed]. See Approvals Process - Number of Approvers required.
|
Edit Child Node
Edit the Approval / Authority section:
See detail
|
| Task (only visible on a new node) |
Select the Task check box if this is a task. This changes the node to a Task node. See the instructions for editing a Root Task node: Edit Root Task Node. Or see how to edit a Child Task node: Edit Child Task Node. After you save the changes to this node, the Task check box no longer appears on the node. |
||
| Label |
Give the node an identifying label. This appears in the tree view alongside the Approver’s name. |
||
| Approval Authorisation Limit |
Enter the Approval Authorisation Limit for this Approval Node. See also Approvals Process - Approval Authorisation Limit. |
||
| Can Approve Over Budget? |
Select if Approver(s) on this node are allowed to approve Requisitions/AP Invoices that result in going over the GL Budget/Project Budget. See also Approvals Process - Can Approve Over Budget. This setting is only relevant if GL Budget Checking is Enabled (see GL Budget) or if Enable Project Budget Checking is enabled (see Global Settings).
|
||
| Require Reason for Over Budget Approval? |
Select if the approver needs to supply a reason when approving over budget. (This check box is only enabled if you first select Can Approve Over Budget.) |
||
| Auto Approve? |
Select if you want approvals to be done automatically for this Approver. This also means that this Approver will not get Notifications about approvals if the Notification service is in use. See also Approvals Process - Auto Approve. If you select this, then Require Reason for Over Budget Approval? will be cleared. |
Edit the Criteria section.
|
The instructions here apply to the Advanced tree type. See how to set the Criteria section for:
|
This section has two options:
-
Either the node is not an Approval Entry Point (criteria is inherited)
-
or the node is an Approval Entry Point (with criteria)
Best practice is for the higher nodes to be non-entry nodes (inherit criteria) and for the lower (leaf) nodes to have be entry nodes (have criteria).
-
Enter a Minimum Approval Threshold: The amount being approved must be at least the Minimum Approval Threshold amount for this to be an approval node on an approval workflow.
-
To inherit the criteria of the below node, clear Approval Entry Point. With this check box cleared, if the criteria for any of the child nodes is met, then the criteria for this node is met.
See Detail
-
Alternatively, to make this an approval entry point, select Approval Entry Point, then select the criteria for this node.
See Detail
To select criteria:
-
Click on the three vertical dots on the left of the root node, then select from:
-
Add a child node: Click to add a child node to this node.
-
Wrap this node inside a new node: Click to insert a parent node above this node.
-
Delete all children of this node: If this node has children, these will all be deleted. (For a new tree node, there will be no children here yet.)
-
-
Click on the Criteria label to update the Node Options.
See Detail
-
Optionally update the Label. The label appears on the criteria tree for this approval tree node and it also appears in the Workflow diagram when you hover over this node.
-
Select OR, AND or NOT as the operator for this node.
-
Click Close.
The Criteria button appears as light blue for OR, dark blue for AND, and red for NOT. The default operator is OR.
- OR
-
The OR operator is used between all operands (the children of this node). For example, if condition 1 is met, OR condition 2 is met, OR condition 3 is met, then the criteria for this node, the parent node, is satisfied (at least one condition must be met).
Example
If there is only one child, then its condition must be met.
- AND
-
The AND operator is used between all operands (the children of this node). For example, if condition 1 is met, AND condition 2 is met, AND condition 3 is met then the criteria for this node, the parent node, is satisfied (all conditions must be met).
Example
All child conditions must be met.
- NOT
-
If a parent node has the NOT operator then it must have one, and only one, child node. If the condition for the child node is not met, then the criteria for the parent node is satisfied.
Example
-
-
Set the condition clause for each node.
See Detail
-
Click on the Select Field button, then select a field from the drop-down list. The field is selected as an operand (VendorCode for this example) and the default operator for that field is inserted (IN for this example).
See available fields in Approval Tree Criteria. -
Click on the operator to select from the list. Available operators depend on the selected field. For example, field GLAccountCode is restricted to operators 'MATCHES' and 'NOT MATCHES', whereas field LocationCode has 'IN', '=', 'MATCHES', 'IS BLANK' and others.
See Example Operators
-
IN
-
=
-
IS BLANK
-
NOT BLANK
-
MATCHES
-
NOT MATCHES
-
-
Click on Specify value to select a value. The options here depend on the selected field. Sometimes you can add multiple values, for example where there is an IN operator.
If you are editing the criteria tree, you can select a different field, operator, and value(s) to change the condition for a node. -
-
Continue to add nodes and set their conditions, until the tree node Criteria section is complete.
-
You can manipulate the criteria tree by adding child nodes, deleting nodes, etc. To create a new branch, select Wrap this node inside a new node.
-
For a node without child nodes you can:
-
Copy this node
-
Insert a node above
-
Insert a node below
-
Wrap this node inside a new node
-
Delete this node
-
-
For a node with child nodes you can:
-
Add a child node
-
Insert a node above
-
Insert a node below
-
Wrap this node inside a new node
-
Delete this node
-
Delete all children of this node
-
Delete this node and its children
-
-
See example
(1) Wrap this node inside a new node.
(2) Add a child node.
-
See an example of a Criteria tree with multiple nodes:
|
In summary, the Criteria section is where you define the criteria for an entry node in an approval workflow. For example, if there is a Minimum Approval threshold of $ 1,000 and the criteria is for LocationCode IN (Location A, Location B, Location C) then the approver on this node is responsible for approving requisitions of at least $ 1,000 for Locations A, B, or C.
Edit the Approver(s) section:
Detail
|
| Approver |
Add one or more Approvers. Search for a user in the Input to search user search box, then select Add. |
||
| Number of Approvers required |
This edit box only appears if there is more than one approver, and defaults to the number of approvers listed (all approvers are required). Select any number from 1 to [total number of approvers listed]. See Approvals Process - Number of Approvers required.
|
Task Nodes
Task nodes do not have an Approval Authorisation Limit, Can Approve Over Budget or Auto Approve in the Approval / Authority section.
Task nodes do not have a Minimum Approval Threshold as part of their criteria. They are also exempt from the Document Type Configuration setting for Repeated Approver Behavior.
Edit Root Task Node
Edit the Approval / Authority section:
See detail
|
| Task Name |
This gives the task node an identifying label. The task node label appears in the tree view alongside the Approver’s name. |
| Purchase Order Creator |
Select a User from the drop-down list. For requisition approvals: This is the Purchase Order Creator that is used on the pro-forma order, after a requisition line is approved. |
||
| Buyer Info |
Select a Buyer from the drop-down list. For requisition approvals: This is the Buyer used on the pro-forma order if there is no buyer set for the requisition line.
|
Edit the Criteria section.
|
The instructions here apply to the Advanced tree type. See how to set the Criteria section for:
|
This section has two options:
-
Either the node is not an Approval Entry Point (criteria is inherited)
-
or the node is an Approval Entry Point (with criteria)
Best practice is for the higher nodes to be non-entry nodes (inherit criteria) and for the lower (leaf) nodes to have be entry nodes (have criteria).
To set the Criteria section for a task node:
-
To inherit the criteria of the below node, clear Approval Entry Point. With this check box cleared, if the criteria for any of the child nodes is met, then the criteria for this node is met.
See Detail
-
Alternatively, to make this an approval entry poin, select Approval Entry Point, then select the criteria for this node.
See Detail
To select criteria:
-
Click on the three vertical dots on the left of the root node, then select from:
-
Add a child node: Click to add a child node to this node.
-
Wrap this node inside a new node: Click to insert a parent node above this node.
-
Delete all children of this node: If this node has children, these will all be deleted. (For a new tree node, there will be no children here yet.)
-
-
Click on the Criteria label to update the Node Options.
See Detail
-
Optionally update the Label. The label appears on the criteria tree for this approval tree node and it also appears in the Workflow diagram when you hover over this node.
-
Select OR, AND or NOT as the operator for this node.
-
Click Close.
The Criteria button appears as light blue for OR, dark blue for AND, and red for NOT. The default operator is OR.
- OR
-
The OR operator is used between all operands (the children of this node). For example, if condition 1 is met, OR condition 2 is met, OR condition 3 is met, then the criteria for this node, the parent node, is satisfied (at least one condition must be met).
Example
If there is only one child, then its condition must be met.
- AND
-
The AND operator is used between all operands (the children of this node). For example, if condition 1 is met, AND condition 2 is met, AND condition 3 is met then the criteria for this node, the parent node, is satisfied (all conditions must be met).
Example
All child conditions must be met.
- NOT
-
If a parent node has the NOT operator then it must have one, and only one, child node. If the condition for the child node is not met, then the criteria for the parent node is satisfied.
Example
-
-
Set the condition clause for each node.
See Detail
-
Click on the Select Field button, then select a field from the drop-down list. The field is selected as an operand (VendorCode for this example) and the default operator for that field is inserted (IN for this example).
See available fields in Approval Tree Criteria. -
Click on the operator to select from the list. Available operators depend on the selected field. For example, field GLAccountCode is restricted to operators 'MATCHES' and 'NOT MATCHES', whereas field LocationCode has 'IN', '=', 'MATCHES', 'IS BLANK' and others.
See Example Operators
-
IN
-
=
-
IS BLANK
-
NOT BLANK
-
MATCHES
-
NOT MATCHES
-
-
Click on Specify value to select a value. The options here depend on the selected field. Sometimes you can add multiple values, for example where there is an IN operator.
If you are editing the criteria tree, you can select a different field, operator, and value(s) to change the condition for a node. -
-
Continue to add nodes and set their conditions, until the tree node Criteria section is complete.
-
You can manipulate the criteria tree by adding child nodes, deleting nodes, etc. To create a new branch, select Wrap this node inside a new node.
-
For a node without child nodes you can:
-
Copy this node
-
Insert a node above
-
Insert a node below
-
Wrap this node inside a new node
-
Delete this node
-
-
For a node with child nodes you can:
-
Add a child node
-
Insert a node above
-
Insert a node below
-
Wrap this node inside a new node
-
Delete this node
-
Delete all children of this node
-
Delete this node and its children
-
-
See example
(1) Wrap this node inside a new node.
(2) Add a child node.
-
See an example of a Criteria tree with multiple nodes:
|
In summary, the Criteria section is where you define the criteria for an entry node in an approval workflow. For example, if there is a Minimum Approval threshold of $ 1,000 and the criteria is for LocationCode IN (Location A, Location B, Location C) then the approver on this node is responsible for approving requisitions of at least $ 1,000 for Locations A, B, or C.
Edit the Persons section:
Detail
|
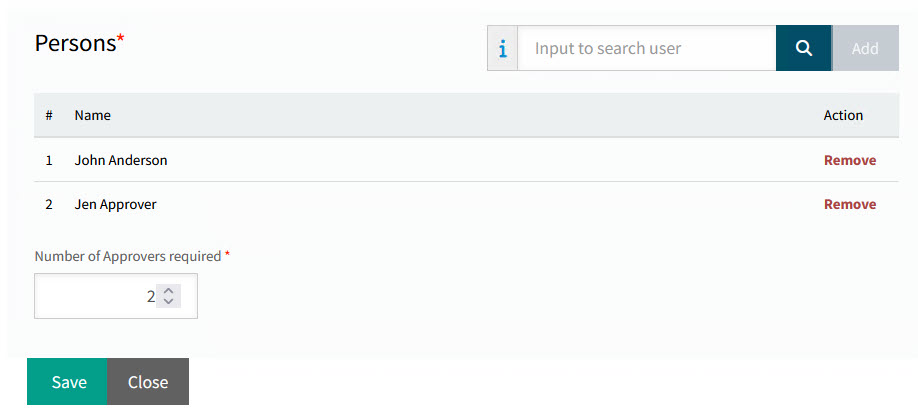
| Person |
Add one or more Persons. Search for a user in the Input to search user search box, then select Add. |
| Number of Approvers required |
This edit box only appears if there is more than one approver, and defaults to the number of persons listed (all persons are required). Select any number from 1 to [total number of persons listed]. See Approvals Process - Number of Approvers required. |
Edit Child Task Node
Edit the Approval / Authority section:
See detail
|
| Task Name |
This gives the task node an identifying label. The task node label appears in the tree view alongside the Approver’s name. |
Edit the Criteria section.
|
The instructions here apply to the Advanced tree type. See how to set the Criteria section for:
|
This section has two options:
-
Either the node is not an Approval Entry Point (criteria is inherited)
-
or the node is an Approval Entry Point (with criteria)
Best practice is for the higher nodes to be non-entry nodes (inherit criteria) and for the lower (leaf) nodes to have be entry nodes (have criteria).
To set the Criteria section for a task node:
-
To inherit the criteria of the below node, clear Approval Entry Point. With this check box cleared, if the criteria for any of the child nodes is met, then the criteria for this node is met.
See Detail
-
Alternatively, to make this an approval entry poin, select Approval Entry Point, then select the criteria for this node.
See Detail
To select criteria:
-
Click on the three vertical dots on the left of the root node, then select from:
-
Add a child node: Click to add a child node to this node.
-
Wrap this node inside a new node: Click to insert a parent node above this node.
-
Delete all children of this node: If this node has children, these will all be deleted. (For a new tree node, there will be no children here yet.)
-
-
Click on the Criteria label to update the Node Options.
See Detail
-
Optionally update the Label. The label appears on the criteria tree for this approval tree node and it also appears in the Workflow diagram when you hover over this node.
-
Select OR, AND or NOT as the operator for this node.
-
Click Close.
The Criteria button appears as light blue for OR, dark blue for AND, and red for NOT. The default operator is OR.
- OR
-
The OR operator is used between all operands (the children of this node). For example, if condition 1 is met, OR condition 2 is met, OR condition 3 is met, then the criteria for this node, the parent node, is satisfied (at least one condition must be met).
Example
If there is only one child, then its condition must be met.
- AND
-
The AND operator is used between all operands (the children of this node). For example, if condition 1 is met, AND condition 2 is met, AND condition 3 is met then the criteria for this node, the parent node, is satisfied (all conditions must be met).
Example
All child conditions must be met.
- NOT
-
If a parent node has the NOT operator then it must have one, and only one, child node. If the condition for the child node is not met, then the criteria for the parent node is satisfied.
Example
-
-
Set the condition clause for each node.
See Detail
-
Click on the Select Field button, then select a field from the drop-down list. The field is selected as an operand (VendorCode for this example) and the default operator for that field is inserted (IN for this example).
See available fields in Approval Tree Criteria. -
Click on the operator to select from the list. Available operators depend on the selected field. For example, field GLAccountCode is restricted to operators 'MATCHES' and 'NOT MATCHES', whereas field LocationCode has 'IN', '=', 'MATCHES', 'IS BLANK' and others.
See Example Operators
-
IN
-
=
-
IS BLANK
-
NOT BLANK
-
MATCHES
-
NOT MATCHES
-
-
Click on Specify value to select a value. The options here depend on the selected field. Sometimes you can add multiple values, for example where there is an IN operator.
If you are editing the criteria tree, you can select a different field, operator, and value(s) to change the condition for a node. -
-
Continue to add nodes and set their conditions, until the tree node Criteria section is complete.
-
You can manipulate the criteria tree by adding child nodes, deleting nodes, etc. To create a new branch, select Wrap this node inside a new node.
-
For a node without child nodes you can:
-
Copy this node
-
Insert a node above
-
Insert a node below
-
Wrap this node inside a new node
-
Delete this node
-
-
For a node with child nodes you can:
-
Add a child node
-
Insert a node above
-
Insert a node below
-
Wrap this node inside a new node
-
Delete this node
-
Delete all children of this node
-
Delete this node and its children
-
-
See example
(1) Wrap this node inside a new node.
(2) Add a child node.
-
See an example of a Criteria tree with multiple nodes:
|
In summary, the Criteria section is where you define the criteria for an entry node in an approval workflow. For example, if there is a Minimum Approval threshold of $ 1,000 and the criteria is for LocationCode IN (Location A, Location B, Location C) then the approver on this node is responsible for approving requisitions of at least $ 1,000 for Locations A, B, or C.
Edit the Persons section:
Detail
|
| Person |
Add one or more Persons. Search for a user in the Input to search user search box, then select Add. |
| Number of Approvers required |
This edit box only appears if there is more than one approver, and defaults to the number of persons listed (all persons are required). Select any number from 1 to [total number of persons listed]. See Approvals Process - Number of Approvers required. |
Adding Criteria for a GL Tree
For a GL tree type, each node must have one or more GL Account masks defined. You can also add one or more GL Account Exclusion masks.
See how to add criteria for a node in a GL tree:
-
Enter a Minimum Approval Threshold: The amount being approved must be at least the Minimum Approval Threshold amount for this to be an approval node on an approval workflow.
If this is a Task node, there is no Minimum Approval Threshold to set. -
Add one or more GL Account Masks.
-
Select a reference: Customer and a reference: Employee field for the GL Account Masks.
-
Optionally add one or more GL Accounts Masks Exclusion.
-
Select a reference: Customer and a reference: Employee field for the GL Account Exclusion Masks.
Adding Criteria for a Location Tree
For a Location tree type, each node must have one or more Locations assigned.
See how to add criteria for a node in a Location tree:
-
Enter a Minimum Approval Threshold: The amount being approved must be at least the Minimum Approval Threshold amount for this to be an approval node on an approval workflow.
If this is a Task node, there is no Minimum Approval Threshold to set. -
Select a Location from the Locations search box.
-
Continue to add more Locations, as required.
Adding Criteria for a Category Tree
For a Category tree type, each node must have one or more Category Groups defined.
See how to add criteria for a node in a Category tree:
-
Enter a Minimum Approval Threshold: The amount being approved must be at least the Minimum Approval Threshold amount for this to be an approval node on an approval workflow.
If this is a Task node, there is no Minimum Approval Threshold to set. -
Select a Category Group from the Category Groups search box.
-
Continue to add more Category Groups, as required.
Copy Approval Tree
To copy the current approval tree, click  Copy on the Menu Bar.
To copy another approval tree, return to Maintain Approval Trees, and copy a tree from the results grid. See Copying an Approval Tree.
Create Approval Tree
To create a new approval tree, return to Maintain Approval Trees and click Add Tree on the Menu Bar. See Adding an Approval Tree.
Approval Tree Criteria
The following criteria are available to use in the Criteria section for an advanced tree approval entry point:
-
GLAccountCode
-
LocationCode
-
RequisitionType
-
Buyer
-
Project
-
ProjectManager (for the selected project on requisition line, where applicable)
-
Phase
-
CostCode
-
VendorGroup
-
VendorCode
-
CategoryGroup
-
CategoryCode
-
PartNo
-
GLCompany
-
Over GL Budget Amount
-
CustomForm
-
CreatedBy
-
Requester Group
-
Requester
-
Terms Code
-
Job
-
Line-level Misc Charge Code
-
From Inventory (IS TRUE or IS FALSE)
-
Linked Sales Order (IS TRUE or IS FALSE)
-
DocumentType
-
Order Adjustment Type
-
AP Line Type
See how to use the criteria in Edit the Criteria section in Edit Root Node or Edit Child Node.