Locations
Locations can be integrated from Kinetic or added in ARM (local).
Locations (local or Kinetic) can be manually updated, or bulk updated with an Import.
| A Location in ARM is a Warehouse in Kinetic. |
Permissions
You require a role with the Maintain Locations permission to access Locations maintenance. See Permissions in ARM.
For Local Locations:
-
When a Purchase Order is raised for an ARM location, it will show the ARM location address and contact details on the PO Header in Kinetic.
-
The bins available for Receiving are sourced from the mapped location.
-
Catalogue items for the mapped location will be automatically assigned to the ARM location when it is saved.
In ARM, each location can have a GL Account Code mask. The GL Account Code mask should be unique and non-overlapping, and represents a Cost Centre for that location.
Location Approvals
Approvals can be based on locations. See Approvals Maintenance.
Maintaining Locations
-
Select the Locations menu item on the Administration Page. See Administration Page.
The Locations page opens.
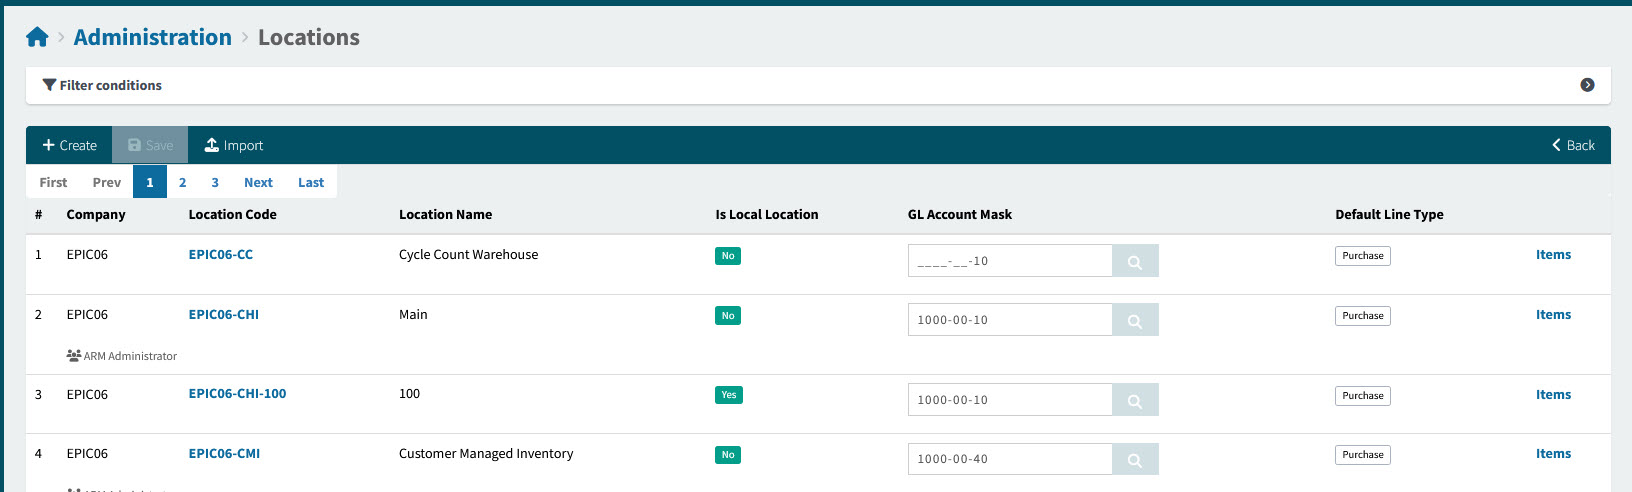
Company The company that this location belongs to.
Location Code The unique code to identify this location.
 The names of all approvers for this location are listed below the Company and Location Code.
Location Name The name assigned to this location.
Is Local Location Yes for ARM Local locations, otherwise No.
GL Account Mask The GL Account Code assigned to this location.
Default Line Type Purchase, Transfer or blank for Expense.
The Line Type for new Requisition lines added for this location will default to the Default Line Type (if Location is the Default Line Type From in Global Settings).
Items Select the Items hyperlink to view items for this location, on the Catalogue page.
-
Adjust the Filter conditions.
See Details
-
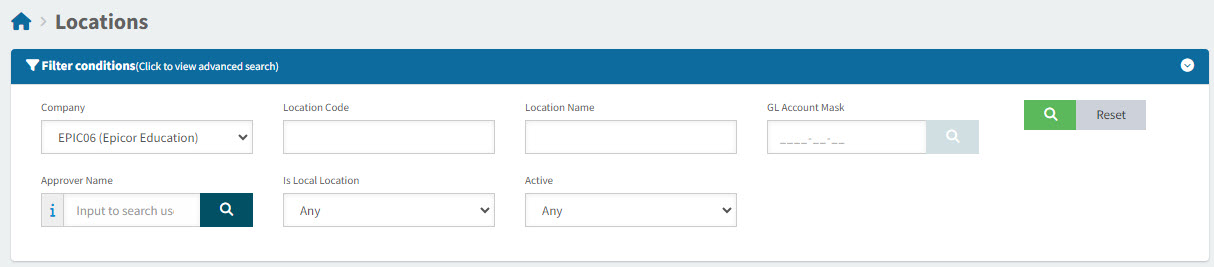
Expand the Filter conditions in the top section of the page to search for a specific location or to narrow your search.
View Filter conditions
-
Enter values in the edit boxes, or select from the search boxes. See the Filter conditions, below.
Filter conditions
Company Select a Company name from the drop-down list.
Location Code Enter a valid Location Code to search for that location only.
Location Name Enter a valid Location Name, or part of the name.
GL Account Mask Enter a valid GL Account Mask or GL Account Code to search for locations that have been assigned that mask or code only.
The search icon can be used to find GL Accounts. Alternatively, a GL Account Mask may be entered.
Approver Name Locations for which only the selected Approver can approve.
Is Local Location Applies a filter around ARM local locations.
Active Select Any, Yes, or No.
-
When you have entered the search criteria click on the green search
 button in the top right corner.
Locations that match the search conditions are listed in the grid.
-
Creating a Local Location
-
Select the Create button.
The Locations > New Location page opens.
-
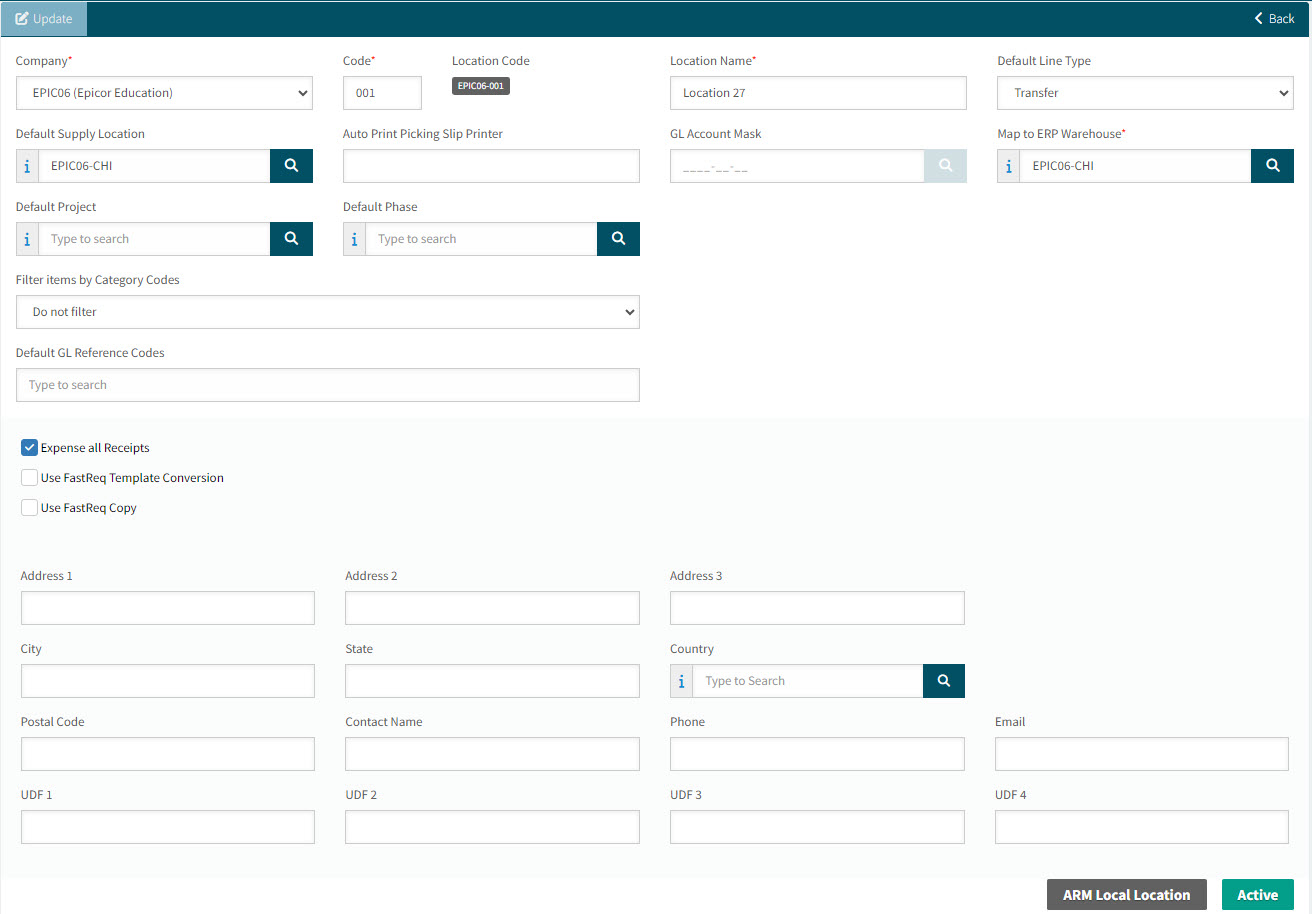
Populate the relevant fields in the New Location page.
Company* Select a company from the drop-down list.
Code Enter a code for the location.
Location Code The unique Location Code is derived from the Company and Code, resulting in [Company Code]-[Code].
Location Name Enter a location name.
Default Supply Location This is the default Source location for transfers. Only non-local locations with 'Transfer Supply Location' selected may be selected as the Default Supply Location.
Default Line Type Select Purchase, Expense or Transfer (only available if licensed for Transfers). This is the default line type when catalogue items are added to a requisition.
Auto Print Picking Slip Printer Enter a full, valid path for the printer to be used for auto picking slip reports. If this field is left blank, the printing is done on the default printer for the ARM Application Server for the user profile that the Print Service runs under.
Map to ERP Warehouse* Catalogue items for the mapped ERP Warehouse are automatically assigned to the local ARM location, and the bins available for Receiving are sourced from the mapped location.
GL Account Mask Select a GL Account Mask to be used as part of the default logic, for this location.
Default Project Enter a default Project code from Kinetic. Requisition lines (non-catalogue) will default to this Project code when the 'Purchase for Project' option is selected (unless a different default Project is selected for the Requisition).
Default Phase Enter a default Phase code from Kinetic. This will be a Phase of the selected Project. Requisition lines (non-catalogue) will default to this Phase code when the 'Purchase for Project' option is selected (unless a different default Phase is selected for the Requisition).
Cost Code Select a Cost Code that belongs to the selected Project and Phase.
Filter items by Category Codes Select an option, then select Category Codes. See Filter Items by Category Code.
Category Codes Add one or more Category Codes to work with the Filter items by Category Codes selection.
Default GL Reference Codes Select one or more Default GL Reference Codes to be used in the defaulting logic for this location.
Expense Transfer Receipts If this is selected, transfer order receipts will be expensed. See Expense Transfer Receipts Setting.
Use FastReq Template Conversion If this setting is on and you create a Requisition from the Template with Fast Copy selected, then all the details of the Template will be copied as is (all the Tax Codes, GL Account Codes and GL Reference Codes will be copied from the Template). If this setting is off, you cannot select the Fast Copy check box when creating the Requisition. The line items will still be copied over but the Tax Codes, GL Account Codes and GL Reference Codes will be set to the defaults.
Use FastReq Copy If this setting is on and you Copy or Template a Requisition with the Fast Copy check box selected, then all the details of the Requisition will be copied to the new Requisition or Template that you create. If this setting is off then you cannot tick the Fast Copy check box and the resulting Requisition or Template will copy the line inventory items but will set the GL Account Codes, GL Reference Codes and Tax Codes to the defaults.
Address details Enter the address details.
UDF Fields Enter the UDF fields.
-
Select Apply or OK.
Deactivating a Local Location
You can deactivate a local location, provided it is not used in a document (Requisitions, PFOs, Purchase Orders etc.).
Select the Deactivate button.

The location is marked as Inactive. The deactivated location cannot be used in any new documents.
To reactivate a location, select Activate.

Maintaining a Kinetic Location in ARM
-
On the Administration > Locations page, click on a Location Code for a location where the Is Local Location label is No.
This opens the Kinetic location in ARM.
-
Update the relevant fields for the location.
Location Name You may optionally update the location name. This will not update the location name in Kinetic.
Transfer Supply Location If you select this check box, then this location can be used as a Source location for transfers.
Default Supply Location This is the default Source location for transfers. Only non-local locations with 'Transfer Supply Location' selected may be selected as the Default Supply Location.
Default Line Type Select Purchase, Expense or Transfer (only available if licensed for Transfers). This is the default line type when catalogue items are added to a requisition.
Auto Print Picking Slip Printer Enter a full, valid path for the printer to be used for auto picking slip reports. If this field is left blank, the printing is done on the default printer for the ARM Application Server for the user profile that the Print Service runs under.
GL Account Mask Select a GL Account Mask to be used as part of the default logic, for this location.
Default Project Enter a default Project code from Kinetic. Requisition lines (non-catalogue) will default to this Project code when the 'Purchase for Project' option is selected (unless a different default Project is selected for the Requisition).
Default Phase Enter a default Phase code from Kinetic. This will be a Phase of the selected Project. Requisition lines (non-catalogue) will default to this Phase code when the 'Purchase for Project' option is selected (unless a different default Phase is selected for the Requisition).
Cost Code Select a Cost Code that belongs to the selected Project and Phase.
Filter items by Category Codes Select an option, then select Category Codes. See Filter Items by Category Code.
Category Codes Add one or more Category Codes to work with the Filter items by Category Codes selection.
Default GL Reference Codes Select one or more Default GL Reference Codes to be used in the defaulting logic for this location.
Active Select Active to use this Location within ARM.
You can only update the Active flag when the warehouse in the backend ERP is
Expense Transfer Receipts If this is selected, transfer order receipts will be expensed. See Expense Transfer Receipts Setting.
Use FastReq Template Conversion If this setting is on and you create a Requisition from the Template with Fast Copy selected, then all the details of the Template will be copied as is (all the Tax Codes, GL Account Codes and GL Reference Codes will be copied from the Template). If this setting is off, you cannot select the Fast Copy check box when creating the Requisition. The line items will still be copied over but the Tax Codes, GL Account Codes and GL Reference Codes will be set to the defaults.
Use FastReq Copy If this setting is on and you Copy or Template a Requisition with the Fast Copy check box selected, then all the details of the Requisition will be copied to the new Requisition or Template that you create. If this setting is off then you cannot tick the Fast Copy check box and the resulting Requisition or Template will copy the line inventory items but will set the GL Account Codes, GL Reference Codes and Tax Codes to the defaults.
Address details Integrated from Kinetic warehouse details.
UDF Fields Enter the UDF fields.
-
Select Apply or OK.
The Expense Transfer Receipts Setting
A location has an Expense Transfer Receipts check box.
When a Transfer Order is completed in ARM where items are receipted to a location set to Expense Transfer Receipts, the receipt transaction is integrated. Two Kinetic transactions are subsequently created:
-
A Quantity Adjustment transaction to deduct the quantity that was just receipted. The Quantity Adjustment Reason Code reason code (Company Settings) is used on the adjustment.
-
A GL transaction is created in Kinetic, which:
-
Debits the GL Account defined on the ARM Transfer Line.
-
Credits the GL Account set on the Quantity Adjustment Reason Code reason code in Kinetic, this being the Expense Account.
To find the GL Account number in Kinetic:
-
Locate the corresponding Reason Code in Kinetic.
-
Open GL Control Code Entry for the Reason Code.
-
In GL Control Maintenance, navigate to the Main Book > Adjustment node.
-
The GL Code for the Reason Code is displayed in the Account>Detail sheet.
-
Filter Items by Category Codes
The Category Codes filter controls restrictions on items that can be added to requisitions for the location. The three options are:
- Do not filter
-
No restriction on the items that can be requisitioned for this location.
- Filter and include
-
Items that can be requisitioned for this location are restricted to those assigned to the selected Category Code(s).
- Filter and exclude
-
Items that can be requisitioned for this location are restricted to those not assigned to the selected Category Code(s).