Top Menu Bar

The top menu bar has a group of menu items on the left for quick navigation, and another group on the right.
Menu Items on the Top Left
|
Show/hide side menu |
Select to hide the Side Menu, to make more space for the Main Panel. Select again to show the Side Menu. See Side Menu. |
|
Show Dashboard |
Select to show the Dashboard on the Main Panel, replacing whatever is currently there. See Dashboard. |
|
Create a new document |
Click the menu item. Select from the list to create a new document of that type. See Creating a New Document. |
|
View recent documents |
Click the menu item to open a list of documents that you have recently opened. Select from the list to open the document. See Viewing Recent Documents. |


Menu Items on the Top Right
|
Profile |
The first and last name of the logged-in user appears alongside the profile icon. Click the icon to view the user profile drop-down menu, with options to View Profile or Log Off. See User Profile. |
|
Notifications |
Click to view current notifications for the current logged-in user. See Notifications. |
|
View Activities |
Click to monitor the status of background tasks you have submitted. See View Activities. Once you have viewed recent notifications, the red dot in the icon disappears: |
|
About ARM |
See About ARM. |
|
Help |
Click to open the help drop-down menu. From here you can open the ARM Online Help or link to the latest ARM Release Guide. |
|
Translations |
Click the drop-down to see the available translations. Selecting any of these will change the display to that language where a translation has been provided, including date/time formats visible within the product. If you select a translation that differs from the selection on the server, then the icon is updated to your selection, for example |


Environment Banner Text
You can set text for the top menu bar which labels the current application environment (for example 'TEST ENVIRONMENT' or 'QA ENVIRONMENT').
View example:

To set the text and view it on the menu bar:
-
Set a value in the Environment Banner Text in Global Settings.
-
Log out of ARM.
-
Log back in to see the text, which is in uppercase orange font.
-
To clear the text, clear the value in the Environment Banner Text in Global Settings.
Viewing Recent Documents
To open a document you’ve recently opened, click on View recent documents  on the menu bar.
Documents are listed in order of the 15 most recently opened.
Here are the document types that appear in the recent documents list, with example document numbers:
| Document Type | Example | |
|---|---|---|
|
Requisition |
R000138 |
|
Purchase Order |
54254 |
|
AP Invoice |
28676-V1 |
|
Transfer |
141 |
|
Standing Order |
S000001 |
|
Request for Quote |
RQ000002 |
|
Template |
T000012 |


User Profile
Select Profile  on the Top Menu to open the Profile drop-down menu.
|
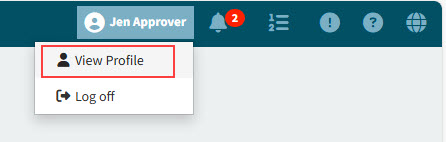
-
Select
 View Profile to open the My Profile page.
My Profile
When you select User Profile, the My Profile page opens.
|
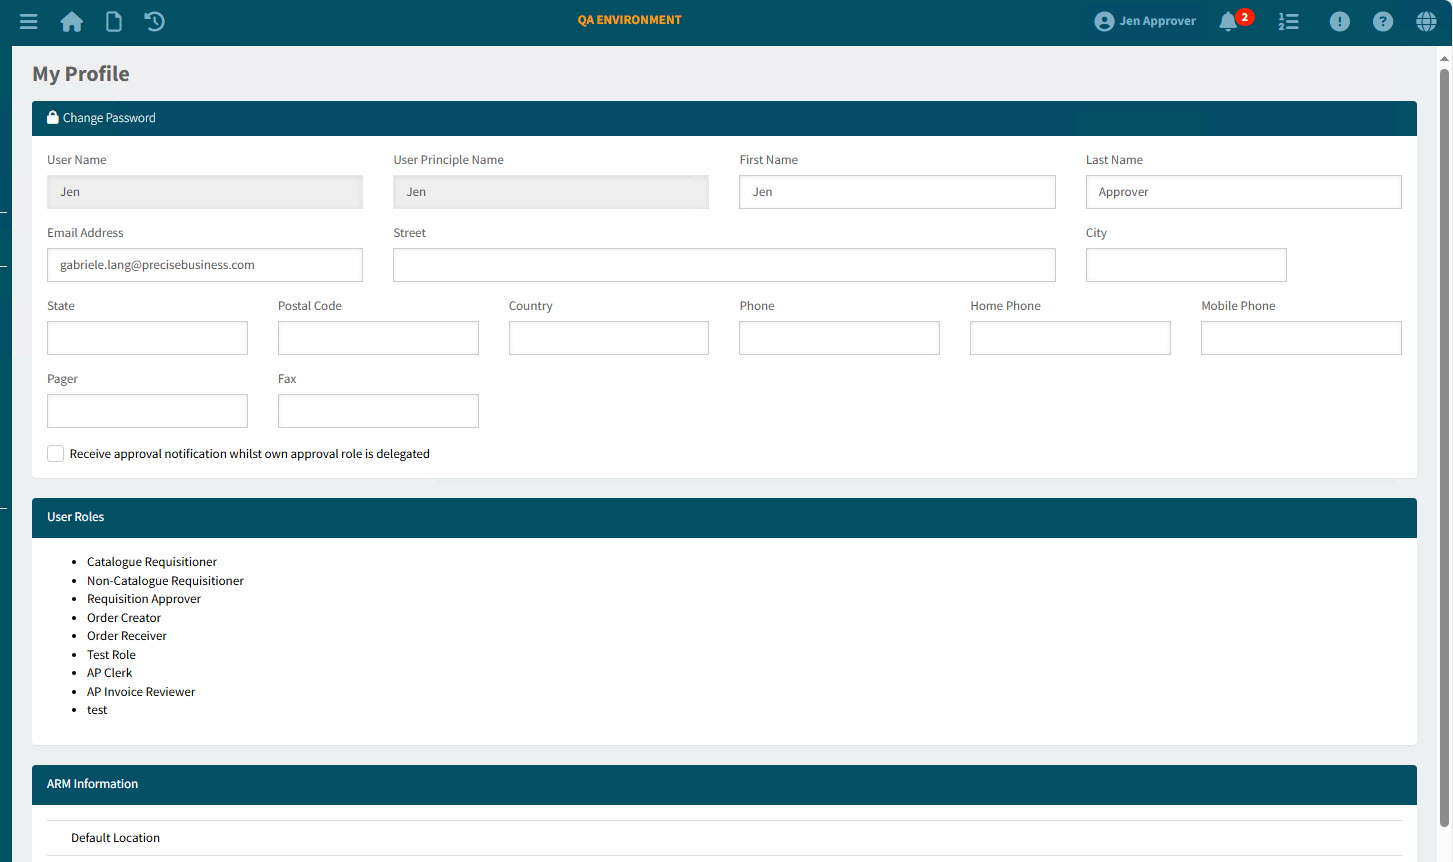
This is divided into two main sections: one you can update, and one that is read-only. You can also change your password from this page.
| If this is your first time logging in, you should change the password assigned to you by your System Administrator. |
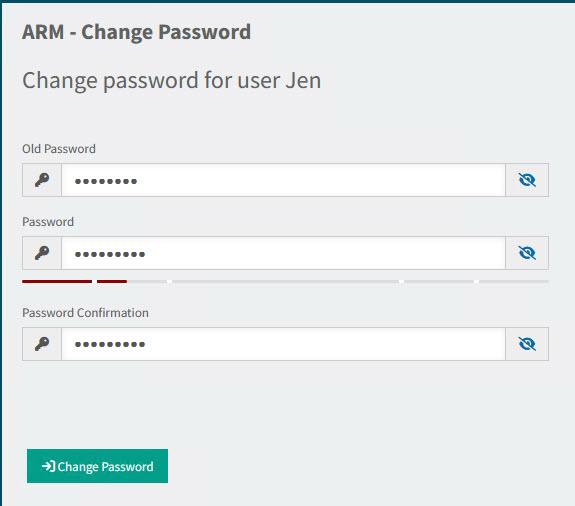
To change your password:
-
Select
 Change Password.
The Change Password page displays.
-
Enter your Old Password.
-
Enter your new Password.
-
Confirm your new password in Password Confirmation.
-
Click Change Password.
A Success message appears.
-
-
Click OK.
Your password is changed. The next time you log in using your Application Username and Password, this will be with your new Password.
See the profile section, which you can update.
-
Review your personal details, and update these if necessary. You cannot update your User Name (used for logging in) or your User Principle Name.
-
Select the check box Receive approval notification whilst own approval role is delegated, if that is your preference.
-
Select Apply at the bottom of the page, to save your changes.
See User Roles and ARM Information (read-only) details.
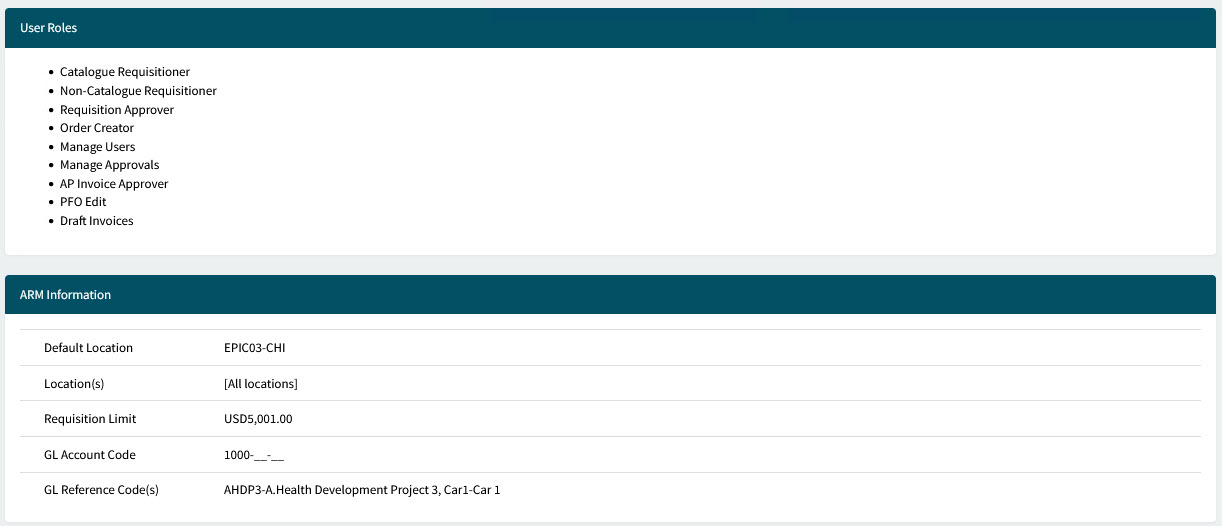
==== User Roles
User Roles lists the different roles that are assigned to you. You will have the permissions associated with these roles. Roles are assigned to users by the Administrator.
==== ARM Information
ARM Information lists other settings and defaults assigned to you by the Administrator.
Default Location |
This is your default Location Code. |
Location(s) |
These are the locations you are allowed to use, for example when creating a requisition. They are the only locations that will appear in the Locations search, when you are logged in. |
Requisition Limit |
Amounts below your Requisition Limit are auto-approved. (Note that the approval tree’s configuration must have Enable User Limit selected.) If the Requisition Limit is 0.00 (zero), there is no limit (all amounts will be under the Requisition Limit). See Requisition Limit. |
GL Account Code |
This is your default Account Mask. |
GL Reference Code(s) |
These are your GL Reference Code(s), which you can select from. |
Log Off
See Logging Off.
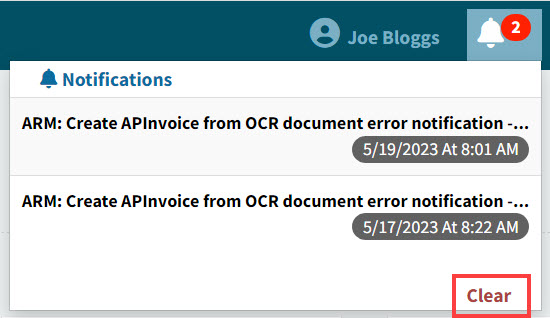
Notifications
| Your system may be configured to automatically clear any overdue notifications. This is controlled by the settings Enable Notification Clean Up and Overdue Notification Period in ARM’s Global Setting Maintenance (Global Settings). |
-
Click on a notification, to open the related page.
There are different types of notifications. For example:
-
Requiring approval
-
Requisition has been revised
-
Requisition [x] has been approved by [abc]
To clear all notifications, select Clear at the bottom of the Notifications pop-up.
|
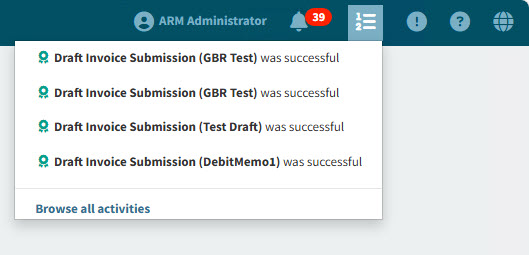
View Activities
The View Activities  button opens a notification area which allows you to monitor the status of background tasks you have submitted.
Example notifications are:
-
Draft invoice submission was successful.
-
Draft invoice submission is in progress.
The notification area is used to provide clear, real-time feedback, to ensure you are informed when invoices are being converted.
Permissions
-
All users are able to monitor their own activities.
-
To monitor all activities, you require the permission: Can Monitor Integration Jobs.
-
Select View Activities
 on the Top Menu Bar to open a list of recent activities for tasks you have submitted.
Example
-
Click on one of the listed tasks to open the relevant page.
OR
Click on Browse all activities.
This opens the Activity Center pop-up.
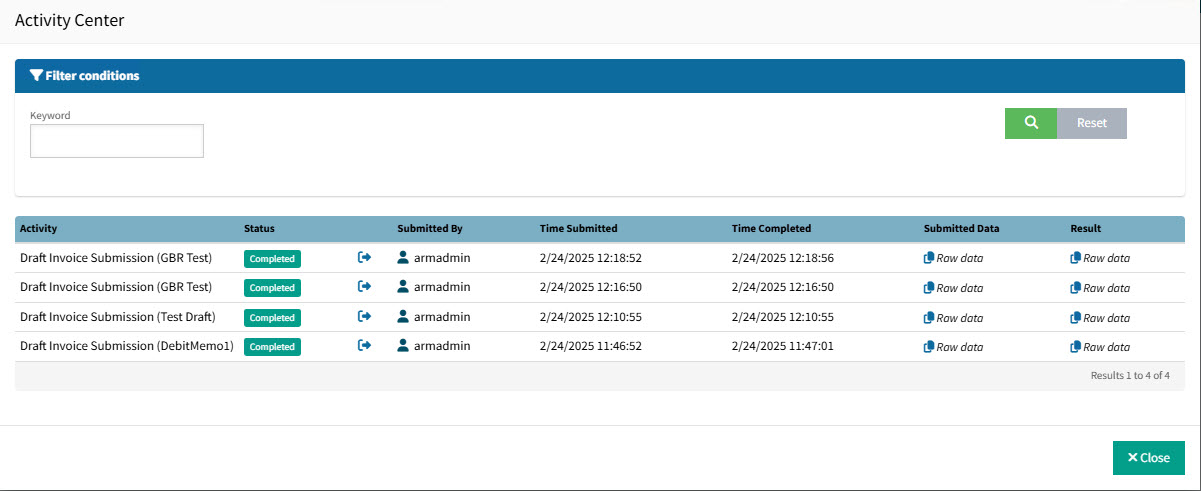
The Activity Center pop-up shows more detail on recent activities.
For each activity, you can:

-
Click to open the details on the relevant page.
 Submitted Data
-
Click to copy to clipboard the raw submitted data.
- Result
-
Click to copy to clipboard the raw result data.
About ARM
Click the About ARM  button on the right of the Top Menu Bar to open the About ARM page.
This page displays the following ARM version information:
| Commit Version |
ARM’s build information |
| Component List |
Each component of ARM, with its version number |
| Database |
ARM’s database name, version number, created date |
| Software |
Software used by ARM |
| ERP backend |
Click the Get Backend Info button to display the back-end information. |