Vendors
Permissions
You require a role with the Maintain Vendors permission to access Vendors maintenance. See Permissions in ARM.
Vendors are created and maintained in Kinetic as Suppliers, and integrated into ARM.
| For more information on Suppliers, read the Kinetic help topic: Creating Suppliers, in the Purchase Management section. |
You can maintain additional fields that are specific to ARM, as described below in Maintaining Vendors.
Maintaining Vendors
-
Select the Vendors menu item on the Administration Page. See Administration Page.
The Vendors page displays the list of Vendors (Suppliers) integrated from Kinetic.
View Vendors
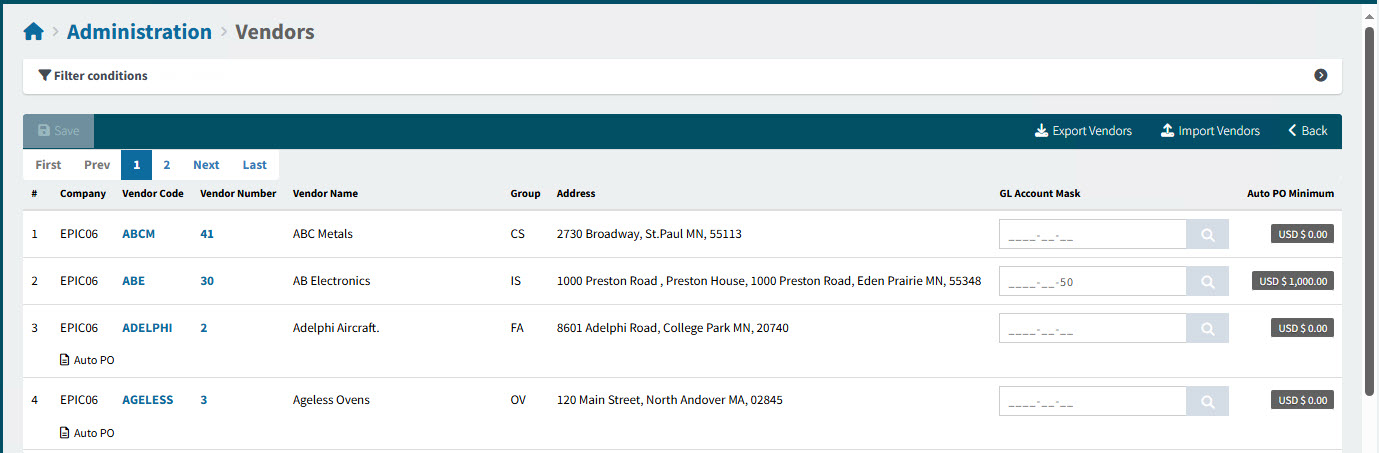
On the Menu Bar, you can perform the following actions:
|
Export Vendors |
Use this to export vendor details to a file. See Export Vendors. |
|
Import Vendors |
See Import Vendors. |
See Menu Bar

-
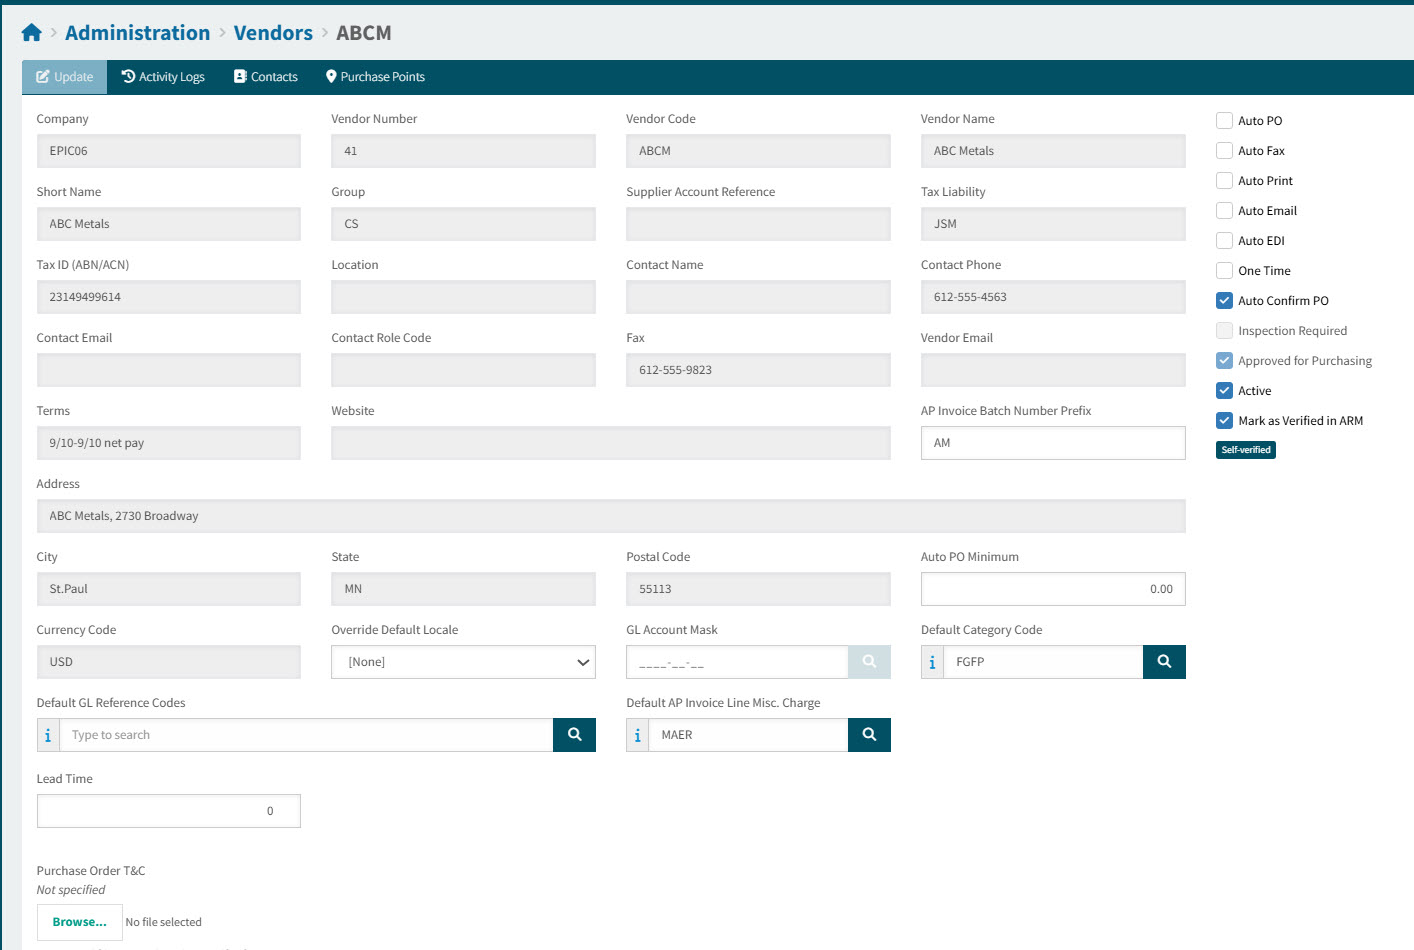
Click on a Vendor Code to view the details for that Vendor.
View Selected Vendor
-
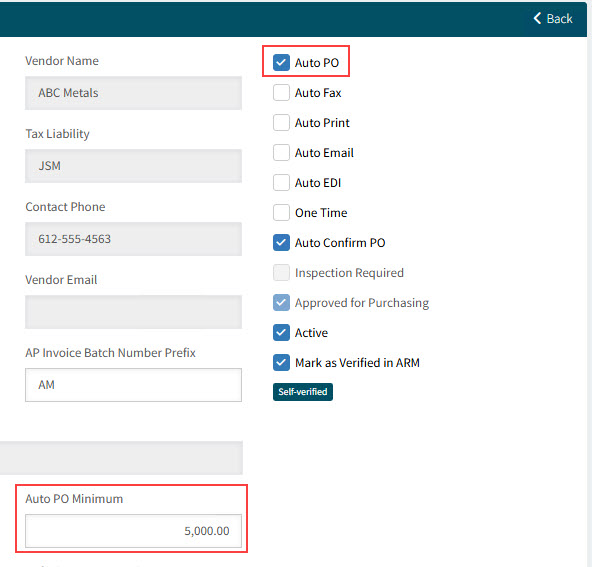
Complete the Vendor details, as required, selecting or clearing check boxes that are specific to ARM.
Check box options for Vendors in ARM
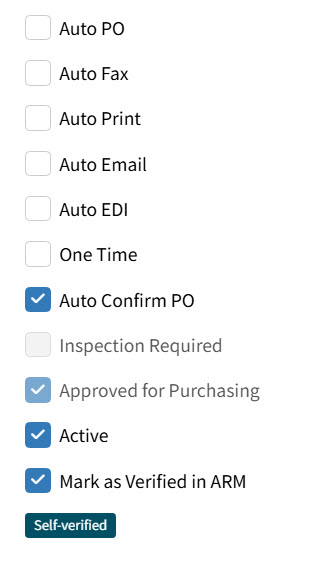
Check box If selected Auto PO
Approved Requisitions for this Vendor are automatically created as Purchase Orders, skipping the Pro-Forma Order stage. See Automatic Purchase Orders for Vendors.
Note: This is selected by default for all new Vendors if Enable Auto Purchase Order For New Vendor is enabled. This is a Company General Setting setting, found in Company Settings. See Company Settings.
Auto Fax
Purchase Orders are automatically faxed to this Vendor. See Automatic Faxing of Purchase Orders.
Note: For Auto Fax to work, there must be a Fax number in the Contact details for the Supplier in Kinetic. This is integrated into ARM.
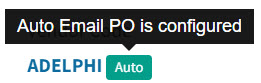
Auto Email
Purchase Orders are automatically emailed to this Vendor. See Automatic Email of a Purchase Order.
Note: For Auto Email to work, there must be an Email in the Contact details for the Supplier in Kinetic. This is integrated into ARM.
The Auto label:
The Auto label is green if Auto Email is configured, and red if not.

This label appears on Requisition line items under the Vendor code, and on the Pro-Forma Order and the Purchase Order documents, next to the Vendor code.
Hover over the Auto label for details.
Auto EDI
Auto EDI enables Automatic Electronic Data Interchange between ARM and this Vendor. See Automatic EDI of Purchase Orders.
This means that a Requisition attachment is included when the PO is emailed to the Vendor.
Use Auto EDI in conjunction with Auto Email.
One Time
If you select One Time, then this Vendor can be used as an ad-hoc Vendor in a Requisition. On the Requisition line, if a One Time Vendor is selected, the Vendor name and address must be added. Also, payment details for the ad-hoc Vendor can optionally be supplied on the Requisition line. See One Time Vendor.
Note: After integration to Kinetic, the name and address supplied with the Requisition Line are added as a Purchase Point for the Supplier record in Kinetic. This is to support payment of ad-hoc suppliers with payment options other than cheque, without the need to create and maintain an AP Master record in Epicor for each Ad-hoc supplier. The Vendor name and address are displayed on the Purchase Order.
Auto Confirm PO
If selected, Purchase Orders for this Vendor will have Confirmed selected by default.You can also update the Confirmed check box in the Purchase Order. See Editing a Purchase Order.
This is selected by default for new Vendors if the company setting Auto Confirm PO for New Vendor is Yes. See Company General Settings.
Inspection Required
This read-only value is from the Kinetic value Inspection Required on the Supplier record.
If the Vendor has Inspection Required selected, any requisition lines for this Vendor have the check box selected and read-only.
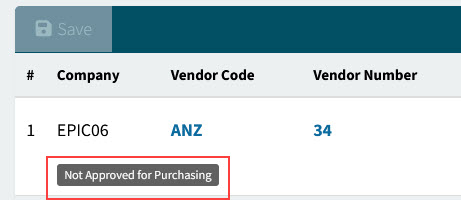
Approved for Purchasing
This read-only value is from the Kinetic value Approved. A Vendor must be Approved for Purchasing to be used on a requisition, pro-forma order, or purchase order.
If a Vendor is not approved, this is displayed in Vendor search screen results.
Active
The Vendor is active in ARM. Inactive Vendors cannot be used on any new transactions (PO Receipt and AP Invoice), but their details can still be viewed via hyper-links on pre-existing transactions.
See Active Vendor.
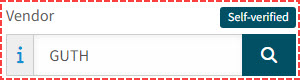
Mark as Verified in ARM
Select this check box to mark the Vendor as verified in ARM. The Unverified label updates to a Self-verified label. The verified label appears in the Draft Invoice page:
 OR
OR 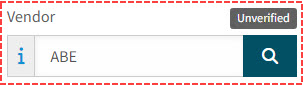
The Vendor’s verified status also appears in the Risk Assessment for AP Invoices.
-
Complete the Vendor details, as required, by filling the fields specific to ARM.
Additional fields for Vendors in ARM
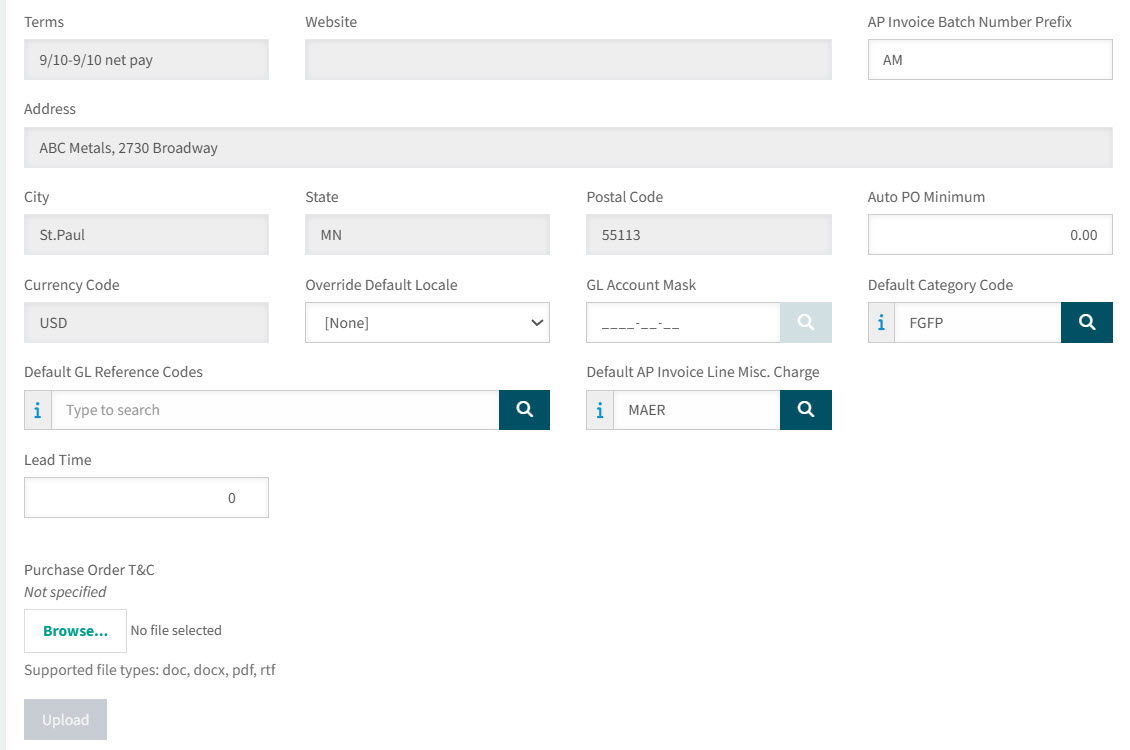
Field Description AP Invoice Batch Number Prefix
Optionally enter a two-character prefix. This may be used as the prefix for the system-generated, auto-incrementing Batch Number for AP Invoice.
The prefix used, in order of precedence and availability, is from the User, Vendor, Vendor Group, or Company for the AP Invoice.
Auto PO Minimum
A minimum order value can be set for this Vendor. See Auto PO Minimum.
Note: If you leave this as zero, there is no Auto PO Minimum for this Vendor.
Override Default Locale
The Default Locale is set at Company level, in the Company Settings. You may override this at the Vendor level.
GL Account Mask
Any GL Account or GL Account Mask added here will be set on the Requisition line when this Vendor is selected for the line.
Default Category Code
You may assign a Default Category code to the Vendor to be used in the system default for Category Codes for:
-
Template and Requisition Lines.
-
Draft Invoice Lines.
Default GL Reference Codes
Any GL Reference Code added here will be added to the Requisition line if this Vendor is selected and any of the GL Reference Codes match the GL Account that is added to the line.
Default AP Invoice Line Misc. Charge
Optionally assign a Purchasing Miscellaneous Charge Code to use as the default Charge Code for a Line Charge on an AP Invoice that gets generated from the Misc Charge on a Draft Invoice line. This overrides the Default Miscellaneous Charge Code for AP Invoice Lines on Company Settings (see Company General Settings).
Lead Time
The Lead Time (in days) may affect how Due Date for Requisitions is calculated.
Purchase Order T&C
Browse and attach a document that represents Terms and Conditions. When a Vendor has Auto Email enabled, the Terms and Conditions document is included on the Purchase Order email as a separate attachment.
-
-
Complete the OCR Settings section, as required.
OCR Settings at Vendor level are optional. Company settings will be used if Vendor settings are not configured. OCR Settings
Read about the values for Group OCR Suggestions in Company Settings. Each settings has a value for:
-
Populate Threshold
-
Trust Threshold
Some of the settings have one or both of the following check box values:
-
Trust Inferred Value
-
Ignore mismatch warnings
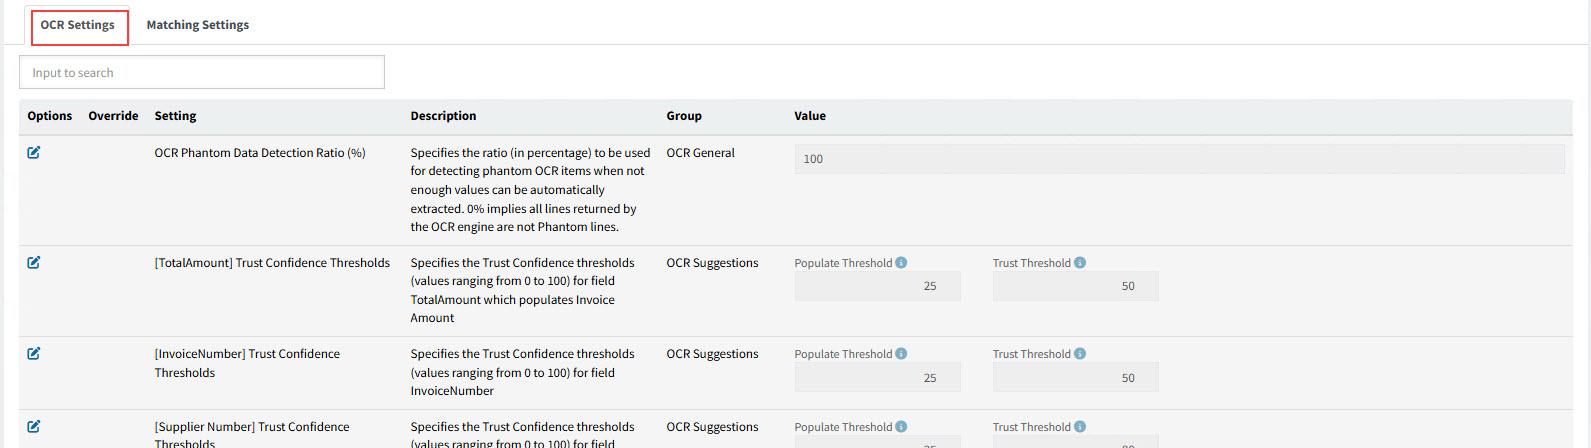
The OCR Settings are:
Setting Description Value OCR Phantom Data Detection Ratio (%)
Specifies the ratio (in percentage) to be used for detecting phantom OCR items when not enough values can be automatically extracted. 0% implies all lines returned by the OCR engine are not Phantom lines.
The OCR Phantom Data Detection Ratio is used to detect whether the lines have sufficient value to be added.
For example, 100
[TotalAmount] Trust Confidence Thresholds
Specifies the Trust Confidence thresholds (values ranging from 0 to 100) for field TotalAmount
[Populate Threshold; Trust Threshold]
[InvoiceNumber] Trust Confidence Thresholds
Specifies the Trust Confidence thresholds (values ranging from 0 to 100) for field InvoiceNumber
[Populate Threshold; Trust Threshold]
[Supplier Number] Trust Confidence Thresholds
Specifies the Trust Confidence thresholds (values ranging from 0 to 100) for field Supplier Number which populates Tax ID
[Populate Threshold; Trust Threshold]
[DueDate] Trust Confidence Thresholds
Specifies the Trust Confidence thresholds (values ranging from 0 to 100) for field DueDate
[Populate Threshold; Trust Threshold; Trust Inferred Value; Ignore mismatch warnings]
[InvoiceDate] Trust Confidence Thresholds
Specifies the Trust Confidence thresholds (values ranging from 0 to 100) for field InvoiceDate
[Populate Threshold; Trust Threshold]
[PurchaseOrder] Trust Confidence Thresholds
Specifies the Trust Confidence thresholds (values ranging from 0 to 100) for field PurchaseOrder
[Populate Threshold; Trust Threshold]
[BalanceDue] Trust Confidence Thresholds
Specifies the Trust Confidence thresholds (values ranging from 0 to 100) for field BalanceDue
[Populate Threshold; Trust Threshold]
[PaymentTerms] Trust Confidence Thresholds
Specifies the Trust Confidence thresholds (values ranging from 0 to 100) for field PaymentTerms
[Populate Threshold; Trust Threshold; Trust Inferred Value; Ignore mismatch warnings]
[Freight] Trust Confidence Thresholds
Specifies the Trust Confidence thresholds (values ranging from 0 to 100) for field Freight
[Populate Threshold; Trust Threshold]
[Supplier Name] Trust Confidence Thresholds
Specifies the Trust Confidence thresholds (values ranging from 0 to 100) for field Supplier Name
[Populate Threshold; Trust Threshold]
[Supplier Address] Trust Confidence Thresholds
Specifies the Trust Confidence thresholds (values ranging from 0 to 100) for field Supplier Address
[Populate Threshold; Trust Threshold]
[Supplier Phone] Trust Confidence Thresholds
Specifies the Trust Confidence thresholds (values ranging from 0 to 100) for field Supplier Phone
[Populate Threshold; Trust Threshold]
[Supplier Email] Trust Confidence Thresholds
Specifies the Trust Confidence thresholds (values ranging from 0 to 100) for field Supplier Email
[Populate Threshold; Trust Threshold]
[Item Amount] Trust Confidence Thresholds
Specifies the Trust Confidence thresholds (values ranging from 0 to 100) for field Amount
[Populate Threshold; Trust Threshold; Trust Inferred Value]
[Item Description] Trust Confidence Thresholds
Specifies the Trust Confidence thresholds (values ranging from 0 to 100) for field Description
[Populate Threshold; Trust Threshold]
[Item Quantity] Trust Confidence Thresholds
Specifies the Trust Confidence thresholds (values ranging from 0 to 100) for field Quantity
[Populate Threshold; Trust Threshold; Trust Inferred Value]
[Item UnitPrice] Trust Confidence Thresholds
Specifies the Trust Confidence thresholds (values ranging from 0 to 100) for field UnitPrice
[Populate Threshold; Trust Threshold; Trust Inferred Value]
[Item ProductCode] Trust Confidence Thresholds
Specifies the Trust Confidence thresholds (values ranging from 0 to 100) for field ProductCode
[Populate Threshold; Trust Threshold; Trust Inferred Value]
[Item UOM] Trust Confidence Thresholds
Specifies the Trust Confidence thresholds (values ranging from 0 to 100) for field UOM (Unit of Measure)
[Populate Threshold; Trust Threshold; Trust Inferred Value]
[Item Tax] Trust Confidence Thresholds
Specifies the Trust Confidence thresholds (values ranging from 0 to 100) for field Tax
[Populate Threshold; Trust Threshold]
[Item PurchaseOrder] Trust Confidence Thresholds
Specifies the Trust Confidence thresholds (values ranging from 0 to 100) for field Purchase Order
[Populate Threshold; Trust Threshold]
[Item Tax Category] Trust Confidence Thresholds
Specifies the Trust Confidence thresholds (values ranging from 0 to 100) for field Tax Category
[Populate Threshold; Trust Threshold; Trust Inferred Value]
-
-
Complete the Matching Settings section, as required.
Matching Settings at Vendor level are optional. Company settings will be used if Vendor settings are not configured. Matching Settings for Receipt Matching
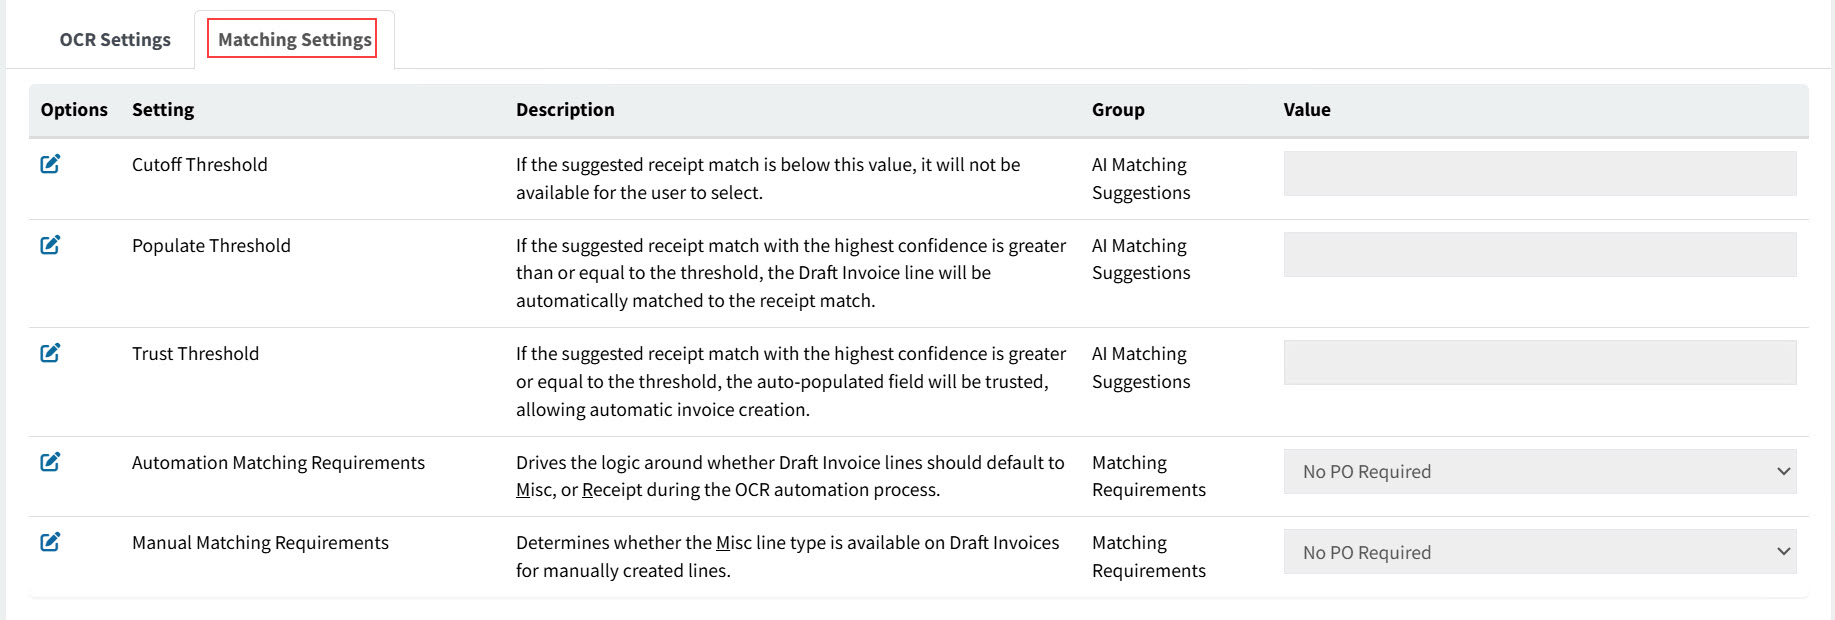
The settings for group AI Matching Suggestions are:
- Cutoff Threshold
-
If the suggested receipt match is below this value, it will not be available for the user to select.
Example value: 20
- Populate Threshold
-
If the suggested receipt match with the highest confidence is greater than or equal to the threshold, the Draft Invoice line will be automatically matched to the receipt match.
Example value: 50
- Trust Threshold
-
If the suggested receipt match with the highest confidence is greater or equal to the threshold, the auto-populated field will be trusted, allowing automatic invoice creation.
Example value: 80
Settings for group AI Matching Suggestions at Vendor level are optional. Company settings will be used if Vendor settings are not configured. See AI Matching on the Company Settings page for more information on the threshold settings for receipt matching at the Company level.
The settings for group Matching Requirements are:
- Automation Matching Requirements
-
The selected setting drives the logic around whether Draft Invoice lines should default to Misc, or Receipt during the OCR automation process.
Choose between "No PO Required", "Require PO Receipts" and "Never Use a PO"for Invoice automation. ARM will perform matching, provide warnings or misc lines creation based on the setup for PO Required and PO Number specification.
- No PO Required
-
Draft/AP Invoices created for this Vendor may have line items added from receipts ('Add from Receipts') or lines added/imported for miscellaneous ('Add Misc Line' / 'Import Misc Line').
- Require PO Receipts
-
Draft/AP Invoices created for this Vendor may only have line items added from receipts ('Add from Receipts'). This restriction is overridden by the User permission: 'Override Manual Invoice Requirements to allow Misc. Invoice Lines'.
- Never Use a PO
-
Draft Invoices for a Vendor with this setting selected have no PO number displayed on the header, and the PO number on line items is disabled.
- Manual Matching Requirements
-
Choose between "No PO Required" and "Require PO Receipts".
The selected setting determines whether the Misc line type is available on Draft Invoices for manually created lines.
- No PO Required
-
Draft/AP Invoices created for this Vendor may have line items added from receipts ('Add from Receipts') or lines added/imported for miscellaneous ('Add Misc Line' / 'Import Misc Line').
- Require PO Receipts
-
Draft/AP Invoices created for this Vendor may only have line items added from receipts ('Add from Receipts'). This restriction is overridden by the User permission: 'Override Manual Invoice Requirements to allow Misc. Invoice Lines'.
-
Save the changes.
Terms and Currency as Defaults
The Vendor’s Terms and Currency are both maintained in Kinetic.
Terms from a Vendor may be used as the default Terms Code for a Draft Invoice, as determined by the Terms Code default logic. The Vendor’s Currency is the default Currency for a Draft Invoice.
See How Fields are Populated in Draft Invoices.
Export Vendors
Use this function to export a list of vendors. This can be used as follows:
-
As a template for performing bulk updates on selected vendors.
-
As a file of vendors updates to import in a different environment.
To create a file of vendors:
-
Filter a list of vendors to update, using the filter conditions.
-
Click
 Export Vendors on the Menu Bar.
This creates a CSV file of the filtered users, called 'VendorList_[YYYY-MM-DD]'.
The file contains instructions, as well as details for the list of selected vendors.
Import Vendors
Use this process to bulk update a batch of vendors.
-
Export a selection of vendors to a file.
-
Update the contents of the file.
-
Click
 Import Vendors on the Menu Bar.
 -
Click Choose File, then browse to and select the file to import, and click Open.
-
Click Import.
After importing:
To update the details for any one vendor, select that vendor from the Administration > Vendors page. See Maintaining Vendors.
Automatic Purchase Orders for Vendors
The Vendor record can be marked in ARM so that a Purchase Order will be automatically created when a Requisition for this Vendor is approved.
Marking a Vendor as Auto PO
-
In ARM, open the Vendor Details page for the Vendor. See Maintaining Vendors.
-
Select the Auto PO check box for the Vendor and save the change.
Automatic Purchase Order Limitations
Automatic Purchase Order creation for a particular Vendor on the Requisition will not occur if:
-
A non-catalogue item has been requisitioned and the setting Auto Create PO with Non Catalogue Items is set to No.
-
An unlocked Pro-Forma Order with a status of New already exists for this Vendor and location (and the other header fields are exactly the same).
-
The Requisition amount (for a Vendor) is less than the Auto PO Minimum for the Vendor.
One Time Vendor
Use a One Time Vendor (also known as an ad-hoc Vendor) when you buy goods from a particular Vendor that you don’t usually use. For example, if you need to purchase a selection of hardware items from a Vendor that you wouldn’t ordinarily use, you could use a One Time Vendor.
When you use a One Time Vendor, you need to add the Vendor’s name and address details to the Requisition Line. This allows you to use the same One Time Vendor repeatedly, for different purchases from different ad-hoc Vendors. The name and address details are integrated into Kinetic and added as a Purchase Point to the Supplier. If you add Bank/Remit To details on the Requisition Line, these details are also integrated and added as a new Bank/Remit To for the Supplier.
If you have Vendor Quotes in ARM, it may be helpful to configure each of those Vendors as One Time. Alternatively, add a new Supplier record in Kinetic to use as a One Time Vendor, with Supplier Price Lists containing the required parts.
Marking Vendors in ARM as One Time
-
In ARM, open the Vendor Details page for the Vendor you want to use as a One Time Vendor. See Maintaining Vendors.
-
Select the One Time check box for the Vendor and save the change.
| You can mark more than one Vendor as One Time. |
Auto PO Minimum
Vendors sometimes have incentives in place to encourage businesses to place larger orders with them. For example, a Vendor might offer free deliver for an order over a certain value.
In ARM, this value is entered as the Auto PO Minimum for the Vendor. In Kinetic, the field Minimum Order Value serves a similar purpose.
Using Auto PO Minimum as a Warning Threshold
-
If the Warning setting "Vendor Minimum Order Warning for Requisitioner" is set to Yes, then a warning is displayed to the Requisitioner when the Requisition value is below the Vendor’s Auto PO Minimum.
-
If the Warning setting "Vendor Minimum Order Warning for PO Creator" is set to Yes, then a warning is displayed to the Purchase Order creator when the Purchase Order value is below the Vendor’s Auto PO Minimum.
See Global Settings.
Auto PO and Auto PO Minimum
If a Vendor has Auto PO selected, then the Auto PO Minimum value is used as a threshold value.
Example
Auto PO and Auto PO Minimum work together as follows:
-
For approved Requisitions, items are added to new or existing Pro-Forma Orders, as usual.
-
However, a Purchase Order will not automatically be created from the PFO if it is less than the Auto PO Minimum value. In this case, the Purchase Order Creator can either create the Purchase Order manually or leave the PFO and wait for additional items to be added.
This allows the existing PFO’s value to reach or exceed the Vendor’s Auto PO Minimum. See Automatic Purchase Orders for Vendors for details on Auto PO.
Active Vendor
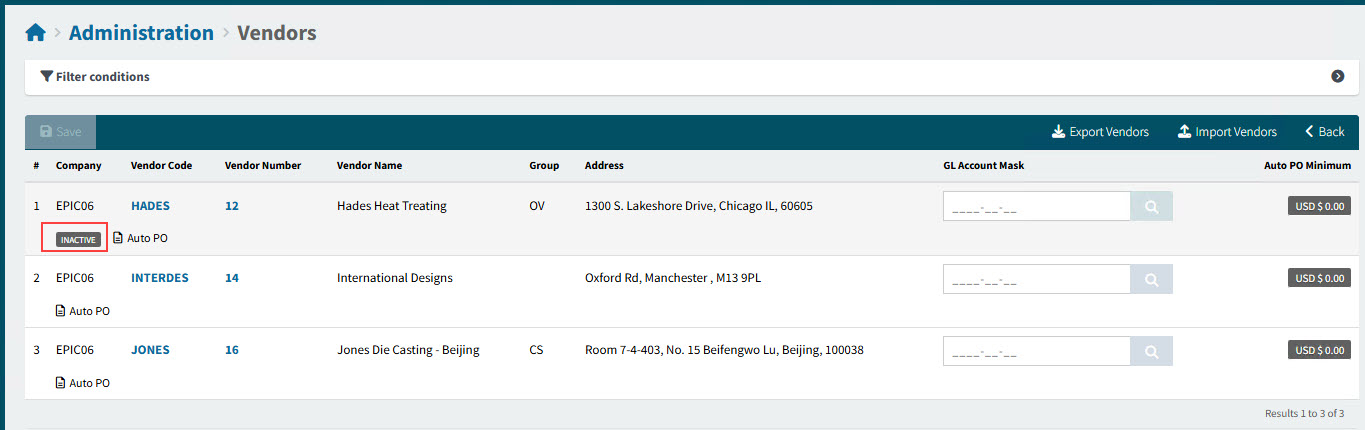
If the Supplier is marked Inactive in Kinetic, this is shown on a label on the Vendors page and also below the Active check box on the Vendor details page.
| To see Inactive Vendors in the search results, ensure you have Any or No selected in the Active filter option. |
View details
Label on the Vendors page |
|
|
|
Label on the Vendor details page |
|
|

Marking Vendors in ARM as Active
-
Open the Vendor detail page for the Vendor.
-
Select the Active check box for the Vendor and save the change.
See Maintaining Vendors.
You can only update the Active check box in ARM if:
-
The Vendor Group is active AND
-
The Supplier in Kinetic is active.
See Vendor Groups.
Marking Suppliers in Kinetic as Inactive
If you select the Inactive check box for a supplier in Kinetic, this automatically updates the Vendor to inactive in ARM.
If you clear the Inactive check box in Kinetic, this automatically updates the Vendor to active in ARM.
| You can have a Vendor that is inactive in ARM but not in Kinetic, but an inactive supplier in Kinetic cannot be active in ARM. |