New Blanket Order
Use a blanket order to approve a requisition with unspecified items, but for an approved Order Total. This results in a blanket pro-forma order, which can be used to purchase from the vendor, in the form of one or multiple Releases, within the specified period.
Adding a New Blanket Order
To add a new blanket order or append a blanket order to an existing PFO.
-
Select
 Blanket Order under
  Create a new document on the Top Menu Bar. See Creating a New Document.
 -
See how to add a new blanket order requisition: Creating a Blanket Order.
The option only appears if Blanket Orders is included in your permissions.
Creating a Blanket Order
Permissions
The following permissions relate to Blanket Orders:
-
Create Blanket Order Requisitions: The user can create a Requisition that will turn into a Blanket Pro-Forma Order.
-
Can Release Blanket Order: The user can create releases within a Blanket Pro-Forma Order.
-
Can Close Blanket Order: The user can close a Blanket Pro-Forma Order.
-
Replace Line Owner of Blanket Proforma Order: The user can replace line owner of the Blanket PFO document.
-
Delete Release line of Blanket Proforma Order: The user can delete unreceived release of the Blanket PFO document.
-
Select Create a new document from the Top Menu bar, then select
 Blanket Order from the menu (see Creating a New Document).
The Requisitions > Add New form displays, for a Blanket Order.
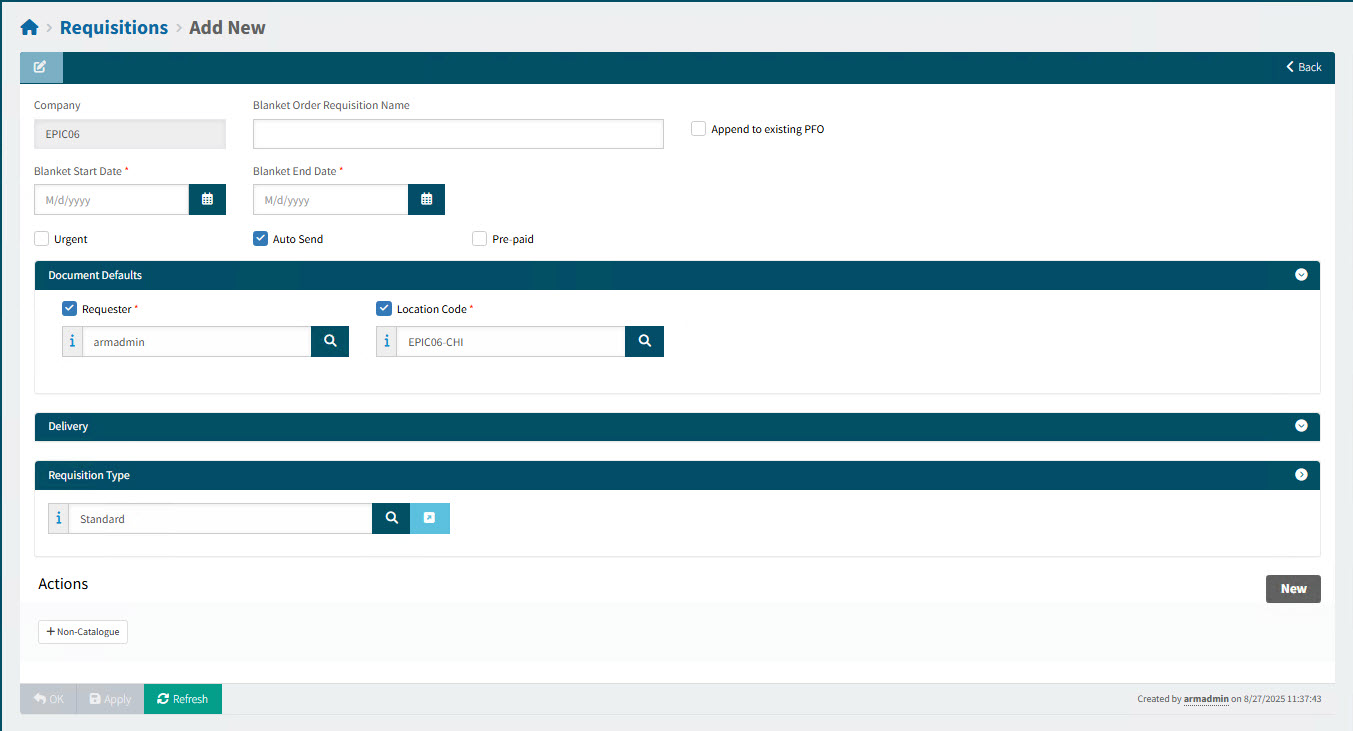
The Requisition Type section only appears if the Use Requisition Types setting is set to either optional or required. -
Click Save to save the new Blanket Order. Alternatively, if you want to append to an existing PFO, see Appending to a Blanket Pro-Forma Order.
-
Fill out the header details. See Blanket Order Header.
-
If using Requisition Types, complete the Requisition Type section. See Completing the Requisition Type Section.
-
Add Document Defaults. See Adding Document Defaults.
-
Optionally add Delivery details. See Adding Blanket Order Delivery Details.
-
Add one or more line items. See Adding Blanket Order Line Items.
You can add more than one line to a blanket order to manage different buckets of approved spend. To delete blanket order lines, see Deleting Blanket Order Line Items.
-
Optionally apply new defaults to selected lines. See Applying Defaults to Line Items.
-
Complete the lines by editing them. See Editing Blanket Order Line Items.
Your Blanket Order is now ready to be submitted, or it can be edited or reviewed first. See Working with Requisitions.
For functions relating to Blanket Orders specifically, see Blanket Pro-Forma Order Functionality. Here you will learn how to add a release to a blanket order, append a blanket order to a new requisition, close the blanket order early, and search for a blanket order.
Blanket Order Header
Fill out the fields for the document header section.
Header Details
- Company
-
This read-only field displays the requester’s Default Company.
- Blanket Order Requisition Name
-
Enter a name for the Blanket Order.
- Append to existing PFO
-
Select this check box if you want this document appended to an existing Blanket Pro-Forma Order. See Appending to a Blanket Pro-Forma Order.
- Blanket Start Date
-
The start of the Blanket Order period.
- Blanket End Date
-
The end of the Blanket Order period.
- Urgent
-
Select this check box to mark this requisition as urgent. Urgent requisitions are shown with a red exclamation mark
 in the requisition search results page. If there is a scheduled job for urgent requisitions (Remind Urgent Requisition Approval), email notifications will be sent to relevant parties.
 - Auto Send
-
Select this check box to automatically send purchase orders to the vendor. There are other settings and selections to make - see note below. This check box is pre-selected if the setting Default Allow Auto Send for PO is set to On.
See how to set up the automatic email and/or automatic faxing of a purchase order (see Automatic Email of a Purchase Order and Automatic Faxing of Purchase Orders). - Pre-paid
-
Select this check box to indicate that the requisition lines have been pre-paid.
More
- Payment Type
-
AP Payment Methods on the logged-on user’s User Detail page (AP Payment Methods tab) are displayed in a drop-down list. (Only AP Payment Methods where the company matches the selected Location’s company are displayed.)
This field is only visible if Pre-paid is selected.
- Payment Reference
-
Any Payment References on the logged-on user’s User Detail page (AP Payment Methods tab) will be displayed here in a drop-down list, otherwise the field is free text.
This field is only visible if the selected Payment Type requires a reference.
Completing the Requisition Type Section for a Blanket Order
The Requisition Type is used to categorize the Requisition. Custom Data is saved to the database, where it can be used in reports or mapped to user-defined fields in Kinetic. The Requisition Type can also be selected as a field for criteria in an Advanced approval tree.
|
NOTES:
|
-
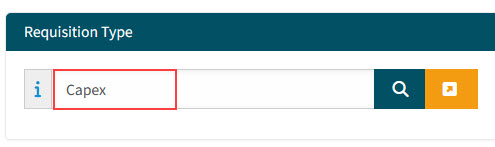
Select a Requisition Type, or keep the default Requisition Type.
-
Click the Values button
 to open the custom form for the selected Requisition Type.
-
If there are no required fields to fill out, the Values button
 is blue.
 -
If the required fields are filled out, the Values button
 is green.
-
-
Select the required values in the custom form, then click Save and Close. See Custom Form Designer.
Adding Document Defaults
-
To set default values in new line items, set and select default values in the Document Defaults section before adding the new line items.
OR
-
To update values in existing line items, set and select default values in the Document Defaults section, select the line items to update, then click Apply selected fields to selected Lines on the bottom left of the Document Defaults section.
To select default values in the Document Defaults section:
-
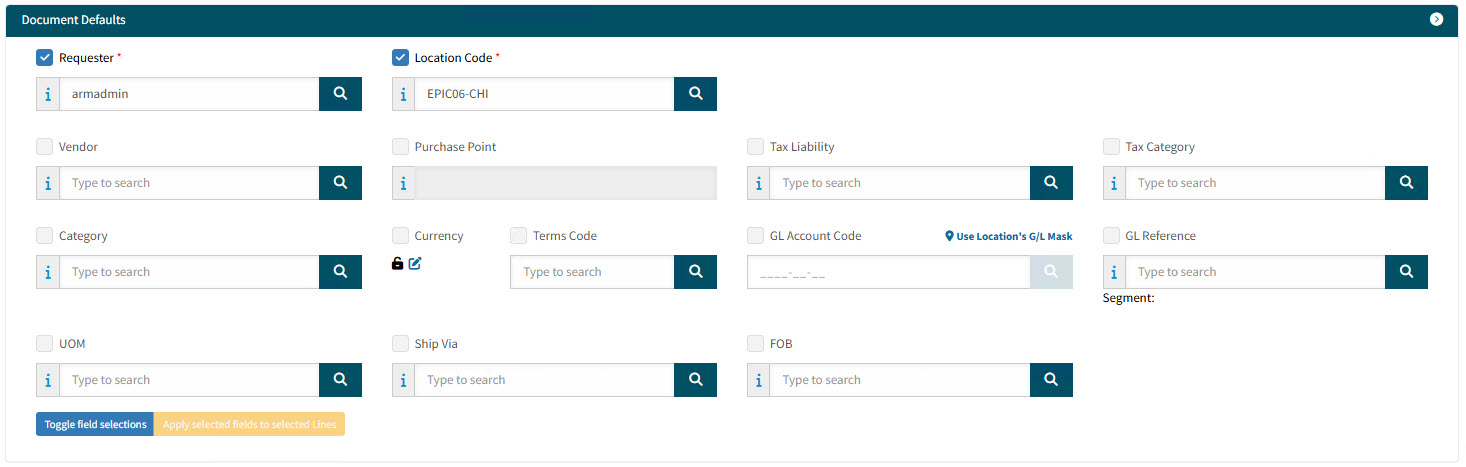
Click on Document Defaults section header bar, to expand the Document Defaults section.
Some of the defaults already have values.
View Document Defaults
-
For each default setting, select a value, then select the check box alongside its label. If the check box is not selected, the default value will not be applied to the corresponding field on the new or selected lines.
Tip: Click the Toggle field selections button at the bottom of this section, to select/clear the selected fields in Document Defaults.

Default Settings
- Requester
-
This defaults to your Link Requester. You can select any other Requester in your Requester Groups.
- Location Code
-
This defaults to the Requester’s Default Receiving Location. You can select from any other Locations that you have access to. Note that the Requester’s Default Receiving Location might not be one you have access to, in which case you must select a different one.
- Vendor
-
Select a Vendor.
- Purchase Point
-
Select a Purchase Point (configured on the Supplier in Kinetic).
-
The Purchase Point detail is also visible on the Purchase Order report.
-
The Purchase Point’s contact email address is a point of reference for email notification. (The order of preference for an email address is: Purchase Point > Vendor Primary Contact > Other contacts > Vendor.)
-
- Tax Liability
-
Select a Tax Liability.
- Tax Category
-
Select a Tax Category.
- Category
-
Select a Category.
- Currency
-
If you have permissions you can change the default currency.
Details
Click on the edit
 icon next to the currency field.
The Currency Info pop-up dialog appears.
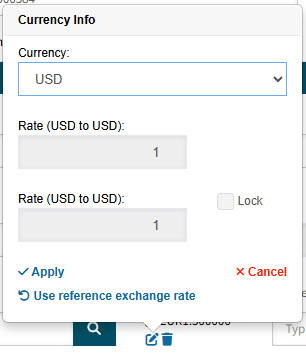
Here you can:
-
Select a different Currency from the drop-down list.
-
Select Lock to lock in the current exchange rate between the two currencies (as displayed in the two Rate boxes).
-
Select Apply.
-
- Terms Code
-
Select a default Terms Code for the line items.
- GL Account Code
-
Click the search
 button on the GL Account Code edit box. This opens the GL Account Code Search screen. Search for and select a GL Account Code.
OR
- Use Location’s G/L Mask
-
Click Use Location’s G/L Mask if you want the list of GL Account Codes in the drop-down list limited to the document location’s GL Account Mask (for example, if the location’s GL Account Mask is _ _ _ _ -_ _-10, the drop-down list will only display GL Account Codes that end in 10).
OR
- Edit the GL Account Code
-
If you have edit permissions on the three GL Account segments you may edit the GL Account Code in the edit box.
Otherwise, click the edit
 button on the GL Account Code edit box. This opens the GL Account Segments screen. Search for and select the segments that make up a GL Account Code.
Details
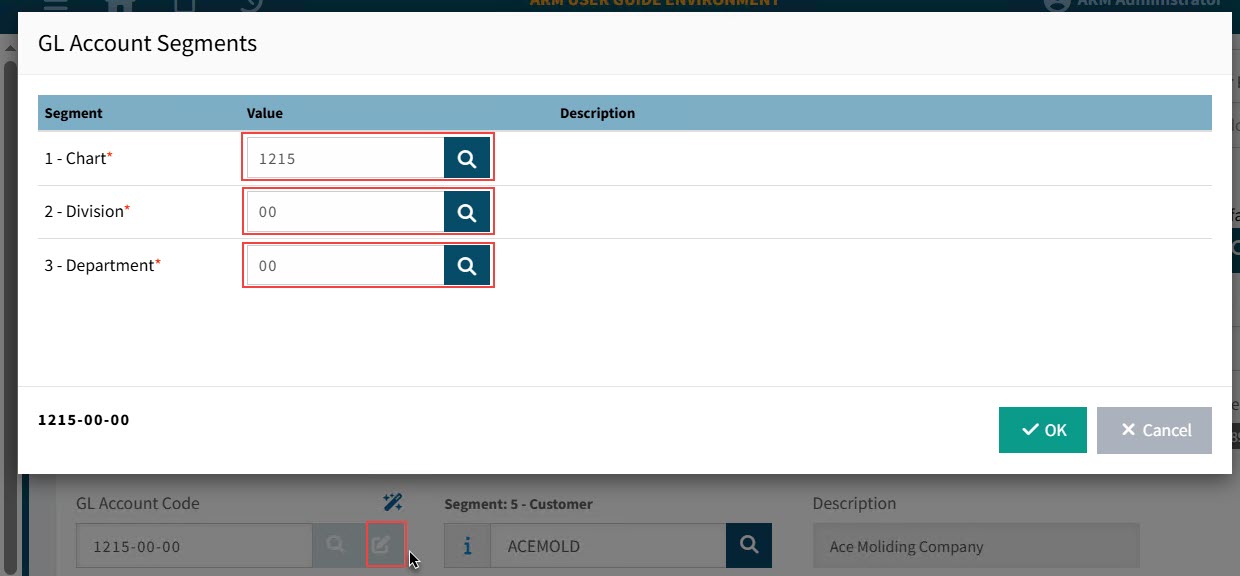
You may only select GL Account segments for which you have edit permissions. See Editable GL Segments.
- GL Reference
-
Select a GL Reference from the drop-down list. This will be used as the default GL Reference in the line items.
- UOM
-
Select a UOM.
- Ship Via
-
Select a Ship Via.
- FOB
-
Select a FOB.
-
To close the Document Defaults section, click on the section header bar again.
Adding Blanket Order Delivery Details
-
Click on the Delivery section header bar.
This opens the Delivery section.
View Delivery Section
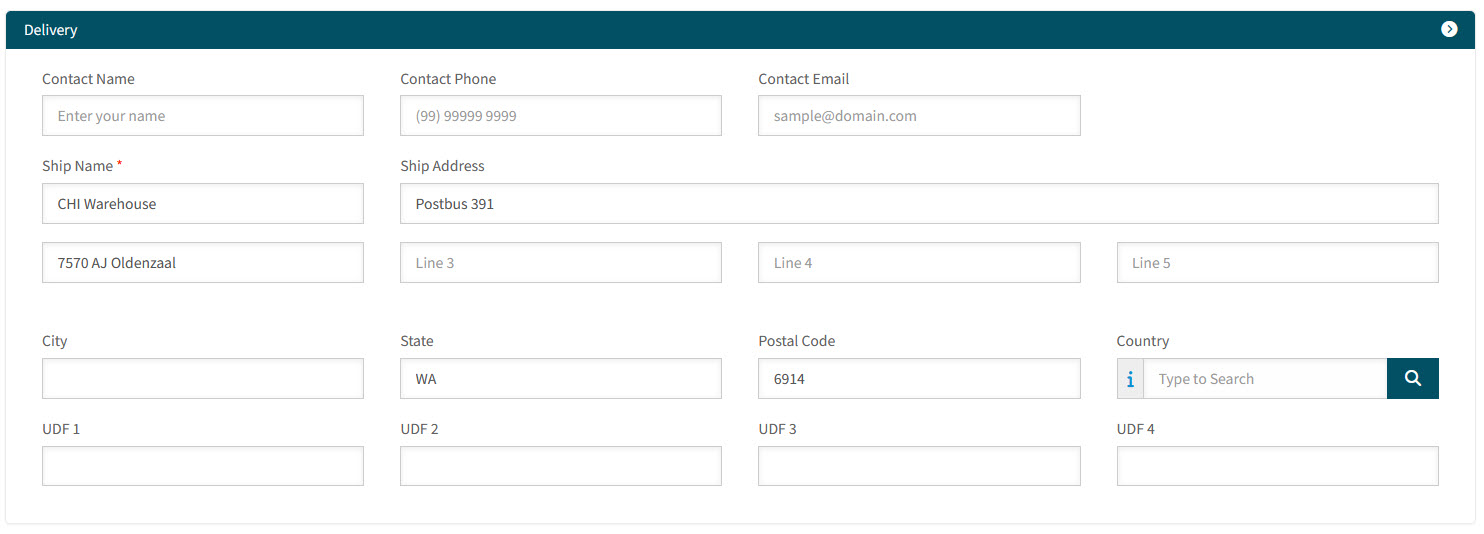
The delivery details of the selected Location are populated in these fields.
-
Update the delivery details, if necessary.
Delivery Settings
-
Contact Name
-
Contact Phone
-
Contact Email
-
Ship Name
-
Ship Address
-
City
-
State
-
Postal Code
-
Country
-
User Defined Fields (UDF 1, etc.)
-
-
To close the Delivery section, click on the Delivery section header bar again.
Adding Blanket Order Line Items
Add one or more  Non-Catalogue line items to the document. See Adding Non-Catalogue Items to a Blanket Order.
See below for more detail.
Adding Non-Catalogue Items to a Blanket Order
Add a non-catalogue item for a Blanket Order, where the items are unknown when the Requisition is created.
-
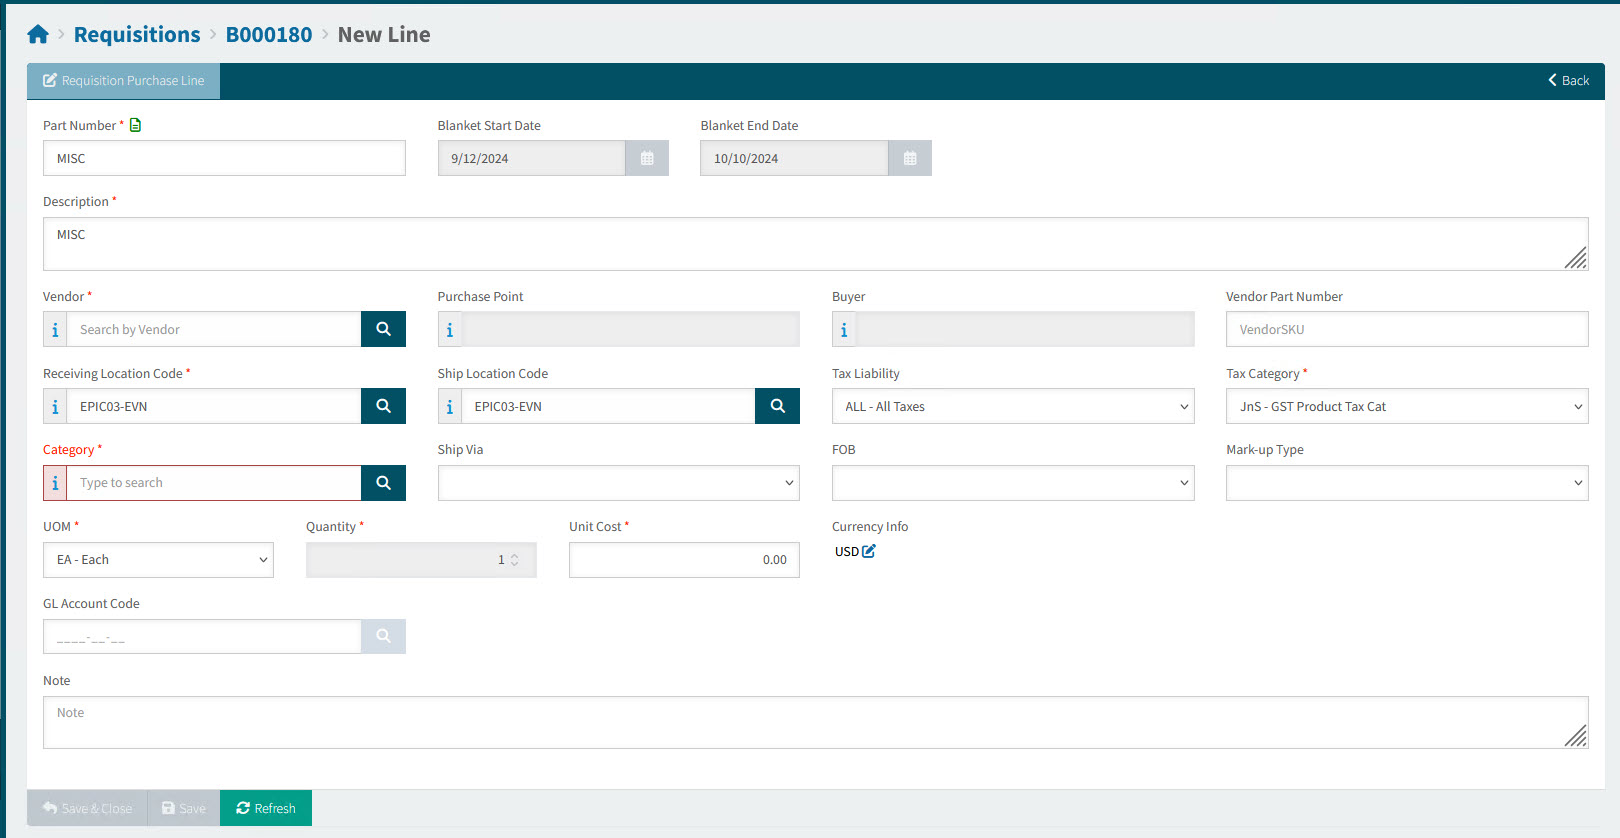
Select Non-Catalogue at the bottom of the page.

The Requisition > [Blanket Document No.] > New Line page opens.
-
Edit the fields to create a non-catalogue item.
Line Item Fields
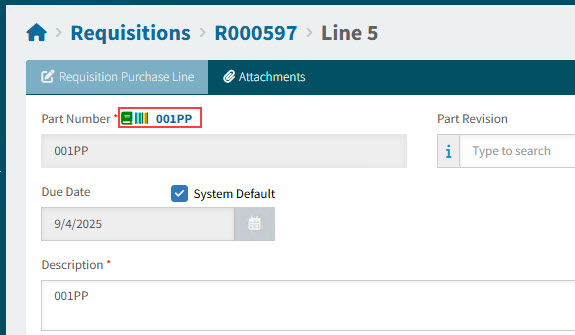
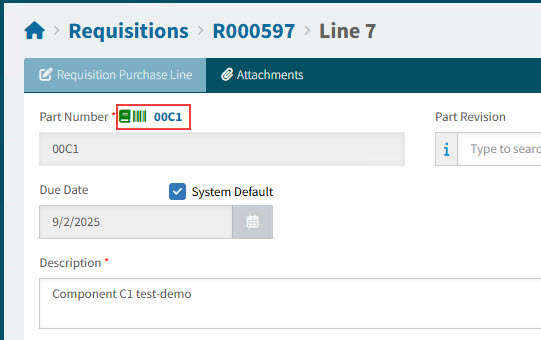
- Part Number
-
The icon
 indicates this is a non-catalogue item.
The Part Number defaults to the value set in the Company Setting for Default Non-Cat Part No. If you have the permission Can Change Non-catalogue Item Name, you can edit it.
Converting a Non-Catalogue Item to a Catalogue Item
Inventory Part Number
If you enter a Part Number belonging to an Inventory Part, select Yes to convert the line to a Catalogue Line Item.
Details
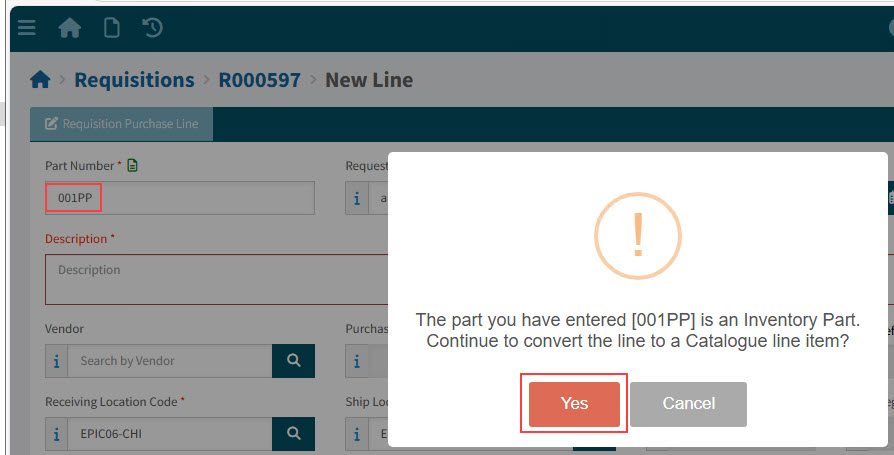
The line item converts to a Catalogue item, with the selected Inventory Part selected as the Part Number.
Cross-referenced Part Number
If the Part Number is cross-referenced to one or more parts, a Cross-references pop-up for the Part Number displays.
-
Click the check
 Action button to select the cross-referenced part.
Details

The line item converts to a Catalogue item, with the selected cross-referenced part as the Part Number.
Note that you cannot edit the part number after saving the non-catalogue item.
-
- Requester
-
Select a Requester for the line item. You can select any other Requester from your Requester Groups.
- Custom Data
-
This field is available if Use Requisition Types is enabled. See Global Settings.
-
Select a User Assigned Custom Form then click the Values
button. -
Select the required values in the custom form, then click Save and Close. See Custom Form Designer.
-
- Blanket Start Date
-
The start of the Blanket Order period.
You cannot edit the Blanket Start Date for a line item.
- Blanket End Date
-
The end of the Blanket Order period.
You cannot edit the Blanket End Date for a line item.
- Description
-
You can optionally update the item description.
- Vendor
-
To update, select a Vendor by typing a partial name and selecting from the displayed list, which is limited to Vendors Approved for Purchasing that are also on the Catalogue Item’s Price List as an Approved Supplier.
- Purchase Point
-
Select a Purchase Point (configured on the Supplier in Kinetic).
If you have a Document Default Purchase Point, then this is selected, otherwise the System Default Purchase Point (if available) is selected.
If you select a different Purchase Point, this clears the System Default check box.
- Purchase Point
-
The vendor’s primary purchase point.
-
The Purchase Point detail is also visible on the Purchase Order report.
-
The Purchase Point’s contact email address is a point of reference for email notification. (The order of preference for an email address is: Purchase Point > Vendor Primary Contact > Other contacts > Vendor.)
- Terms
-
If you have a Document Default Terms Code, then this is selected, otherwise the System Default Terms Code is selected.
If you select Terms, this clears the System Default check box.
- Terms
-
The Terms defaults to the first available from:
-
Supplier (Vendor), if available, otherwise
-
Company settings
-
- Vendor Part Number
-
Enter the vendor part number or SKU (stock taking unit), if known.
- Receiving Location Code
-
You can select a different location code from the one on the Document Defaults. The Global Setting Line Level Locations must be enabled.
Different locations will cause a Requisition to split into separate Pro-Forma Orders and thus different Purchase Orders. See Pro-Forma Order Creation Rules.
Note that the locations can be from multiple companies.
- Ship Location Code
-
You can select shipping location that is different from the receiving location. You can also Edit to edit the Delivery Address. The Global Setting Line Level Locations must be enabled.
If you cannot edit the Delivery Address, you can View it.
The locations can be from multiple companies.
- Tax Liability
-
If you have a Document Default Tax Liability, then this is selected, otherwise the System Default Tax Liability is selected.
If you select a Tax Liability, this clears the System Default check box.
- Tax Liability
-
The Tax Liability defaults to the first available of:
-
The Vendor’s Tax Liability, if available, otherwise
-
The Company Setting Default Tax Liability (Tax Region) Code.
-
- Tax Category
-
If you have a Document Default Tax Category, then this is selected, otherwise the System Default Tax Category is selected.
If you select a Tax Category, this clears the System Default check box.
- Tax Category
-
For Catalogue items, the Tax Category defaults to the first available of:
-
The Tax Category for the Catalogue item for the Location matching the Receiving Location Code
-
The Tax Category for the Catalogue item
-
The Tax Category for the Catalogue’s Category
-
The Default Product Tax Category Code defined in Company Settings.
For items not in the Catalogue, the Tax Category defaults to the Default Product Tax Category Code defined in Company Settings.
-
- Category
-
If you have a Document Default Category, then this is selected, otherwise the System Default Category is selected.
Just for Blanket Orders:
-
If you have a Document Default Category, then this is selected
-
Otherwise, the same Category as used in the first line of the Blanket Order (for the second line onward).
-
Otherwise the System Default Category is selected.
If you select a Category, this clears the System Default check box.
- For Catalogue and Non-Catalogue Items
-
The category defaults to the first available of:
-
The Category for the Catalogue item (catalogue items only)
-
The Default Category for the Vendor
-
The Default Category for the Vendor Group
-
Default Category in Company settings
-
<blank>
- For PunchOut Lines
-
The category defaults to the first available of:
-
The PunchOut line Category
-
The Category that maps to the PunchOut item’s UNSPSC code
-
The Category for the Catalogue item that maps to the PunchOut item
-
The Category for the PunchOut configuration - see Maintaining PunchOut.
-
-
The Default Category for the Vendor
-
The Default Category for the Vendor Group
-
Default Category in Company settings
-
<blank>
To update the Category, click the search
 button open the Category Code Search. The Category Code Search contains a list of Category Codes that belong to the Category Groups assigned to your User details.
 -
- Ship Via
-
If you have a Document Default Ship Via, then this is selected, otherwise the System Default Ship Via is selected.
If you select a Ship Via, this clears the System Default check box.
- Ship Via
-
The Ship Via defaults to the first available from:
-
The selected Vendor’s Ship Via value (from the Supplier record on Kinetic).
Ship Via specifies the shipping method (for example, FedEx, or Company Truck) that the supplier uses to ship purchased materials to your shipping location.
-
The Company Setting for Ship Via
-
If PFO Combining is enabled, Requisition lines will combine based on the combinations of line Ship Via and FOB values. - FOB
-
If you have a Document Default FOB, then this is selected, otherwise the System Default FOB is selected.
If you select a FOB, this clears the System Default check box.
- FOB
-
The FOB defaults to the first available from:
-
The selected Vendor’s FOB value (from the Supplier record on Kinetic). The FOB specifies the free on board location for the supplier. This location indicates the point at which title of the shipped goods changes from the supplier to your company.
-
The Company Setting for Default FOB
-
If PFO Combining is enabled, Requisition lines will combine based on the combinations of line Ship Via and FOB values. - Buyer
-
The Buyer for this item. Buyers are integrated from Kinetic and available for selection in this field when Enable Buyer Mapping in Global Settings is set to Yes.
On full approval of a Requisition, the Buyer field will be mapped to the Buyer field on the resulting Pro-Forma Order.
If the Buyer field is blank on the Pro-Forma Order, it will default to the Buyer info on the Root Node of the relevant approval tree. You cannot edit the Buyer for a line item on a Blanket Order.
- Mark-up Type
-
This field is visible when the Enable On-charge Mark-up Global Setting is enabled.
Select either Unit Price or Percent.
If there is a configured Default Mark Up in Kinetic, then the default on-charge data is displayed here (based on the Project/Phase/Cost Code and Part selections). You can enter values if necessary.
- Unit Price Mark-Up
-
This field appears if Unit Price is selected for Mark-up Type.
- Mark-up %
-
This field appears if Percent is selected for Mark-up Type.
- UOM
-
If you have a Document Default UOM, then this is selected, otherwise the System Default UOM is selected.
If you select a UOM, this clears the System Default check box.
- UOM
-
This defaults to the catalogue item’s (part) UOM. The available UOM’s in the drop-down list are those that belong to the same UOM group.
When a Vendor is selected and there is a Price for this Vendor, then the UOM for the Vendor Price for this Catalogue Item overrides the Catalogue Item’s UOM.
When a line is added from Job Material, the UOM defaults from the Job Material UOM, overriding the Part UOM.
For non-catalogue requisition line items and AP Invoice Misc lines, the UOM defaults to the company’s Default UOM defined in Company Settings.
- Quantity
-
The quantity for a blanket order item is 1 and cannot be edited.
- Unit Cost
-
Enter a Unit Cost for the line.
- Currency Info
-
If you have permissions you can change the currency on the line.
Details
Click on the edit
icon next to the currency field.The Currency Info pop-up dialog appears.
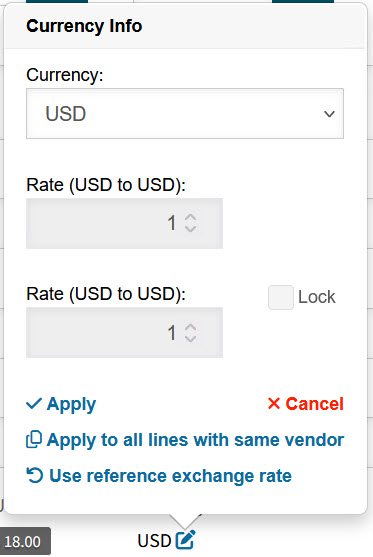
Here you can:
-
Select a different Currency from the drop-down list.
-
Select Lock to lock in the current exchange rate between the two currencies (as displayed in the two Rate boxes).
-
Select Apply to apply the new currency to just this line, or select Apply to all lines with the same vendor.
-
- GL Account Code
-
If you have a Document Default GL Account Code, then this is selected, otherwise the System Default GL Account Code is selected.
- GL Account Code
-
See GL Account Mask Sequence for an explanation on how the GL Account Code is derived as a system default.
To show the GL Sequencing Steps:
-
Click on the wand
 button above the GL Account Code search box.
This opens the GL Sequences information panel.
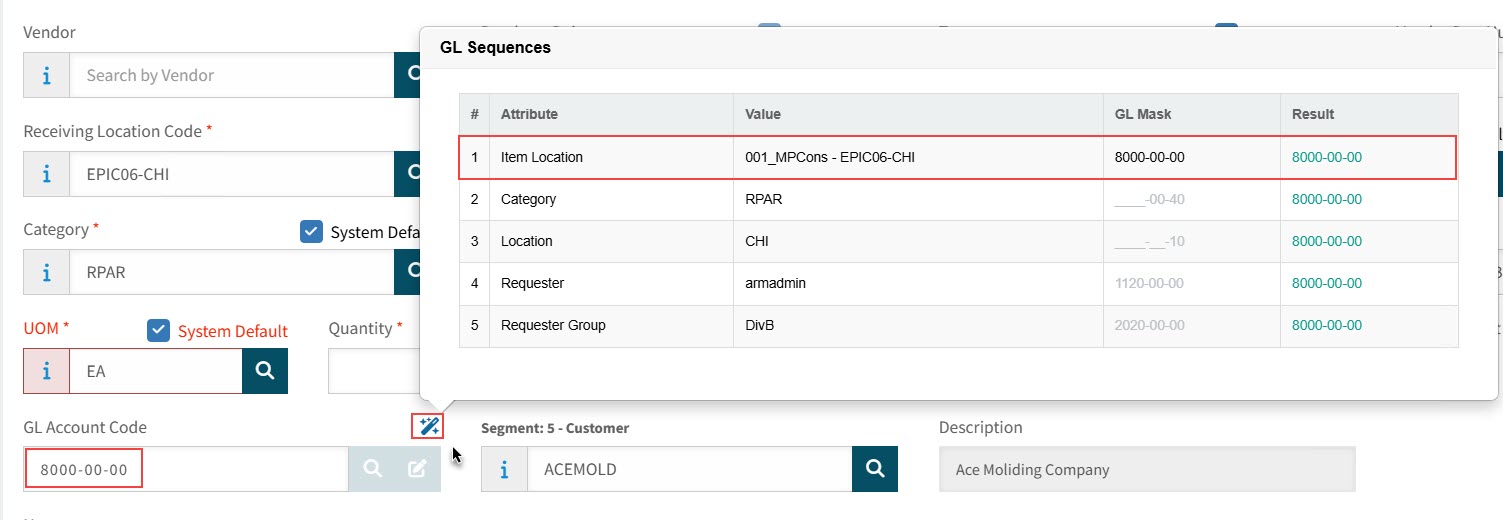
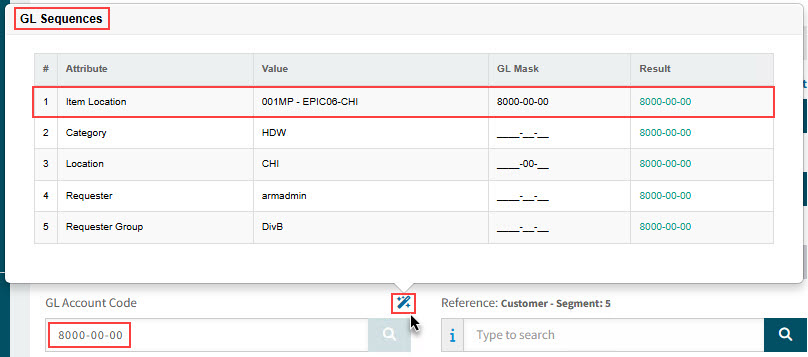
Example 1: Attribute # 1 has a valid and complete result, which is colored in green.
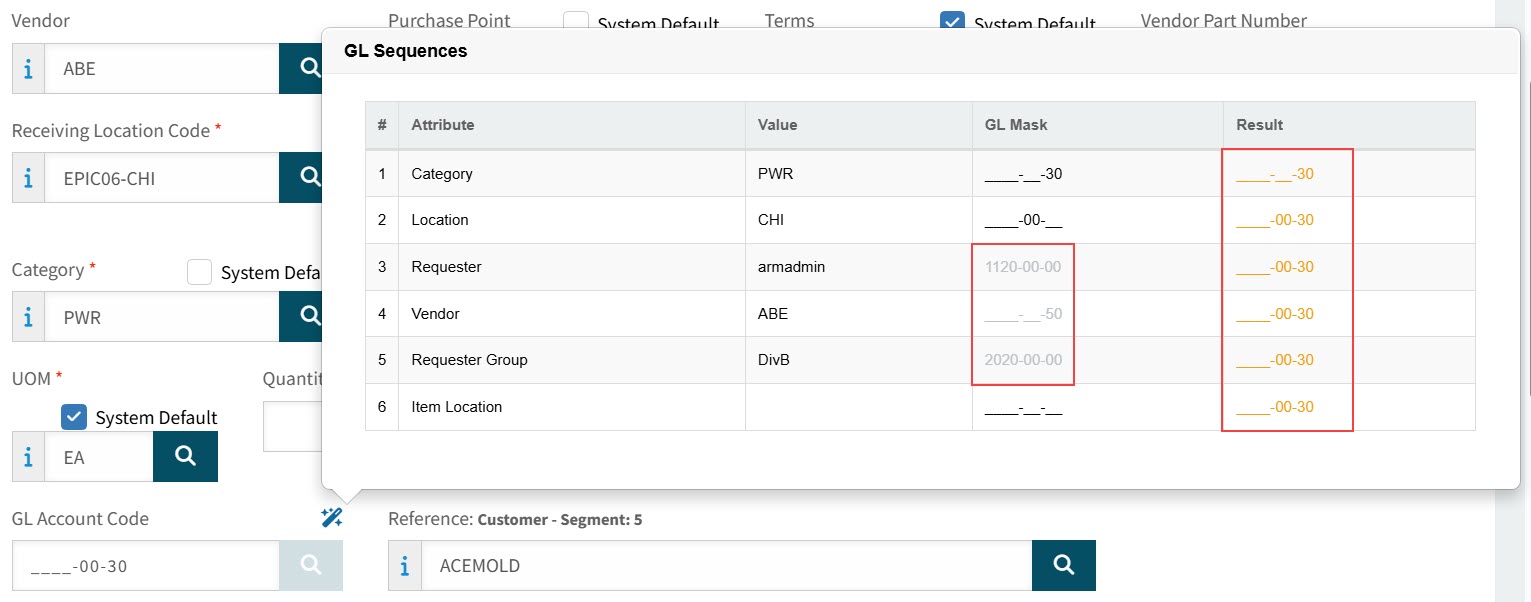
Example 2: Each result shown here is colored in amber, incomplete but valid. GL Masks that don’t match previous results are displayed in gray.
- Attribute
-
The attribute name from the GL Account Mask Sequence, with the first in the sequence at the top of the list (for example, CATEGORY).
- Value
-
The value of that attribute on the requisition line (for example, HDW).
- GL Mask
-
The GL mask associated with the value of the attribute. e.g., "__-00-20".
If the GL mask does not match the previous result, it is colored in gray and is not used.
- Result
-
The resultant GL Account code when this attribute value’s mask is applied to the cumulative GL Account. The result is color-coded as follows:
- Amber
-
The GL Account mask is incomplete, but valid.
- Red
-
The GL Account mask is complete, but invalid.
- Green
-
The GL Account mask is complete and valid. (This is the value that ARM defaults into the GL Account field.)
GL Sequences displays how the default GL Account Code is derived, according to the GL Account Mask Sequence.
Based on the information displayed, it is possible to see where there are GL Account segments for relevant attribute values that are missing from the Chart of Accounts.
See example where GL Account segments are missing:
Each result shown here is colored in amber: the GL Account mask is incomplete but valid. GL Masks that don’t match previous results are displayed in gray.

To search for a new GL Account Code:
-
Click the search
button on the edit box. This opens the GL Account Code Search screen. Search for and select a new GL Account Code.All GL Account Codes that match the User’s Assigned GL Accounts (for the Company) are available for selection. See Maintaining Users - Assigned GL Accounts Tab.
For Inventory items, the GL Account Code defaults to the GL Account Code for the Catalogue Item Location, unless the Company Setting Use ARM’s GL defaulting logic on inventory items is enabled, in which case the GL Account Code is created as it is for non-inventory items.
To edit the GL Account Code:
-
Edit the GL Account Code in the edit box. This is only possible if you have edit permissions on the three GL Account segments.
OR
-
Click the edit
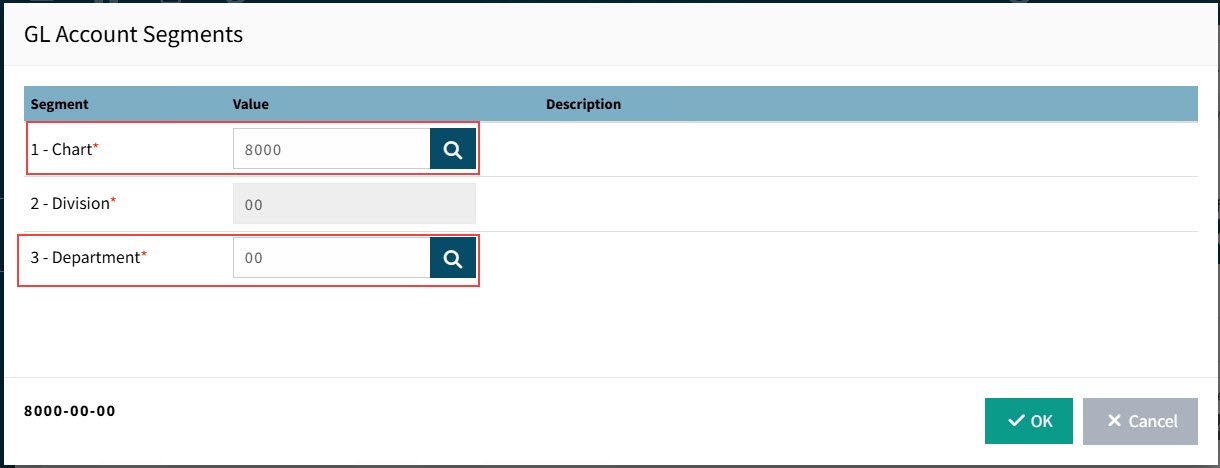
button on the GL Account Code edit box. This opens the GL Account Segments screen. Search for and select the segments that make up a GL Account Code.Details
NOTE: You may only select GL Account segments for which you have edit permissions. See Editable GL Segments.
In this example, a user may only select the Chart and Department segments.
Details
- Dynamic Reference Segment/s (Client Specific Values)
-
If the Chart of Account structure in Kinetic includes the setup of multiple dynamic segments, these are integrated into ARM and can be selected within Requisition lines.
Example of reference segments:
- Reference: Customer
-
Select a Customer reference from the drop-down list.
- Reference: Employee
-
Select an Employee reference from the drop-down list.
- Reference: Vehicles
-
Select a Vehicle reference from the drop-down list.
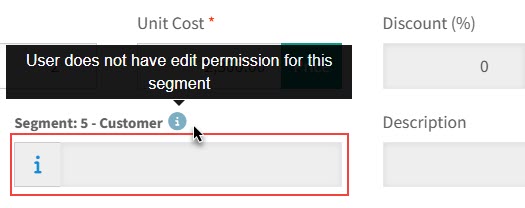
You may only select dynamic references for which you have edit permissions. See Editable GL Segments.
In this example, a user may not edit the segment.
- HS Commodity Code
-
Overwrite the HS Commodity Code, if necessary. This field is required if the Company General Setting for HS Commodity Code Required setting is Yes.
- Note
-
Any note added here will be integrated into Kinetic on the Purchase Order > Line > Comments.
Deleting Blanket Order Line Items
To delete items from a document:
-
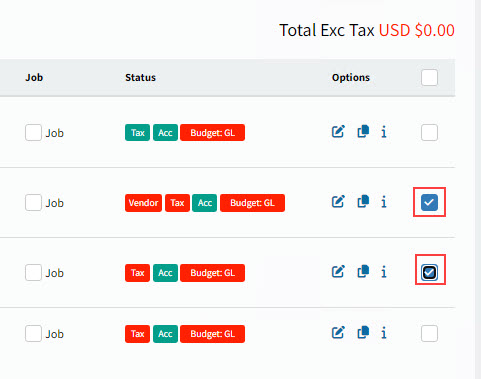
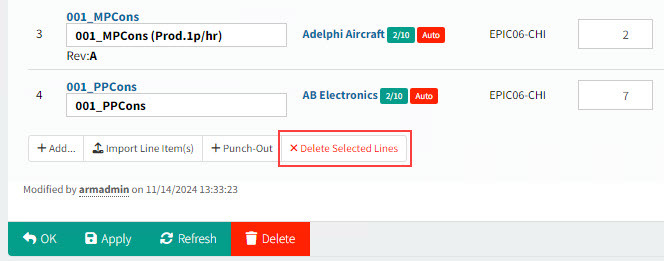
Select the check box to the right of one or more items to delete.
-
Select Delete Selected Items button on the Line Items footer.
Applying Defaults to Blanket Order Line Items
-
Before applying defaults, select one or more lines to include in the update, by selecting the check box at the end of the line, under the Options column.
-
Open the Document Defaults section.
-
Optionally update default values.
-
To apply the selected values, click the Apply selected fields to Lines button.
-
Close the Document Defaults section.
Editing Blanket Order Line Items
-
Edit the item fields.
Line Item Fields
- Part Number
-
The icon
indicates this is a non-catalogue item.The Part Number defaults to the value set in the Company Setting for Default Non-Cat Part No. If you have the permission Can Change Non-catalogue Item Name, you can edit it.
Converting a Non-Catalogue Item to a Catalogue Item
Inventory Part Number
If you enter a Part Number belonging to an Inventory Part, select Yes to convert the line to a Catalogue Line Item.
Details
The line item converts to a Catalogue item, with the selected Inventory Part selected as the Part Number.
Cross-referenced Part Number
If the Part Number is cross-referenced to one or more parts, a Cross-references pop-up for the Part Number displays.
-
Click the check
Action button to select the cross-referenced part.
Details
The line item converts to a Catalogue item, with the selected cross-referenced part as the Part Number.
Note that you cannot edit the part number after saving the non-catalogue item.
-
- Requester
-
Select a Requester for the line item. You can select any other Requester from your Requester Groups.
- Custom Data
-
This field is available if Use Requisition Types is enabled. See Global Settings.
-
Select a User Assigned Custom Form then click the Values
button. -
Select the required values in the custom form, then click Save and Close. See Custom Form Designer.
-
- Blanket Start Date
-
The start of the Blanket Order period.
You cannot edit the Blanket Start Date for a line item.
- Blanket End Date
-
The end of the Blanket Order period.
You cannot edit the Blanket End Date for a line item.
- Description
-
You can optionally update the item description.
- Vendor
-
To update, select a Vendor by typing a partial name and selecting from the displayed list, which is limited to Vendors Approved for Purchasing that are also on the Catalogue Item’s Price List as an Approved Supplier.
- Purchase Point
-
Select a Purchase Point (configured on the Supplier in Kinetic).
If you have a Document Default Purchase Point, then this is selected, otherwise the System Default Purchase Point (if available) is selected.
If you select a different Purchase Point, this clears the System Default check box.
- Purchase Point
-
The vendor’s primary purchase point.
-
The Purchase Point detail is also visible on the Purchase Order report.
-
The Purchase Point’s contact email address is a point of reference for email notification. (The order of preference for an email address is: Purchase Point > Vendor Primary Contact > Other contacts > Vendor.)
- Terms
-
Keep Use Default Terms selected, or clear the check box and select a Terms code.
- Vendor Part Number
-
Enter the vendor part number or SKU (stock taking unit), if known.
- Receiving Location Code
-
You can select a different location code from the one on the Document Defaults. The Global Setting Line Level Locations must be enabled.
Different locations will cause a Requisition to split into separate Pro-Forma Orders and thus different Purchase Orders. See Pro-Forma Order Creation Rules.
Note that the locations can be from multiple companies.
- Ship Location Code
-
You can select shipping location that is different from the receiving location. You can also Edit to edit the Delivery Address. The Global Setting Line Level Locations must be enabled.
If you cannot edit the Delivery Address, you can View it.
The locations can be from multiple companies.
- Tax Liability
-
If you have a Document Default Tax Liability, then this is selected, otherwise the System Default Tax Liability is selected.
If you select a Tax Liability, this clears the System Default check box.
- Tax Liability
-
The Tax Liability defaults to the first available of:
-
The Vendor’s Tax Liability, if available, otherwise
-
The Company Setting Default Tax Liability (Tax Region) Code.
-
- Tax Category
-
If you have a Document Default Tax Category, then this is selected, otherwise the System Default Tax Category is selected.
If you select a Tax Category, this clears the System Default check box.
- Tax Category
-
For Catalogue items, the Tax Category defaults to the first available of:
-
The Tax Category for the Catalogue item for the Location matching the Receiving Location Code
-
The Tax Category for the Catalogue item
-
The Tax Category for the Catalogue’s Category
-
The Default Product Tax Category Code defined in Company Settings.
For items not in the Catalogue, the Tax Category defaults to the Default Product Tax Category Code defined in Company Settings.
-
- Category
-
If you have a Document Default Category, then this is selected, otherwise the System Default Category is selected.
Just for Blanket Orders:
-
If you have a Document Default Category, then this is selected
-
Otherwise, the same Category as used in the first line of the Blanket Order (for the second line onward).
-
Otherwise the System Default Category is selected.
If you select a Category, this clears the System Default check box.
- For Catalogue and Non-Catalogue Items
-
The category defaults to the first available of:
-
The Category for the Catalogue item (catalogue items only)
-
The Default Category for the Vendor
-
The Default Category for the Vendor Group
-
Default Category in Company settings
-
<blank>
- For PunchOut Lines
-
The category defaults to the first available of:
-
The PunchOut line Category
-
The Category that maps to the PunchOut item’s UNSPSC code
-
The Category for the Catalogue item that maps to the PunchOut item
-
The Category for the PunchOut configuration - see Maintaining PunchOut.
-
-
The Default Category for the Vendor
-
The Default Category for the Vendor Group
-
Default Category in Company settings
-
<blank>
To update the Category, click the search
button open the Category Code Search. The Category Code Search contains a list of Category Codes that belong to the Category Groups assigned to your User details. -
- Ship Via
-
If you have a Document Default Ship Via, then this is selected, otherwise the System Default Ship Via is selected.
If you select a Ship Via, this clears the System Default check box.
- Ship Via
-
The Ship Via defaults to the first available from:
-
The selected Vendor’s Ship Via value (from the Supplier record on Kinetic).
Ship Via specifies the shipping method (for example, FedEx, or Company Truck) that the supplier uses to ship purchased materials to your shipping location.
-
The Company Setting for Ship Via
-
If PFO Combining is enabled, Requisition lines will combine based on the combinations of line Ship Via and FOB values. - FOB
-
If you have a Document Default FOB, then this is selected, otherwise the System Default FOB is selected.
If you select a FOB, this clears the System Default check box.
- FOB
-
The FOB defaults to the first available from:
-
The selected Vendor’s FOB value (from the Supplier record on Kinetic). The FOB specifies the free on board location for the supplier. This location indicates the point at which title of the shipped goods changes from the supplier to your company.
-
The Company Setting for Default FOB
-
If PFO Combining is enabled, Requisition lines will combine based on the combinations of line Ship Via and FOB values. - Buyer
-
The Buyer for this item. Buyers are integrated from Kinetic and available for selection in this field when Enable Buyer Mapping in Global Settings is set to Yes.
On full approval of a Requisition, the Buyer field will be mapped to the Buyer field on the resulting Pro-Forma Order.
If the Buyer field is blank on the Pro-Forma Order, it will default to the Buyer info on the Root Node of the relevant approval tree.
- Mark-up Type
-
This field is visible when the Enable On-charge Mark-up Global Setting is enabled.
Select either Unit Price or Percent.
If there is a configured Default Mark Up in Kinetic, then the default on-charge data is displayed here (based on the Project/Phase/Cost Code and Part selections). You can enter values if necessary.
- Unit Price Mark-Up
-
This field appears if Unit Price is selected for Mark-up Type.
- Mark-up %
-
This field appears if Percent is selected for Mark-up Type.
- UOM
-
If you have a Document Default UOM, then this is selected, otherwise the System Default UOM is selected.
If you select a UOM, this clears the System Default check box.
- UOM
-
This defaults to the catalogue item’s (part) UOM. The available UOM’s in the drop-down list are those that belong to the same UOM group.
When a Vendor is selected and there is a Price for this Vendor, then the UOM for the Vendor Price for this Catalogue Item overrides the Catalogue Item’s UOM.
When a line is added from Job Material, the UOM defaults from the Job Material UOM, overriding the Part UOM.
For non-catalogue requisition line items and AP Invoice Misc lines, the UOM defaults to the company’s Default UOM defined in Company Settings.
- Quantity
-
Enter the item quantity for this line.
- Unit Cost
-
Enter a Unit Cost for the line.
- Currency Info
-
If you have permissions you can change the currency on the line.
Details
Click on the edit
icon next to the currency field.The Currency Info pop-up dialog appears.
Here you can:
-
Select a different Currency from the drop-down list.
-
Select Lock to lock in the current exchange rate between the two currencies (as displayed in the two Rate boxes).
-
Select Apply to apply the new currency to just this line, or select Apply to all lines with the same vendor.
-
- GL Account Code
-
If you have a Document Default GL Account Code, then this is selected, otherwise the System Default GL Account Code is selected.
- GL Account Code
-
See GL Account Mask Sequence for an explanation on how the GL Account Code is derived as a system default.
To show the GL Sequencing Steps:
-
Click on the wand
button above the GL Account Code search box.This opens the GL Sequences information panel.
Example 1: Attribute # 1 has a valid and complete result, which is colored in green.
Example 2: Each result shown here is colored in amber, incomplete but valid. GL Masks that don’t match previous results are displayed in gray.
- Attribute
-
The attribute name from the GL Account Mask Sequence, with the first in the sequence at the top of the list (for example, CATEGORY).
- Value
-
The value of that attribute on the requisition line (for example, HDW).
- GL Mask
-
The GL mask associated with the value of the attribute. e.g., "__-00-20".
If the GL mask does not match the previous result, it is colored in gray and is not used.
- Result
-
The resultant GL Account code when this attribute value’s mask is applied to the cumulative GL Account. The result is color-coded as follows:
- Amber
-
The GL Account mask is incomplete, but valid.
- Red
-
The GL Account mask is complete, but invalid.
- Green
-
The GL Account mask is complete and valid. (This is the value that ARM defaults into the GL Account field.)
GL Sequences displays how the default GL Account Code is derived, according to the GL Account Mask Sequence.
Based on the information displayed, it is possible to see where there are GL Account segments for relevant attribute values that are missing from the Chart of Accounts.
See example where GL Account segments are missing:
Each result shown here is colored in amber: the GL Account mask is incomplete but valid. GL Masks that don’t match previous results are displayed in gray.
To search for a new GL Account Code:
-
Click the search
button on the edit box. This opens the GL Account Code Search screen. Search for and select a new GL Account Code.All GL Account Codes that match the User’s Assigned GL Accounts (for the Company) are available for selection. See Maintaining Users - Assigned GL Accounts Tab.
For Inventory items, the GL Account Code defaults to the GL Account Code for the Catalogue Item Location, unless the Company Setting Use ARM’s GL defaulting logic on inventory items is enabled, in which case the GL Account Code is created as it is for non-inventory items.
To edit the GL Account Code:
-
Edit the GL Account Code in the edit box. This is only possible if you have edit permissions on the three GL Account segments.
OR
-
Click the edit
button on the GL Account Code edit box. This opens the GL Account Segments screen. Search for and select the segments that make up a GL Account Code.Details
NOTE: You may only select GL Account segments for which you have edit permissions. See Editable GL Segments.
In this example, a user may only select the Chart and Department segments.
Details
- Dynamic Reference Segment/s (Client Specific Values)
-
If the Chart of Account structure in Kinetic includes the setup of multiple dynamic segments, these are integrated into ARM and can be selected within Requisition lines.
Example of reference segments:
- Reference: Customer
-
Select a Customer reference from the drop-down list.
- Reference: Employee
-
Select an Employee reference from the drop-down list.
- Reference: Vehicles
-
Select a Vehicle reference from the drop-down list.
You may only select dynamic references for which you have edit permissions. See Editable GL Segments.
In this example, a user may not edit the segment.
- HS Commodity Code
-
Overwrite the HS Commodity Code, if necessary. This field is required if the Company General Setting for HS Commodity Code Required setting is Yes.
- Note
-
Any note added here will be integrated into Kinetic on the Purchase Order > Line > Comments.
-
Click Save & Close on the Footer Menu.
OR
- Save
-
Click this button to apply the changes and keep the form open.
- Refresh (button)
-
Click this button to refresh unsaved data.
Appending to a Blanket Pro-Forma Order
To append a Blanket Order Requisition to a Blanket Pro-Forma Order:
-
Continue to add the Blanket Order Requisition as normal. See Creating a Blanket Order.
Read more about appending blanket requisitions in Append Order.