Editing an Automatically Generated Draft Invoice
For automatically generated draft invoices, unless this automatically submitted, you will need to do some editing. Refer to the stages described in AP Automation.
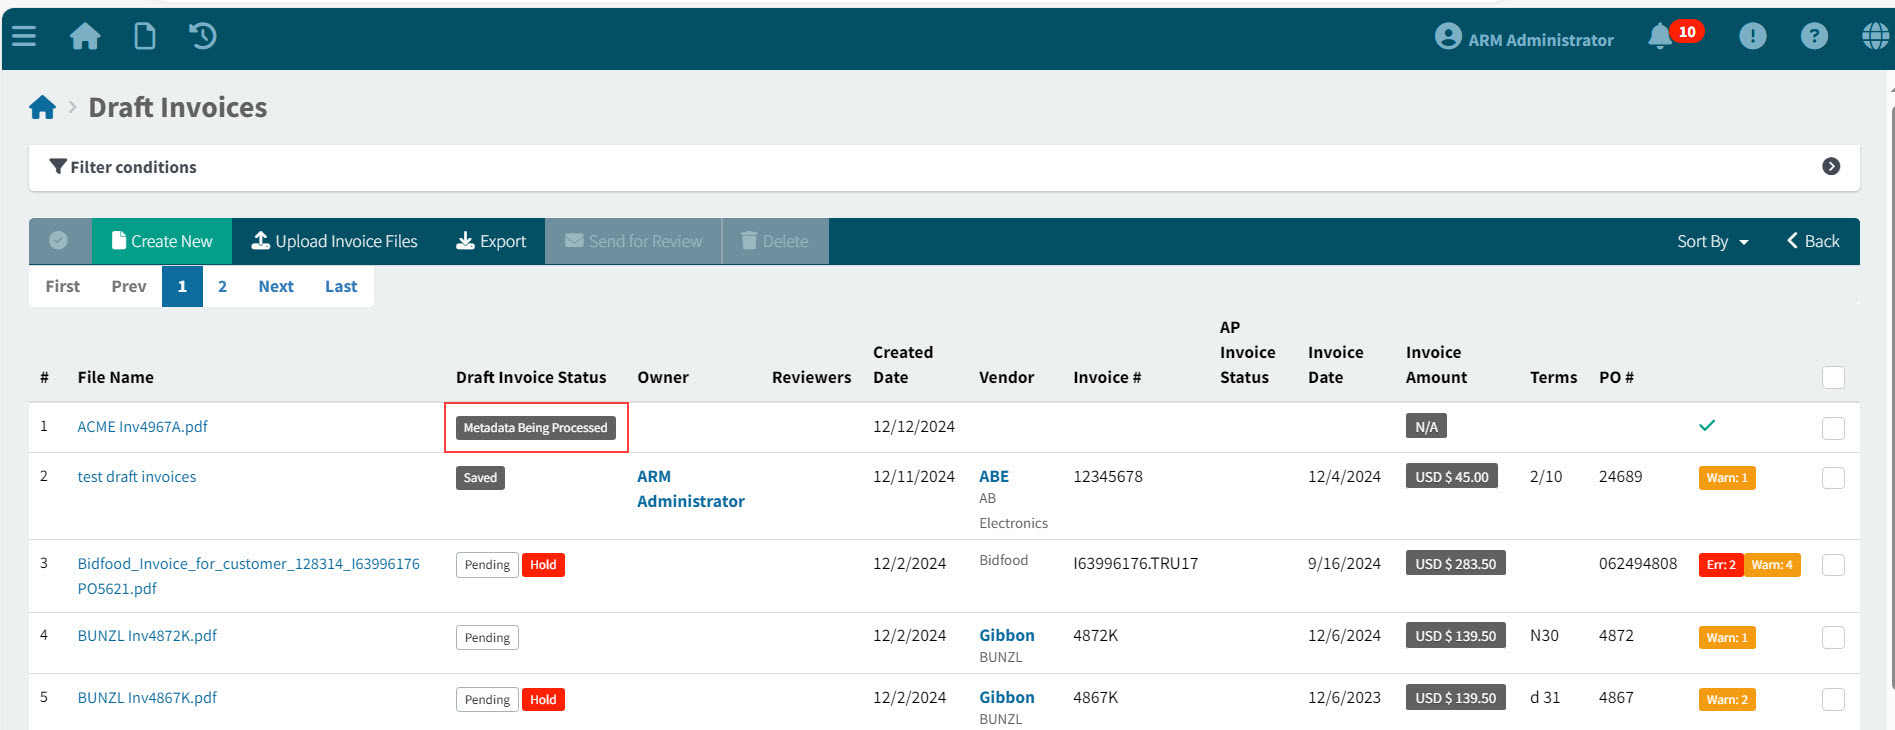
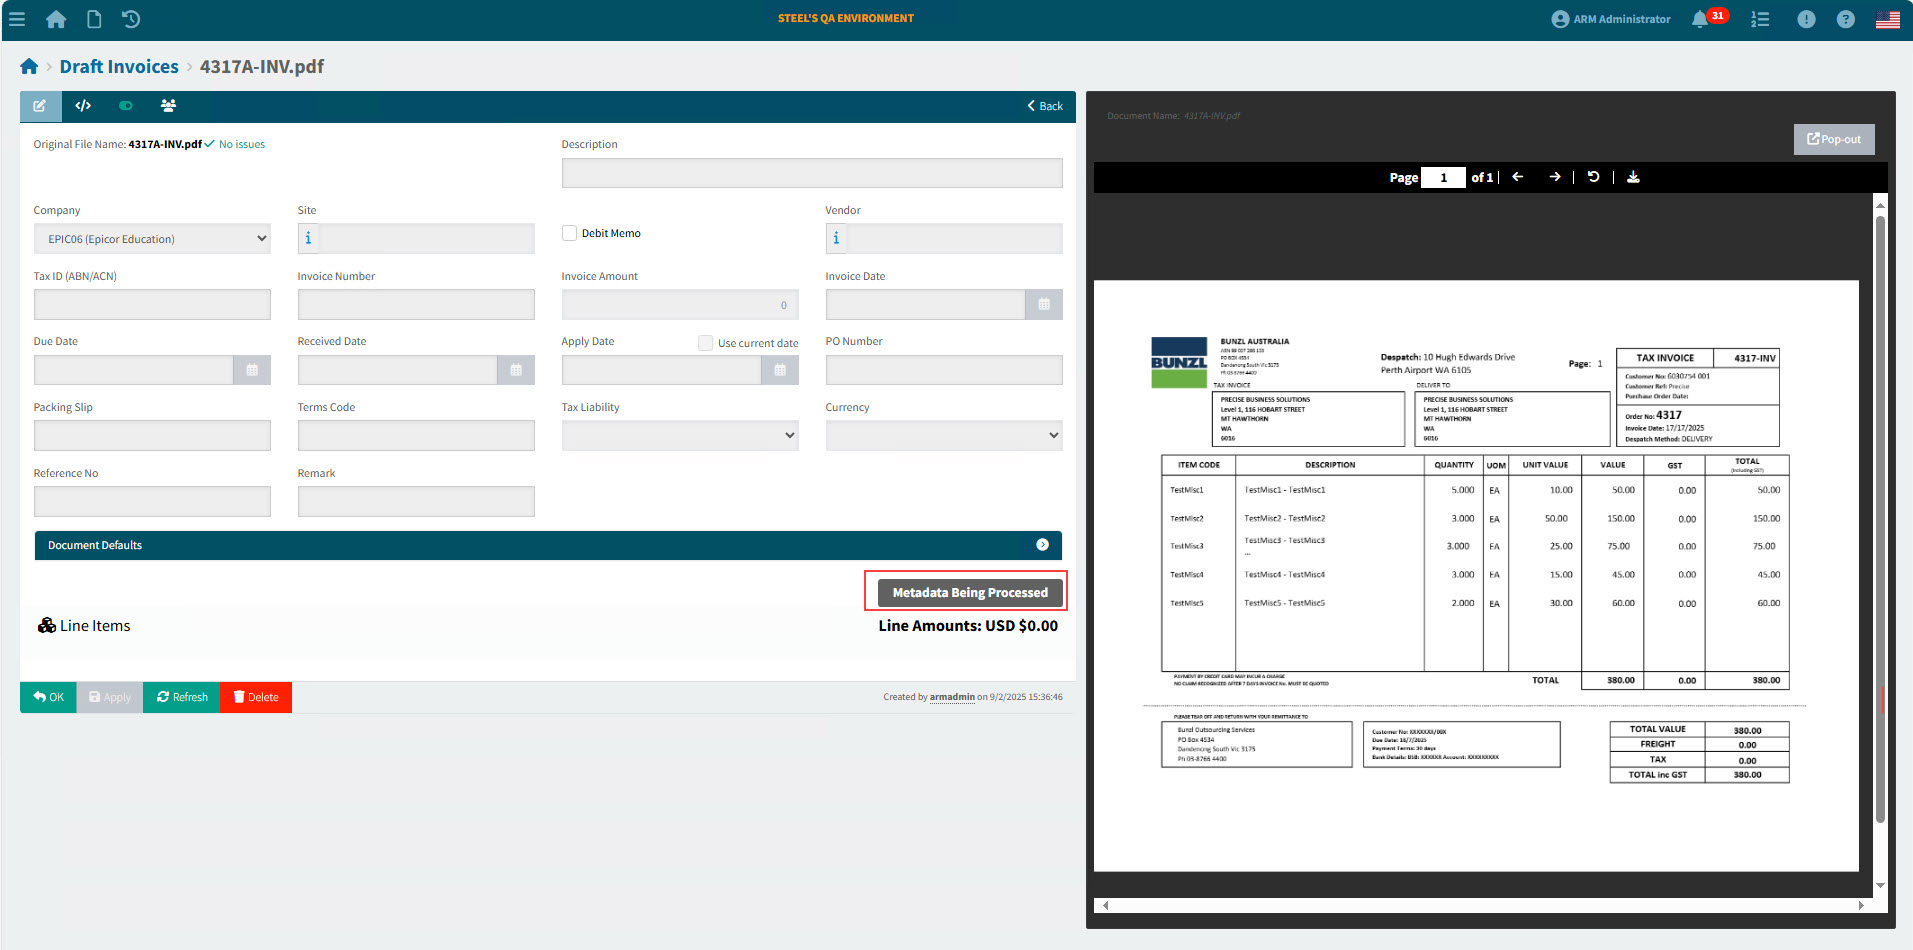
While an automatically generated draft invoice is processing, it has the status Metadata Being Processed.
-
To open an automatically generated Draft Invoice, click on the File Name.
Identify Draft Invoices that were automatically generated by those missing the Owner field. The Draft Invoices > [File Name] page opens.
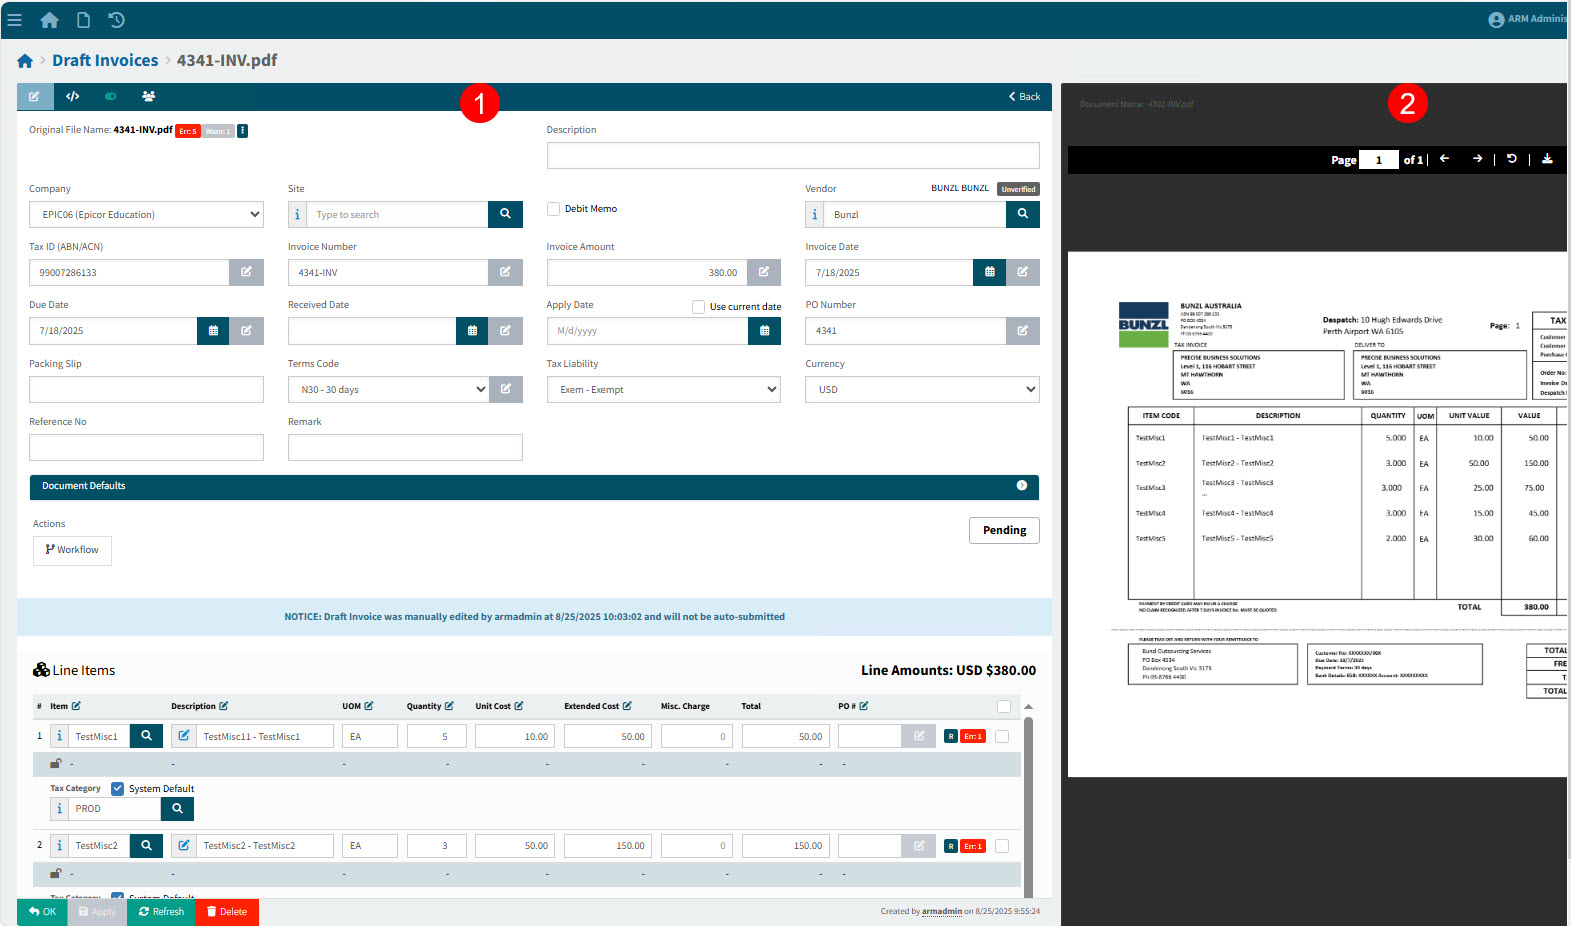
The page is divided into two panels.

On the left panel is the Draft Invoice, which may already have several fields populated.

On the right panel is a preview of the original Invoice PDF file.
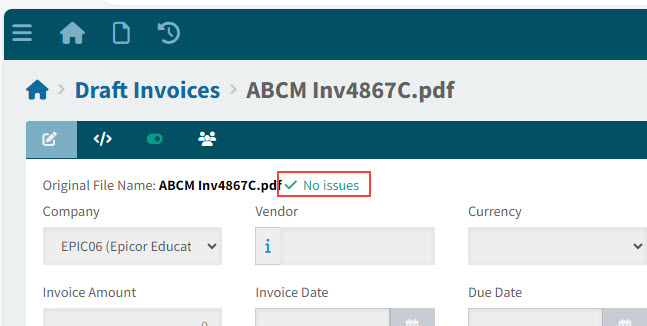
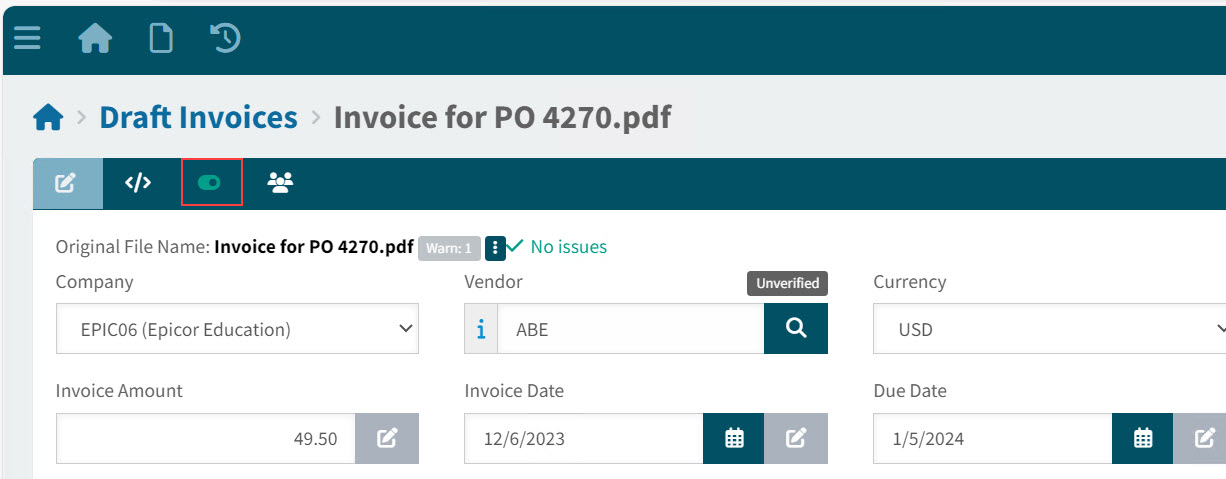
If there are no errors or warnings, the Draft Invoice needs no further editing or validation.
If the file is still being processed, you will see the status Metadata Being Processed.
View Example of Draft Invoice with No Issues
-
For Draft Invoices with warnings or errors, edit the Draft Invoice until it is ready for submission. Refer to the Invoice PDF on the right, when making updates.
After a Draft Invoice has been updated, it can no longer be auto-submitted. View Example

How Fields are Auto-Populated
Each field on the Draft Invoice has its own OCR Settings that determine whether the field is auto-populated, based on the confidence of the current data. The OCR Settings for Draft Invoice fields are maintained in Company Settings.
Read about Group OCR Suggestions in OCR Settings to see how ARM populates fields.
| For Vendors that have Never Use a PO as their Automation Matching Requirements (see Matching Requirements) each invoice line is read in as a Misc line, and there is neither a PO Number nor a Packing Slip on the header. |
Additional logic used for auto-populating or defaulting various fields is listed below:
Terms Code
The Terms Code field is populated in order of precedence by:
- OCR Terms Code
-
The OCR Terms Code is used, provided this is a valid Terms Code and the confidence threshold is above the low threshold setting for the Terms Code field.
- Default from Purchase Order
-
If the Draft Invoices contains receipt lines and all receipt lines are for the same PO.
- Default from Supplier
-
Uses the Supplier/Vendor Terms Code.
- Default from Company Settings
-
The Company Setting for Terms Code is used, if available.
- Blank
-
An error is raised and the User must enter a Terms Code to dismiss the error.
Due Date
The Due Date field is populated in order of precedence by:
- OCR Due Date
-
The OCR Due Date is used, provided the confidence is above the low threshold setting for the Due Date field.
- Terms Code
-
The Due Date is calculated from the Invoice Date and the number of days from the terms.
- Blank
-
The User enters a value.
Currency
The Currency field is populated with the Vendor’s Currency.
Editing the Draft Invoice (Left Panel)
Evaluate the warnings and errors when editing the Draft Invoice values and use the original invoice PDF, on the right panel, as a reference.
Some of the fields just need checking: for example, if there is a warning, it may be that there are other available options. Your role here is to check that the automatically populated field was correctly chosen, and update it if necessary.
See how to edit a manually captured Draft Invoice. You can edit the automatically generated Draft Invoice following the same instructions. See Capture and Save the Draft Invoice.
Below are some techniques used for editing the Draft Invoice:
| Action/Feature | Purpose | Example |
|---|---|---|
Highlight fields on the Original Draft Invoice. |
Hover over the fields in the Draft Invoice to see their originating fields in the Invoice PDF. |
|
Select from |
When more than one source field option is available, you can select an alternative value from a drop-down list after clicking the |
|
Selected value must match a value from the drop-down list, for certain fields. |
Some values, for example Terms Code, must match a value from their drop-down list. You can reference the source value, but the actual selected value must be from the drop-down list. |
|
Zoom and pan the Invoice PDF. |
When checking fields on the Invoice PDF, rotate the wheel button on your mouse to zoom in or out. After zooming in, you can also drag the mouse to move the image to focus in on certain fields. |
|
Pop-out |
Click the Pop-out button on the Document Panel, to open the Document Panel in a new window in the browser. The Draft Invoice panel fills the original window.
|
|
Read warning on the header. |
To read warnings on the Draft Invoice header, click the Warn label. The warning messages are listed in a box. |
|
Download and view the metadata file. |
The metadata file shows each field on the Invoice PDF, with its data value, confidence value, and the pixel coordinates of the rectangle outlining the field. To view the metadata file, click the |
|
Toggle Document Panel button |
Click the Toggle document panel |
|
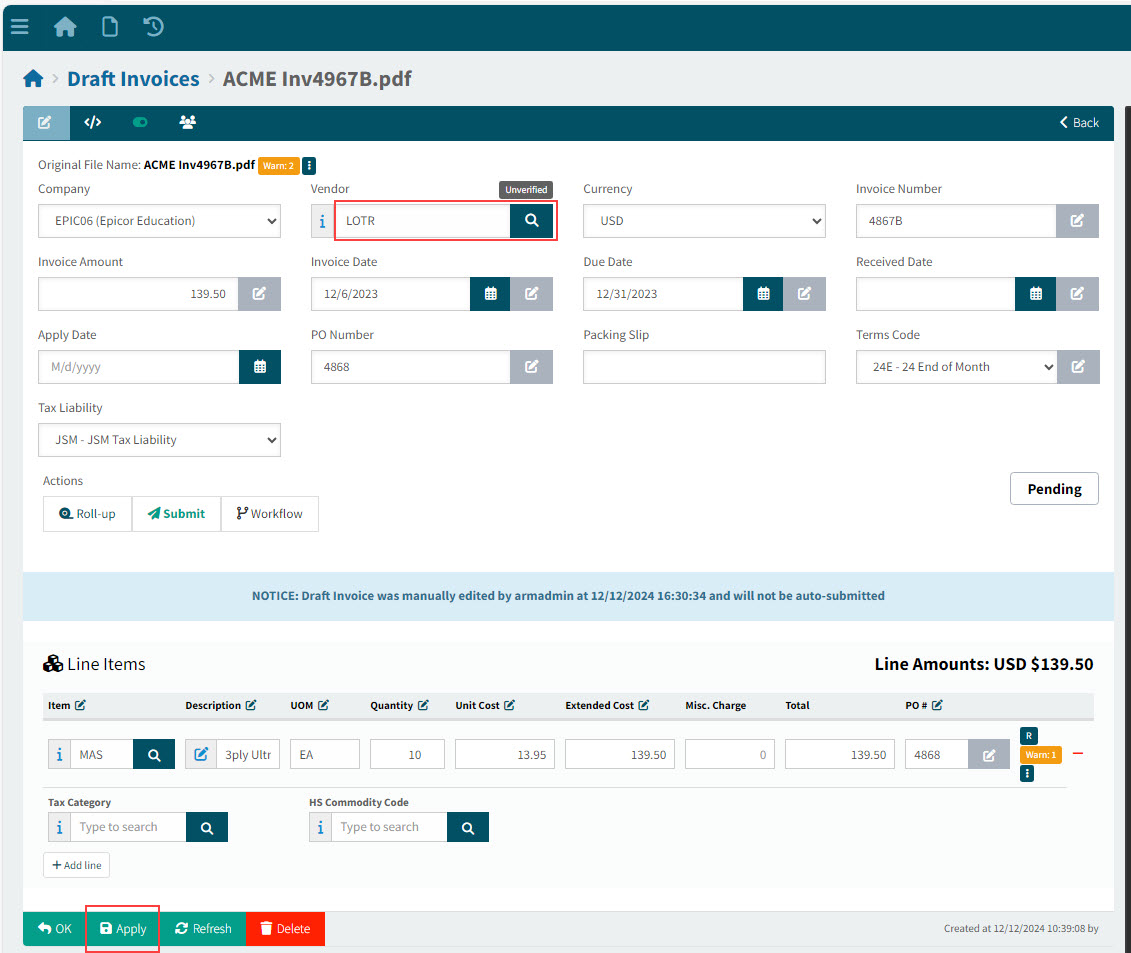
Choosing a different value from the Original Draft Invoice |
Select a different value from the Original Draft Invoice on the right-hand panel by comparing what is highlighted in red, then selecting from the drop-down list of available options. |
|
You can choose a different value using the search option, or a drop-down list. |
For example, select the Vendor using the Vendor search button, or select a new Terms Code from the Terms Code drop-down. Here, you are selecting an ARM value, not a value from the scanned Invoice document. |
|
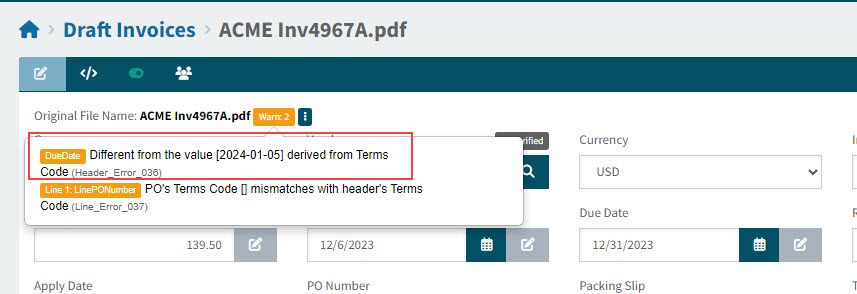
NOTE: When you select a different value, this may raise a new validation warning or error. |
In the example shown here: selecting a new Terms Code causes a warning, because the Due Date is different from what it should be. |
See Figure 18. |
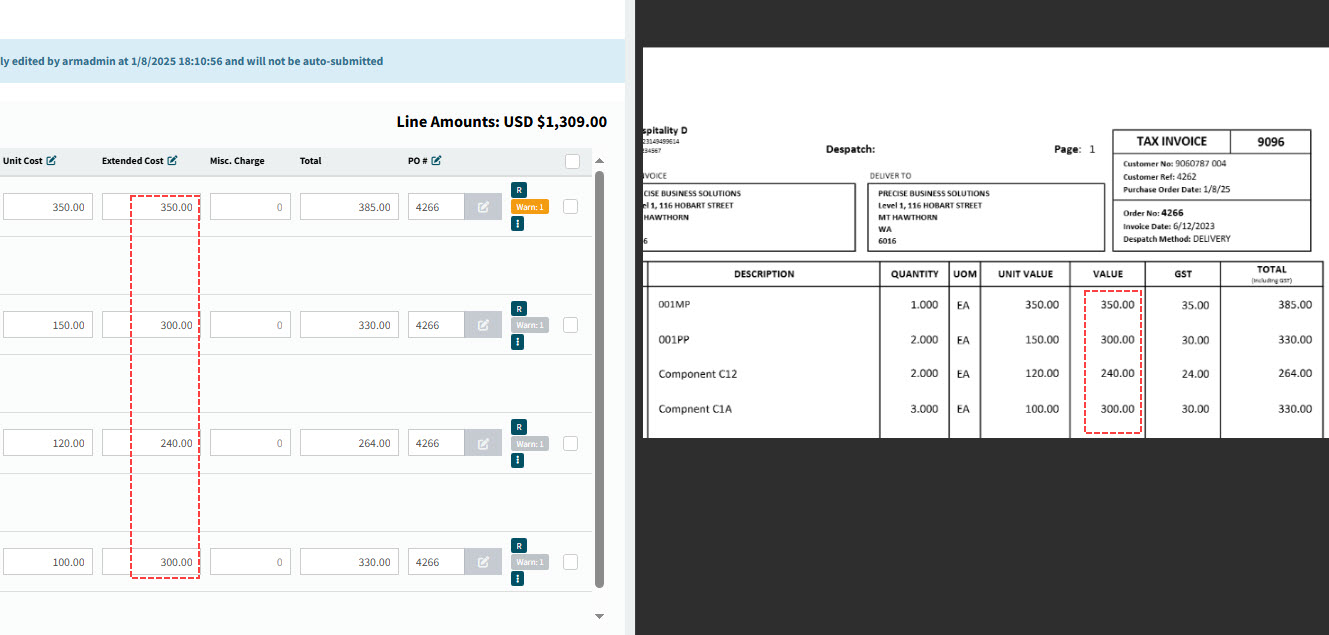
Switching Columns |
For some of the fields in the line items, you can switch the whole column if the pre-selected column is incorrect.
|


View Table of Figures
Figure 1: Hover Over Draft Invoice Fields on Header |
|
Figure 1: Magnified |
|
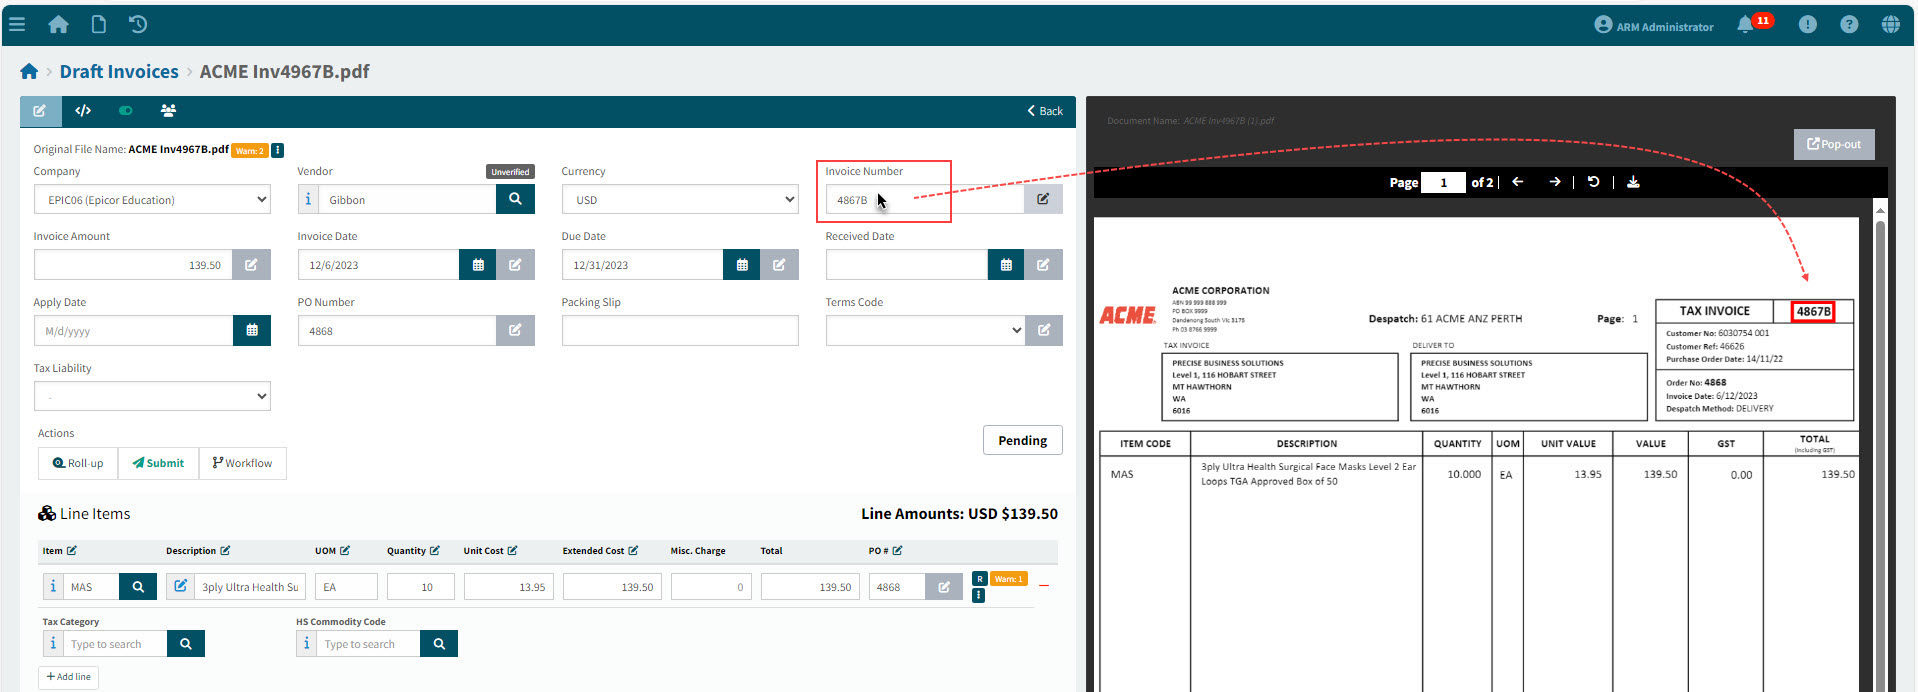
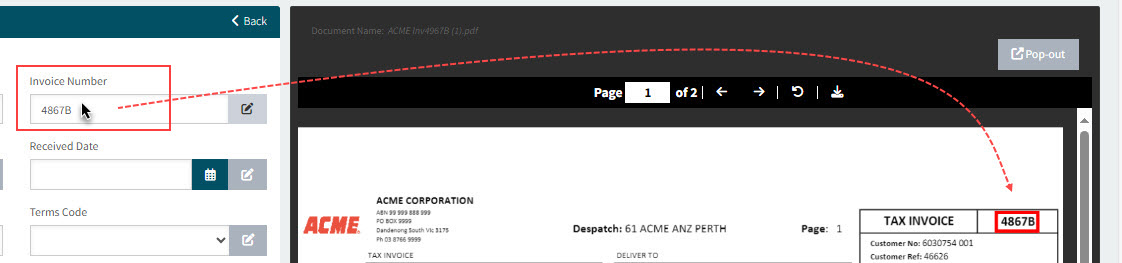
Figure 2: Hover Over Draft Invoice Fields on Lines |
|
Figure 2: Magnified |
|
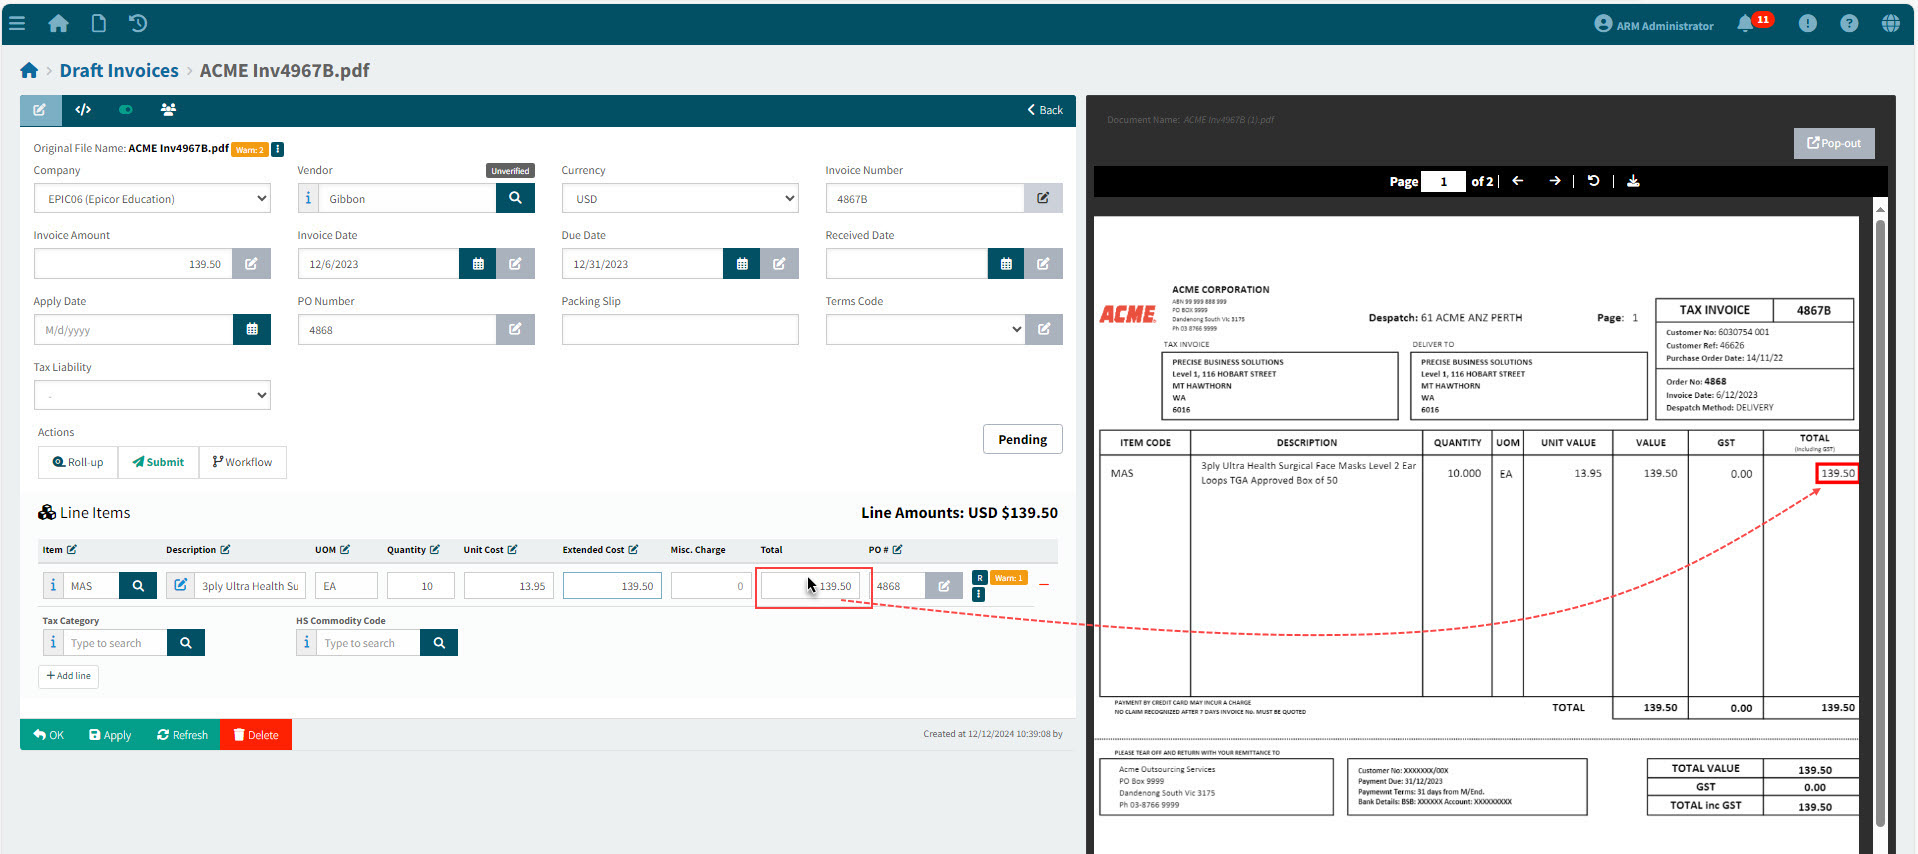
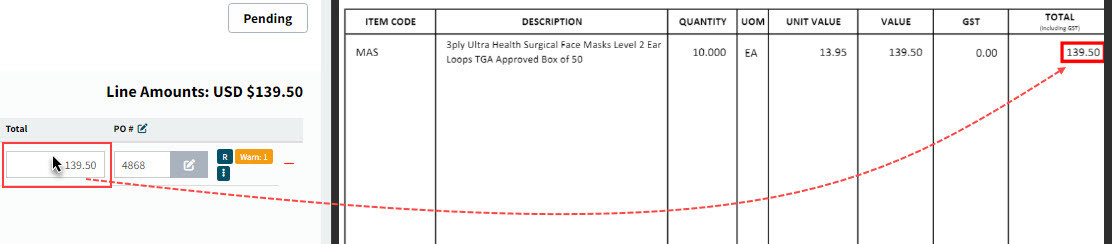
Figure 3: Choose Alternative Value from Drop-down List |
|
Figure 3: Magnified |
|
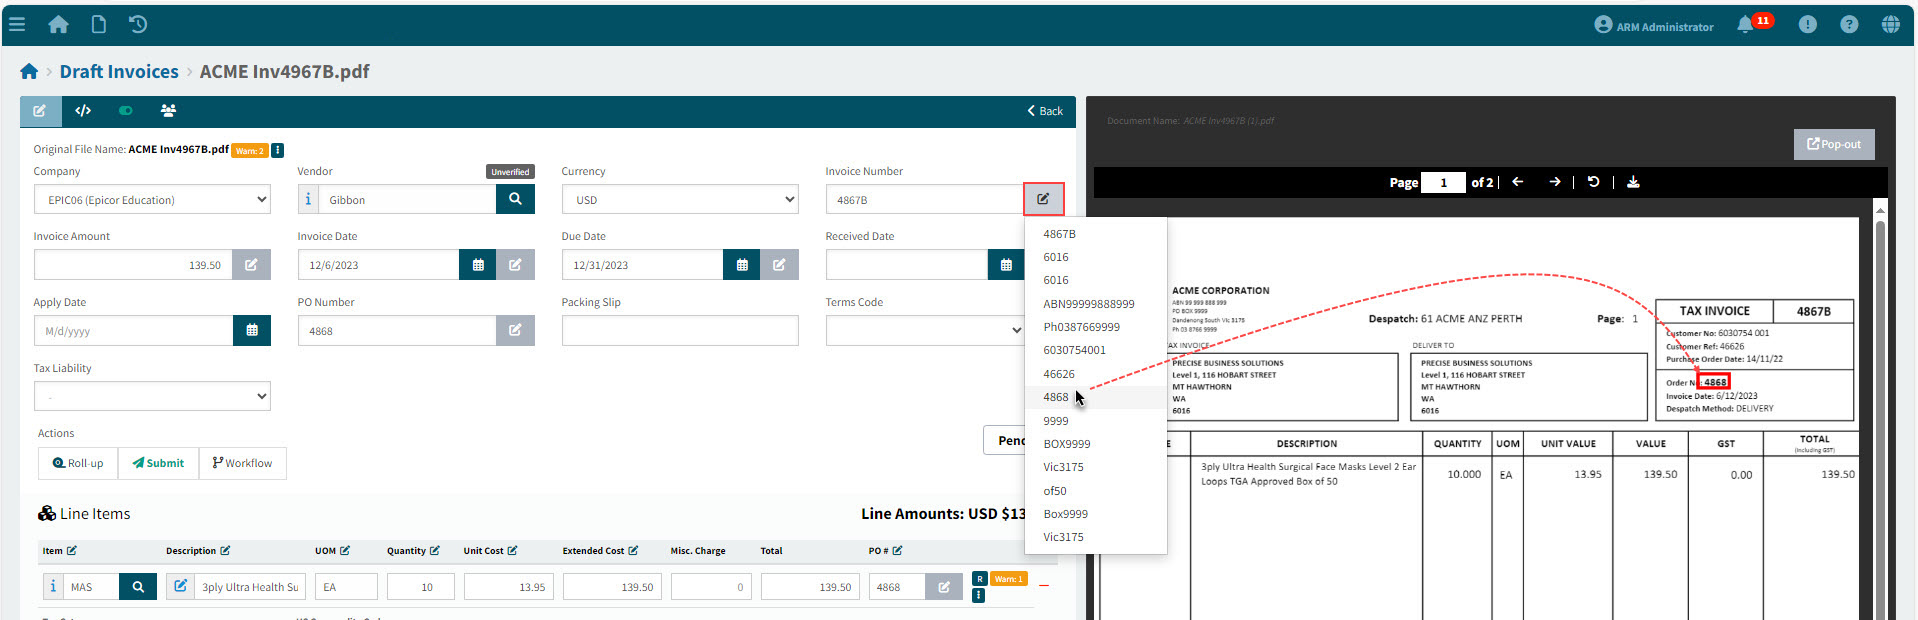
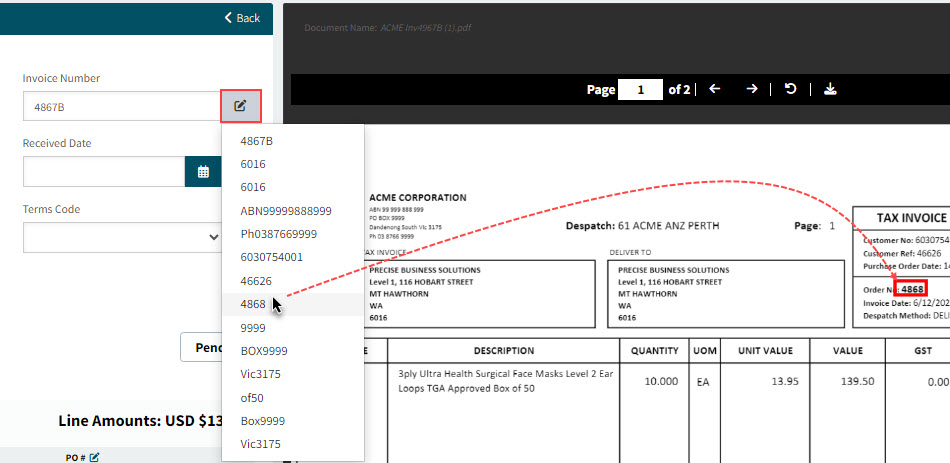
Figure 4: Terms Code closely matches the Source Data from the Invoice PDF. |
|
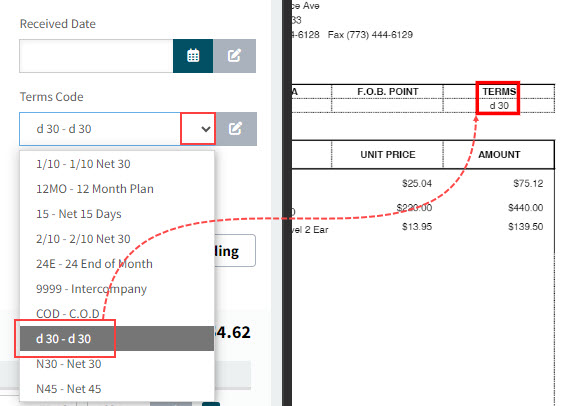
Figure 5: An Invoice PDF shown close up and focused. |
|
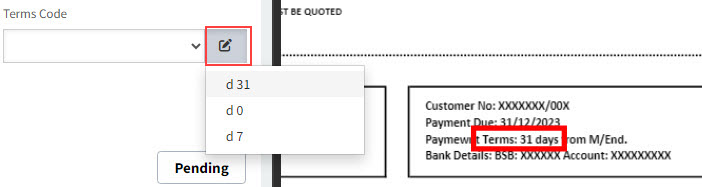
Figure 6: Click the pop-out button. |
|
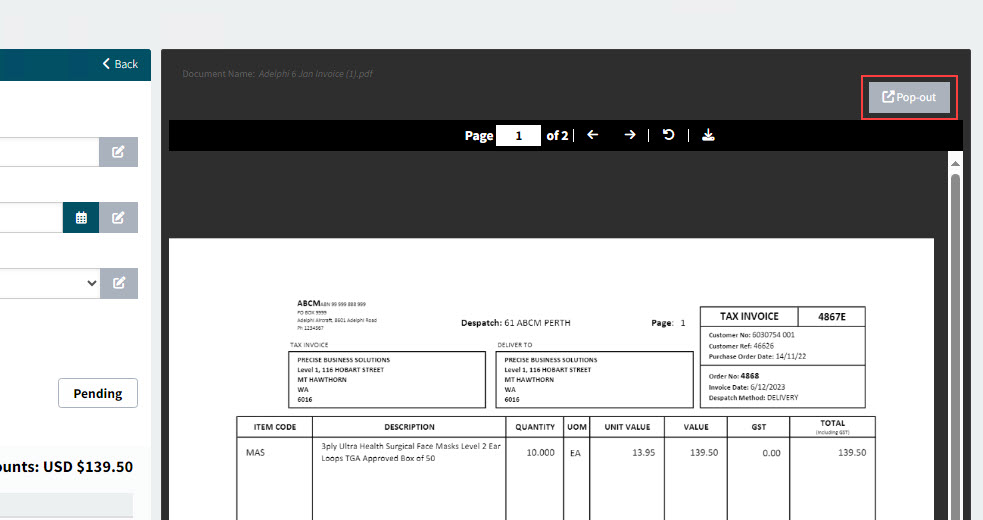
Figure 7: The warning message here shows a low confidence level in the data. |
|
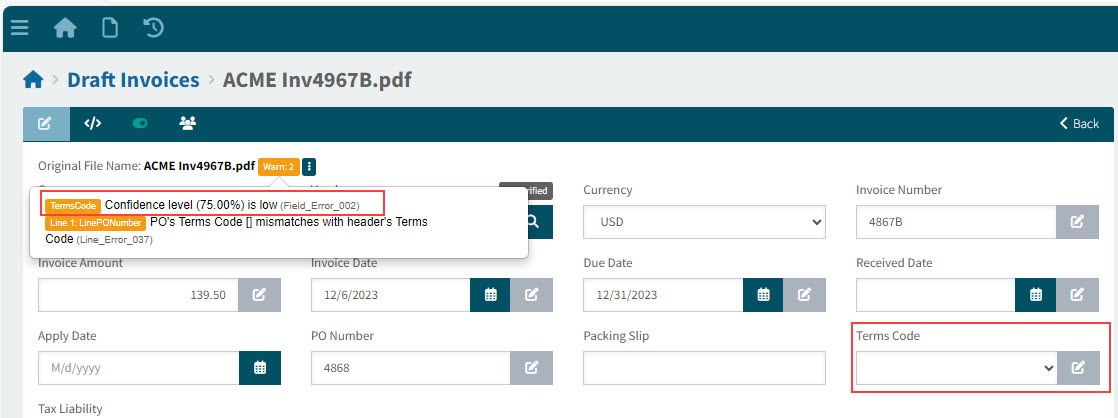
Figure 8: Download the original meatadata file. |
|
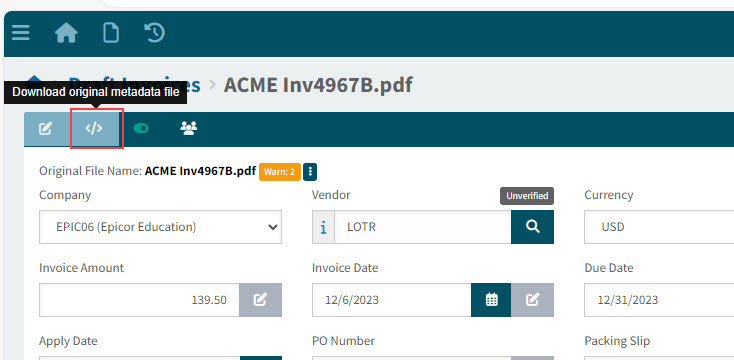
Figure 9: Drag and drop the file into the browser. |
|
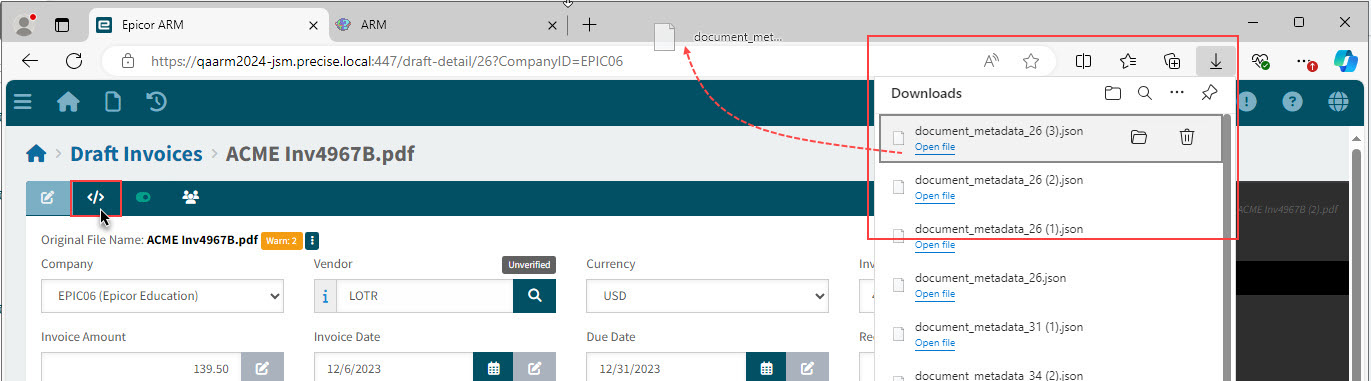
Figure 10: View the metadata file. |
|
Figure 10: Magnified |
|
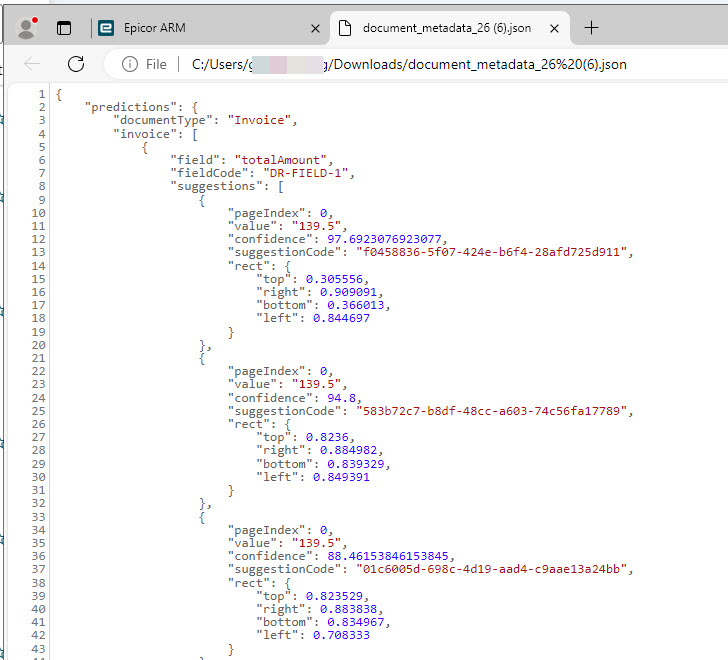
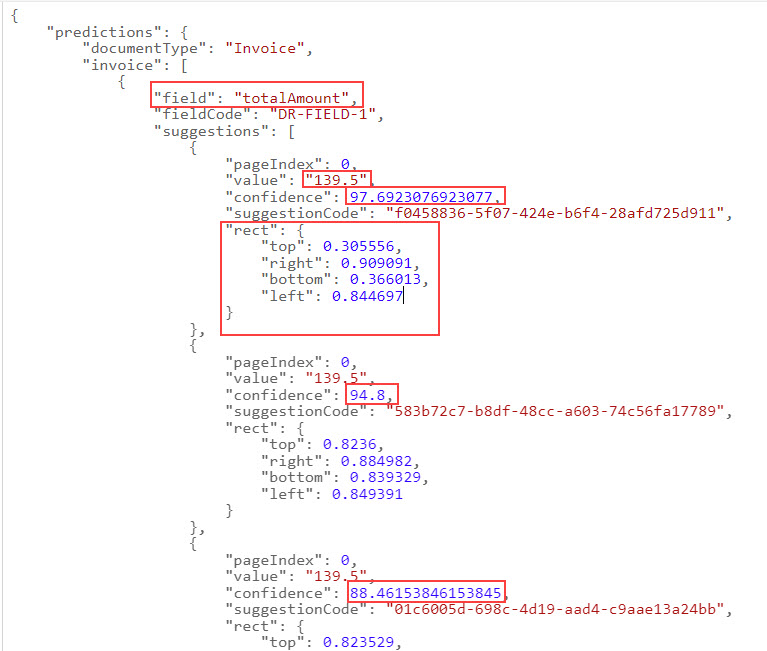
Figure 11: Click to hide/show the document panel. |
|
Choosing a different value from the Original Draft Invoice
Figure 12: Inspecting the Invoice Number on the original document |
|
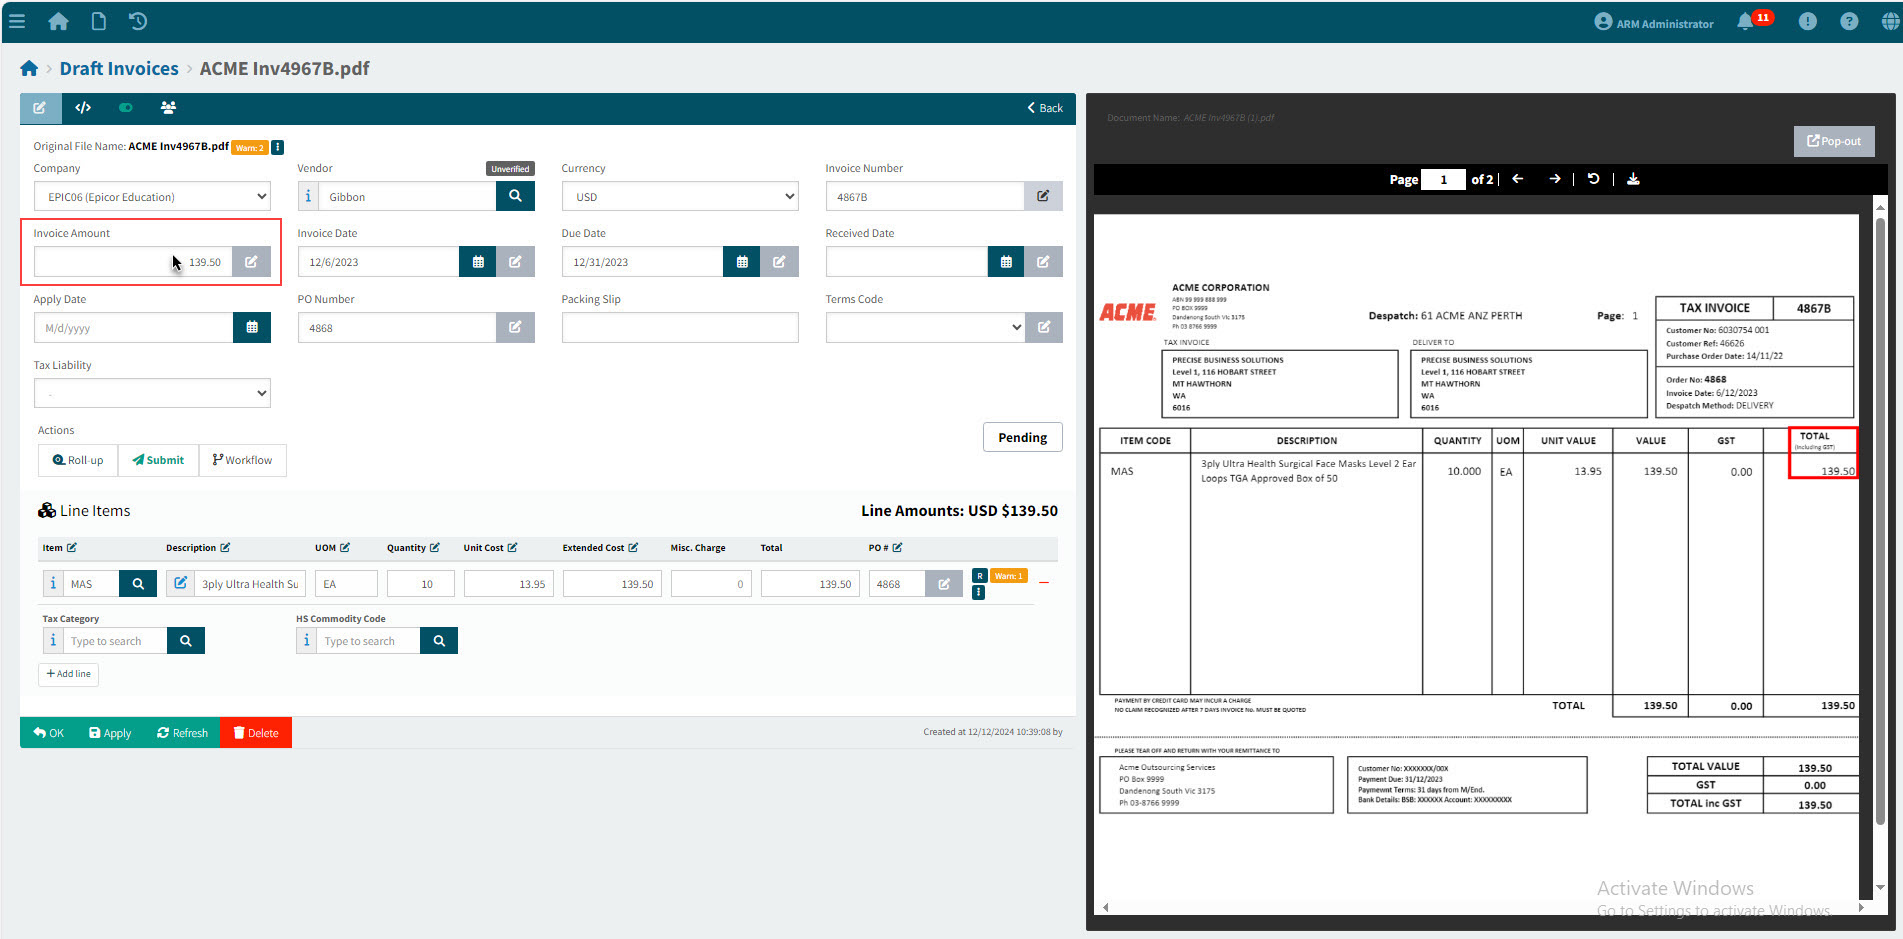
Figure 13: Finding an Alternative Invoice Total on the original document |
|
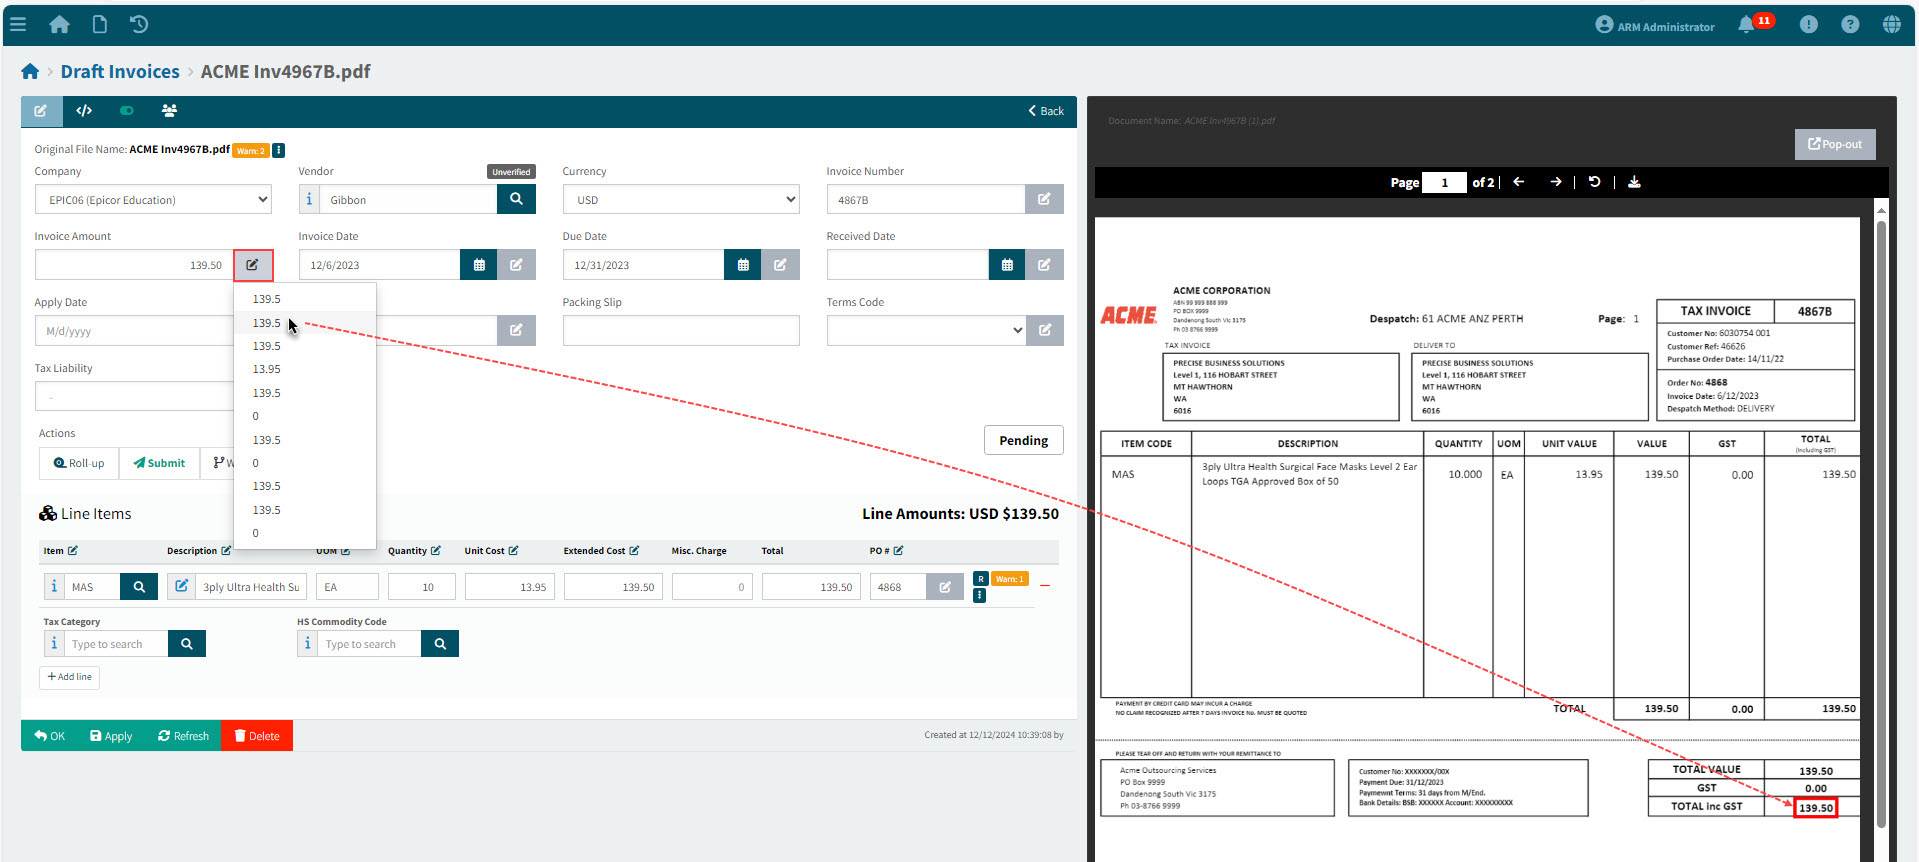
Figure 14: Accepting a new Invoice Total |
|
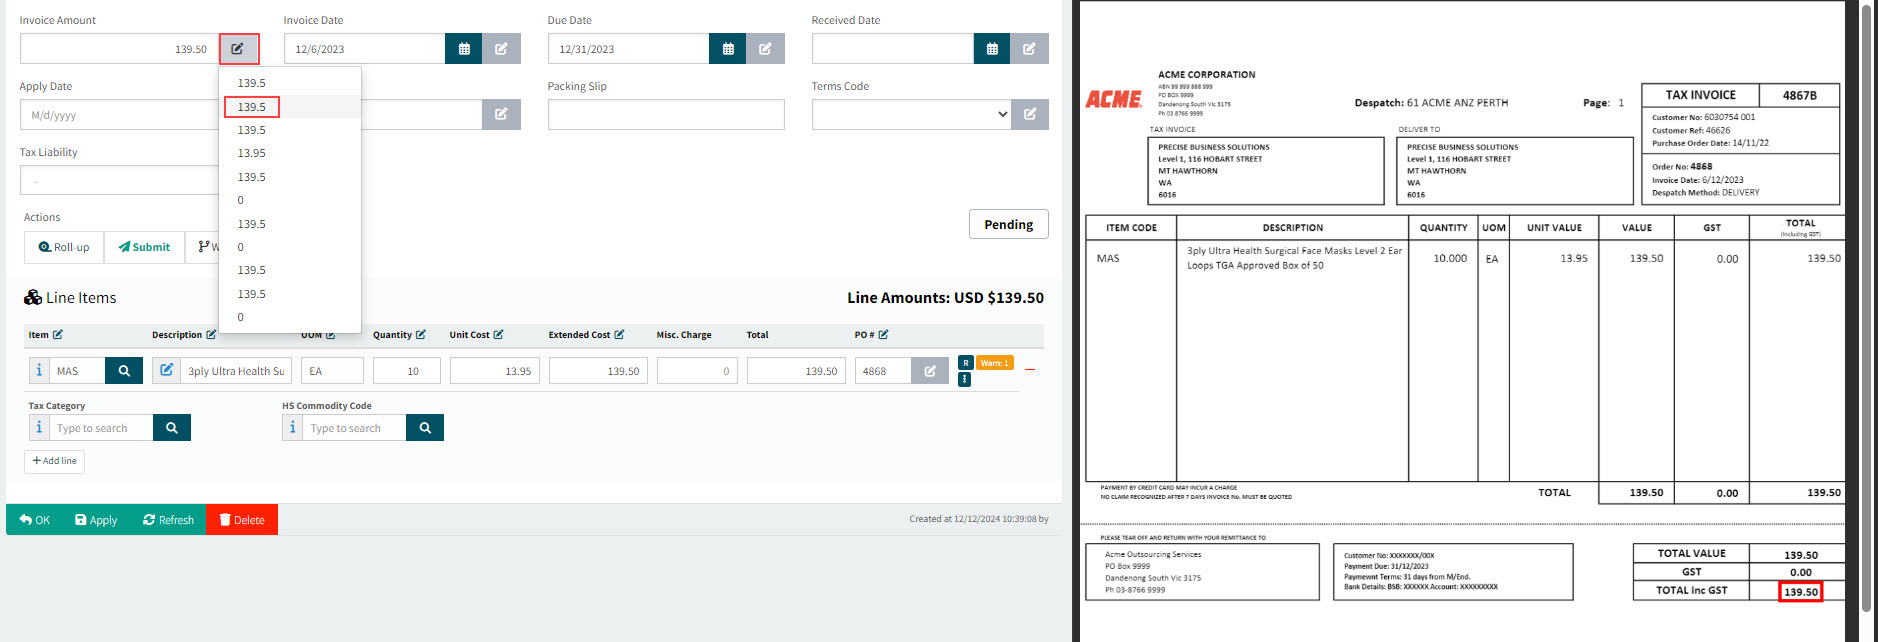
Figure 15: The new Invoice Total is accepted |
|

Updating the Draft Invoice from Search options
Figure 16: Update the Vendor from the Vendor Search Options |
|
Picking Terms Code From Drop-down List
Figure 17: Pick Terms Code from the Terms Code drop-down list, while comparing with the Terms on the original document |
|
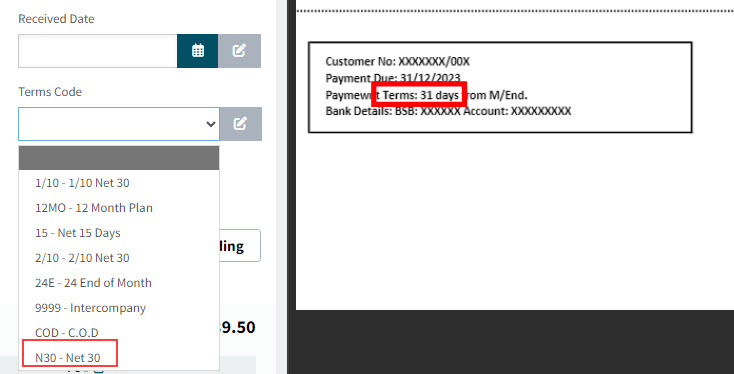
Figure 18: A new warning appears when the Due date is different from the derived Due Date for the selected Terms Code. |
|
Switching Columns
Figure 19: Look at the original document to see which column should be swapped. Here we are considering swapping (1) out for (2) |
|
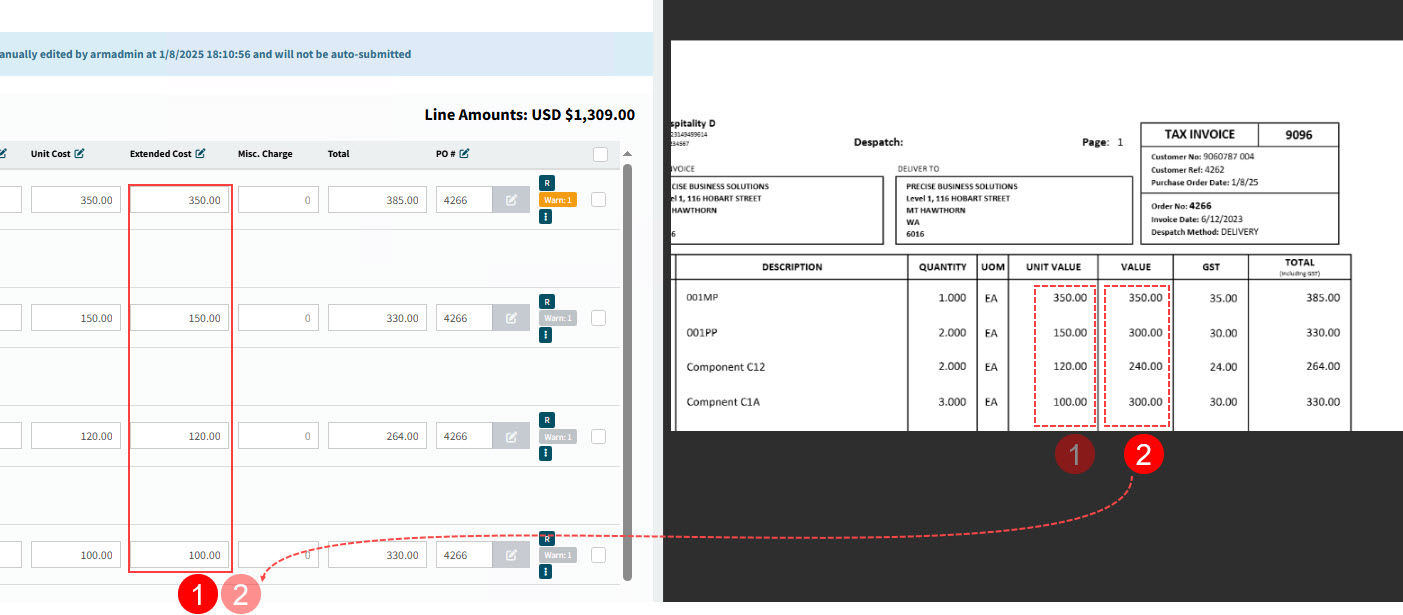
Figure 20: Select an alternative column |
|
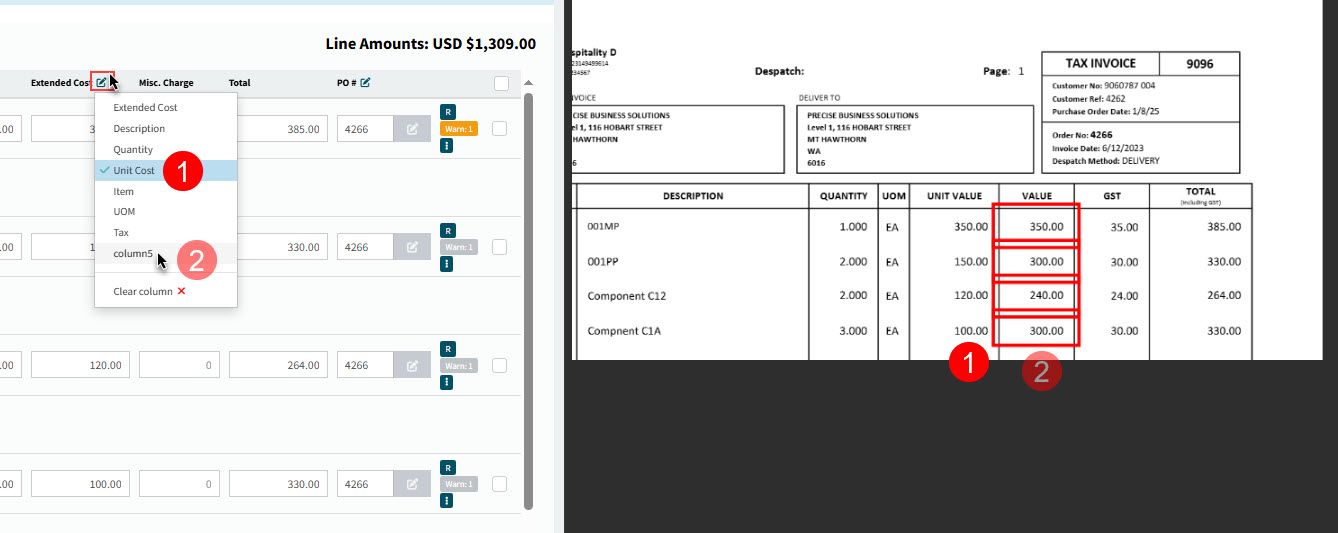
Figure 21: Refer to original after column is switched |
|
Deleting a Draft Invoice
-
To delete the Draft Invoice, see Delete Draft Invoices.