PunchOut
PunchOut is part of the ARM "External Integration Suite" module which includes an API to programmatically create requisition lines from other applications.
| PunchOut links can be added to vendors whose online stores support the international CXML programming standard. |
ARM uses PunchOut to connect to external websites. Users can select items from a PunchOut site to add to a requisition. See Adding PunchOut items to a requisition.
This method gives access to current prices and availability, straight from the vendor.
| When you add PunchOut items to a document, such as a requisition, you are not ordering them. You are only adding them as lines. The requisition still needs to go through the usual approval workflows before anything is ordered. |
How it Works
PunchOuts are specially configured for specific vendors within ARM. See Maintaining PunchOut.
As a user, you only have access to PunchOuts that are assigned to you. See PunchOuts on the User Detail page.
-
To add items from a vendor’s configured PunchOut website, click the + PunchOut button on the bottom of the requisition.
PunchOuts that you have access to appear in the drop-down list.
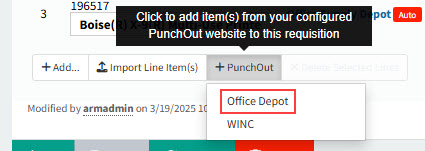
When you select one of these, the vendor’s PunchOut website opens in a new web page on your browser, and from here you can select items to add as requisition lines.
When a Purchase Order is created, ARM uses Electronic Data Interchange (EDI) to send the PunchOut lines to the relevant vendors. See Automatic EDI of Purchase Orders.
Maintaining PunchOut
To make a vendor’s PunchOut site available to selected users, you first need to configure the vendor’s PunchOut website details.
| Keep the EDI URL blank for a test environment. Orders for PunchOut items will not be sent to the vendor, without a valid EDI URL. |
Permissions
You require a role with the Maintain Punchout permission to maintain PunchOuts in PunchOuts.
Other permissions relating to PunchOuts are:
-
Launch Punchout - The user can launch a PunchOut session in a Requisition.
-
Can Copy PunchOut Lines - The user can copy PunchOut lines.
See Permissions in ARM.
| Only ARM Administrators should maintain PunchOuts. The PunchOut Maintenance settings are very sensitive. |
In preparation for adding a new PunchOut, your Precise Consultant will request a vendor’s details on your behalf. The vendor will supply all details required to configure a connection specific to their PunchOut website.
-
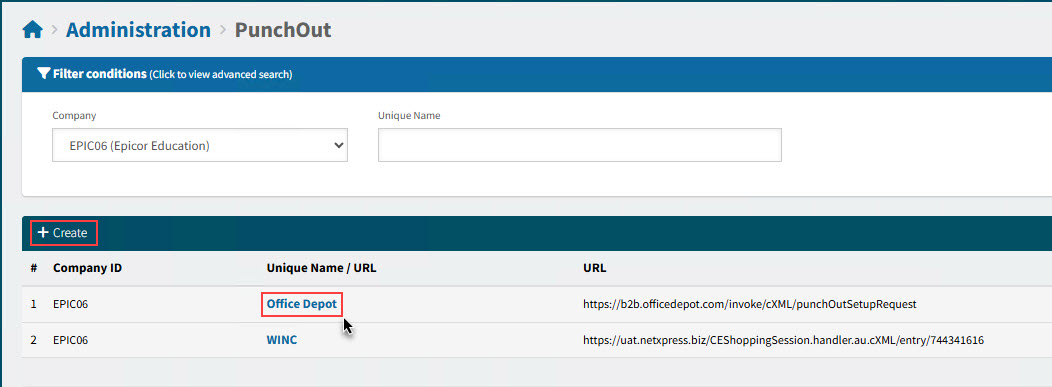
Select the PunchOut menu item on the Administration Page. See Administration Page.
The available PunchOuts are listed in the search results.
-
To add a new PunchOut, click
 Create on the menu bar.
This opens a new PunchOut form:
OR
-
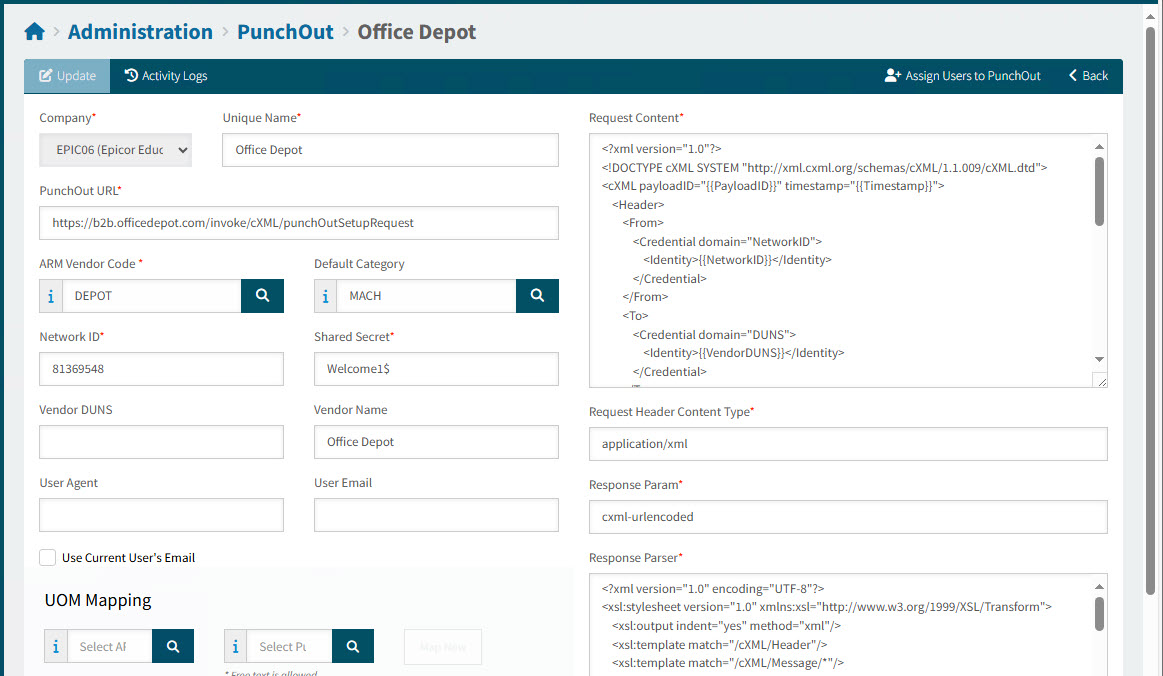
To edit or view PunchOut details, click on a Unique Name / URL to open the selected PunchOut in the Administration > PunchOut > [Unique Name / URL] page.
View PunchOut Configuration Page for Unique Name / URL:
-
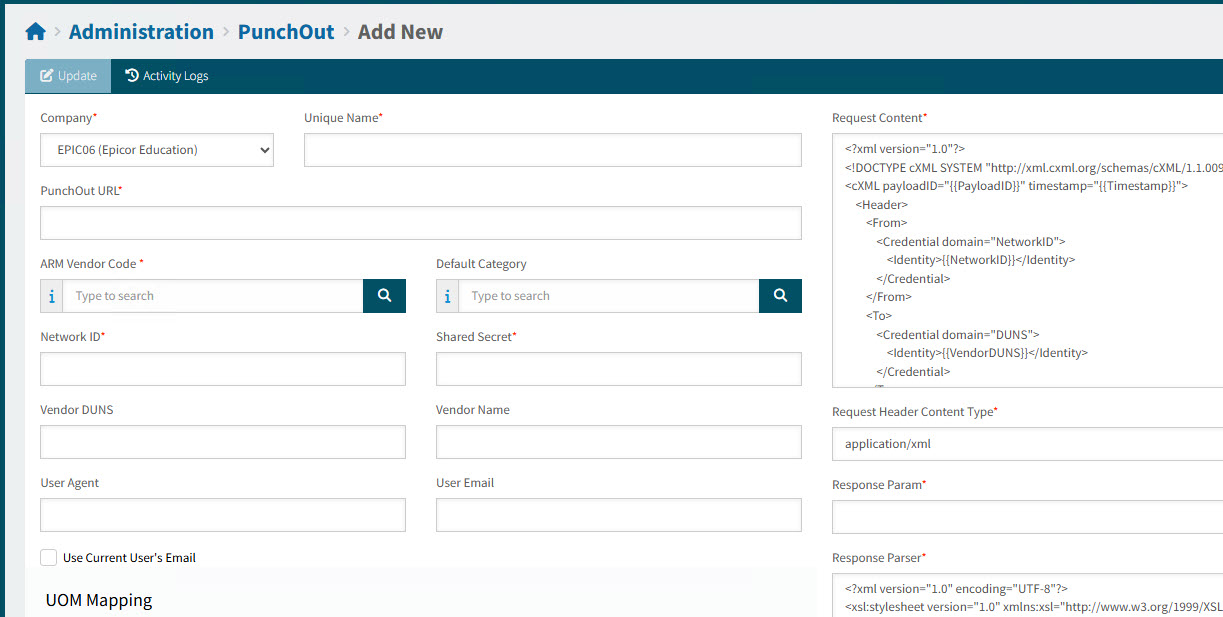
Fill out the fields for a new PunchOut, or review and edit the fields for an existing one.
Many of the details are supplied by the vendor, such as Request Content and Request Header Content Type, and use XML or cXML (Commerce eXtensible Markup Language), necessary for communicating with the vendor’s eCommerce site. These fields also incorporate variables from the ARM site.
Company Select a company from the drop-down list.
Unique Name A unique name for the PunchOut. This name appears in the PunchOut drop-down list on a requisition form.
Example
PunchOut URL Supplied by the vendor.
ARM Vendor Code Select from the list of vendors.
Default Category (Optional) Select from the list of Categories.
The Default Category is used in the system default logic for the Category for a PunchOut Line item.
Network ID Supplied by the vendor.
Shared Secret Supplied by the vendor.
Vendor DUNS Optionally enter the vendor’s DUNS (Data Universal Numbering System).
DUNS
DUNS is used by the US Government, the European Commission, and the United Nations.
Vendor Name (Optional) Enter the vendor name.
User Agent (Optional) Enter the name of a vendor representative.
User Email (Optional) Enter the representative’s email address.
Use Current User’s Email Select this check box to use the currently logged-in user’s email address (if available).
Request Content Supplied by the vendor.
Request Header Content Type Supplied by the vendor.
Response Param Supplied by the vendor.
Response Parser Supplied by the vendor.
EDI URL (Optional) Supplied by the vendor. See Automatic EDI of Purchase Orders.
Tip: Keep this blank if you are working in a test environment.
Request EDI Content Supplied by the vendor.
-
Optionally add one or more UOM Mappings.
Details
Mapping is not mandatory. Any UOMs mapped here will be used for secondary matching when a UOM is selected on a PunchOut website. ARM will initially try to match a website UOM with all UOMs that are stored in the UOM database table.
To add a mapping:
-
Select the ARM UOM that you want to map to.
-
Select the PunchOut mapping to map to, or enter text to map to.
The PunchOut mapping list is maintained in the Value List Settings for Punch-Out UOM.
-
Click Map New.
View Example

If ARM uses these mappings for secondary mapping, it will map a PunchOut mapping from the vendor to an ARM UOM, wherever the PunchOut UOM occurs for this vendor. For example, you can map "CS" from the ARM UOMs to "CASE" for the PunchOut UOM for this vendor. The resulting line from a "CASE" will appear in ARM as a "CS".
-
-
Complete the Tax Code Mapping.
Details
Tax Code mappings are not mandatory. ARM will generate a PunchOut line’s tax code using the following conditions:
-
If the PunchOut tax code matches an existing ARM tax code, use the PunchOut tax code directly.
-
If the PunchOut tax code does not match any existing ARM tax code, use the tax code mapping logic if applied on the PunchOut.
-
If neither condition 1 or 2 is met, ARM will use the default tax code configured in Company Settings.
To add a mapping:
-
Select the Tax Code that you want to map to.
-
Select the PunchOut Tax Code mapping to map to, or enter text to map to.
The PunchOut Tax Code mapping list is maintained in the Value List Settings for Punch Out Tax Code.
-
Click Map New.
-
-
Save the changes.
-
As a final step, assign users to the PunchOut. These users will be able to access the PunchOut.
Details
-
Select
 Assign Users to PunchOut on the menu bar.
This opens the Administration > PunchOut > User Assignment page (see User Assignment) for the selected PunchOut.
-
Select the Assign check box for all users who should have access. Alternatively you can select Assign to all users, under the menu bar.
-
Save the changes.
-