Users
Use User Maintenance to add users to the system and give them access to specified functionality within ARM, as well as selecting default settings, and assigning them access to Vendor Groups, Category Groups, etc. This page is also used for setting up User Authentication.
Permissions
Maintaining Users is an Administration function, and the Users page is only available to users with the Administrator role or the Manage Users role.
| As a general User, you can update some of your personal details, and view your allocated Roles and ARM Information on your User Profile. See User Profile. |
Note that individual users can access ARM via an Application Login (Username and Password) or using an alternative Login Provider (Single Sign On), depending on how this is configured for them.
| The number of active users is limited by the number of purchased licenses. If you have exceeded this number, you may still add new users; however, they will not be activated. |
User Roles
A user has permissions allowing them to perform various functions, and access various areas. These permissions belong to the Roles assigned to the user.
If a user has the Catalogue Requisitioner or Non-Catalogue Requisitioner role, we refer to them as a Requisitioner. Likewise, a user with the Requisition Approver role is referred to as an Approver, or a Requisition Approver. This name is used in context, so if we are talking of approvals, we use the term Requisition Approver, even if that user is also a Catalogue Requisitioner.
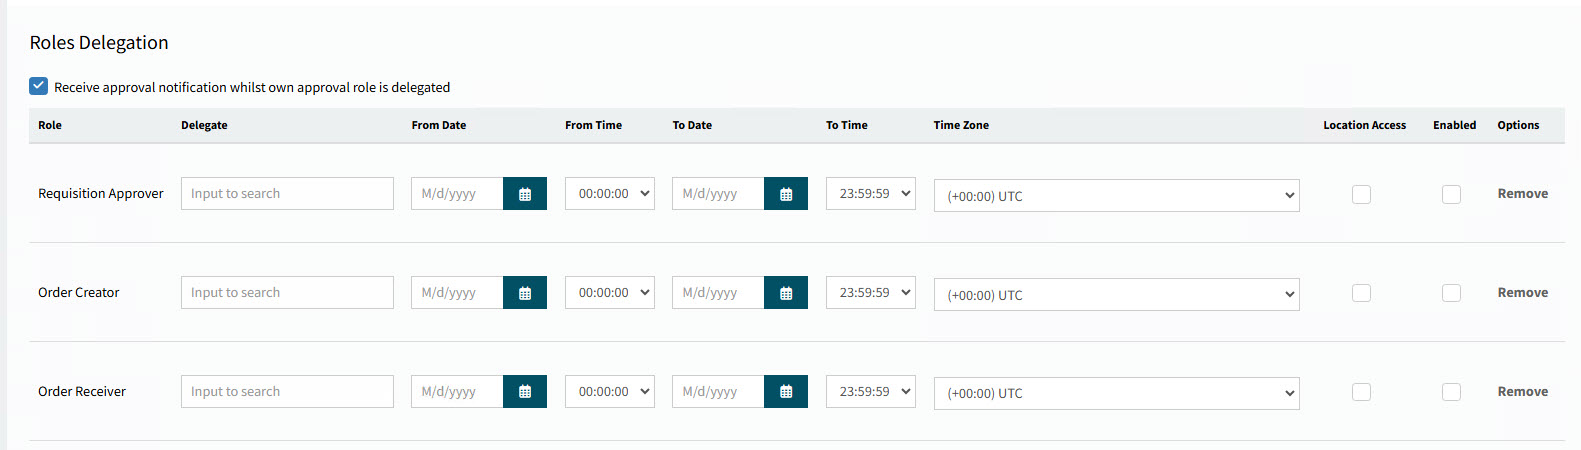
Delegating Roles
Some roles can be delegated to another user. This is controlled by a setting for the role (on the Roles page), called Can Delegate. If a role can be delegated, and the user has this role (User Detail, Roles tab sheet), then it will appear in their Roles Delegation list.
Delegation involves two users:
-
The delegate: The user who takes on the role.
-
The delegator: The user whose role is taken on.
The delegation can be performed by the delegator, from the User Delegation page, accessed from their dashboard, or by an Administrator, on the User Detail page for the delegator.
See example
| If there are no roles to delegate for this user, there is a label: 'You have no Roles Assigned that can be Delegated'. |
-
The user will receive approval notifications even while that role is delegated, if the check box Receive approval notification whilst own approval role is delegated is selected.
To delegate a role:
-
Click into the Delegate box, then select a user from the drop-down list.
-
If you are delegating from a specific date, select a From Date. If you are delegating up to a specific date, select a To Date. Otherwise, leave these blank to delegate for an indefinite period.
-
Select Location Access if you want the Delegate to have the Delegator’s locations added to their list of Assigned Locations.
-
To enable the delegation, select Enable.
-
Save the changes.
Here are some examples of roles that may appear in a user’s Roles Delegation list:
-
Catalogue Requisitioner
-
Requisition Approver
-
Order Creator
-
Order Receiver
-
AP Invoice Approver
-
Order Creator
Here are some guidelines relating to roles delegation:
|
Maintaining Users
To maintain users:
-
Select
 Administration in the side menu, to open the Administration page.
 -
On the Administration page, select Users.
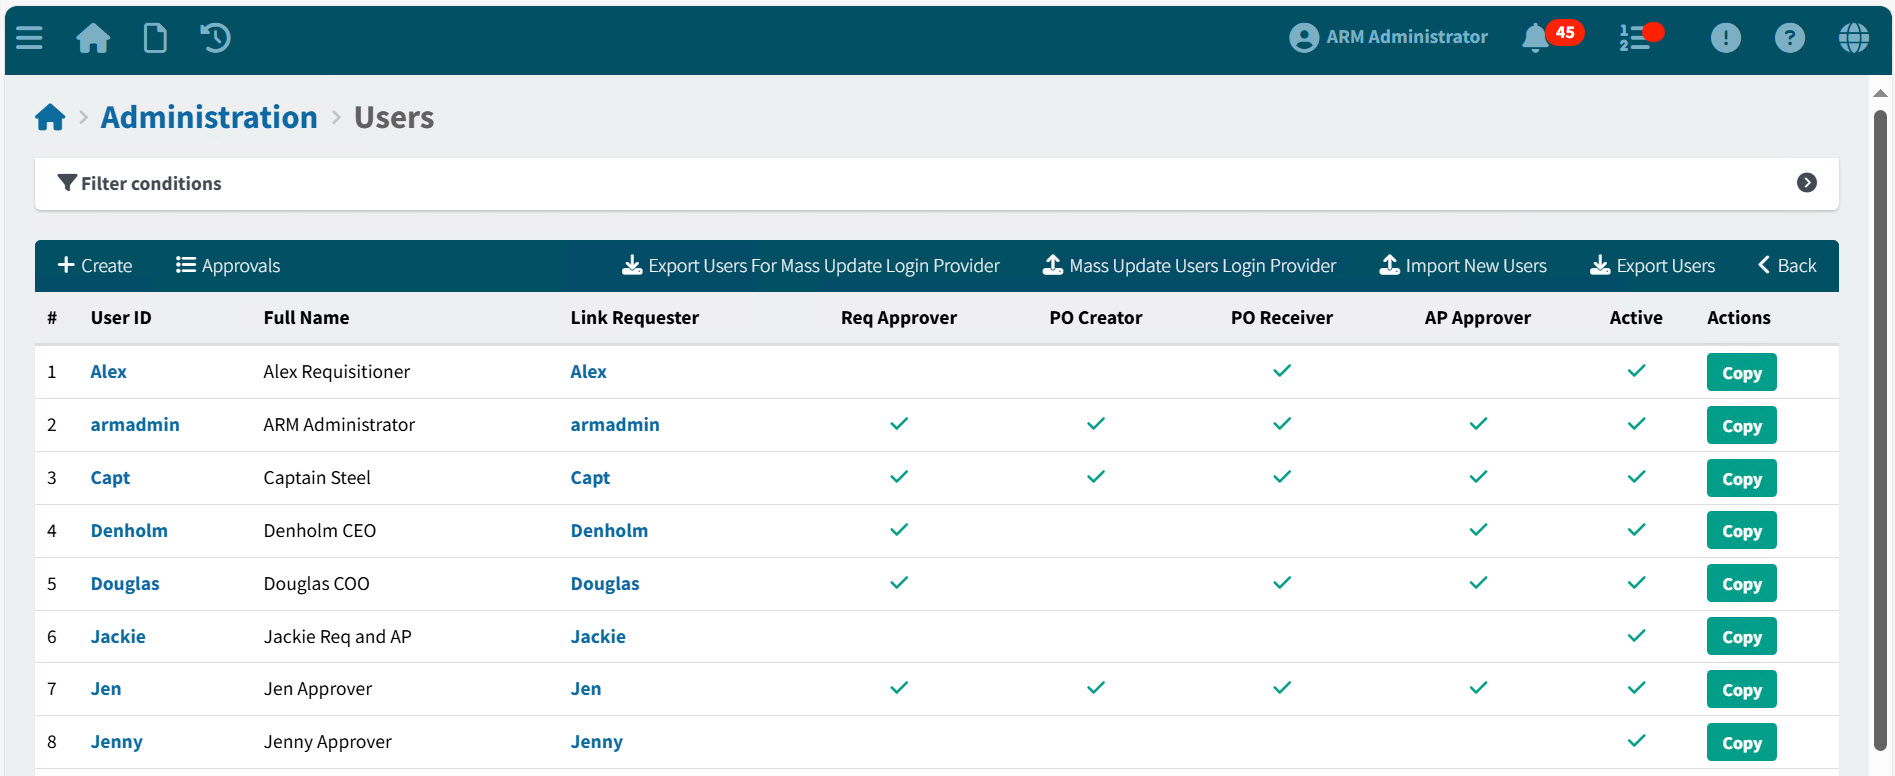
The Administration > Users page opens.
This page provides an overview of users of the ARM system.
-
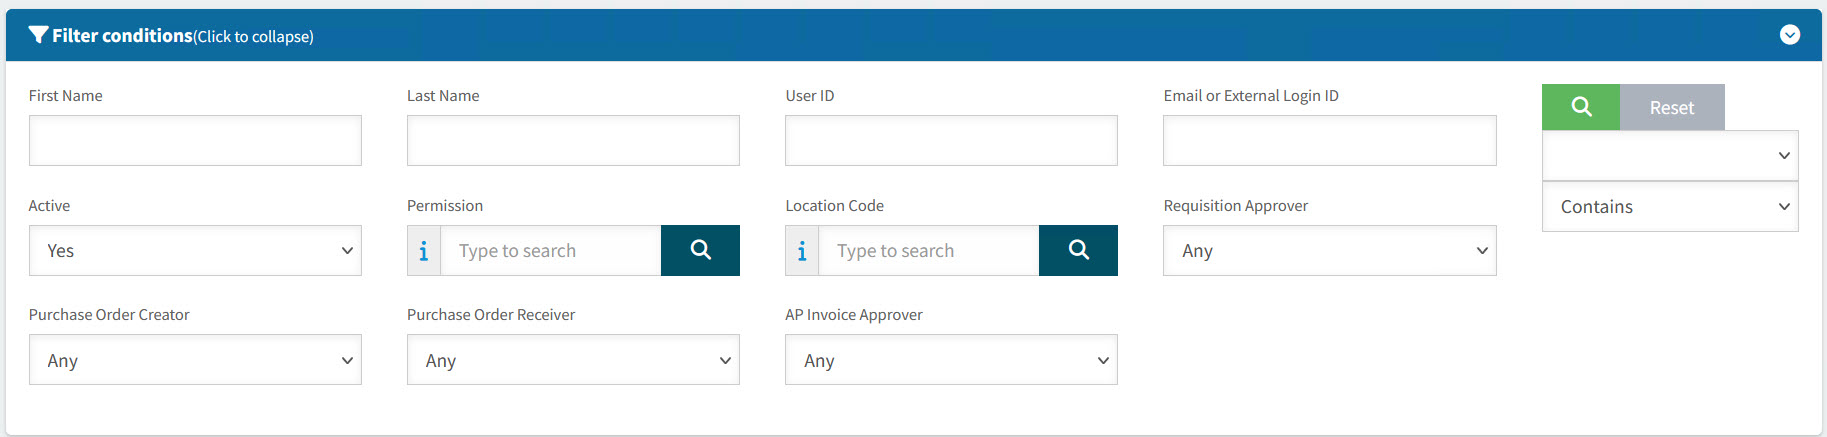
Adjust the filter conditions.
See Details
-
Expand the filter conditions in the top section of the page to narrow your search.
View filter conditions
-
Enter values in the edit boxes, or select from the search boxes. See the filter conditions, below.
Filter conditions
First Name Leave blank, or enter a First Name to filter on.
Last Name Leave blank, or enter a Last Name to filter on.
User ID Leave blank, or enter a User ID to filter on.
Active Inactive Users cannot use the system, although their details can be saved.
Permission Select to filter for Users who have this permission.
Location Code Select to filter for Users who have access to this Location.
Requisition Approver Select Yes to filter for Users who have the Requisition Approver Role.
Purchase Order Creator Select Yes to filter for Users who have the Order Creator Role.
Purchase Order Receiver Select Yes to filter for Users who have the Order Receiver Role.
AP Invoice Approver Select Yes to filter for Users who have the AP Invoice Approver Role.
-
When you have entered the search criteria click on the green search
 button in the top right corner.
Rows that match the Filter Conditions appear in the grid.
-
On the grid, you can do the following:
|
Get an overview of all users in the search results, and some of their main roles. |
|
Click Copy to copy a user’s attributes to a new user. See Copying a User. |
|
Click on a User ID to view or maintain their details on the User Detail page. See Maintain User Details. |
|
Click on a Link Requester to open the Requesters page for the Link Requester. Each User has a direct link to a Requester. See Maintain Requester Details. |
See Grid
|
Create |
Create a new user. See Creating a New User. |
|
Approvals |
Open the approvals list. See Opening the Approval List. |
|
Export Users For Mass Update Login Provider (Only available if the Enable User Export Global Setting is set to Yes.) |
Use this to export user details to a file for the purpose of updating their provider login details. See Export Users for Mass Update Login Provider. |
|
Mass Update Users Login Provider (Only available if the Enable User Import Global Setting is set to Yes.) |
|
|
Import New Users (Only available if the Enable User Import Global Setting is set to Yes.) |
See Import New Users. |
|
Export Users (Only available if the Enable User Export Global Setting is set to Yes.) |
Use this to export user details to a file. See Export Users. |


See Menu Bar

Creating a New User
-
To create a new user, click Create on the Menu Bar.
This opens the Administration > Users > Add New page.
-
Update the new user details, following the instructions for editing an existing user. See Maintain User Details.
Opening the Approval List
This button on the Administration > Users menu bar provides a shortcut to the Approval List page in Approval Maintenance.
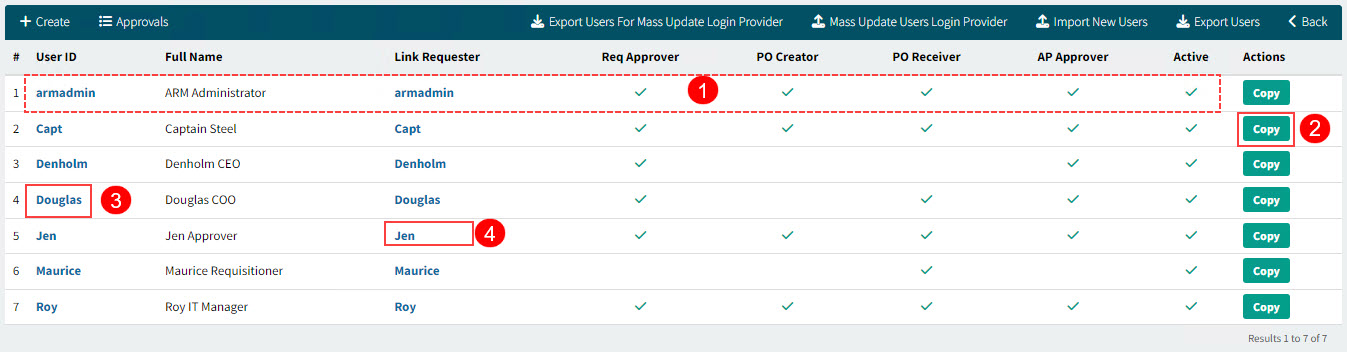
Copying a User
To copy a user from the Administration > Users page:
-
Locate the User in the results grid.
-
Click Copy on the row for the User ID.
The User Copy Options form appears.
View details
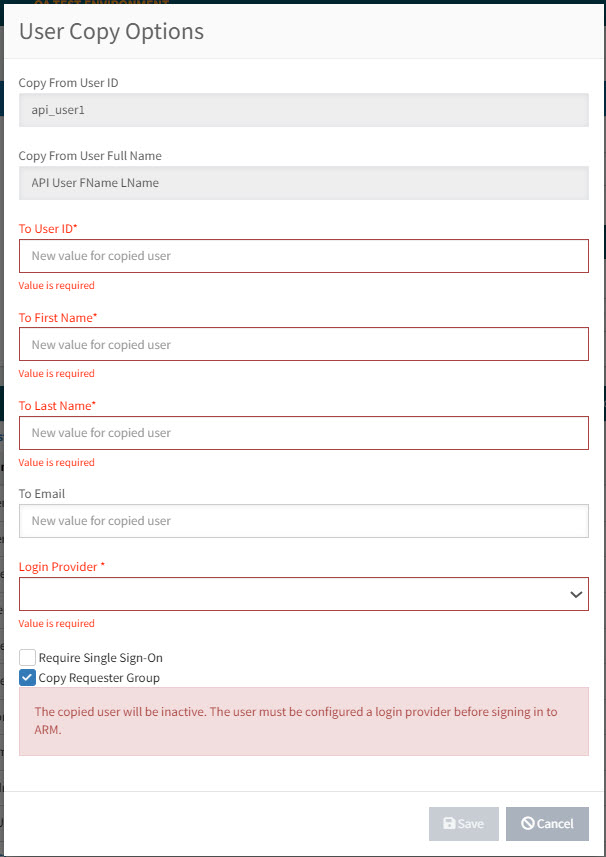
-
Enter User Details for the new user.
-
To User ID
-
To First Name
-
To Last Name
-
To Email
-
-
Select a Login Provider.
-
Enter the authentication details required for the selected Login Provider.
-
Select Require Single Sign-On if this is a requirement.
-
Select Copy Requester Group to copy the User’s Requester Group.
-
Click Save.
The new user is saved, but inactive. All Roles, Default Settings and Assignments from the copied user are allocated to the new user.
-
You will need to update the Authentication details. See Maintaining User Details.
Importing New Users
Use this process to import a batch of new users.
This is achieved in four steps:
-
Step 1: Upload template.
-
Step 2: Select user roles.
-
Step 3: Select default values.
-
Step 4: Review and import.
These steps are described below.
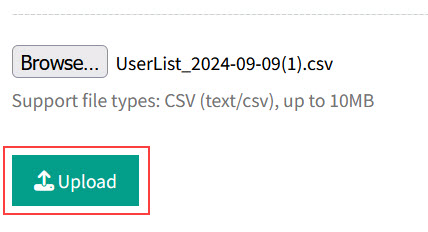
Step 1: Upload Template
-
Click
 Import New Users on the Menu Bar.
 -
Click Users Import Template to add a template file to your Downloads folder.
-
Open the CSV file, and add User Details for your new users. Refer to the section Information Tab to see what is required for inserting user personal and authentication details.
Alternatively, you can export users to create a User List file. See Exporting Users.
-
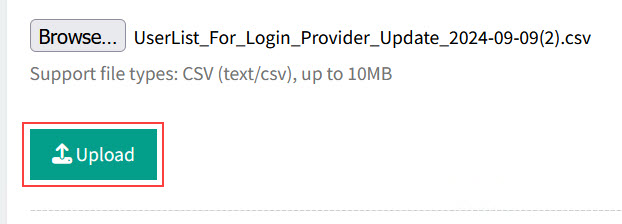
Click Browse… to select the updated User List file. In the file manager, browse to locate the file, then select it and click Open.
-
Click Upload to upload the User List.
View Details
Step 2: Select User Roles
The Select User Roles section appears.
-
Select one or more User Roles to give to the whole batch of users.
-
Click the
 Next button.
Step 3: Select Default Values
For all users in the batch:
-
Complete the selections in the Select Default Values section.
-
Complete the Select Locations section.
-
Complete the Select Punchouts section.
-
Complete the Select Vendor Groups section.
-
Complete the Select Category Groups section.
-
Complete the Select AP Payment Methods section.
-
Complete the Select Requisition Types section (only if Use Requisition Types is enabled).
-
Complete the Select GL Accounts section.
-
Click the
Next button.
Step 4: Ready for Importing
-
Before importing the file, review the details in the section Following Users will be imported with previous selected data on the lower part of the page.
View Details
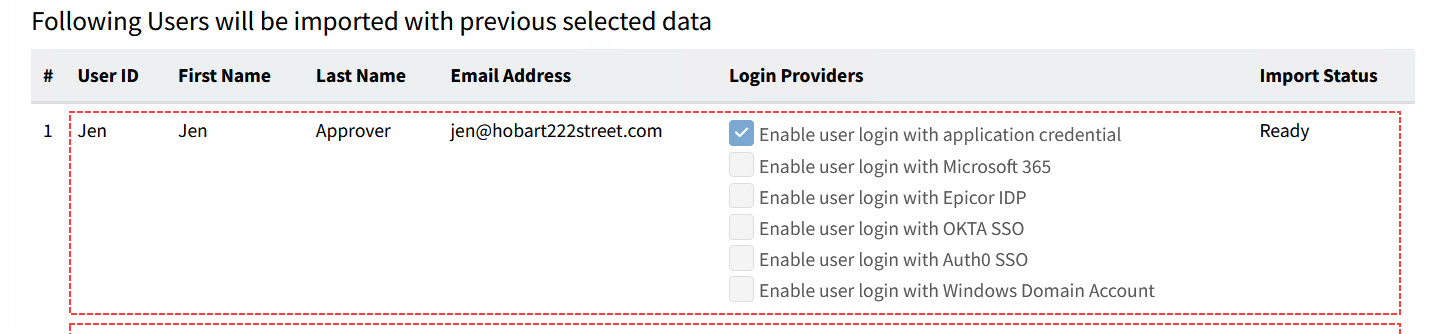
-
Check that the Import Status is Ready for each User ID.
-
Click the Start Importing button.
View Details
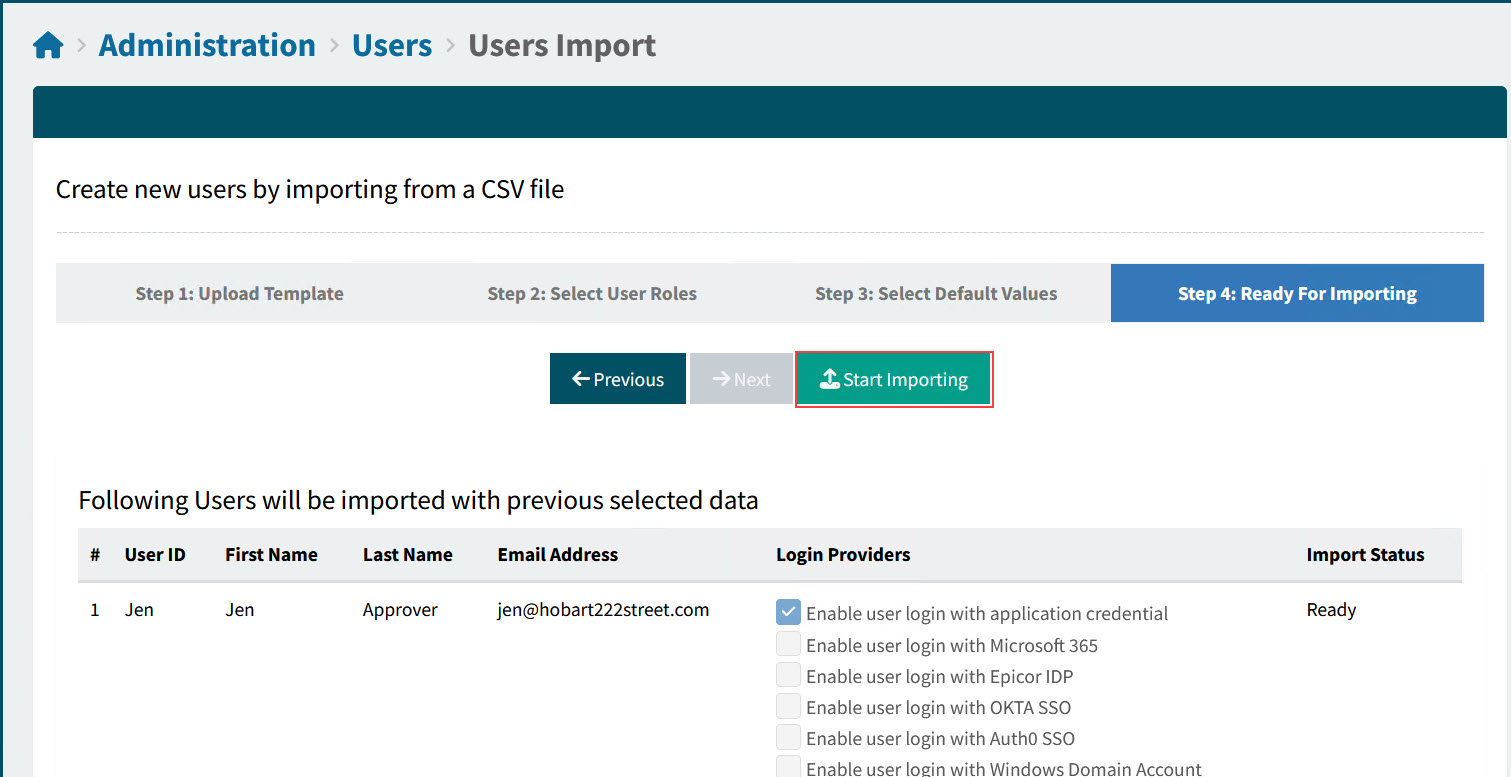
When the import is completed successfully, a message appears on the bottom right: All users have been processed.
The Import Status for each User ID should change to Success.
All new users will have the selected roles, defaults, and access to the same Locations, PunchOuts, Vendor Groups, AP Payment Methods, and GL Accounts.
To update the details for any one user, select that user from the Administration > Users page. See Maintain User Details.
Exporting Users
Use this function to export a list of users. This can be used as follows:
-
As a template for importing new users.
-
As a file of users to import in a different environment.
To create a file of user details:
-
Filter a list of users to update, using the filter conditions.
-
Click
 Export Users on the Menu Bar.
This creates a CSV file of the filtered users, called 'UserList_[YYYY-MM-DD]'.
The file contains personal and authentication details, as found on the Information tab on the User Detail page for each included user.
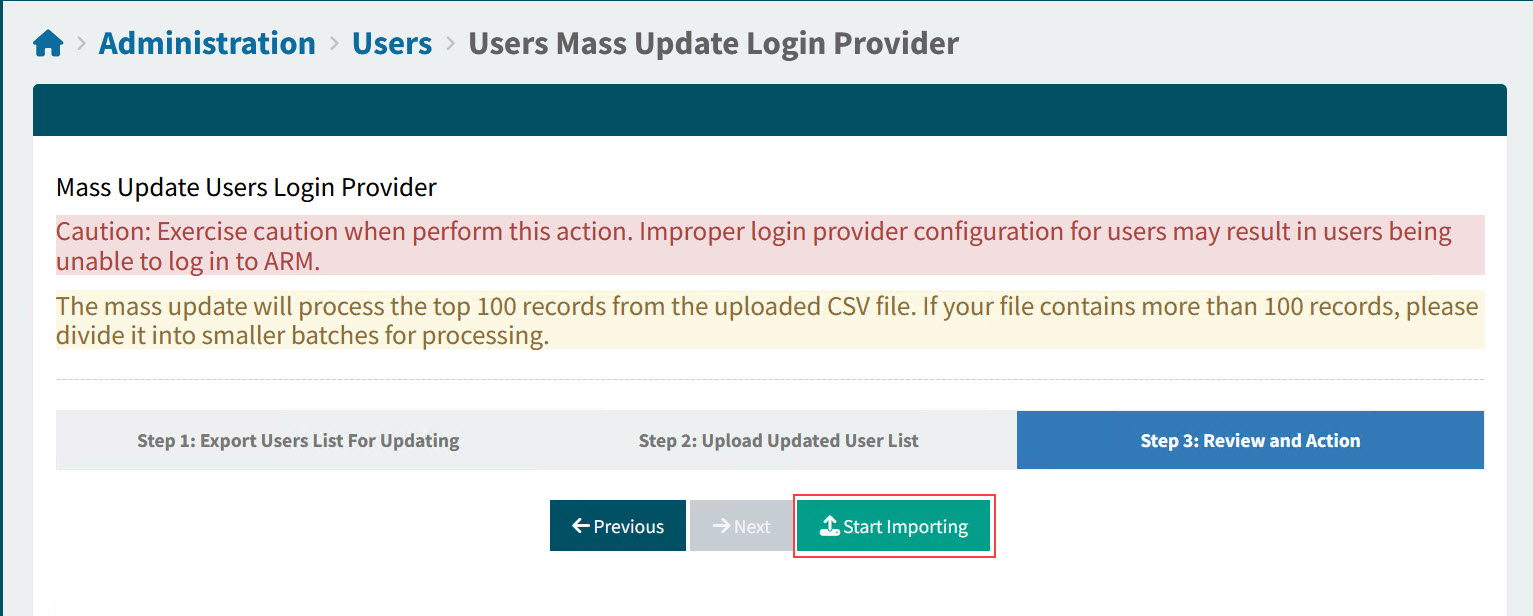
Mass Update Users Login Provider
This mass update will process the top 100 records from the uploaded CSV file. If your file contains more than 100 records, please divide it into smaller batches for processing.
The update is achieved in three steps:
-
Step 1: Export users list for updating.
-
Step 2: Upload updated user list.
-
Step 3: Review and action.
This is described below.
| Exercise caution when performing a mass update of login providers. Incorrect login provider configuration for a user may prevent that user from logging in to ARM. |
Step 1: Export Users List For Updating
If you don’t already have a file to import, then you can prepare this using Export Users For Mass Update Login Provider. See Export Users for Mass Update Login Provider.
Step 2: Upload Updated User List
-
Click
Mass Update Users Login Provider on the Menu Bar. -
Click the
Next button. -
Click Browse… to select the updated UserList_For_Login_Provide_Update file. In the file manager, browse to locate the file, then select it and click Open.
-
Click Upload to upload the file.
View Details
-
Click the
Next button.
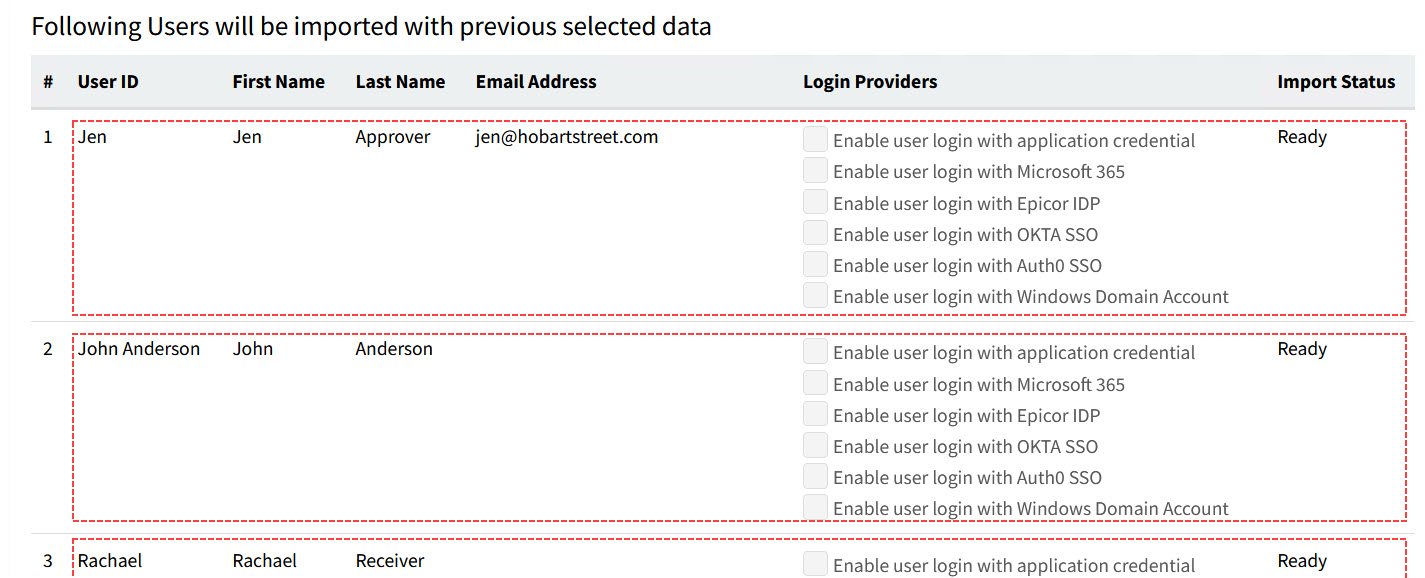
Step 3: Review and Action
-
Before importing the file, review the details in the section Following Users will be imported with previous selected data on the lower part of the page.
View Details
-
Check that the Import Status is Ready for each User ID.
-
Click the Start Importing button.
View Details
When the import is completed successfully, a message appears on the bottom right: All users have been processed.
The Import Status for each User ID should change to Success.
Exporting Users for Mass Update Login Provider
Use this function to export a list of users, to apply login provider details for each.
This is achieved in two steps:
-
Step 1: Create a user list file.
-
Step 2: Update authentication details on the file.
Step 1: Create a User List file
-
Filter a list of users to update, using the filter conditions.
-
Click
Export Users For Mass Update Login Provider on the Menu Bar.
This creates a CSV file of the filtered users, called 'UserList_For_Login_Provider_Update_[YYYY-MM-DD]'.
Step 2: Update Authentication Details
Open the file in Microsoft Excel, or another editor, and update the details, as you would in the Authentication section on the Information tab for an individual user. See Information Tab.
| You cannot change passwords in this file. |
The file is now ready to be imported, with the updated authentication details for the selected users.
Maintain User Details
On this page you can perform various functions, such as activating/deactivating a User, anonymising a deactivated User, resetting a User’s password, and replacing approvals for a User. You can also assign roles, locations, vendor groups etc. to the user.
Use the User > User Detail page to maintain the details and roles of individual Users of the ARM system. This can be an existing user, or a new user.
-
Select the Users menu item on the Administration Page. See Administration Page.
-
Select a User Id to maintain user details for that User.
The User Detail page appears.
-
From this page you can:
-
Click Activity Logs
 to view a log of updates to the user.
 -
Open the different user tabs User Tabs
 .
. -
Update the user details such as roles, assignments, personal information, and so on, on the user tabs
 .
. -
The Footer Menu
 has buttons to save or cancel changes, de-activate/activate the user, or replace approvals.
-
User Tabs
Use these tabs to define personal and authentication details, as well as assigning roles and access to various codes.
You can update the information on the separate tabs, and then save the changes, or refresh to cancel changes.
Some of the tabs have an 'All' check box, for example 'Access All Category Groups' on the Category Groups tab. For these tabs, you can toggle between allowing all (select the check box) or allowing limited access (clear the check box).
Clearing the check box reverts to the previously saved selections.
Show Example
1. Select two category groups. |
|
Result: The user has access to the selected Category Groups |
|
|
|
2. Select Access All Category Groups. |
|
Result: The user has access to All Category Groups. |
|
|
|
3. Clear the check box Access All Category Groups. |
|
Result: The user has access to the same two Category Groups as before. |
|
|
These are the user tabs:
Update the user’s personal and authentication details. |
|
Assign roles to the user; you can also delegate a user’s roles to another user. |
|
View the user’s permissions, which are based on their assigned roles. |
|
Assign Requester Groups to the user. |
|
Assign the user’s Default Company; assign Requisition Types to the User, and select a default Requisition Type. |
|
Assign locations that the user can requisition for. The locations also apply to permissions related to receiving, creating, or viewing Purchase Orders. |
|
Assign PunchOut sites that the user can use. |
|
Assign the AP Payment Methods accessible to the user. This is also where you can add Payment References that are available to the user. |
|
Assign the Vendor Groups accessible to the user. |
|
Assign the Category Groups accessible to the user. |
|
The user’s GL Account Masks and GL Account Mask Exclusions are based on their assigned roles. Alternatively, you can give them access to all GL Accounts. This tab sheet also has additional GL Accounts settings for the user. |
|
Assign which GL Account segments the user can edit. |
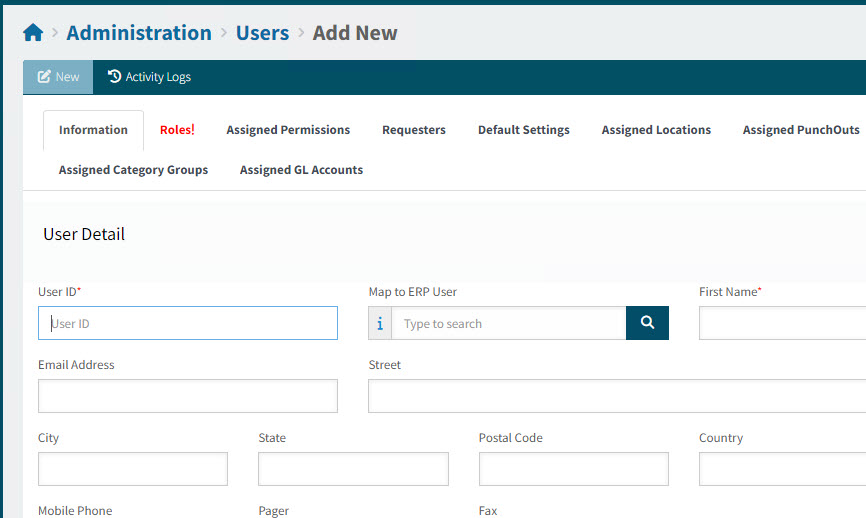
Information tab
The Information tab sheet contains personal details such as name and address, as well as Authentication and Login details for that user.
-
Update the User Detail section.
User Detail section
User ID This is the unique ID for a User and cannot be updated.
Map to ERP User Select a Kinetic user to map to the ARM user.
First Name, Last Name The First Name and Last Name fields are displayed in the top right of the ARM Menu Bar.
Email Address The user’s email address, used for any email notifications for this user.
Street, City, State, Postal Code, Country The user’s postal address.
Mobile Phone, Pager, Fax Contact details for the user.
AP Invoice Batch Number Prefix Optionally enter a two-character prefix. This may be used as the prefix for the system-generated, auto-incrementing Batch Number for AP Invoice.
The prefix used, in order of precedence and availability, is from the User, Vendor, Vendor Group, or Company for the AP Invoice.
Job Title Optionally enter the user’s job title.
-
Update the Authentication section.
A User account that is configured for Single Sign-On (SSO) can be modified to use SSO from a different Login Provider. For example, if a User’s SSO is currently configured for Microsoft 365, it can be reconfigured to use Windows Domain AD SSO access, or Epicor IdP SSO access. More than one Login Provider can be configured for the User and selected for them to use. There is also an option to enforce Single Sign-On for the User.
Authentication section
-
Select the authentication options:
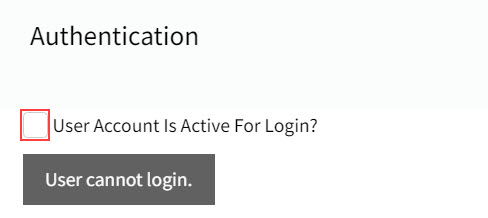
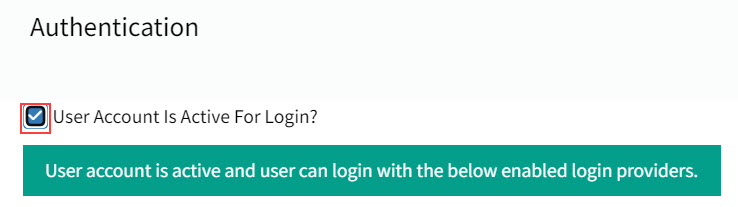
User Account Is Active For Login? If selected, the user account is active and the user can log in with their enabled login providers.
If not selected, the user cannot log in.
Require Single Sign-On Select to enforce single sign-on. Single sign-on allows the user to sign on with a single user name and password for one of the providers listed below. The available sign-on options are listed below. At least one of these must be selected, if Single Sign-On is enforced.
If Require Single Sign-On is not selected, the user can log in using either their Application credentials, or one of the enabled SSO providers.
Send login invitation email to user Select to send a login invitation email to the user.
-
Fill out the necessary Login Provider details. For each provider that you want to enable:
-
Select the Enabled check box.
-
Fill in the required details.
Application If enabled, the user can log into ARM using their User ID (username) and password.
- Application User Name
-
This is the User ID for the selected user, which cannot be updated.
- Password
-
If you need to set the user password (before their first login, or if they require a password reset), enter a Password and Password Confirmation, then click Set User Password.
Click Yes on the confirmation pop-up dialog. Note that this will overwrite the user’s current password.
The user will need to log in using this Password. Once they are logged in, they can change their password on their Profile page.
Microsoft 365 If enabled, the user can log into ARM using Microsoft 365 (Azure AD) account. Enter a user id that the user uses to log into Microsoft 365.
Epicor IDP If enabled, the user can log into ARM using their Epicor IDP account.
- External Identity Epicor IDP
-
Enter a user id that the user uses to log into Epicor IDP.
Okta SSO If enabled, the user can log into ARM using their Okta SSO.
- External Identity Okta SSO
-
Enter a user id that the user uses to log into Okta.
Auth0 SSO If enabled, the user can log into ARM using their Auth0 SSO.
- External Identity Auth0 SSO
-
Enter a user id that the user uses to log into Auth0.
Windows Domain AD If enabled, the user can log into ARM using their Windows domain account.
- External Identity Windows Domain
-
Enter a Windows active directory domain user name.
-
-
-
Click Save on the footer menu.
Roles tab
The Roles tab sheet is for allocating roles to the user or delegating roles to another user.
Roles and permissions are maintained in the Roles page.
User Roles
-
Select the check box alongside a User Role, to allocate the role to the user.
See example
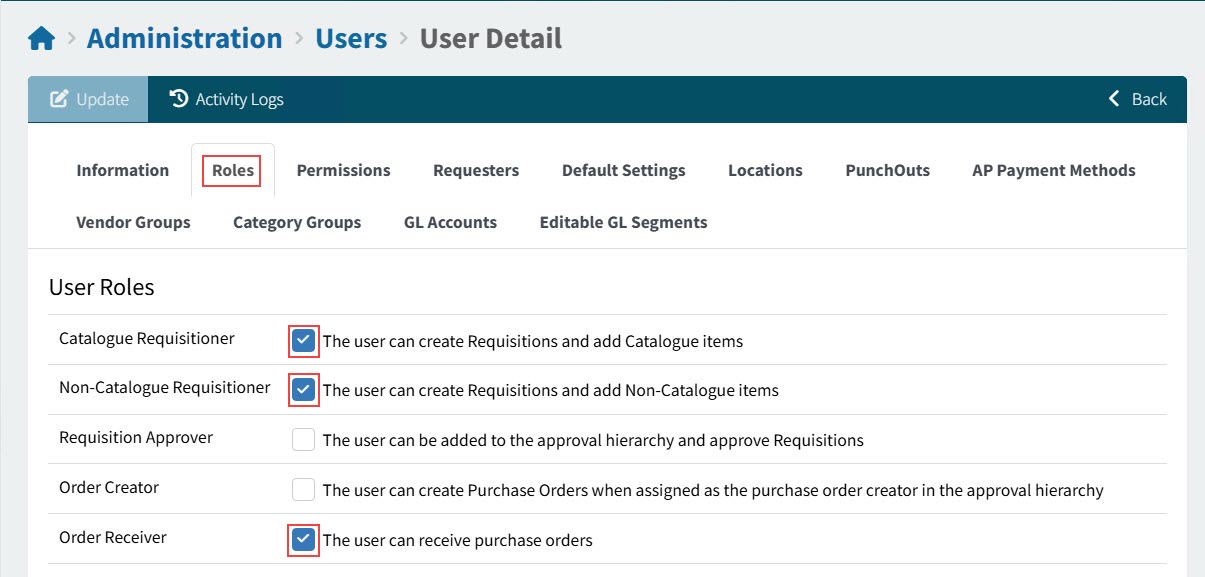
Roles have permissions attached to them, as well as GL Account Masks and GL Account Masks Exclusion.
To see the full list of permissions for a user, open the Permissions tab.
To see the full set of GL Account Masks for a user, open the GL Accounts tab. (You will need to deselect Access All GL Accounts to see the list.)
| To see your own User Roles, open your Profile and view the User Roles section. See User Profile. |
Permissions tab
This tab shows the permissions assigned to the user, based on their allocated roles.
View Permissions tab
|
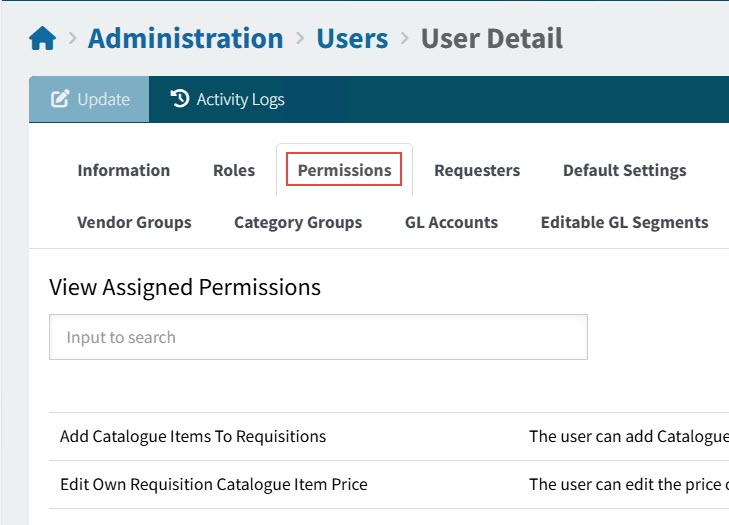
Scroll through the list to see what permissions are assigned to the selected user, or use the search box if you are checking to see whether a specific permission is assigned to the user.
Much of the functionality available to a user is determined by the permissions they hold. For example, a user can add catalogue items to requisitions if they have the permission "Add Catalogue Items To Requisitions".
| To see which permissions are grouped into a role, open the Roles page. See Roles for more information. You can then allocate the appropriate role to the user, it they require a new permission. |
Requesters tab
The Requesters tab sheet is for allocating Requester Groups to the user.
View Requesters tab
|

You can also link to the user’s Link Requester from here.
Requester Groups are maintained in the Requester Groups page.
Default Settings tab
The Default Settings tab sheet is for assigning defaults for the user, uploading their signature, and assigning Requisition Types.
View Default Settings tab
|
-
Select the User Default Settings.
These are the defaults for this user when they create a new document, such as a new requisition.
-
Select a Default Company from the drop-down list.
-
-
Select Requisition Types. These are only available if the setting Use Requisition Types is set to Yes.
-
Select the requisition types that the user can have access to, when creating a requisition.
-
To select a User Default, click on the grey star
 next to a requisition type, changing the star to green
  .
.The User Default requisition type appears as the default Requisition Type for a new requisition for this user.
-
-
Optionally, upload a file containing the user’s signature.
This can be a scanned signature file of type .jpeg, .gif, or .png.
Note that you need the Can Maintain User Signatures permission to upload or remove a signature.
-
In the Signature section, click Browse, then select and open a signature file for the user.
The signature is displayed in a preview box.
-
Click Upload, to upload the file.
-
To remove the image, select Remove Image, then Save the changes.
-
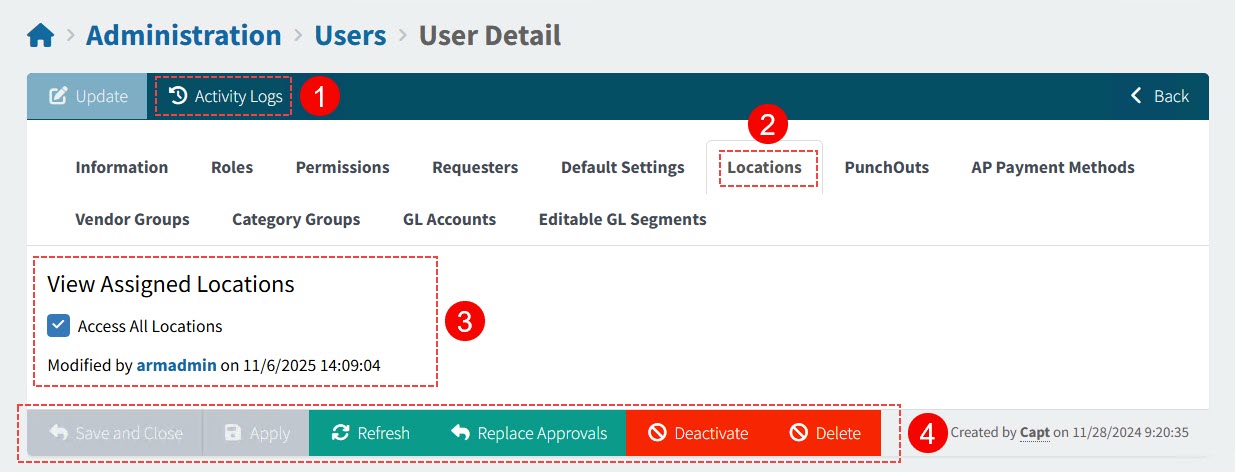
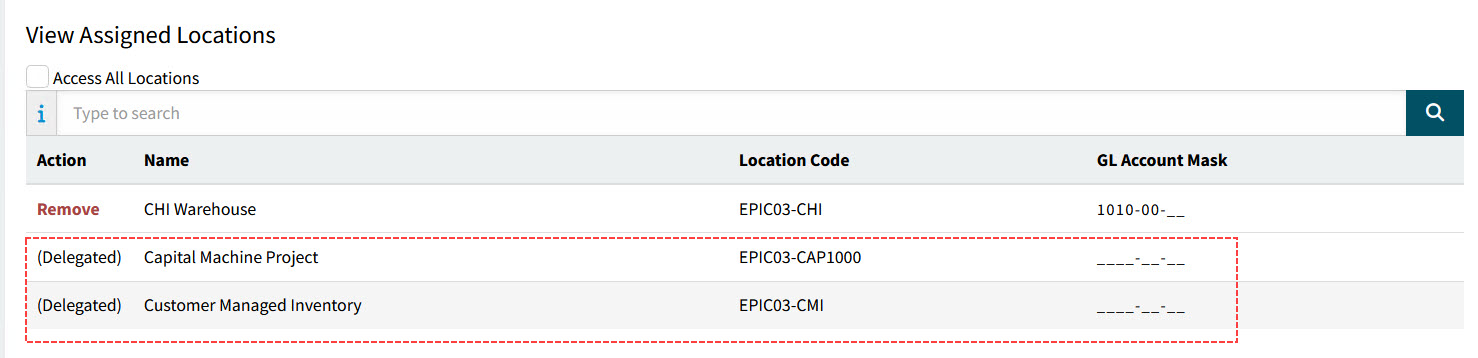
Locations tab
The user has access to these locations, for example when creating a requisition.
-
Select Access All Locations to make all locations available.
OR
-
To choose specific locations, first clear Access All Locations, then search for and select locations.
To remove a location, click on Remove in the Actions column for that row.
View Locations tab
|
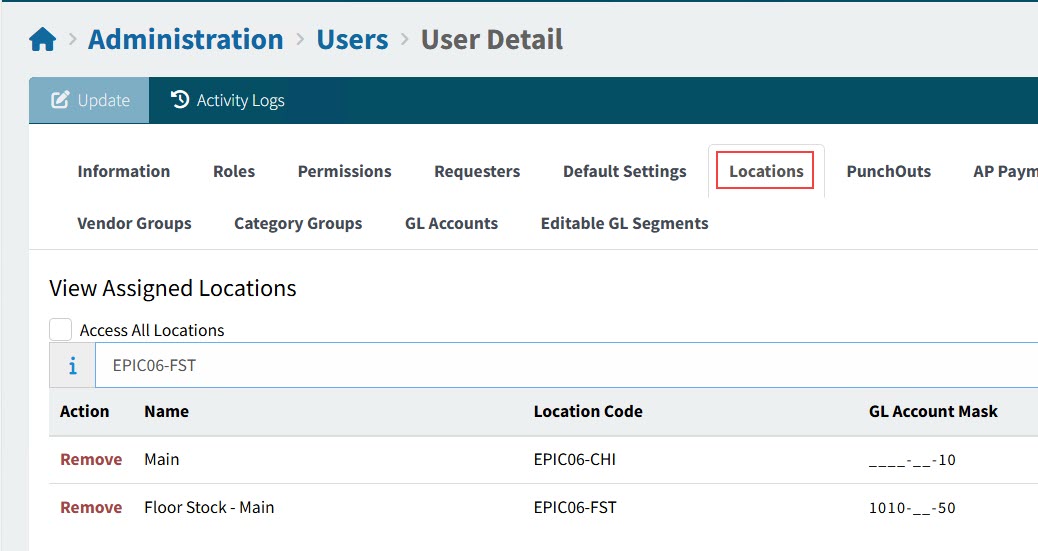
| If the user has locations assigned together with a delegated role, then these also appear in the list of assigned locations, for the duration of an enabled delegation. |
See example of locations (delegated)
|
Sites
A user is limited to accessing Draft Invoices and AP Invoices where one of their assigned locations belongs to the Site on the Draft Invoice/AP Invoice header.
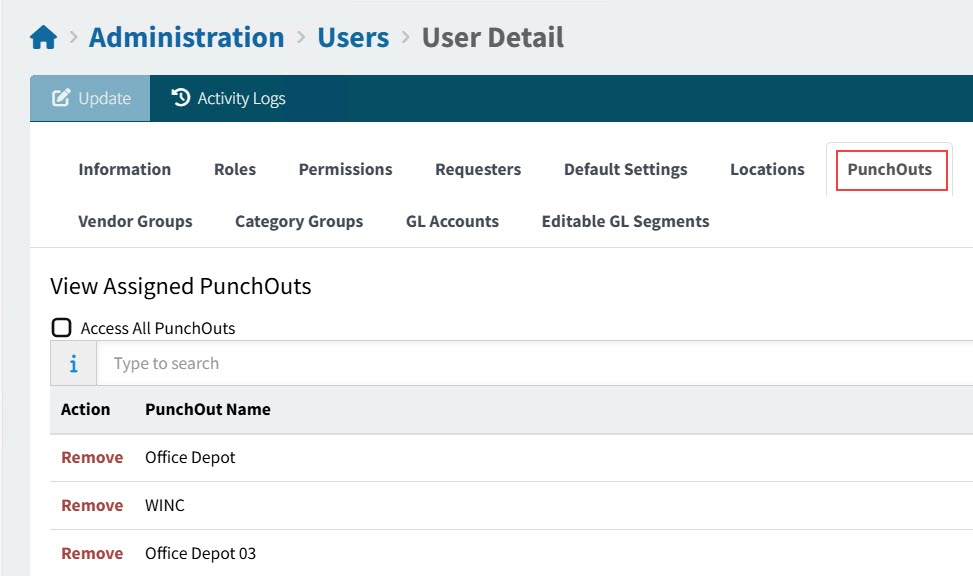
PunchOuts tab
The user will have access to configured PunchOut websites.
-
Select Access All PunchOuts to make all configured PunchOuts available.
OR
-
To choose specific PunchOuts, first clear Access All PunchOuts, then search for and select PunchOuts.
To remove a PunchOut from the list, click on Remove in the Actions column for that row.
View PunchOuts tab
|
AP Payment Methods tab
The AP Payment Methods a user has access to when creating and/or processing Requisitions.
-
Select Access All AP Payment Methods to make all AP Payment Methods available to the user.
OR
-
To select specific AP Payment Methods, first clear Access All AP Payment Methods, then search for and select AP Payment Methods.
To remove an AP Payment Method from the list, click on Remove in the Actions column for that row.
View AP Payment Methods tab
|

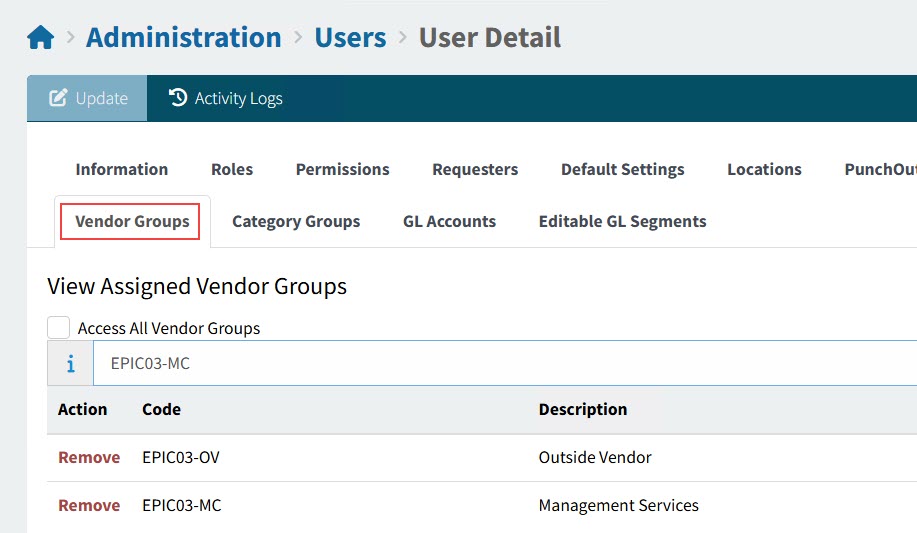
Vendor Groups tab
Allow this user access to selected Vendors and their Vendor Groups.
-
Select Access All Vendor Groups to make all Vendor Groups available to the user.
OR
-
To select specific Vendor Groups, first clear Access All Vendor Groups, then search for and select Vendor Groups.
View Vendor Groups tab
|
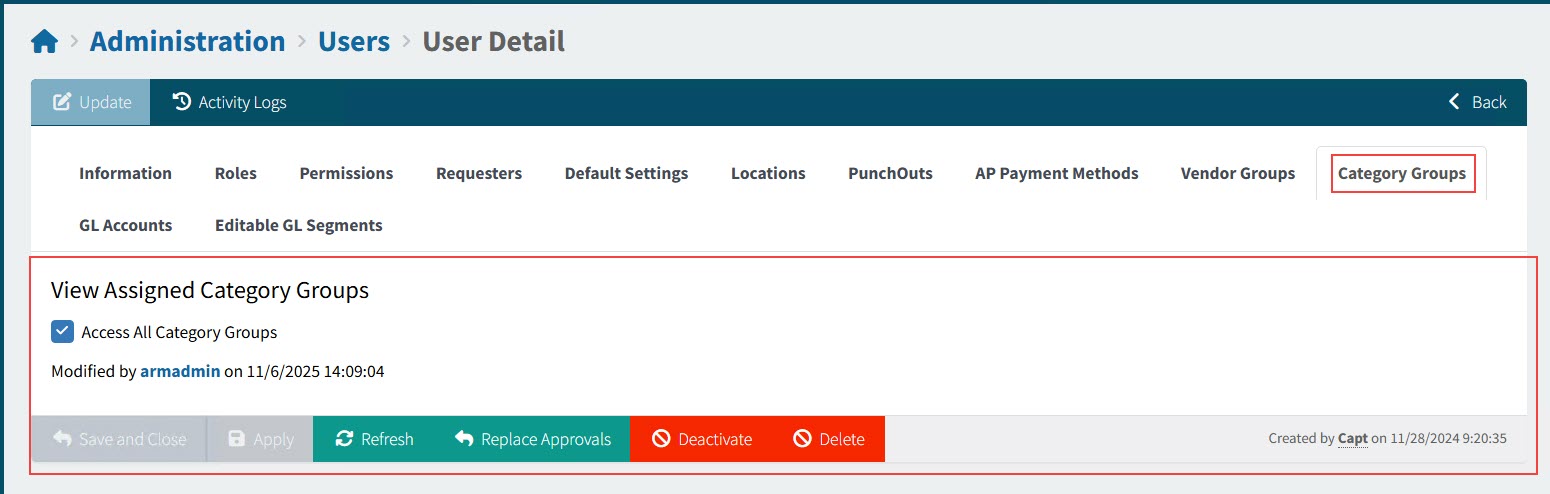
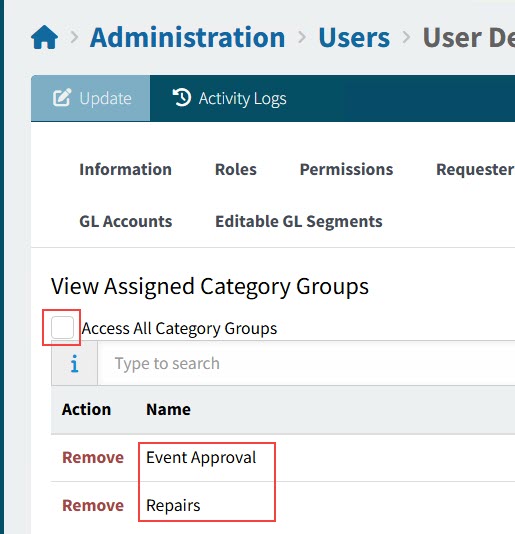
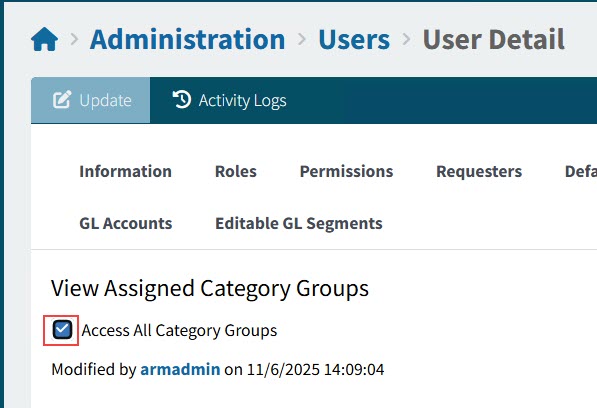
Category Groups tab
Allow this user access to selected Category Groups, their Categories, and the associated Catalogue Items. See Catalogue Items and Category Groups.
-
Select Access All Category Groups to make all Category Groups available to the user.
OR
-
To select specific Category Groups, first clear Access All Category Groups, then search for and select Category Groups.
View Category Groups tab
|
|
Example of a user with access to two Category Groups |
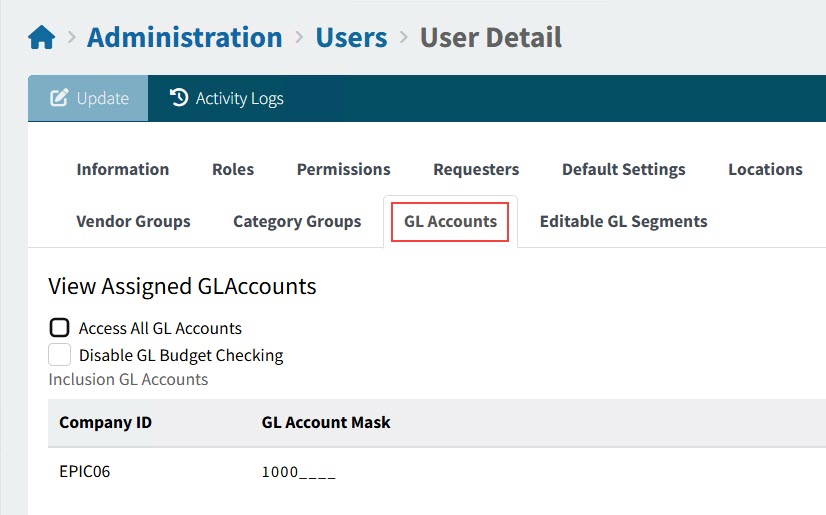
GL Accounts tab
Allow this user access to selected GL Account masks throughout the ARM system.
View GL Accounts tab
|
Notes:
-
Select Access All GL Accounts to make all GL Accounts available to the user.
If this is not selected, then the user only has access to GL Account Masks belonging to their selected Roles.
-
Select Disable GL Budget Checking to override GL Budget Checking for this User. GL Budget Checking is enabled/disabled on the GL Budget page (see GL Budget Checking).
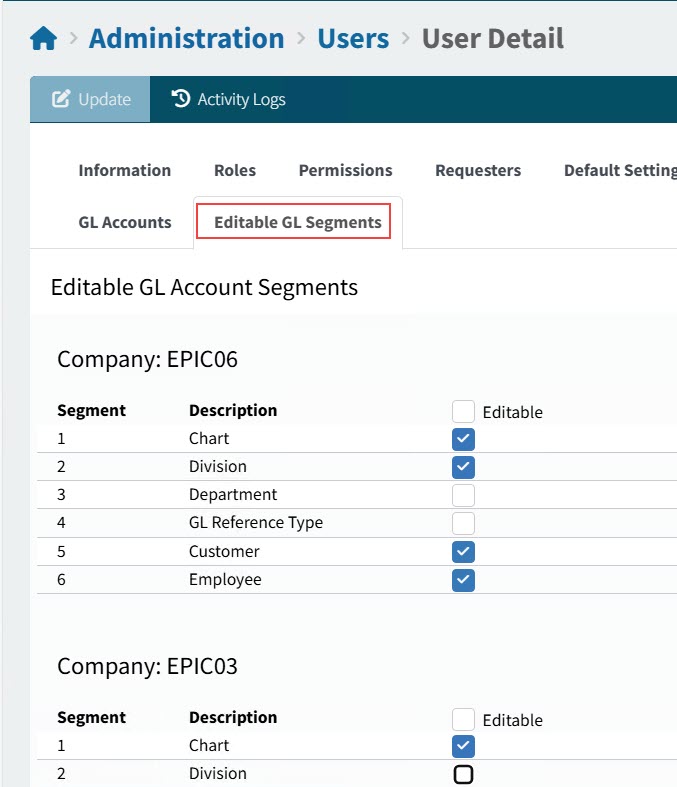
Editable GL Segments
Use this section to define which GL account segments the user can edit.
For each company, either select the Editable check box for all segments, or clear the check box and select individual check boxes for:
-
Chart
-
Division
-
Department
-
GL Reference Type
-
Customer
-
Employee
When the user edits GL Account segments, for example on a requisition line, they may only edit the segments that are editable to them.
| Chart, Division and Department segments apply to the GL Account Code, while the GL Reference Type, Customer and Employee segments apply to the available segments, respectively). |
View Editable GL Segments tab
|
Footer Menu
The footer menu buttons vary depending on the context.
See example
|

The menu buttons that may appear are:
-
OK
-
Save
-
Refresh
-
Replace Approvals - Replace the user’s approvals by assigning these to a different user. See Replacing Approvals for a User.
-
Deactivate - This deactivates the selected user. See Activating or Deactivating a User.
-
Activate - This activates the selected user. The button is only visible for deactivated users. See Activating or Deactivating a User.
-
Anonymise - This anonymises the selected user. The button is only visible for deactivated users. See Anonymising a User.
-
Delete this deletes the selected user from the system.
Setting User Password
The Administrator can set or reset a User’s application password when Application login is enabled.
You can change your password on your User Profile after logging in with the temporary password.
-
Select Enabled for Login Provider Name Application.
-
Enter the Password.
-
Enter the same password in Password Confirmation.
-
Select Set User Password.
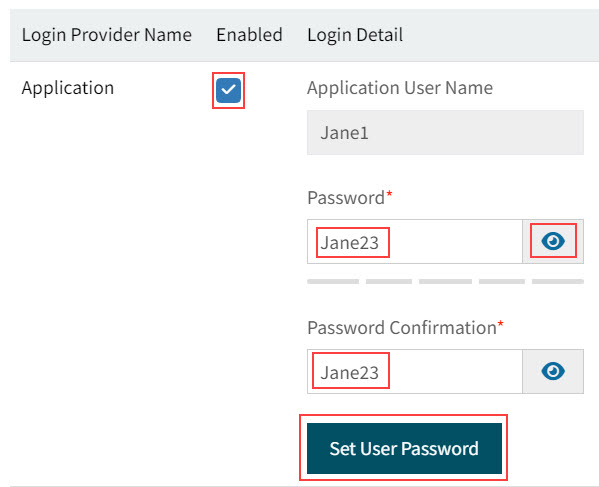
-
On the Confirmation dialog, select Yes.
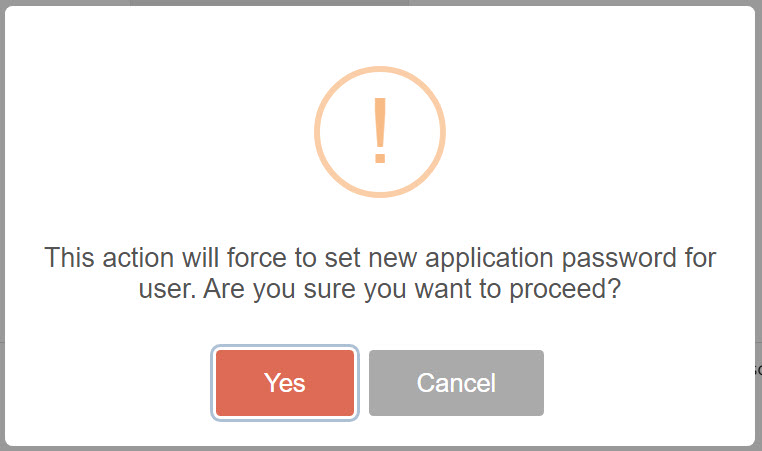
The User’s password is successfully set, and the User can log in with their Application User Name and the new Password.
Activating or Deactivating a User
You should only deactivate a User if:
-
They are no longer specified in any approval hierarchy as a Purchase Order Approver, a Purchase Order Creator, or an Approver for Requisitions and
-
They are not an active or future delegate and
-
They have no outstanding tasks within ARM, e.g. submission of Requisitions, approval of Requisitions, Purchase Order Creation, Receiving etc.
As an Administrator, these are the steps you should follow before deactivating a User.
If the User is a Requisitioner:
-
Review each saved Requisition for the User, submitting or deleting as appropriate.
-
Check for outstanding Requisitions that the User should be reviewing or revising, and process these.
If the User is a Requisition Approver:
-
Approve or Reject any pending Requisitions or POs that are assigned to the user.
-
Replace the User on the relevant Approval Trees:
-
Navigate to Approvals and disable the relevant Approval Trees. See Approvals Maintenance.
If you access the Approvals list from User Maintenance, you can filter for the user you want to disable. See Opening the Approval List. -
Select a different User to take the place of this User in every existing Tree. See Replacing Approvals for a User.
-
Re-enable the relevant Approval Trees.
-
Check for Delegated Roles
-
Check to see whether the User has any roles delegated to them.
This information is available on the User’s Dashboard. See Dashboard.
-
If any roles have been delegated to the User, re-assign these to a different User. See Delegating Roles.
You can now deactivate the User.
Deactivating a User
-
Select the Users menu item on the Administration page. See Administration Page.
-
Select a User Id to open the User > User Detail page for that User.
-
Select Deactivate User.

-
On the Confirmation dialog, select Yes.
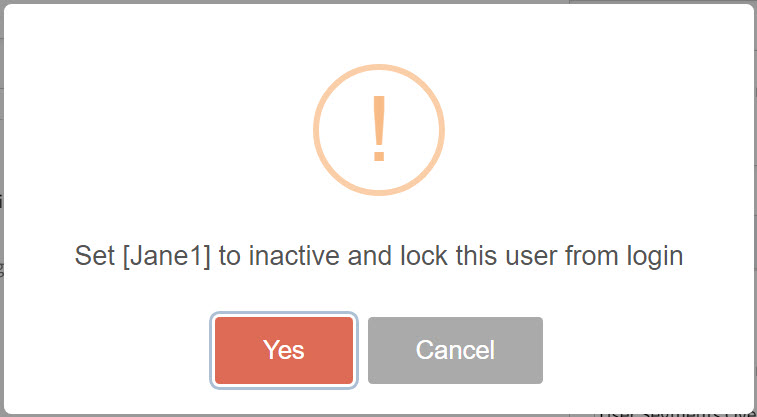
-
Alternatively, clear the User Account is Active for Login check box in the Authentication section.
-
Select Apply on the footer menu to save the changes.
The User can no longer log in to the system.
After Deactivating a User
-
If you had to amend an Approval tree before deactivating the User, check that the Approval tree is working as expected.
-
Submit a test Requisition.
-
Work through the Approval process to confirm that the Approval tree is working as expected.
If the User is unlikely to return, you should Anonymise their details. See Anonymising a User.
Anonymising a User
Inactive Users who will not be activated again should be removed from the ARM system, to meet standards as set out under the General Data Protection Regulation.
To achieve this, the Administrator should 'Anonymise' an Inactive User.
To Anonymise a User
-
Open the Users > User Detail page, for the User. (See Maintaining Users).
-
Ensure the User is Deactivated. (See Activating or Deactivating a User).
-
Select Anonymise on the footer menu.
The Anonymise button is only available for deactivated Users. 
-
On the Confirmation dialog, select Yes.
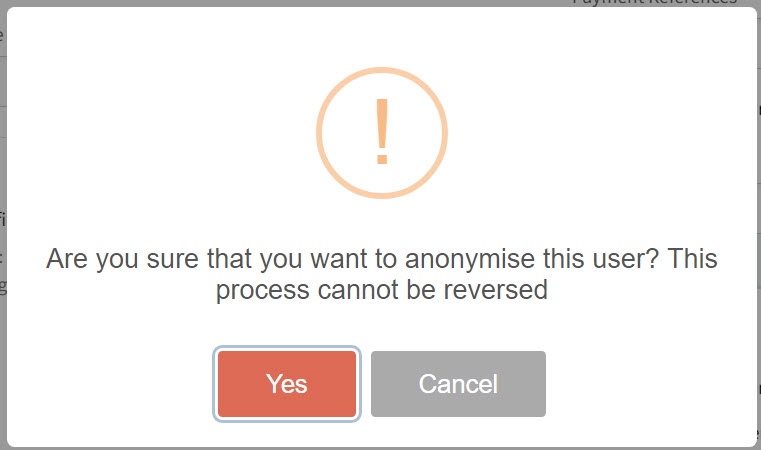
The Anonymise process cannot be reversed.
The Anonymise process hides all profile references to the user in the ARM application by setting this data to an empty (blank or null) value.
-
Some reference data is deleted from the database.
-
Other data is updated to point to an anonymous user.
-
The User Name is encrypted and you can no longer search for the user in ARM.
| Free text fields are not covered by this process, for example Contact Name and Ship Name in the Delivery section of a Requisition. |
Replacing Approvals for a User
When you have User Details open for a specific user, you can replace their approvals by assigning these to a different user.
The user is replaced on all approval trees, as well as on any current approvals.
To replace approvals for a user:
-
Open the User Details for the user. See Maintain User Details.
-
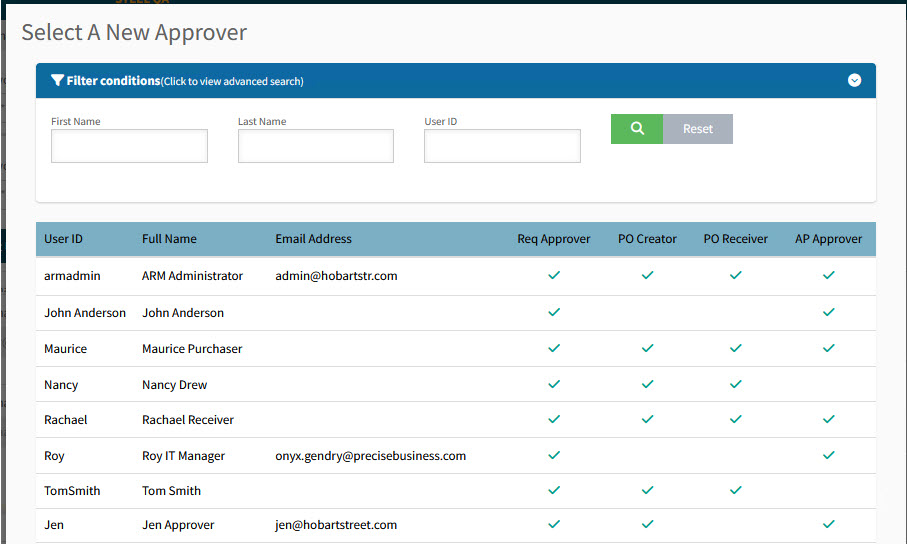
Click Replace Approvals on the footer menu.
The Select A New Approver search screen displays.
Active users who have the Requisition Approver role are listed.
-
Search for and select the new approver.
A Confirmation dialog appears.
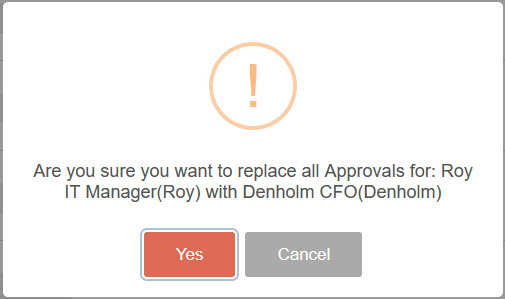
-
Click Yes to confirm.
The new approver replaces the user on approval trees and current approvals, provided they have permission to approve requisitions. If they do not have this permission, an error message is displayed.
User Assignment
The Users Assignment page provides a way of assigning access to Category Groups, PunchOuts, AP Payment Methods, Roles and Vendor Groups to multiple users. This is an alternative to assigning these from the User Detail page, using the separate tabs.
| PunchOut |
User access can be given to a selected PunchOut, selected from the PunchOut page. |
| AP Payment Method |
User access can be given to a selected AP Payment Method, selected from the AP Payment Method page. |
| Vendor Group |
User access can be given to a selected Vendor Group, selected from the Vendor Groups. |
| Category Group |
User access can be given to a selected Category Group, selected from the Category Groups page. |
| Roles |
User access can be given to a selected Role, selected from the Roles page. |
See below, for an example of how to grant access to multiple users.
Assigning Users Access to a Category Group
To assign Category Group access to multiple users:
-
On the Administration > Category Groups page, select a Category Group Name to open the Category Groups > [Category Group Name] page.
-
Click
 Assign Users to Category Group on the menu bar.
This opens the Category Groups > User Assignment page for the selected Category Group. Users that can Access All Category Groups have automatic access to the selected Category Group.
See Category Groups > User Assignment
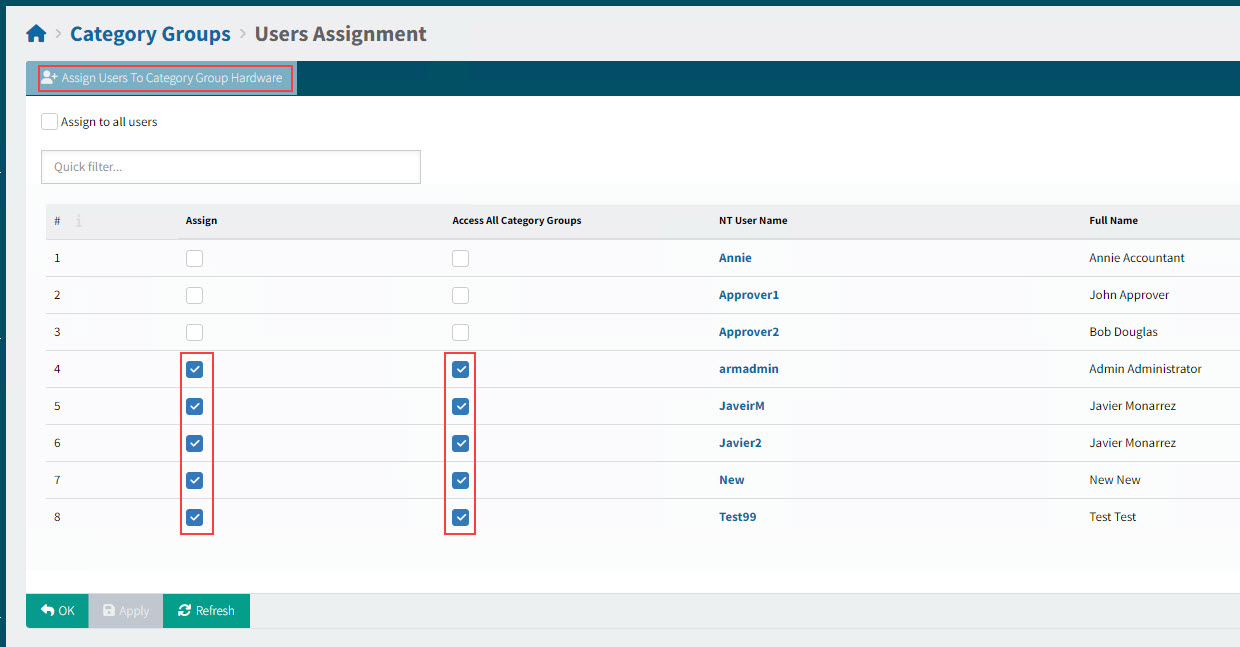
-
To give a user access to the selected Category Group, select Assign for that user.
-
To give a user access to all Category Groups, select Access All Category Groups.
-
To remove access from that user, clear Assign. Note that this clears Access All Category Groups for the user.
-
To link to the User Details page, select the NT User Name.
On the User > User Detail page you can view or maintain the selected user’s access to: Locations, PunchOuts, AP Payment Methods, Vendor Groups, and Category Groups.
Assigning Users Access in Other Areas
Use the same method to the assign user access in:
| PunchOut |
On the Administration > PunchOut page, select a PunchOut, then select |
| AP Payment Methods |
On the Administration > AP Payments Method page, select Users Assignment |
| Vendor Group |
On the Administration > Vendor Groups page, select Users Assignment |
| Roles |
On the Administration > Roles page, select a Role, then select |
