Templates
Any user with the correct permissions and location access can create requisitions from a template, which simplifies and speeds up the process for repeat orders, or commonly purchased items.
- Global Templates
-
A Global template is available from any location. A user can create a requisition at any of their locations, using a Global template (provided the inventory items on the template exist at the selected location).
Templates can also be used to create AP Invoices.
Permissions
-
You require a role with the Maintain Templates permission to access Templates maintenance.
-
You require a role with the Search All Templates permission to search Templates for all Locations.
-
You require a role with the Create Global Templates permission to create a Global template.
See Permissions in ARM.
-
To create a new Template, see New Template.
-
To work with existing Templates:
-
Select
 Templates from the Side Menu to open the Templates page. See Side Menu.
The Templates page opens.

Template No The unique number for this Template.
Template Name A name to describe the Template.
Receive Location(s) The receiving location on the document header. If there is more than one Location, you can click on the ellipsis (…) button to view all Locations in a pop-up box.
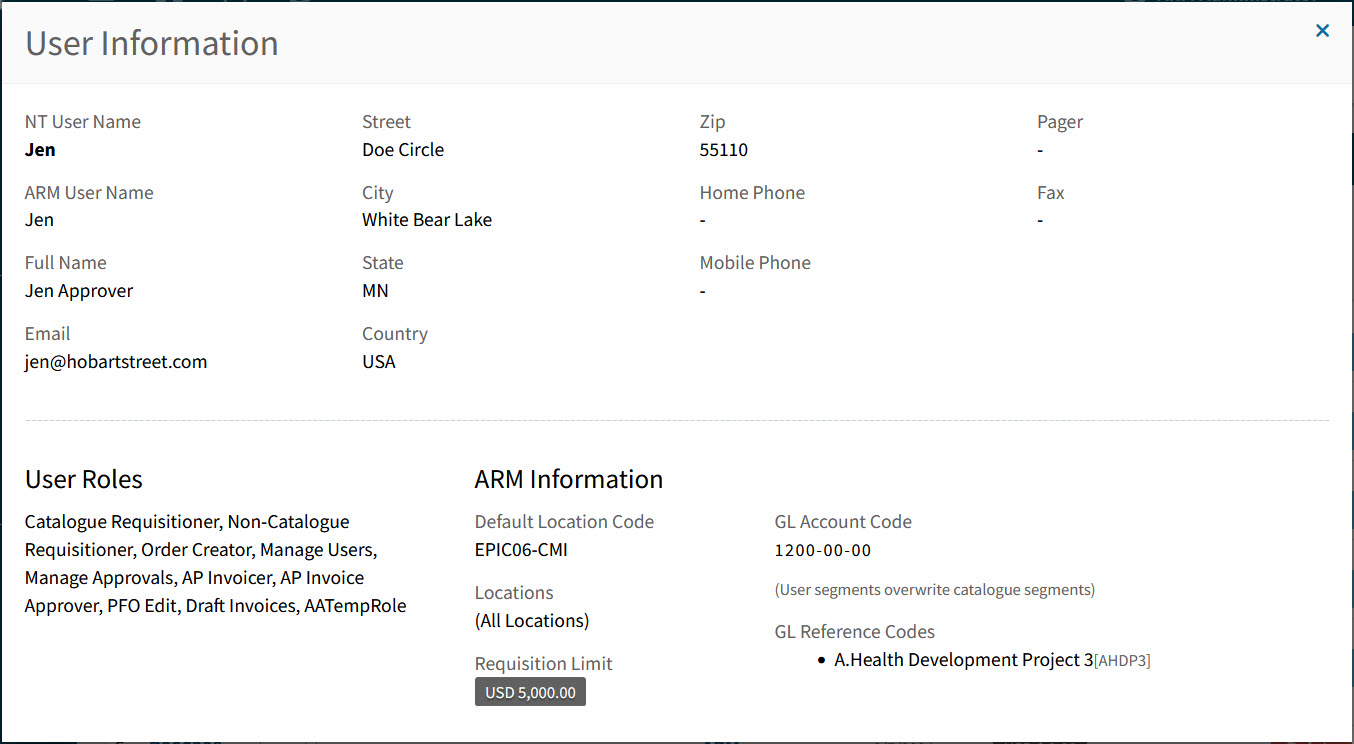
Owner The document owner. This is the User who created the document.
Owner Names are in blue. Hover over an Owner Name to view the full Name, or click on an Owner Name to open the details in the User Information pop-up screen.
Example
Created Date The date the document was created.
Global Indicates whether this is a global Template.
Active Approvers The Approver(s) at the current step in the approval workflow. An Active Approver can approve or reject a requisition.
Actions Template actions:
Available options under the Actions column depend on your User permissions.
- Delete
-
Click Delete to delete the template on this row. On the confirmation dialog pop-up, click Yes to confirm. (Requires Permission: Can delete all templates.)
- Copy
-
Click Copy to copy the template on this row. Select from the Copy Options, then click Save & Close. (Requires Permission: Can Copy Req and Template.)
See Copy Options
- Header Only
-
Only copy the header information, such as dates and payment type.
- Include Attachments
-
Include any attachments in the copy.
- Include Notes
-
Include any notes in the copy.
- Include Custom Data
-
Include any custom data in the copy. This option is only available if the Use Requisition Types Global Setting is set to Yes.
- Include Recurring Setting
-
Include the Recurrence Settings (Recurrence Pattern and Range Of Recurrence) in the copy.
- Copy Tax Data
-
For each line, copy the Tax Liability and Tax Category.
- Fast Copy
-
Copy all details of each line. Without this option selected, the default values (not the edited values) for each line are used.
- Copy Line Date Fields
-
For each line, copy the dates.
- Requester
-
This is the default Requester on the new document. Either keep the Requester (which is the Requester linked to you, the logged-in user), or select a different Requester, from the list of Requesters that you can request for.
- Req
-
Click Req to copy the template on this row to a new Requisition. (Requires Permission: Can Convert to FastReq.)
See Copy Options
- Header Only
-
Only copy the header information, such as dates and payment type.
- Include Attachments
-
Include any attachments in the copy.
- Include Notes
-
Include any notes in the copy.
- Include Custom Data
-
Include any custom data in the copy. This option is only available if the Use Requisition Types Global Setting is set to Yes.
- Copy Tax Data
-
For each line, copy the Tax Liability and Tax Category.
- Fast Copy
-
Copy all details of each line. Without this option selected, the default values (not the edited values) for each line are used.
- Copy Line Date Fields
-
For each line, copy the dates.
- Requester
-
This is the default Requester on the new document. Either keep the Requester (which is the Requester linked to you, the logged-in user), or select a different Requester, from the list of Requesters that you can request for.
- Inv
-
Click Inv to create an AP Invoice from this template. (Requires Permission: Create AP Invoices.)
See Details
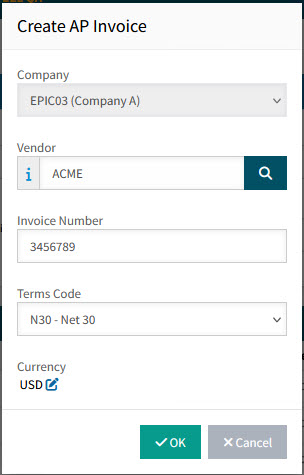
-
Select a Vendor from the Vendor look-up.
-
Type in the Invoice Number.
-
Select the Terms Code from the drop-down list.
-
Update the Currency, if required.
-
Click OK.
A new AP Invoice is created.
-
- Select check box
-
Select the check box next to more than one template, then click Delete Selected Items on the menu bar, to delete the selected templates. (Requires Permission: Can delete all templates.)
-
Adjust the Search conditions.
See Details
-
Expand the filter conditions in the top section of the page to search for a specific Template or to narrow your search.
View filter conditions
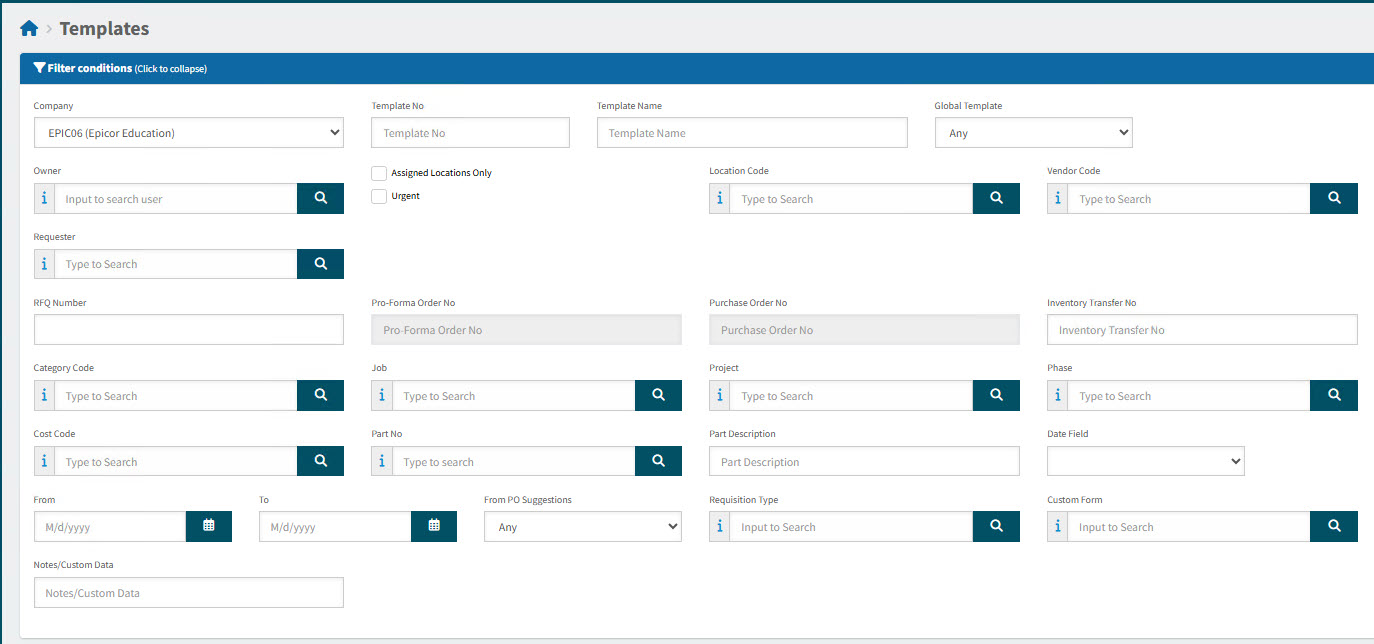
-
Enter values in the edit boxes, or select from the search boxes. See the filter conditions, below.
Filter conditions
Company Select a Company.
Template No Type in the Template Number if known, or do a partial search using part of the number followed by %. For example, T0001% will return all Templates starting with T0001.
Template Name Type in the Template Name if known, or do a partial search using part of the name followed by %.
Global Template Select this option to return Global Templates only.
Requisition Type Select All, Standard, Standing Order, or Blanket Order from the drop-down list .
Requisition Name Enter a name or partial name followed by the % character to list all Requisitions with a name that contains those characters.
Requisition No Type in the Requisition Number if known, or do a partial search using part of the number followed by %. For example, R0001% will return all Requisitions starting with R0001.
Requisition Type Select Blanket Order from the drop-down list .
Requisition Name Enter a name or partial name followed by the % character to list all Requisitions with a name that contains those characters.
Requisition No Type in the Requisition Number if known, or do a partial search using part of the number followed by %. For example, B0001% will return all Blanket Orders starting with B0001.
Status Select one of the following status values from the drop-down list:
-
Any
-
Saved
-
Submitted
-
Rejected
-
Approval in Progress
-
Approved
-
Ordered
-
Received
-
Pending Review
-
Pending Revision
Further refine the list by selecting Any, Not Suspended or Suspended from the adjacent drop-down list.
Owner Type in the User Name, or partial with the % sign, of the person that created the Standing Order, and click on a name from the displayed list.
Next Reviewer This field is disabled.
Assigned Locations Only If this check box is selected only documents for Locations assigned to the User in their User Profile will be displayed.
Location Code Select a Location Code to filter from.
Vendor Code Select a Vendor Code.
RFQ Number Type in the Request For Quote No if known, or do a partial search using part of the number followed by %.
Pro-Forma Order No The number of the pro-forma order originating from this requisition.
Purchase Order No The number of the purchase order originating from this requisition.
Inventory Transfer No Type in the Transfer Order No if known, or do a partial search using part of the number followed by %.
Category Code Select a Category Code and any Standing Order with a line that matches the value will be returned.
Job Select a Job Code and any Standing Order with a line that matches the value will be returned.
Project Select a Project Code and any Standing Order with a line that matches the value will be returned.
Phase Select a Phase (dependent on the value selected in the Project field).
Cost Code This is an independent field and can be selected against any Project when ARM is configured for use with Advanced Projects Management (APM).
Part No Type in a Part No, or click the field search icon
 to select a Part Number from the Search Catalogue page.
Part Description Type in the Part Description if known, or do a partial search using part of the description followed by %.
Date Field Select one of the following date values from the drop-down list:
-
Date Created
-
Date Modified
-
Date Submitted
-
Date Approved
Enter a date range, or just a From Date, or just a To Date.
From PO Suggestions Choose Any, Yes, or No.
Custom Form Select any of the Custom Forms if the ARM system is configured to use these.
Notes/Custom Data You can type in a whole or partial string to search values present within:
-
Internal and External note fields
-
Line note fields
-
Custom UDF value fields
-
Templates that match the search conditions are listed in the grid.
-
Template Functionality
See how to:
-
Create a new template, using Create a new document on the Top Menu Bar. See Creating a Template.
-
Create a template from a requisition. See Creating a Template from a Requisition.
-
Copy an existing template. See Copying a Template.
-
View and edit a template. See Viewing and Editing a Template.
-
Search for a template. See Searching for a Template.
-
Delete a template. See Deleting a Template.
-
Create a requisition from a template. See Creating a Requisition from a Template.
|
Copying a Template
You can copy a template to another template or to create a requisition, if you have access to its location.
Permissions
-
You require a role with the Can Copy Req and Template permission to copy a template from the detail page.
-
You require a role with the Can Fast Copy Req permission to copy a template from the summary page.
To copy a template:
-
Select
Templates on the Side Menu to open the Templates page. -
Enter the relevant search parameters and click the Search icon to list templates to copy.
-
Click Copy OR
Select the Template No then:
-
Click the Copy button across the top right menu bar.
OR
-
Click Requisition from the Workflow menu in the Actions section.
-
-
Select the Template Copy Options from the pop-up dialog, which has default settings from Global Settings.
Detail
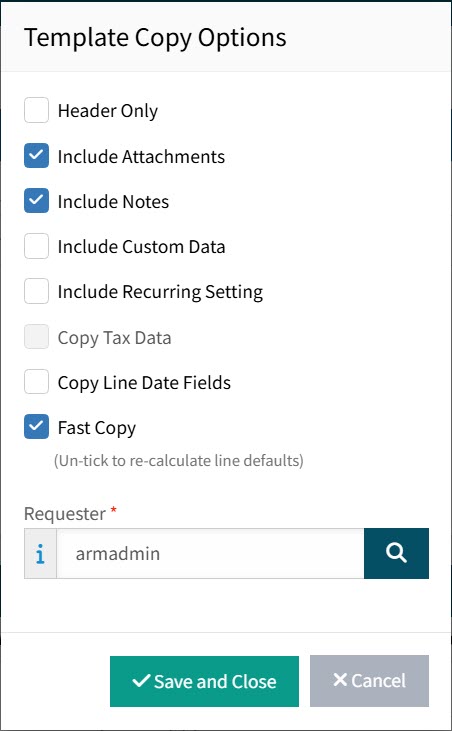
- Header Only
-
Only copy the header information, such as dates and payment type.
- Include Attachments
-
Include any attachments in the copy.
- Include Notes
-
Include any notes in the copy.
- Include Custom Data
-
Include any custom data in the copy. This option is only available if the Use Requisition Types Global Setting is set to Yes.
- Include Recurring Setting
-
Include the Recurrence Settings (Recurrence Pattern and Range Of Recurrence) in the copy.
- Copy Tax Data
-
For each line, copy the Tax Liability and Tax Category.
- Fast Copy
-
Copy all details of each line. Without this option selected, the default values (not the edited values) for each line are used.
- Copy Line Date Fields
-
For each line, copy the dates.
- Requester
-
This is the default Requester on the new document. Either keep the Requester (which is the Requester linked to you, the logged-in user), or select a different Requester, from the list of Requesters that you can request for.
-
Click Save & Close.
The template is copied, according to the selected options.
If the Setting Copy Requisition & Template Quantities Global Setting is set to Yes, then the template line quantities are copied to the new template. If it is No, the quantity on each line of the new template is 0. -
On the Template detail page modify the Template as required.
-
Click OK to save the Template.
Creating a Template from a Requisition
This section describes how to create a template from a requisition.
| You can also create a template from a Standing Order. |
Permissions
You require a role with the Can Copy Req and Template permission to create a template from a requisition.
-
Create a new requisition (see Creating a Requisition) or open an existing requisition of any status (see All Requisitions).
-
Make any necessary adjustments to the requisition.
-
Click the
 Template button on the Header Menu Bar.
 -
Select the Requisition to Template Options from the pop-up dialog, which has default settings from Global Settings.
Requisition to Template Options
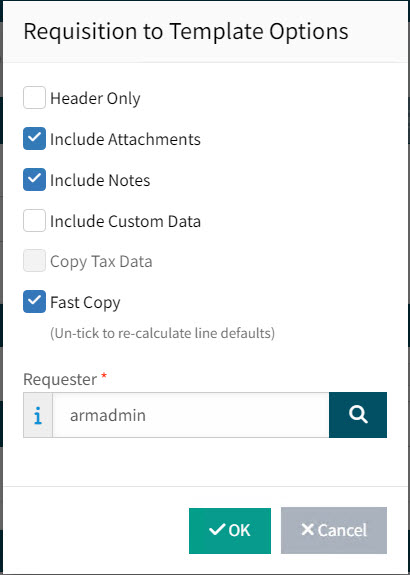
- Header Only
-
Only copy the header information, such as dates and payment type.
- Include Attachments
-
Include any attachments in the copy.
- Include Notes
-
Include any notes in the copy.
- Include Custom Data
-
Include any custom data in the copy. This option is only available if the Use Requisition Types Global Setting is set to Yes.
- Copy Tax Data
-
For each line, copy the Tax Liability and Tax Category.
- Fast Copy
-
Copy all details of each line. Without this option selected, the default values (not the edited values) for each line are used.
- Copy Line Date Fields
-
For each line, copy the dates.
- Requester
-
This is the default Requester on the new document. Either keep the Requester (which is the Requester linked to you, the logged-in user), or select a different Requester, from the list of Requesters that you can request for.
-
Click Save & Close.
The requisition is copied to a new template, according to the selected options.
You can edit the new template. See Viewing and Editing a Template.
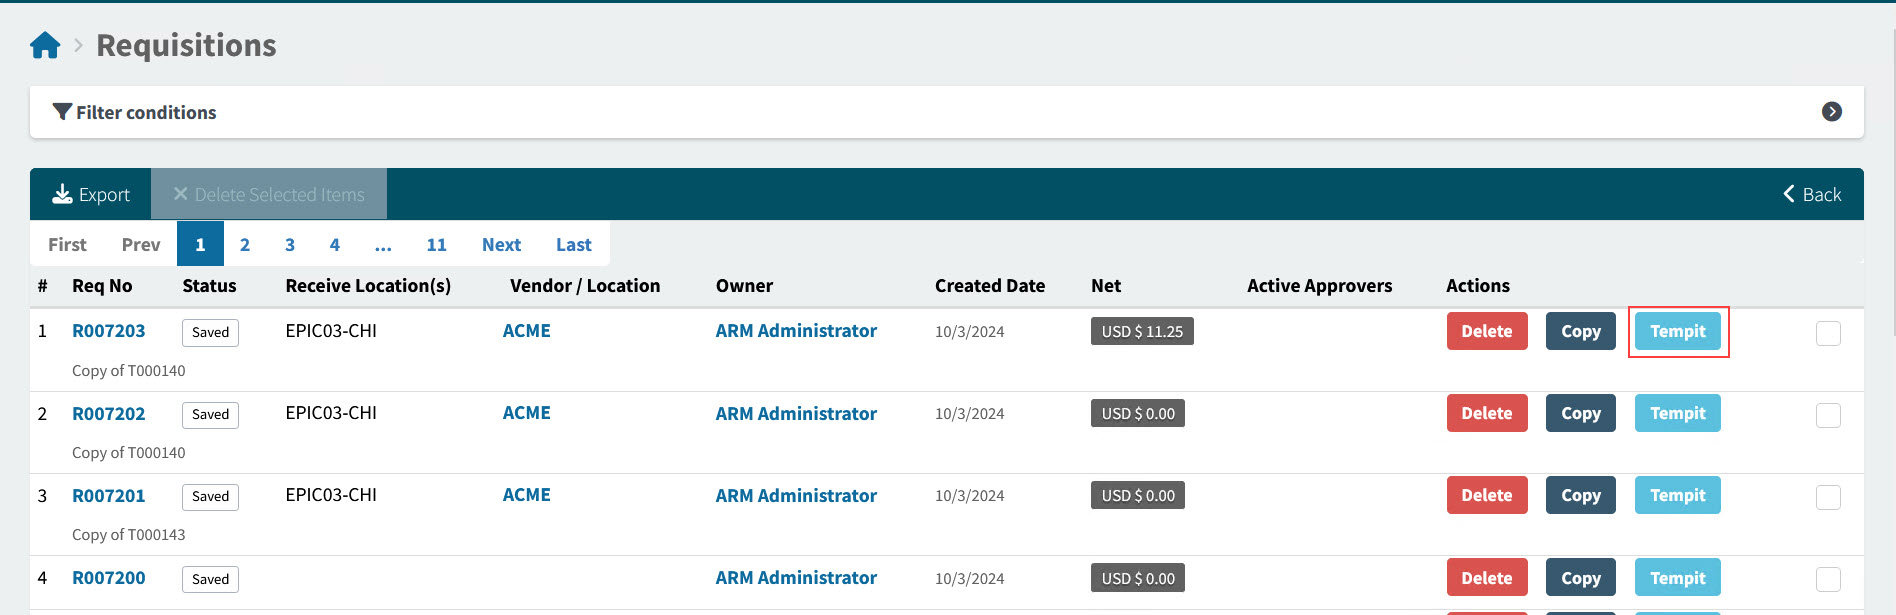
Using the Tempit Button to Create a Template
You can also create a template from the Requisition search results page.
| The Standing Order requisition type also has the Tempit button. |
Permissions
-
Maintain Templates
-
Can Convert to Template
-
Search for a requisition: see Searching for a Requisition.
-
Click the Tempit button for the requisition you want to copy.
View Details
-
Select the Requisition to Template Options from the pop-up dialog, which has default settings from Global Settings.
Requisition to Template Options
- Header Only
-
Only copy the header information, such as dates and payment type.
- Include Attachments
-
Include any attachments in the copy.
- Include Notes
-
Include any notes in the copy.
- Include Custom Data
-
Include any custom data in the copy. This option is only available if the Use Requisition Types Global Setting is set to Yes.
- Copy Tax Data
-
For each line, copy the Tax Liability and Tax Category.
- Fast Copy
-
Copy all details of each line. Without this option selected, the default values (not the edited values) for each line are used.
- Copy Line Date Fields
-
For each line, copy the dates.
- Requester
-
This is the default Requester on the new document. Either keep the Requester (which is the Requester linked to you, the logged-in user), or select a different Requester, from the list of Requesters that you can request for.
-
Click Save & Close.
The requisition is copied to a new template, according to the selected options.
The new template opens in the Templates > [Template No] page.
You can edit the new template. See Viewing and Editing a Template.
Viewing and Editing a Template
Any user can view or copy a template, or use it to create new requisitions - provided they have the required permissions.
To edit a template, you need to be the template creator or an Administrator.
Editing a Template
-
Locate the template you want to view or edit. See Searching for a Template.
-
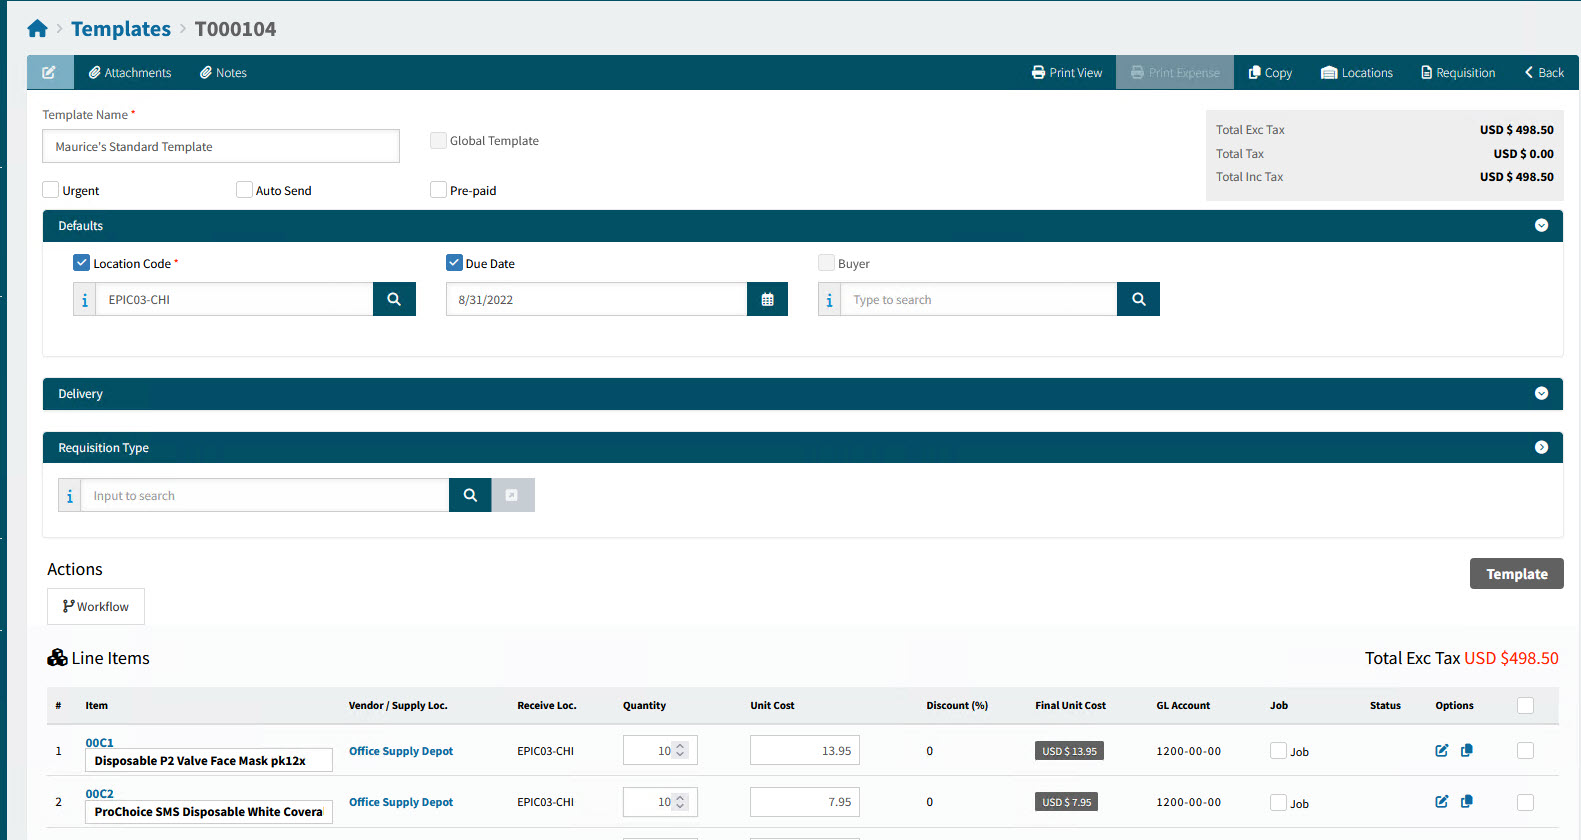
Click the Template No link on the Templates page, to open the template.
The Template > [Template Number] page opens:
-
On the Template > [Template No] page, edit the template Line Item details as required:
You can:
-
Edit the Item description.
-
Update the Quantity.
-
Update the Unit Cost.
-
Enter Job details.
Purchase for an item a job (details are sourced from Kinetic). You can select a job, assembly and material/operation.
View Template Line Items

-
-
To make further changes to the template, refer to the instructions in Creating a Template.
See how to:
-
Update the Template Header.
-
Add Template Line Items.
-
Edit Template Line Items.
-
Apply new defaults to selected Line Items.
-
Delete Template Line Items.
-
Update the Requisition Type Section.
-
-
Click Save to save the changes to the template.
Template Header Menu
On the Header Menu Bar you can perform additional functions:
Header Menu Bar

 Attachments
-
Use this function to upload files. See Adding Attachments to Header.
The Global Setting Attachment Upload File Filter stores the file types that can be uploaded as Attachments.
The attachments are added to Requisitions copied from this Template.
- Notes
-
Use this function if you want to add multiple Internal notes, or a single External note. Notes can be deleted if you have the permission Can Delete Own Internal Notes or Can Delete Any Internal Note. See Adding Notes.
The notes are included in Requisitions copied from this template.
 Print View
-
Downloads a copy of the document that can be printed off. Only enabled once the document has one or more lines.
- Print Expense
-
Use this to download a copy of the Expense Docket. This is enabled if the document has an Expense line item.
 Copy
Copy-
Click this button to copy this document.
 Locations
-
Click this button to assign additional locations to the template. See Assigning Locations to a Template.
Note that if the item is to be requisitioned for other locations the item must first be configured for that location in Kinetic.
 Requisition
-
Click this button to create a Requisition from this template. Only enabled once the Template has one or more lines.
 Back
Back-
Click Back to return to the search page.
Template Footer Menu
Footer Menu

The options here depend on the document status. For example, a Requisition with the Approved status does not have a Delete button.
| Save & Close |
Save the current changes and return to the previous page. |
| Save |
Click this button to apply the changes and keep the form open. |
| Refresh |
Click this button to refresh unsaved data. |
| Delete |
Delete the document. |
Searching for a Template
You can search for and retrieve a saved Requisition Template, in order to edit it, or to create a Requisition based on it.
-
Select
Templates from the Side Menu to open the Templates page. See Side Menu.The Templates page opens.
-
Adjust the Search conditions.
See Details
-
Expand the filter conditions in the top section of the page to search for a specific Template or to narrow your search.
View filter conditions
-
Enter values in the edit boxes, or select from the search boxes. See the filter conditions, below.
Filter conditions
Company Select a Company.
Template No Type in the Template Number if known, or do a partial search using part of the number followed by %. For example, T0001% will return all Templates starting with T0001.
Template Name Type in the Template Name if known, or do a partial search using part of the name followed by %.
Global Template Select this option to return Global Templates only.
Requisition Type Select All, Standard, Standing Order, or Blanket Order from the drop-down list .
Requisition Name Enter a name or partial name followed by the % character to list all Requisitions with a name that contains those characters.
Requisition No Type in the Requisition Number if known, or do a partial search using part of the number followed by %. For example, R0001% will return all Requisitions starting with R0001.
Requisition Type Select Blanket Order from the drop-down list .
Requisition Name Enter a name or partial name followed by the % character to list all Requisitions with a name that contains those characters.
Requisition No Type in the Requisition Number if known, or do a partial search using part of the number followed by %. For example, B0001% will return all Blanket Orders starting with B0001.
Status Select one of the following status values from the drop-down list:
-
Any
-
Saved
-
Submitted
-
Rejected
-
Approval in Progress
-
Approved
-
Ordered
-
Received
-
Pending Review
-
Pending Revision
Further refine the list by selecting Any, Not Suspended or Suspended from the adjacent drop-down list.
Owner Type in the User Name, or partial with the % sign, of the person that created the Standing Order, and click on a name from the displayed list.
Next Reviewer This field is disabled.
Assigned Locations Only If this check box is selected only documents for Locations assigned to the User in their User Profile will be displayed.
Location Code Select a Location Code to filter from.
Vendor Code Select a Vendor Code.
RFQ Number Type in the Request For Quote No if known, or do a partial search using part of the number followed by %.
Pro-Forma Order No The number of the pro-forma order originating from this requisition.
Purchase Order No The number of the purchase order originating from this requisition.
Inventory Transfer No Type in the Transfer Order No if known, or do a partial search using part of the number followed by %.
Category Code Select a Category Code and any Standing Order with a line that matches the value will be returned.
Job Select a Job Code and any Standing Order with a line that matches the value will be returned.
Project Select a Project Code and any Standing Order with a line that matches the value will be returned.
Phase Select a Phase (dependent on the value selected in the Project field).
Cost Code This is an independent field and can be selected against any Project when ARM is configured for use with Advanced Projects Management (APM).
Part No Type in a Part No, or click the field search icon
to select a Part Number from the Search Catalogue page.Part Description Type in the Part Description if known, or do a partial search using part of the description followed by %.
Date Field Select one of the following date values from the drop-down list:
-
Date Created
-
Date Modified
-
Date Submitted
-
Date Approved
Enter a date range, or just a From Date, or just a To Date.
From PO Suggestions Choose Any, Yes, or No.
Custom Form Select any of the Custom Forms if the ARM system is configured to use these.
Notes/Custom Data You can type in a whole or partial string to search values present within:
-
Internal and External note fields
-
Line note fields
-
Custom UDF value fields
-
Templates that match the search conditions are listed in the grid.
-
Deleting a Template
To delete a template, you need to be the template creator or an Administrator.
| Caution: A deleted template cannot be recovered. |
Permissions
-
Can delete all templates: The user has permission to delete all templates.
-
Maintain Templates: The user can view/add/edit/delete templates. The user can only delete their own templates.
-
Select
Templates on the Side Menu to open the Templates page. -
Search for the template to delete, using Filter locations.
-
Select Delete under Actions, on the row to delete. OR
-
Open the template from the list.
-
Select the Delete button on the footer menu.
-
-
Select Yes on the confirmation dialog.
The template is deleted from ARM.