RFQs
Create and email a Request for Quote to one or more suppliers, using the RFQ document.
Permissions
There are three permissions that relate to RFQs:
- Can View all Requests for Quotation
-
The user has permission to view all RFQs.
- Can Create Requests for Quotation
-
The user has permission to raise new RFQs.
- Can Edit all Requests for Quotation
-
The user has permission to edit all RFQs.
Summary of the RFQs Process
- Step 1: Raise an RFQ in ARM
-
An RFQ is raised in ARM and the user selects the Vendor(s) and associated contact. Next, the user adds line items to the RFQ. (These could be Catalogue, Non-Catalogue, Imported Lines).
- Step 2: Send RFQ to Vendors
-
Once the RFQ is ready with no further line items to include, the user sends to Vendors by selecting Send RFQ. The RFQ then moves to a ‘Submitted’ status. At this point, no further lines can be added or removed on the RFQ, but additional Vendors can be invited to provide their quote.
- Step 3: Vendor Receives and Responds
-
The Vendors receive the request, which includes a copy of the full RFQ details (PDF format) and an Excel formatted import template that can be filled out and returned with their response as an attachment.
- Step 4: Quote Entry
-
Quote details from the Vendors can then be manually entered into the RFQ, or imported if an import file has been supplied.
- Step 5: Review Quote
-
Users then move on to Accept or Deny all or some of the Vendors' quote. At this point, the Vendor (Supplier) receives an email notification informing them as to whether their quote has been accepted or denied.
- Step 6: Create Requisitions from Accepted Lines
-
Requisitions are created from any of the accepted supplier responses. The RFQ status then moves to a ‘Requisitioned’ status.
- Step 7: Close the RFQ
-
The RFQ document has mandatory open and end dates. Once the end date has arrived for any RFQ currently still a ‘Submitted’ status, the RFQ moves to an 'Expired' status and no further editing is permitted in the document.
-
To create a new RFQ, see New RFQ.
-
To work with existing RFQs:
-
Select
 RFQs from the Side Menu to open the RFQs page. See Side Menu.
The RFQs page opens.
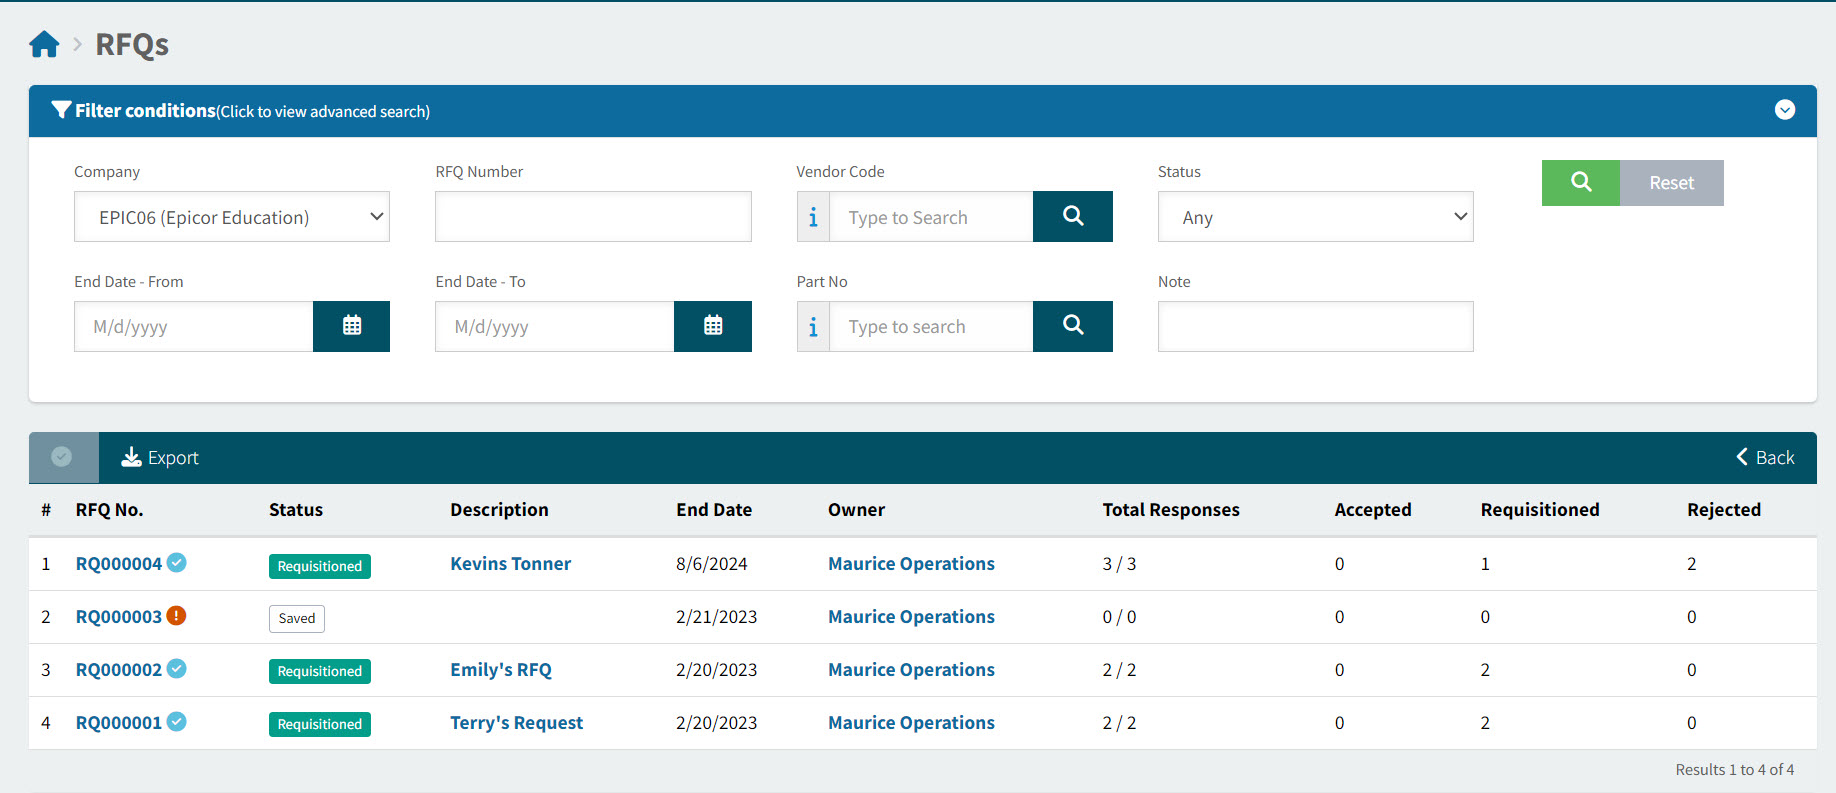
RFQ No The unique number for this RFQ.
The RFQ is completed
 icon displays for RFQs that are finalised.
Status The RFQ status. This could be:
-
Saved
-
Submitted
-
Requisitioned
Status The RFQ description.
End Date The end of the RFQ period.
Owner The document owner. This is the User who created the document.
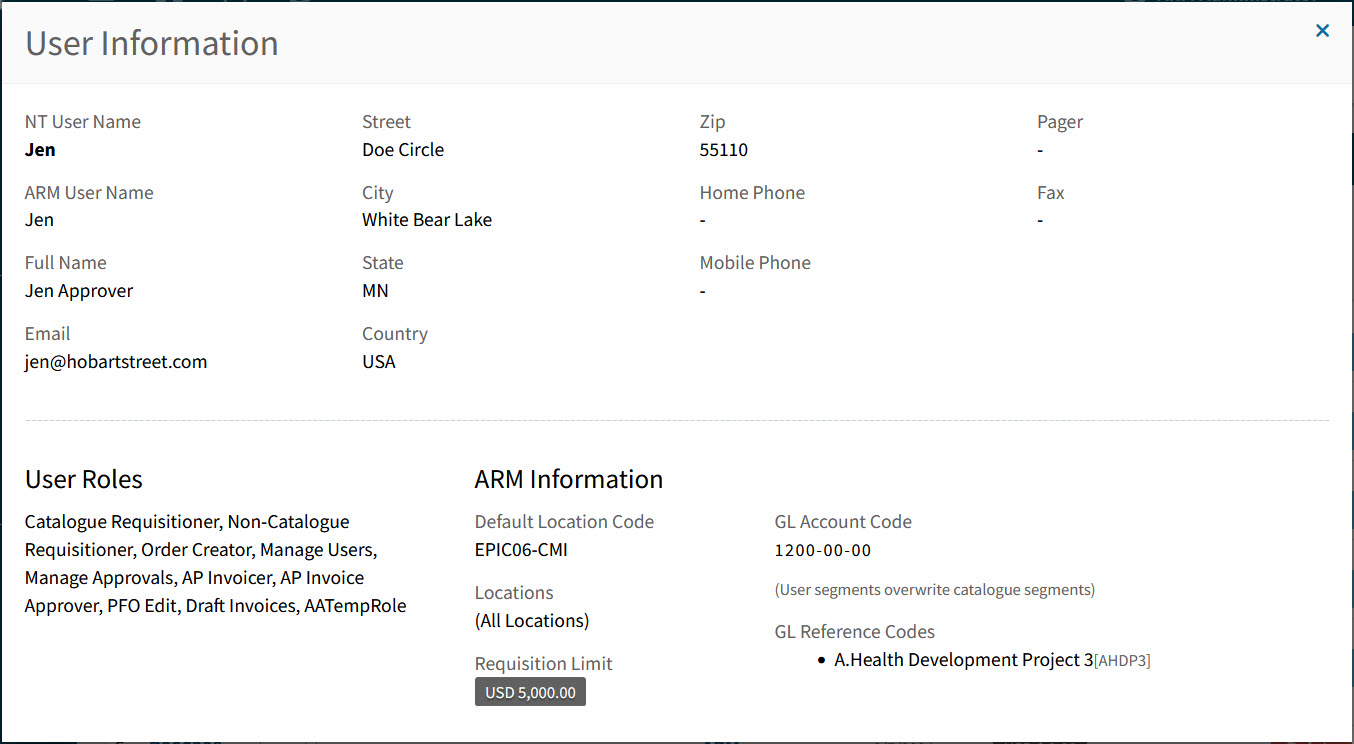
Owner Names are in blue. Hover over an Owner Name to view the full Name, or click on an Owner Name to open the details in the User Information pop-up screen.
Example
Total Responses The number of responses received, out of the number of Vendors that the RFQ was sent to. For example, 3/4 for three responses out of four Vendors.
Accepted The number of accepted or partially accepted responses.
Requisitioned The number of accepted responses that resulted in a Requisition.
Rejected The number of responses that were rejected.
-
-
Adjust the Search conditions.
See Details
-
Expand the filter conditions in the top section of the page to search for a specific RFQ or to narrow your search.
View filter conditions

-
Enter values in the edit boxes, or select from the search boxes. See the filter conditions, below.
Filter conditions
Company Select a Company Code
RFQ Number Type in the Request For Quote No if known, or do a partial search using part of the number followed by %. For example, RQ00001% will return all RFQs starting with R00001.
Vendor Code To search in any of the filter fields where there is a search icon displayed you can start typing partial data and matches will be displayed in a list. Select an item from the list.
Status You can select one of the following status values from the drop-down list:
-
Saved
-
Submitted
-
Requisitioned
Or select Any.
End Date - From Type in a From date value, or select using the Calendar icon.
End Date - To Type in a To date value, or select using the Calendar icon.
Part No Type in a Part No, or click the field search icon to select a Part Number from the Catalogue Search page.
Note You can type in a whole or partial string to search values present within the RFQ Note.
-
The Note field supports using the 'Contains' search context and operates as such under any other contexts (Starts With, Match etc).
-
-
RFQs that match the search conditions are listed in the grid.
-
RFQ Process Steps
Follow the steps below:
-
Create an RFQ. See Creating an RFQ.
-
Send the RFQ. See Sending an RFQ.
-
Receive the RFQ. See Receiving an RFQ.
-
Accept or Reject an RFQ. See Accepting or Rejecting an RFQ.
-
Communicate with Supplier over RFQ. See Communicating with Supplier over RFQ.
-
Create a Requisition from an RFQ. See Creating a Requisition from an RFQ.
See how to:
-
Search for an RFQ. See Searching for an RFQ.
-
Delete an RFQ. See Deleting an RFQ.
Creating an RFQ
Set up a new Request for Quote, ready to send to selected Vendors.
Permissions
User permissions for use with this module include:
-
Can View all Requests for Quotation
-
Can Create Requests for Quotation
-
Can Edit all Requests for Quotation
-
Select
 RFQ under
  Create a new document on the Top Menu.
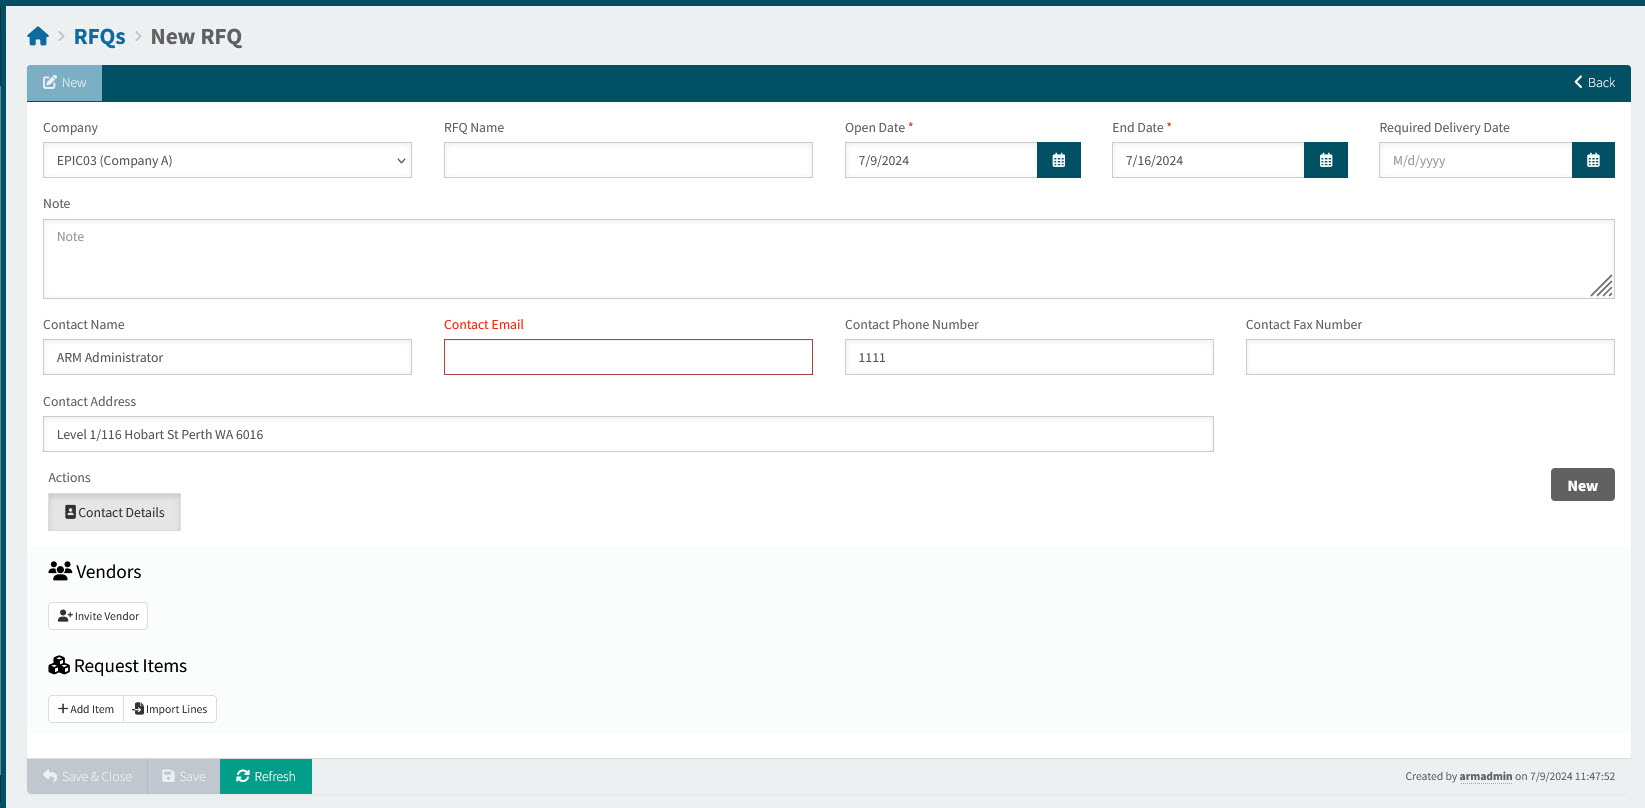
The RFQs > New RFQ page displays.
-
Fill out the Header fields.
To update the Header fields:
Company Select a Company Code.
RFQ Name Optionally enter a descriptive name for the RFQ.
Open Date Select a date to mark the start of the RFQ period.
End Date Select a date to mark the end of the RFQ period.
Required Delivery Date Optionally select a required delivery date.
Note Optionally add a note, to be included in the initial email notifcation sent to the vendors.
-
Update the Contact details.
This section holds your name, address and contact information from your User Profile (or User Detail). The contact details here will appear on the Request For Quote form that gets sent to selected Vendors.
To update Contact details:
-
Select Contact Details under Actions.
-
Update any of the Contact details:
-
Contact Name
-
Contact Email
-
Contact Phone Number
-
Contact Fax Number
-
Contact Address
-
-
Select Apply to save your changes.
-
-
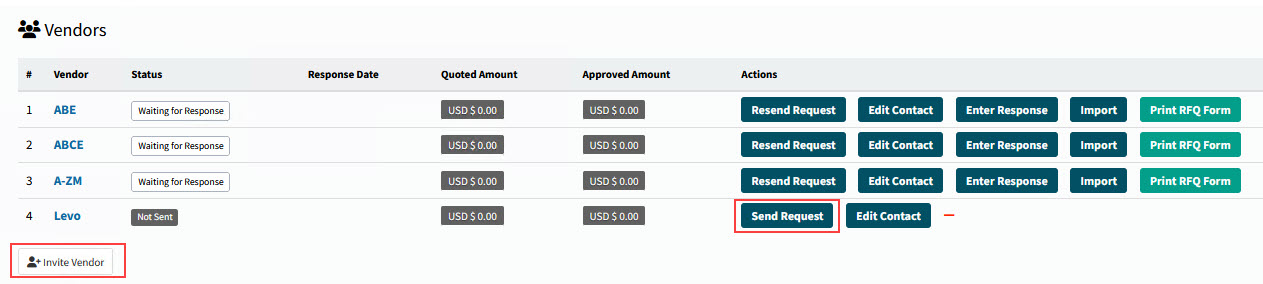
Add one or more Vendors to the RFQ.
To add a Vendor:
-
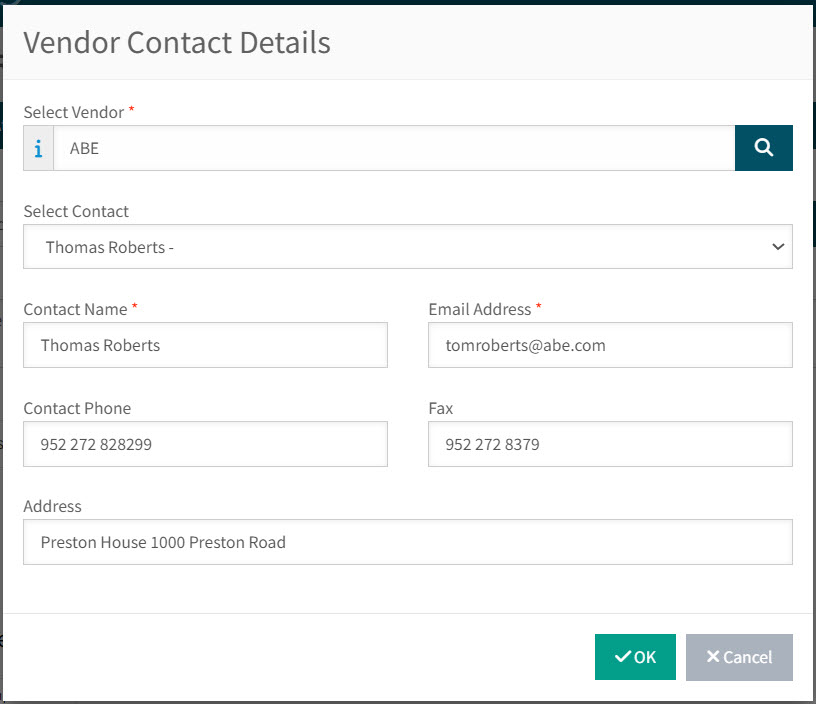
Click the Invite Vendor button, at the bottom of the Vendors section.

The Vendor Contact Details screen pops up, showing the primary contact details for the Supplier in Kinetic.
See example
-
Optionally select a different contact from the Select Contact drop-down list.
-
Adjust the vendor contact details, if required (Contact Name, Email Address, Contact Phone, Fax, Address).
-
Select OK.
The Vendor is added to the RFQ.

-
-
Continue to add Vendors in this way.
Actions
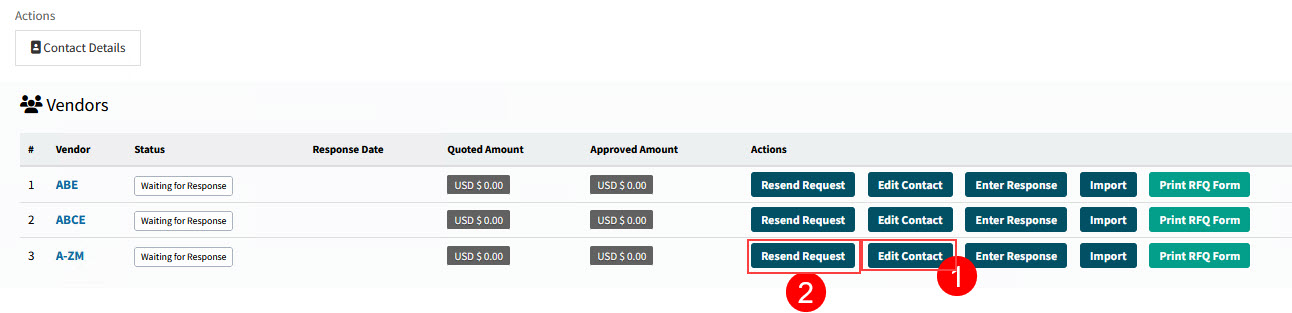
Under the Actions column in the Vendors section:
-
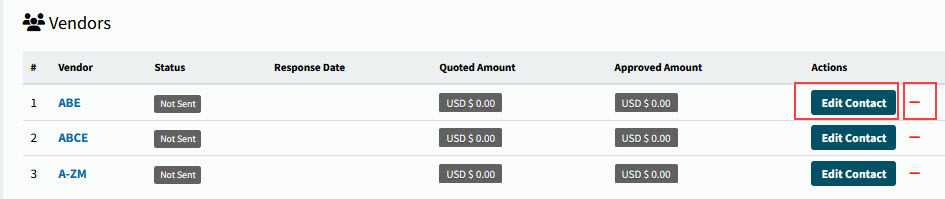
To edit a Vendor’s contact details, click Edit Contact, then update the vendor contact details and save.
-
To remove a Vendor, select the
 button on the item row.
-
-
Add Request Items to the RFQ.
To add Items:
-
You can add catalogue items, non-catalogue items and you can import items from a spreadsheet.
-
To add Catalogue items:
-
Select Add Item.
-
Select the Search
 button, then select an item from the Catalogue Search.
or select a catalogue item from the drop-down list.
-
-
To add Non-Catalogue items:
-
Select Add Item.
-
Type in the Item and Description.
-
-
To import items:
-
Select Import Lines.
-
In the RFQ Import pop-up screen, select Browse, then browse and select a file to import. Select Open.
-
Select Import.
-
After the Upload Progress is 100% Completed, select Close.
-
-
-
Complete the details for each request item:
-
Optionally update the Description.
-
Update the Request Qty.
-
Optionally enter a Reference Unit Cost.
-
Optionally enter a Note.
-
-
To remove an item, select the
button on the item row.See example

-
Select Save to save the changes.
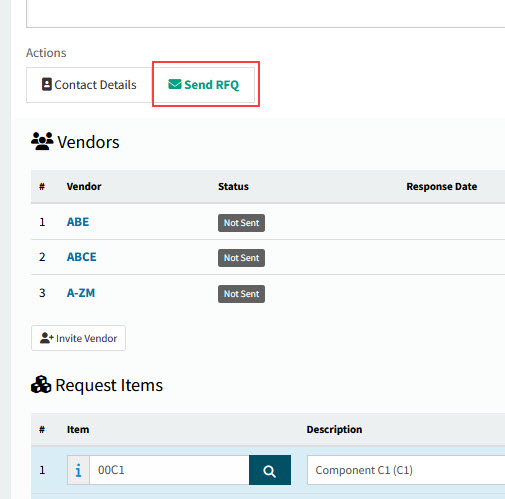
As soon as you have at least one Vendor and at least one Request Item, the Send RFQ button appears in the Actions section of the RFQ.
See details
-
-
Select Save to save the RFQ.
-
Upload any attachments.
Any attachments will be included on the initial RFQ notification sent out to vendors.
To add an attachment:
-
Select
 Attachments on the header menu.
On the Attachments - [RFQ No.] pop-up screen:
-
Select Browse, then browse and select a file to attach. Select Open.
-
Select Upload to upload the attachment.
-
Select the Can be transmitted check box to ensure that the attached document is included in transmissions (for example, attached to emails).
-
-
Close the Attachments pop-up.
-
-
When it is ready, send the RFQ. See Sending an RFQ.
Sending an RFQ
When your RFQ is ready, send an RFQ notification to all the included Vendors.
Prerequisites
The following must be in place for email notifications to be sent out of ARM.
-
SMTP details must be configured in ARM under Dashboard > Global Settings. See Global Settings, System Administration.
-
ARM Integration Service must be running. See Integration Dashboard.
-
Locate and open the RFQ.
-
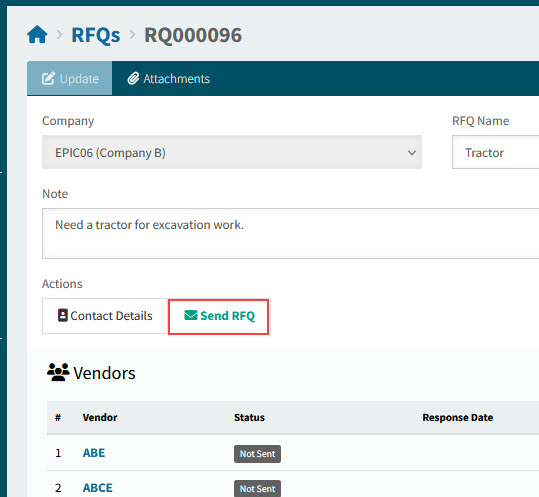
Click the Send RFQ button in the Actions section.
See details
-
The RFQ is emailed to all included Vendors, using the provided email addresses in their contact details.
-
The Status for each Vendor changes to Waiting for Response.
See details
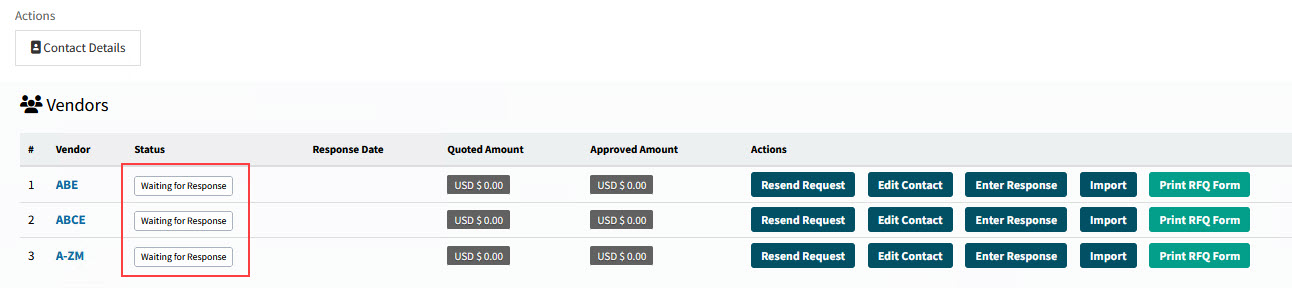
-
The RFQs status updates to Submitted.
-
ARM Task Agent Service Log
The ARM Task Agent service log will show the results of the email process.
Receiving an RFQ
-
Select
RFQs from the Side Menu to open the RFQs page. See Side Menu. -
Search for the RFQ.
-
Select the RFQ No. to open the RFQ.
The RFQs > [RFQ No.] page opens.
Manually entering a Quote into an RFQ
You can manually enter supplier quote data directly into the RFQ.
-
Click Enter Response.
-
Fill in the fields located in the response header (Release Date, Vendor Quote Number etc.).
-
Click Attachments to upload any relevant attachments (for example, supplied by the Vendor).
-
Enter the line item data, then Save.
Importing a Quote into an RFQ
The RFQ email notification to the suppliers contains an Excel formatted import template which they can populate and send back with their response.
You can import this file directly into the Vendor response page.
-
Select Import for the relevant Vendor.
-
On the RFQ Response Import pop-up screen:
-
Select Choose File, then browse and select the vendor-supplied file. Select Open.
-
Select Import.
-
After the Upload Progress is 100% Completed, select Open Response to view the imported response, or Close.
-
Accepting or Rejecting an RFQ
You can accept quotes (in part or in full) from Vendors, or reject them, or mark them as 'No Bid'.
Accepting a Vendor RFQ Response
You may accept some or all line items within an RFQ response.
Accepting the Full Quote
-
Load the RFQ and click the Open Response button for the relevant Vendor.
-
Click the Accept button.
Accept Full Quote
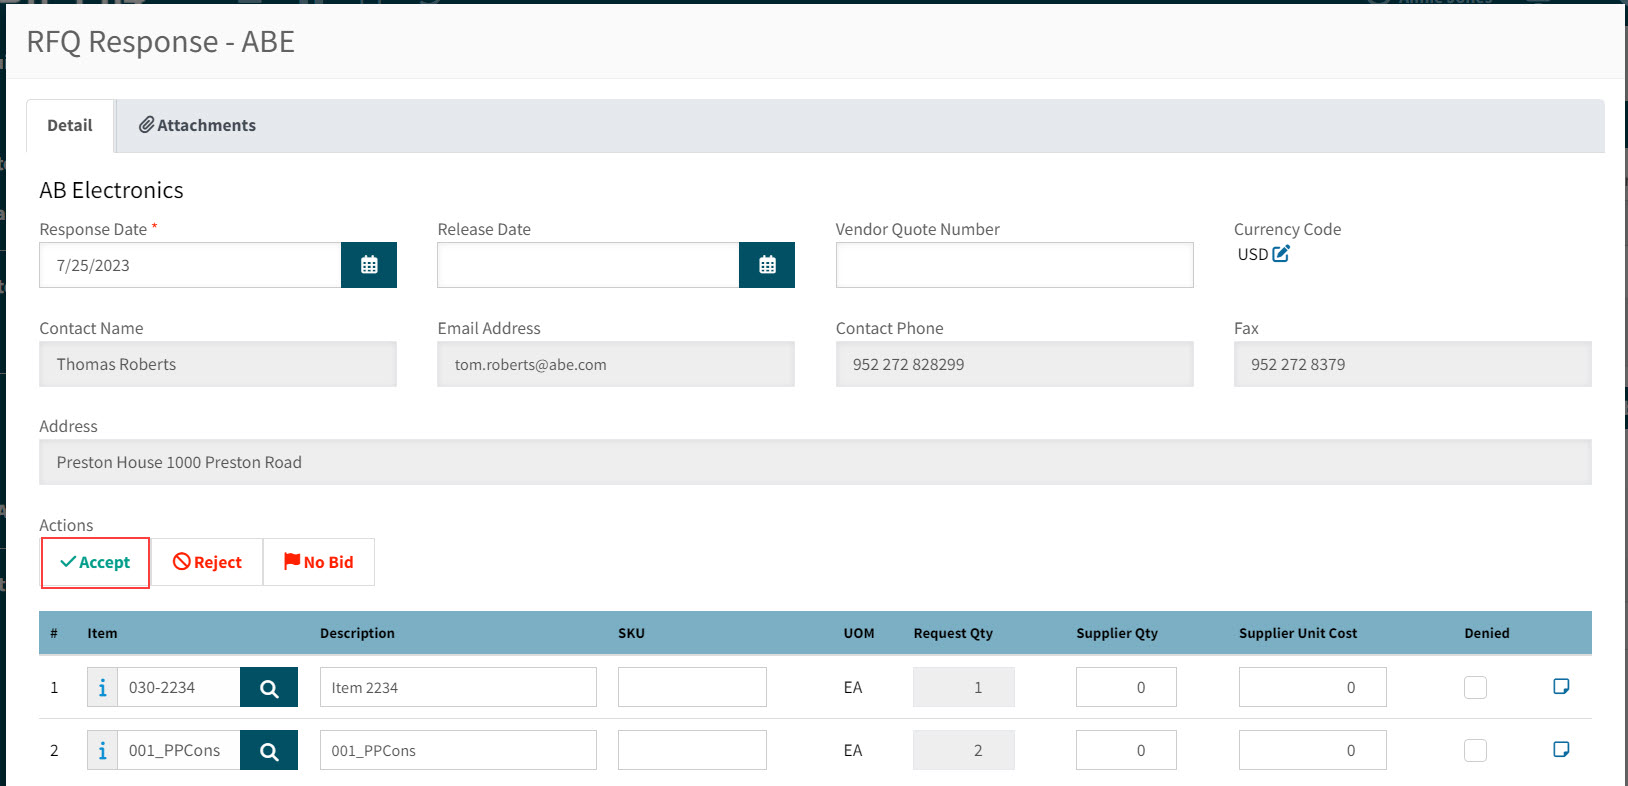
The RFQ Acceptance notification is sent out to the supplier contact and the Vendor status changes to Accepted.
Partially Accepting the Quote
-
Load the RFQ and click the Open Response button for the relevant Vendor.
-
Deny the relevant lines and then click the Accept button.
Partially Accept Quote
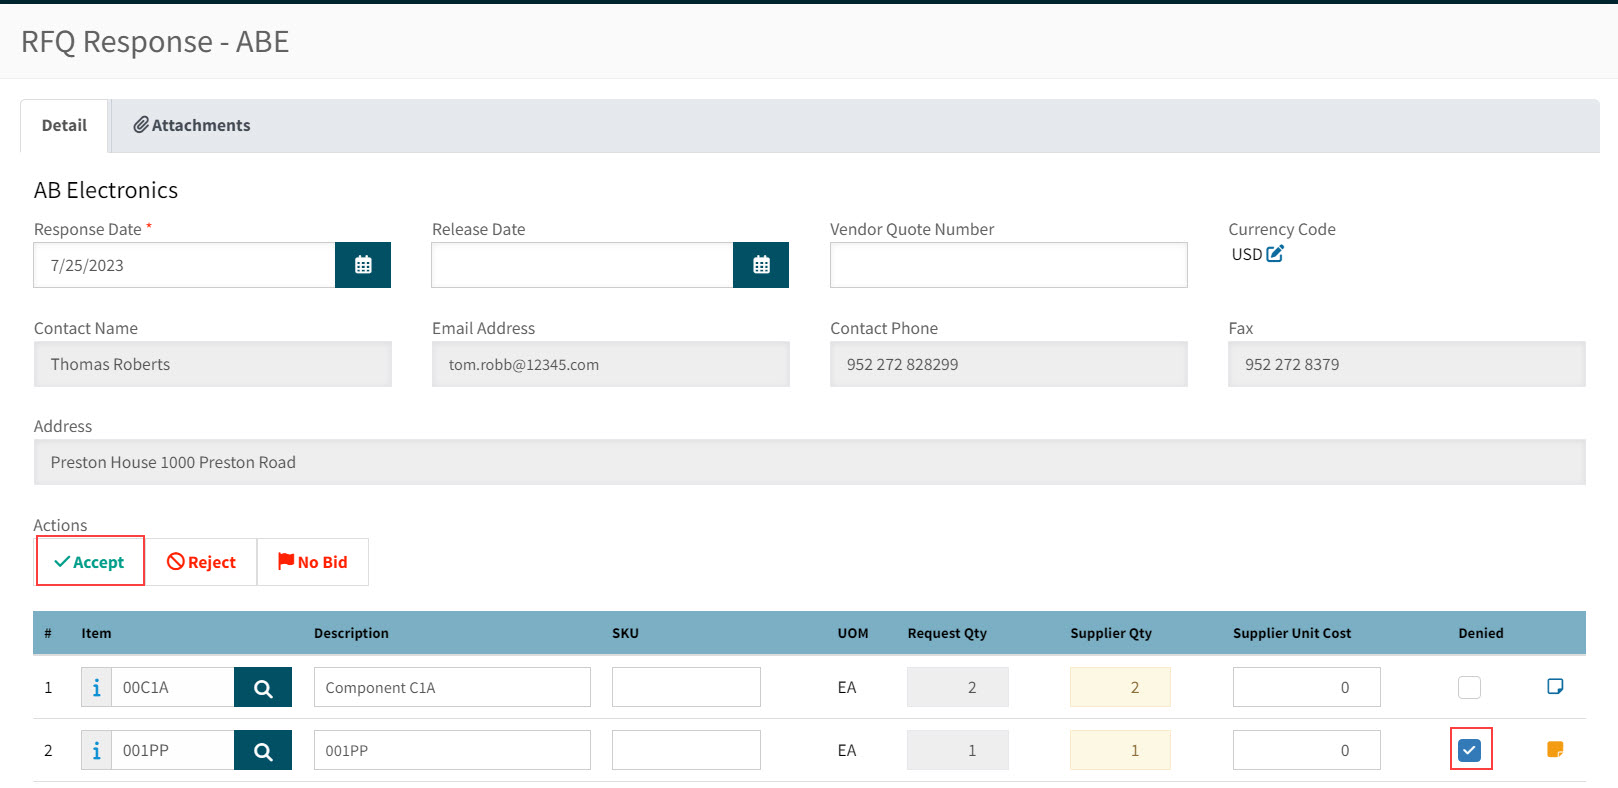
The RFQ Acceptance notification is sent out to the supplier contact and the Vendor status changes to Accepted.
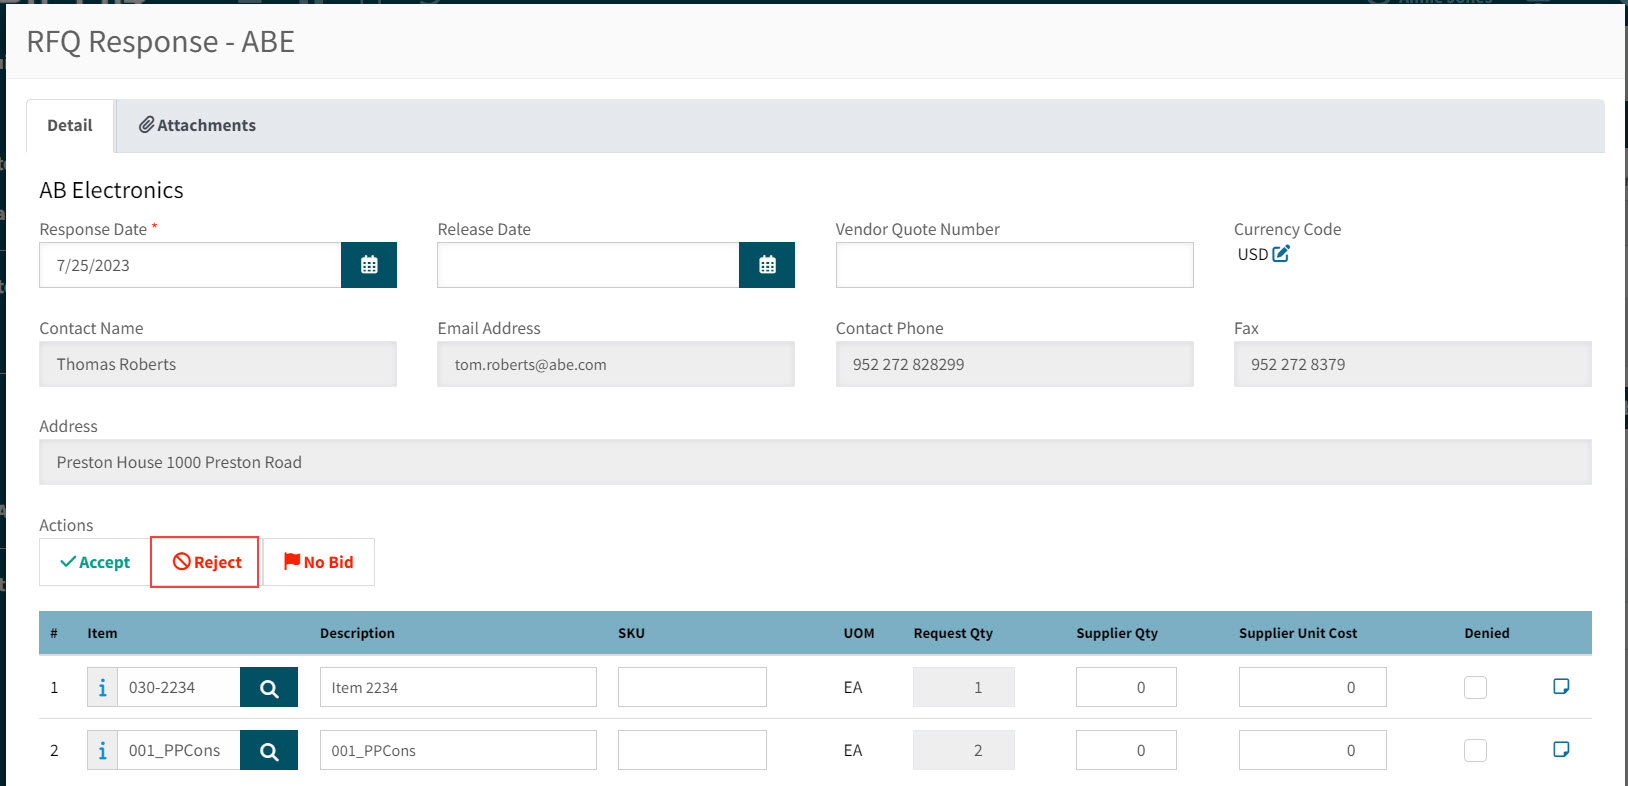
Rejecting a Vendor RFQ Response
To conduct a full rejection of an RFQ response:
-
Load the RFQ and click the Open Response button for the relevant Vendor.
-
Click the Reject button.
Reject Quote
-
Enter a rejection response comment at the prompt (if desired) and click OK.
The RFQ Rejection notification is sent out to the supplier contact and the Vendor status changes to Rejected.
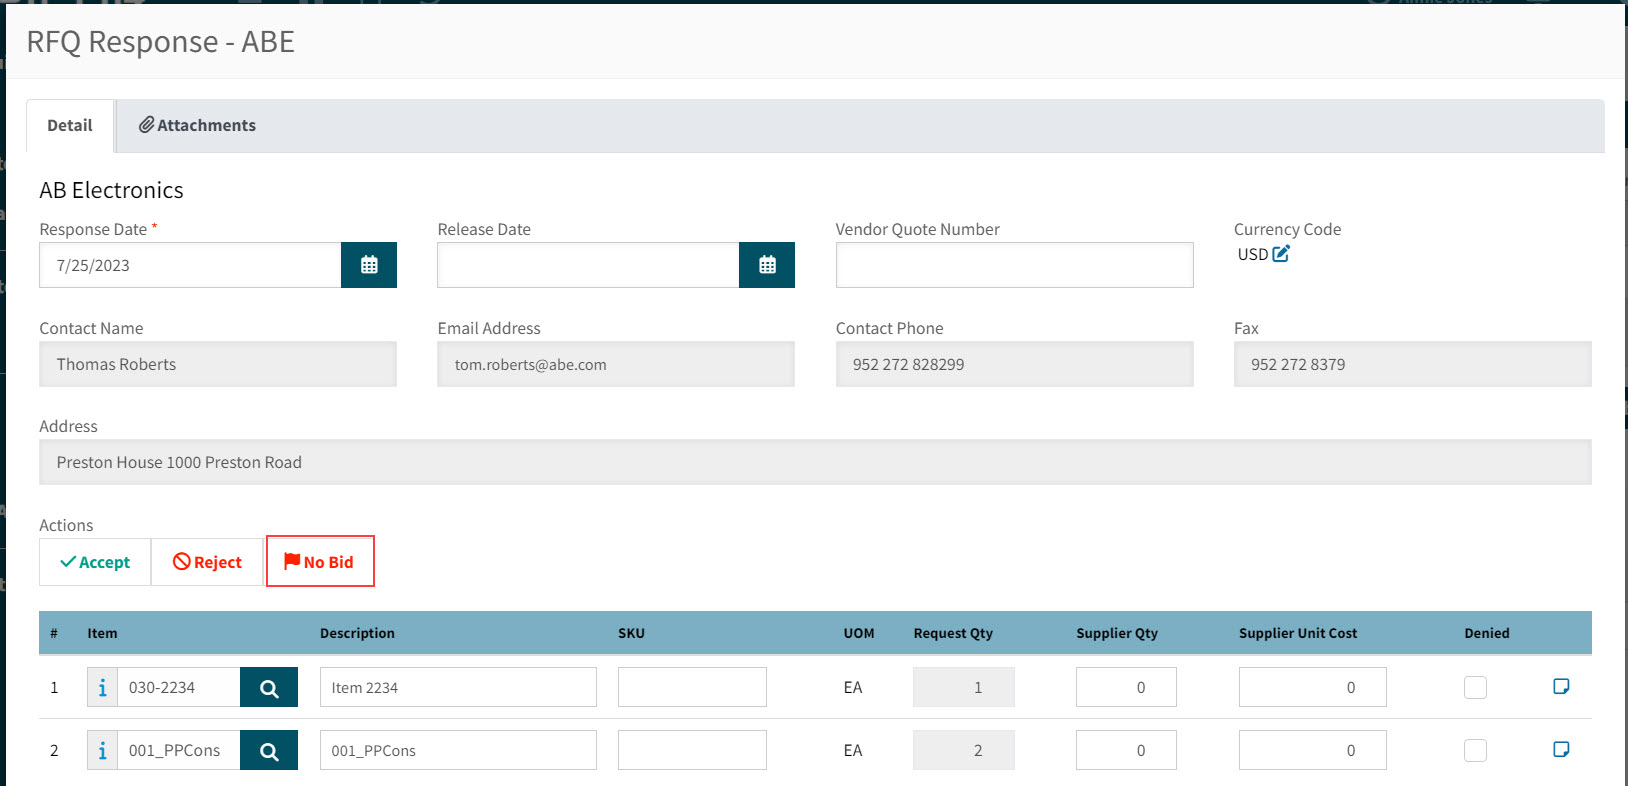
Vendor RFQ Responses with No Bid
When a supplier is unable to provide a response to an RFQ, then the RFQ response can be flagged as such.
-
Load the RFQ and click the Open Response button for the relevant Vendor.
-
Click No Bid.
No Bid
-
Optionally enter a reason for the no bid at the prompt, then click OK.
The Vendor status changes to No Bid.
Communicating with Supplier over RFQ
There are various email notifications generated by the RFQ system and sent out to suppliers.
-
Initial Request for Quote
-
RFQ Acceptance
-
RFQ Rejection
Initial Request for Quote
The initial notification sent to suppliers outlines the Request for Quote details.
The email has a return address and states the Quotation dates (from date and to date).
Included in the email are:
-
A PDF attachment of the RFQ (this shows the full line item information).
-
An Excel-formatted import template, which the supplier can fill out and attach to their response.
-
Any attachments added to the RFQ in ARM.
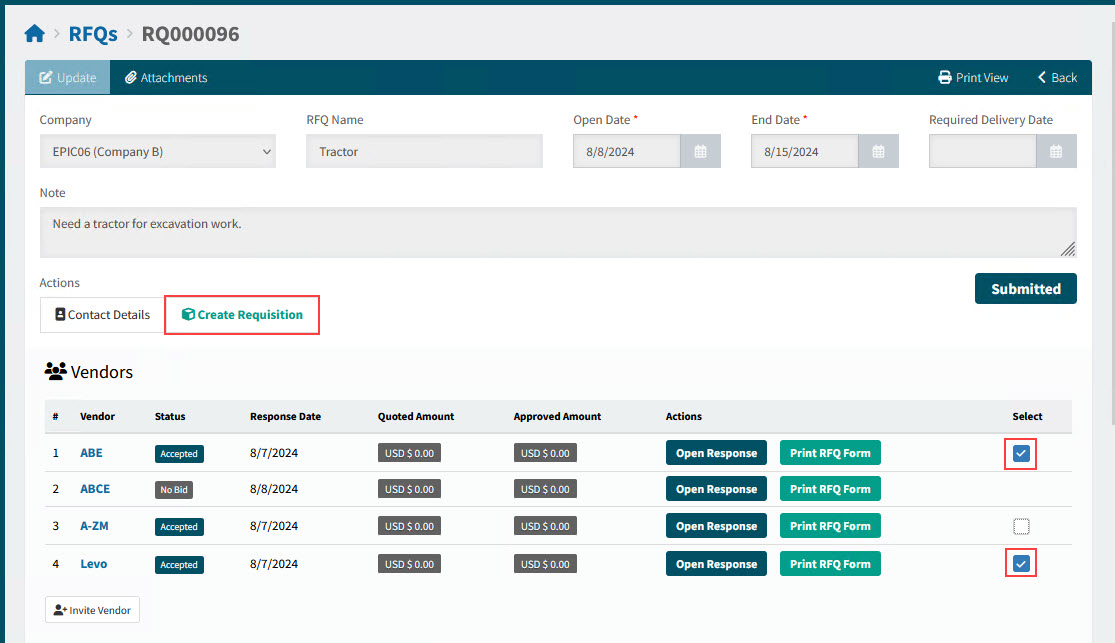
Creating a Requisition from an RFQ
Any RFQ responses that contain accepted lines may be converted to a Requisition directly from the RFQ screen.
-
Select one or more Vendors with an Accepted status.
-
Click the Create Requisition button.
View Details
-
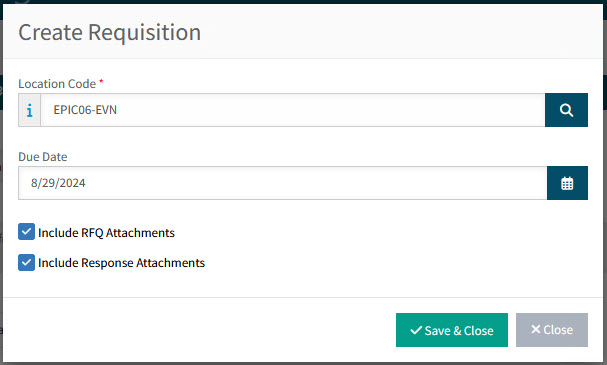
In the Create Requisition pop-up:
-
Select the Location Code and a Due Date.
-
Select or clear Include RFQ Attachments.
-
Select or clear Include Response Attachments.
-
Select OK.
A new Requisition is created and all accepted line items from the chosen vendors are included. The prices are brought across to match the quoted values from the RFQ.
-
-
Complete the Requisition as usual.
After the Requisition is Created
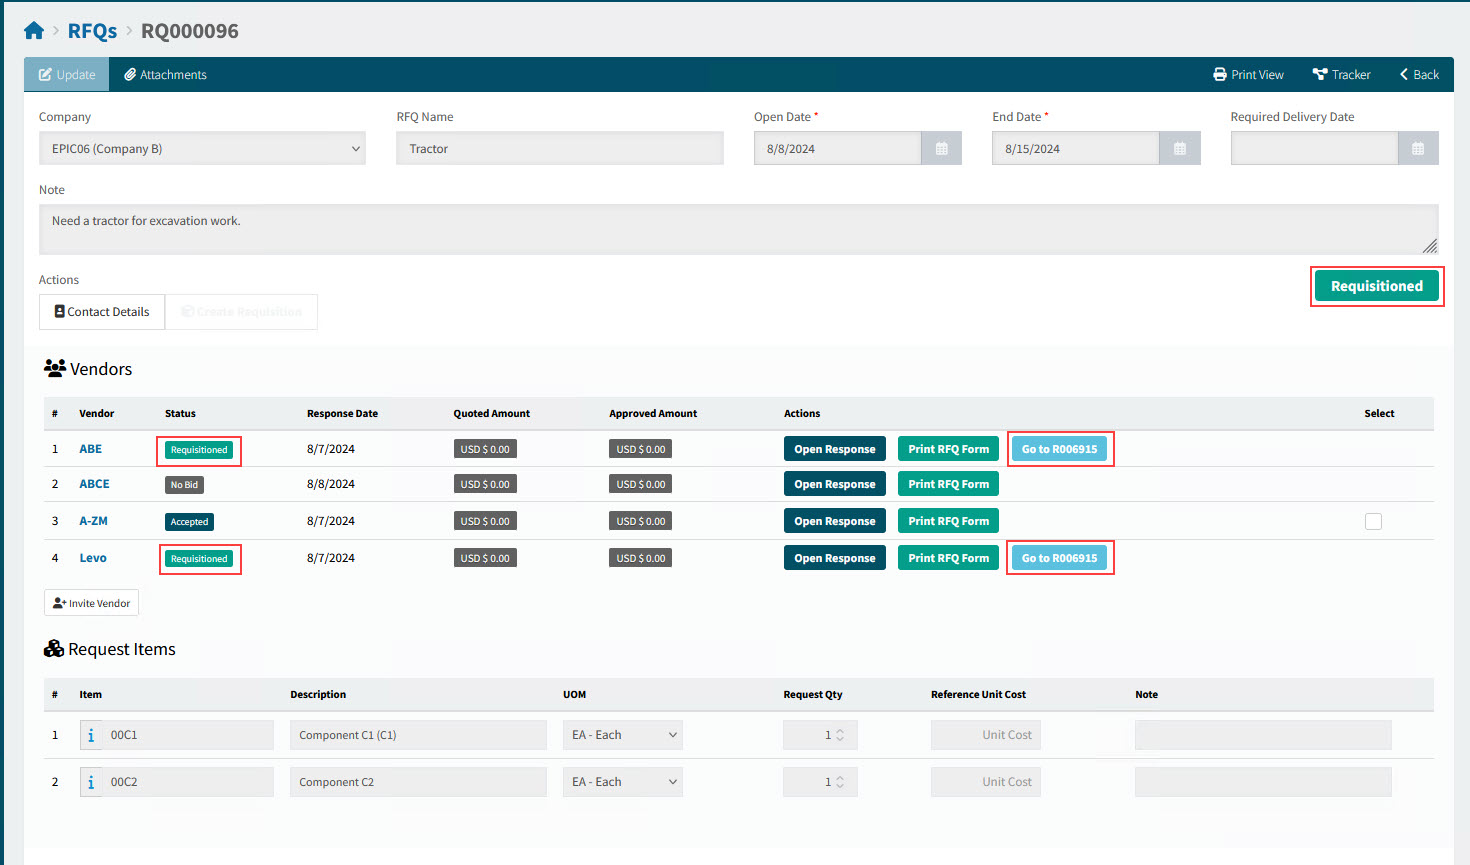
To view the RFQ after you have created a Requisition from it, you will first need to find it and open it. You can also open it from the Requisition’s Tracker.
On the RFQ’s detail page:
-
The RFQ status updates to Requisitioned.
-
For selected vendors:
-
Status updates to Requisitioned.
-
You can link to the new Requisition by selecting the Go to [Requisition No.] button.
View the RFQ After Requisition Created
-
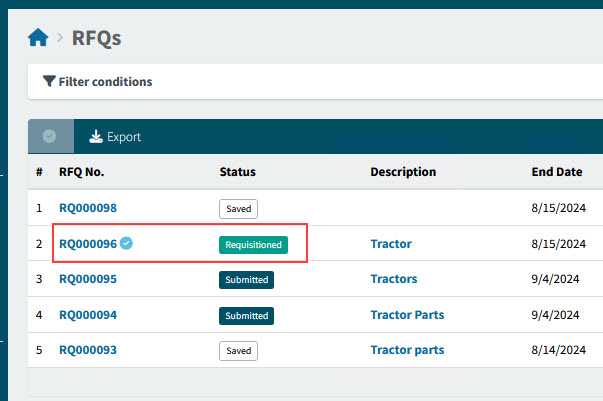
On the RFQs page, the RFQ displays:
-
A tick
 if the RFQ is completed.
 -
The Status is Requisitioned.
View details
Searching for an RFQ
-
To create a new RFQ, see New RFQ.
-
To work with existing RFQs:
-
Select
RFQs from the Side Menu to open the RFQs page. See Side Menu.The RFQs page opens.
-
Adjust the Search conditions.
See Details
-
Expand the filter conditions in the top section of the page to search for a specific RFQ or to narrow your search.
View filter conditions
-
Enter values in the edit boxes, or select from the search boxes. See the filter conditions, below.
Filter conditions
Company Select a Company Code
RFQ Number Type in the Request For Quote No if known, or do a partial search using part of the number followed by %. For example, RQ00001% will return all RFQs starting with R00001.
Vendor Code To search in any of the filter fields where there is a search icon displayed you can start typing partial data and matches will be displayed in a list. Select an item from the list.
Status You can select one of the following status values from the drop-down list:
-
Saved
-
Submitted
-
Requisitioned
Or select Any.
End Date - From Type in a From date value, or select using the Calendar icon.
End Date - To Type in a To date value, or select using the Calendar icon.
Part No Type in a Part No, or click the field search icon to select a Part Number from the Catalogue Search page.
Note You can type in a whole or partial string to search values present within the RFQ Note.
-
The Note field supports using the 'Contains' search context and operates as such under any other contexts (Starts With, Match etc).
-
-
RFQs that match the search conditions are listed in the grid.
-
To open an RFQ:
-
Select the RFQ No. in the Search Results grid.
Deleting an RFQ
Only the RFQ Owner or an Administrator can delete an RFQ.
In addition:
-
The RFQ Status must be Saved.
-
The RFQ cannot be deleted after being sent to vendors.
To delete a Saved RFQ:
-
First open the RFQ. See Searching for an RFQ
-
Click on the RFQ you want to delete.
The RFQ opens on the RFQs>[RFQ No.] page.
View page

-
Select Delete on the footer menu.
-
Select Yes on the confirmation dialog.